Microsoft Excel is not just for numbers and formulas; it’s also a powerful tool for visual data representation. One of its handy features is the ability to insert pictures directly into cells, keeping your spreadsheets organized and visually informative. This guide will walk you through various methods on how to insert a photo in Excel, enhancing your data presentation and making your spreadsheets more dynamic.
Inserting a Picture into a Cell from the Excel Ribbon
The most straightforward way to insert a picture into an Excel cell is using the ribbon. This method offers access to pictures from various sources, ensuring you can use images stored on your device, stock photos, or online resources.
- Navigate to the Insert tab on the Excel ribbon.
- In the Illustrations group, click on the Pictures dropdown menu.
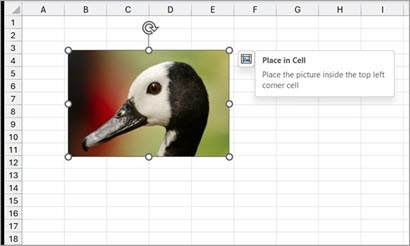
- Select Place in Cell from the options provided.
- The Insert Picture From dialog box will appear, offering three choices:
- This Device: Choose this option to insert a picture saved on your computer or a connected drive.
- Stock Images: Access Microsoft’s library of stock images to find visually appealing and relevant pictures.
- Online Pictures: Search for images online using Bing Image Search.
- Select your desired source and browse or search for the picture you want to insert.
- Once you’ve found the picture, select it and click Insert. The image will be placed directly into the selected cell.
 Inserting a picture into an Excel cell using the ribbon options.
Inserting Multiple Pictures at Once in Excel Cells
Need to add several images to your spreadsheet? Excel allows you to insert multiple pictures simultaneously, streamlining your workflow when you have a batch of images to incorporate.
- Follow steps 1-4 from the “Inserting a Picture into a Cell from the Excel Ribbon” method to reach the Insert Picture From dialog.
- Instead of selecting a single image, select multiple pictures from your chosen source by holding down the Ctrl key (or Command key on Mac) while clicking on each image you want to insert.
- After selecting all the desired images, click Insert.
- Excel will insert the selected pictures into your spreadsheet, starting from the active cell and filling downwards in the column. Each picture will occupy one cell. Be aware that this action will overwrite any existing content in the cells where pictures are inserted.
Pasting a Picture Directly into an Excel Cell
If you have already copied a picture to your clipboard, pasting it directly into a cell is a quick and efficient method. This is especially useful when you are working with images from other applications or web pages.
- Ensure you have copied an image to your clipboard (e.g., by right-clicking on an image and selecting “Copy Image”).
- In Excel, right-click on the cell where you want to insert the picture.
- In the context menu that appears, look for Paste Options.
- Under Paste Options, select the icon labeled Paste Picture in Cell (it usually looks like a picture within a cell grid).
- The picture from your clipboard will be pasted into the selected cell.
Important Note: Using the standard Paste command (Ctrl+V or right-click and Paste) will paste the picture over the cells, as a floating object, not into the cell. Always use the “Paste Picture in Cell” option when you intend to embed the image within the cell boundaries.
Converting Pictures Over Cells to Pictures in Cells
Sometimes you might have existing pictures in your spreadsheet that are floating over cells. Excel lets you easily convert these floating pictures into pictures within cells, ensuring better organization and alignment with your data.
- Select the picture that is currently floating over cells. You will know it’s selected when you see handles around the image borders.
- Once the picture is selected, the Picture Format tab will appear on the ribbon. Click on this tab.
- In the Picture Format tab, find the Place in Cell button and click it.
- Excel will move the selected floating picture and place it into the top-left cell that the picture was originally overlapping.
Switching Back to Pictures Over Cells from Pictures in Cells
If you decide you want a picture to float over cells again after inserting it into a cell, Excel provides a simple way to switch back.
- Right-click on the picture that is currently inside the cell.
- In the context menu, hover over Picture in Cell.
- From the submenu that appears, select Place over Cells.
- The picture will now be converted back to a floating picture, positioned over the cell it was previously in.
Adding Alt Text to Pictures in Excel Cells for Accessibility
Accessibility is crucial, and Excel helps you make your spreadsheets accessible to everyone, including users with visual impairments. Adding alternative text (alt text) to your pictures ensures that screen readers can describe the images to users who cannot see them.
- Right-click on the picture within the cell.
- Select View Alt Text from the context menu.
- The Alt Text pane will open on the right side of the Excel window.
- In the Alt Text pane, type a descriptive and concise text that explains the content and purpose of the picture. Be specific and informative so that someone using a screen reader can understand the image’s relevance to your data.
- Once you’ve entered the alt text, it will be saved with the picture, enhancing the accessibility of your spreadsheet.
By mastering these methods, you can effectively insert photos into Excel cells, creating visually engaging and informative spreadsheets. Whether you’re organizing product catalogs, creating visual dashboards, or simply adding a personal touch to your data, the “Picture in Cell” feature in Excel provides the flexibility and control you need.