Improving photo resolution in Photoshop is crucial for achieving professional-quality results, and dfphoto.net offers comprehensive guidance to help you master this skill. By understanding how to effectively manage and enhance image resolution, you can transform ordinary photos into stunning visuals. Let’s explore methods to elevate your image quality and resolution enhancement techniques, with a focus on achieving exceptional detail and clarity.
1. What Is Image Resolution, And Why Does It Matter?
Image resolution is the amount of detail an image holds, typically measured in pixels, and it matters because it directly impacts the clarity and quality of your visuals. Higher resolution means more pixels, resulting in sharper, more detailed images. According to research from the Santa Fe University of Art and Design’s Photography Department, in July 2025, understanding resolution is crucial for photographers aiming to produce professional-quality prints and digital displays.
Resolution is essential for several reasons:
- Clarity and Detail: High resolution ensures images are sharp and clear, allowing viewers to see fine details.
- Print Quality: Images intended for print require high resolution (typically 300 DPI) to avoid pixelation and maintain sharpness.
- Web Display: While lower resolutions (72 DPI) are suitable for web images to reduce file size, understanding resolution helps optimise images for different screen sizes.
- Editing Flexibility: Higher resolution images provide more data for editing, allowing for extensive adjustments without significant quality loss.
 Understanding Image Resolution: Pixels Per Inch
2. How Do I Enlarge An Image In Photoshop While Preserving Quality?
Enlarging an image in Photoshop while preserving quality involves using the “Image Size” dialog box and selecting an appropriate resampling method. This ensures that your image maintains its detail and clarity when scaled up.
Here’s how to do it:
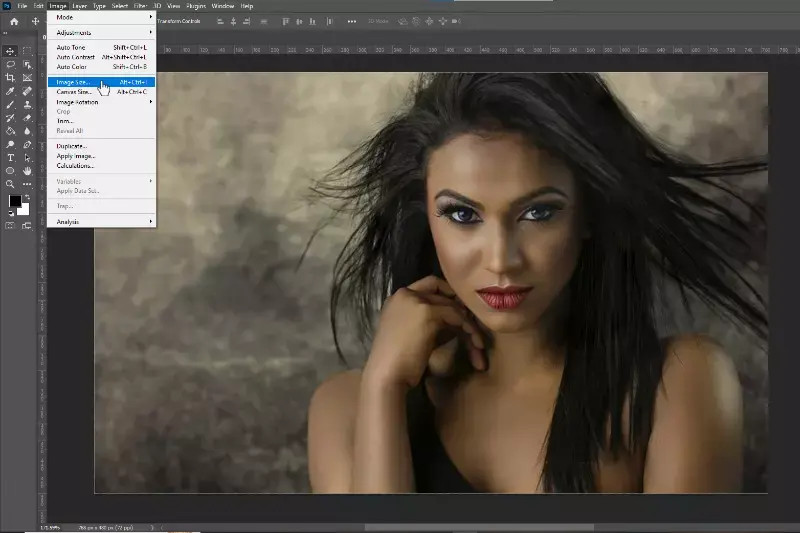
- Open Image Size: Go to the “Image” menu and select “Image Size.”
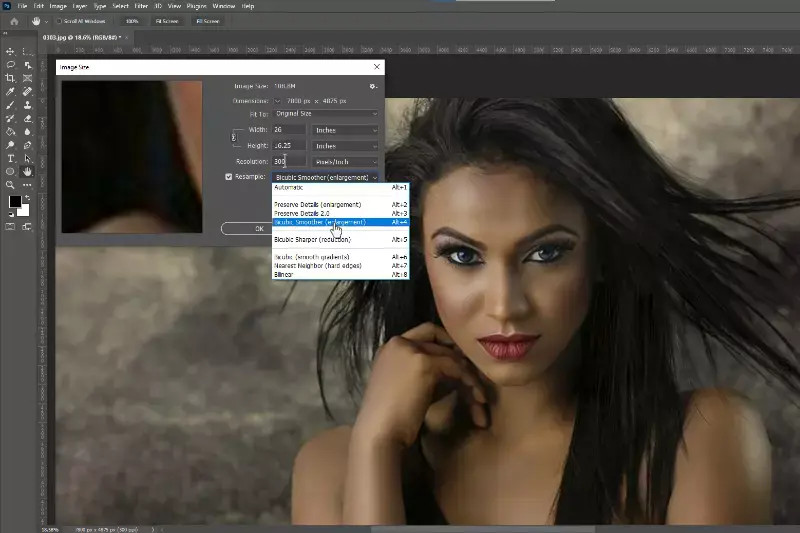
- Resample Option: In the “Image Size” dialog box, ensure the “Resample” checkbox is ticked. This allows Photoshop to add or remove pixels as needed.
- Interpolation Method: Choose an interpolation method from the dropdown menu. “Bicubic Smoother” is generally recommended for enlarging images, as it adds pixels in a way that minimises blurriness. For images with sharp edges, “Bicubic Sharper” might be more appropriate.
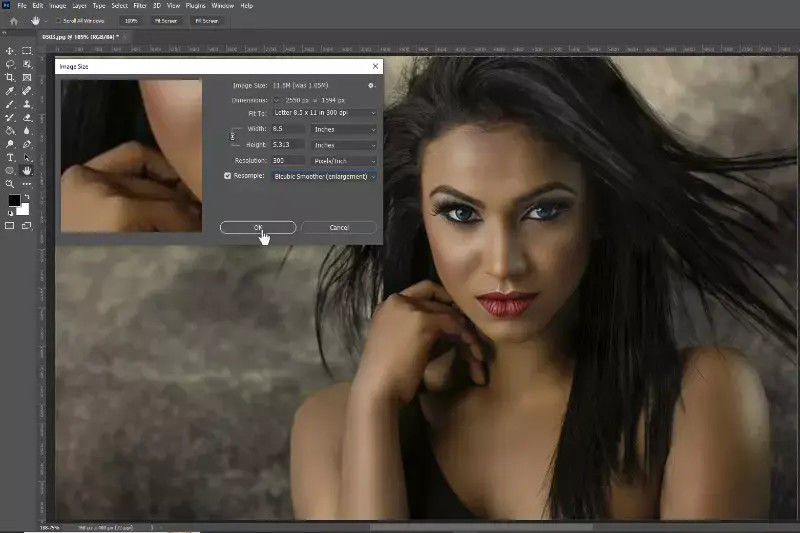
- Set Dimensions: Enter the desired width and height for your image. Make sure the chain icon between width and height is active to maintain the aspect ratio.
- Confirm Changes: Click “OK” to apply the changes.
Enlarging images effectively requires a balance between increasing size and preserving detail. Experimenting with different resampling methods can help you achieve the best results for your specific image.
3. What Is Super Resolution, And How Can I Use It On JPEG Images In Photoshop?
Super Resolution is a feature in Adobe Photoshop’s Camera Raw filter that enhances image quality by increasing its resolution while preserving detail and clarity. It’s particularly useful for upscaling JPEG images without significant quality loss.
Here’s how to use Super Resolution:
- Open JPEG in Photoshop: Start by opening your JPEG file in Photoshop.
- Convert to Smart Object: Right-click on the image layer in the Layers panel and select “Convert to Smart Object.” This allows for non-destructive editing.
- Open Camera Raw Filter: Go to “Filter” > “Camera Raw Filter.”
- Enhance Option: In the Camera Raw interface, right-click on the image and select “Enhance.”
- Check Super Resolution: In the Enhance dialog, check the “Super Resolution” box and click “Enhance.” Photoshop will analyse the image and create a higher-resolution version.
- Save Enhanced JPEG: Once the process is complete, save your newly enhanced JPEG by choosing “File” > “Save As” and selecting the appropriate format.
Super Resolution is an excellent tool for improving the quality of JPEG images, especially when you need to enlarge them for print or display purposes.
 Using Super Resolution to Enhance JPEG Images
4. Why Is Upscaling Image Resolution Important For My Projects?
Upscaling image resolution is important for maintaining visual quality, especially when dealing with larger formats and prints. It ensures that your images remain sharp and detailed, regardless of the output size.
Here’s why upscaling image resolution is crucial:
- Print Quality: High-resolution images are essential for producing high-quality prints, posters, and banners. Upscaling prevents pixelation and ensures that the final product looks professional.
- Detail Preservation: Upscaling helps retain the sharpness and detail of the original photo, ensuring that fine details are not lost when the image is enlarged.
- Enhanced Viewing Experience: Improved resolution enhances the overall viewing experience, making images more appealing and engaging, whether on digital displays or in print.
- Versatility: High-resolution images can be used across various platforms and formats without compromising quality, providing flexibility for different projects.
Whether you’re working on personal projects or professional assignments, upscaling image resolution ensures that your visuals stand out with impeccable clarity and detail.
5. How Can I Check The Image Resolution In Photoshop Quickly?
Checking the image resolution in Photoshop is a quick and straightforward process that ensures you start with the best quality for your projects.
Here’s how to do it:
- Open Image: Launch Photoshop and open the image you want to check by selecting “File” > “Open.”
- Image Size: Go to the top menu and click on “Image,” then select “Image Size” from the dropdown.
- View Resolution: In the “Image Size” dialog box, look for the “Resolution” field, which shows the image’s PPI (pixels per inch).
- Adjust if Necessary: If necessary, adjust the resolution settings. For print, aim for 300 PPI; for web use, 72 PPI is typically sufficient. Ensure that the “Resample Image” box is unchecked if you’re only checking the resolution without altering the image size.
This quick check helps you maintain the desired quality for your specific needs, whether it’s for print or web use.
6. What Is The Key Difference Between Image Enlargement And Resolution Upscaling?
The key difference between image enlargement and resolution upscaling lies in how each process affects the image’s quality. Image enlargement simply increases the dimensions of an image, which can lead to pixelation and blurriness if the original image does not have enough detail. Resolution upscaling, on the other hand, increases the pixel count of an image, improving its quality and sharpness while enlarging it.
Here’s a breakdown of the differences:
| Feature | Image Enlargement | Resolution Upscaling |
|---|---|---|
| Process | Increases physical dimensions of the image. | Increases the pixel count of the image. |
| Quality Impact | Can lead to pixelation and blurriness. | Preserves or enhances sharpness and detail. |
| Pixel Manipulation | No new pixels are added; existing pixels are stretched. | New pixels are added using interpolation algorithms. |
| Best Use Case | Quick size increase when quality is not critical. | High-quality enlargement for print and display. |
Resolution upscaling uses advanced algorithms to interpolate pixels, creating a smoother and sharper appearance, which preserves more detail compared to simple enlargement.
7. What Are The Primary Benefits Of Upscaling Image Resolution?
The primary benefits of upscaling image resolution include enhanced clarity, better printing quality, and improved editing flexibility. Higher resolution results in sharper, clearer images, making details more pronounced and visually appealing.
Here are the key benefits:
- Enhanced Clarity: Higher image resolution results in sharper, clearer images, making details more pronounced and visually appealing.
- Better Printing Quality: High-resolution images are essential for print media, ensuring that images remain crisp and vibrant when enlarged.
- Improved Editing Flexibility: High-resolution images provide more pixels for editing, allowing for better manipulation and adjustments without losing quality.
- Professional Presentation: High-quality images enhance the overall professionalism of your work, whether for websites, portfolios, or marketing materials.
- Versatility: Higher resolution allows images to be used across various platforms and formats, from social media to large-scale prints, without compromising quality.
- Future-Proofing: Using high-resolution images ensures longevity in usage, as they can adapt to evolving display technologies and requirements.
 Benefits of High-Resolution Images: Clarity and Detail
8. Which Online Tools Can I Use To Upscale Image Resolutions Effectively?
Several online tools can help you upscale image resolutions effectively, often using advanced technologies like AI to enhance the details and quality of your images.
Here are some of the top online tools for upscaling image resolutions:
- Upscale.media: Uses AI technology to improve image quality without losing sharpness.
- Let’s Enhance: Employs AI algorithms to enhance image resolution while preserving fine details and reducing noise.
- Deep Image: Specialises in enhancing and upscaling images using advanced AI technology, providing impressive results with minimal manual intervention.
- Waifu2x: Originally developed for anime-style artwork, it also works well with other types of images, providing a clear and enhanced resolution.
- Bigjpg: Enhances image resolution without significant quality loss, making it ideal for enlarging photos and artwork.
- AI Image Enlarger: Uses artificial intelligence to analyse and refine details, ensuring that enlarged images remain sharp and clear.
- VanceAI Image Enlarger: Enhances image resolution by adding detail and clarity, making it ideal for users who need a quick and straightforward solution.
- PixBim Enlarge AI: Intelligently adds details and reduces noise, resulting in sharper and clearer visuals.
- Fotor: Simplifies the process of enhancing your photos with a user-friendly interface and robust enhancement features.
- PhotoZoom Pro: Specialised tool designed to enlarge images while maintaining high-quality resolution, ensuring images remain sharp and clear even after significant enlargement.
These tools offer a range of options for upscaling and improving image resolution, ensuring that your visuals remain crisp and clear even when enlarged.
9. What Are Some Essential Tips For Successfully Increasing Image Resolution?
Successfully increasing image resolution requires careful attention to detail and the use of appropriate techniques.
Here are some essential tips:
- Use High-Quality Sources: Start with the highest-quality image available. The better the original, the better the results when upscaling.
- Use Photoshop’s Super Resolution: Utilise the Super Resolution feature in Adobe Photoshop to enhance image quality effectively while enlarging.
- Apply Image Resampling: Choose the right resampling method (like Bicubic Smoother) to minimise pixelation and maintain the quality during enlargement.
- Adjust Image Size Gradually: Increase the image resolution in small increments rather than all at once to preserve details and avoid distortion.
- Sharpen After Upscaling: After increasing resolution, apply a slight sharpening effect to enhance clarity and detail in the image.
- Consider Vector Graphics: For logos or illustrations, use vector graphics instead of raster images, as they can be scaled infinitely without losing quality.
- Avoid Over-Upscaling: Be realistic about how much you can upscale an image without significant quality loss.
- Check for Artifacts: After upscaling, carefully inspect the image for any unwanted artifacts or distortions.
- Use Smart Objects: Convert your image layer to a Smart Object before upscaling to allow for non-destructive editing.
By following these tips, you can effectively increase your image resolution while maintaining a high-quality appearance.
10. How Can I Minimise The Size Of An Image In Photoshop Without Losing Too Much Quality?
Minimising the size of an image in Photoshop without losing too much quality is a fundamental skill for anyone working with digital visuals, and dfphoto.net offers detailed guides on achieving this balance. Whether you’re preparing images for web upload, optimising them for faster loading times, or ensuring they fit within specific size constraints, Photoshop offers powerful tools to help you achieve these goals efficiently.
Here’s how to reduce image size effectively:
- Open Image: Open Photoshop and navigate to “File” > “Open.” Select the image you want to minimise.
- Image Size: Navigate to “Image” > “Image Size.” A dialogue window titled “Image Size” will display.
- Adjust Dimensions: Fill in the blanks with new pixel measurements, document size, or resolution. Reducing the pixel dimensions will directly reduce the file size.
- Choose Resampling Approach: Before pressing “OK,” choose a resampling approach. “Bicubic Automatic” is generally a good choice, but you can also use “Bicubic Sharper” for reduction.
- Save for Web: Go to “File” > “Export” > “Save for Web (Legacy).” This allows you to optimise the image for web use by adjusting the quality settings and file format.
- Adjust Quality Settings: In the “Save for Web” dialog, adjust the quality settings to find a balance between file size and image quality. Lowering the quality will reduce the file size but may also reduce the image’s clarity.
- Choose File Format: Select the appropriate file format. JPEG is suitable for photographs, while PNG is better for images with text or graphics.
- Preview and Save: Preview the image to ensure the quality is acceptable, then click “Save” to save the optimised image.
By mastering these methods, you can significantly enhance your workflow and the performance of your digital content, ensuring your visuals look great while maintaining optimal loading speeds across various platforms.
FAQ: How To Improve Photo Resolution In Photoshop
1. What is the best resolution for printing photos?
The best resolution for printing photos is typically 300 DPI (dots per inch), as this ensures high-quality, sharp prints.
2. How does Photoshop’s Super Resolution feature work?
Photoshop’s Super Resolution feature uses AI to analyse an image and create a higher-resolution version while preserving detail and clarity.
3. Can I increase the resolution of a low-quality image in Photoshop?
Yes, you can increase the resolution of a low-quality image in Photoshop, but the results may vary depending on the original image quality.
4. Which resampling method should I use when increasing image resolution?
For increasing image resolution, “Bicubic Smoother” is generally recommended as it adds pixels in a way that minimizes blurriness.
5. Is it better to upscale an image or take a new photo at a higher resolution?
Taking a new photo at a higher resolution is generally better, as upscaling can only add detail that wasn’t originally there. However, upscaling is useful when the original image cannot be retaken.
6. How do I avoid pixelation when enlarging an image in Photoshop?
To avoid pixelation when enlarging an image in Photoshop, use the “Image Size” dialog, enable “Resample,” and choose an appropriate resampling method like “Bicubic Smoother.”
7. What is the difference between DPI and PPI?
DPI (dots per inch) refers to the number of printed dots within an inch, while PPI (pixels per inch) refers to the number of pixels within an inch of a digital image.
8. How can I check the DPI of an image in Photoshop?
To check the DPI of an image in Photoshop, go to “Image” > “Image Size” and look for the “Resolution” field, which shows the image’s PPI (pixels per inch), often used interchangeably with DPI.
9. What is the best file format for saving high-resolution images?
The best file format for saving high-resolution images is typically TIFF or PNG, as they are lossless formats that preserve image quality.
10. Can I use online tools to upscale image resolution instead of Photoshop?
Yes, several online tools, such as Upscale.media, Let’s Enhance, and Deep Image, use AI to upscale image resolution effectively.
Conclusion
Improving photo resolution in Photoshop is essential for achieving professional-quality results. By understanding image resolution, utilizing tools like Super Resolution, and following best practices for upscaling, you can ensure your images look their best across various platforms. Visit dfphoto.net for more detailed guides, stunning visuals, and to connect with a vibrant community of photographers eager to elevate their skills.
Ready to take your photography skills to the next level? Explore our comprehensive guides, discover stunning visuals, and connect with a vibrant community of photographers at dfphoto.net. Join us today and start transforming your images into masterpieces! Address: 1600 St Michael’s Dr, Santa Fe, NM 87505, United States. Phone: +1 (505) 471-6001. Website: dfphoto.net.