Importing photos from your iPhone to a Windows 7 PC doesn’t have to be a headache; it’s a straightforward process. At dfphoto.net, we understand the importance of preserving your visual memories and accessing them across devices. This article provides comprehensive methods, troubleshooting tips, and best practices for transferring your precious iPhone photos to your Windows 7 PC, ensuring your memories are safe and accessible. Let’s explore photo management, image transfer, and photo backup.
1. Understanding Your Options for Transferring Photos
There are several methods to transfer your photos. Understanding these options helps you choose the best method for your needs.
- Using USB Cable: A direct connection using a USB cable is often the quickest and most reliable method.
- iCloud for Windows: iCloud offers seamless syncing, but it might require more setup.
- Third-Party Applications: Applications like Apowersoft Phone Manager and WinX MediaTrans offer additional features and can be useful in specific situations.
2. Transferring Photos Using a USB Cable
This is the most common and straightforward method.
2.1. Connecting Your iPhone
- Connect: Plug your iPhone into your Windows 7 PC using a USB cable.
2.2. Trust This Computer
- Trust: If prompted on your iPhone, tap “Trust This Computer.” This is essential for your PC to access the iPhone’s files.
2.3. Accessing Your iPhone in Windows Explorer
- Open Windows Explorer: Go to “Computer” or “My Computer” on your Windows 7 PC.
- Locate Your iPhone: Your iPhone should appear as a portable device. Double-click to open it.
- Navigate to DCIM Folder: Inside, you’ll find a folder named “DCIM” (Digital Camera Images). This folder contains subfolders where your photos are stored.
2.4. Copying Photos
- Browse Folders: Open the “DCIM” folder and browse through the subfolders (e.g., 100APPLE, 101APPLE, etc.) to find your photos.
- Select and Copy: Select the photos you want to transfer. Right-click and choose “Copy.”
- Paste to PC: Navigate to the folder on your Windows 7 PC where you want to save the photos. Right-click and choose “Paste.”
2.5. Troubleshooting USB Transfer Issues
If your iPhone isn’t recognized:
- Check the USB Cable: Ensure the USB cable is not damaged and is properly connected.
- Try a Different USB Port: Sometimes, a different USB port can resolve connectivity issues.
- Restart Your iPhone and PC: A simple restart can often fix temporary glitches.
- Update Apple Mobile Device USB Driver:
- Open Device Manager (search for it in the Start Menu).
- Expand “Portable Devices.”
- Right-click on your Apple iPhone and select “Update driver.”
- Choose “Search automatically for updated driver software.”
- Apple Mobile Device Support Service:
- Press the Windows key + R to open the Run dialog.
- Type services.msc and press Enter.
- Scroll down to find Apple Mobile Device Service.
- Right-click on it and select Properties.
- In the General tab, set the Startup type to Automatic.
- If the service is not running, click Start.
- Click Apply and then OK.
 Connecting iPhone to Windows 7 PC via USB for photo transfer, showing DCIM folder access
3. Using iCloud for Windows to Sync Photos
iCloud for Windows can automatically sync your photos between your iPhone and PC.
3.1. Downloading and Installing iCloud for Windows
- Download: Visit the Apple website and download iCloud for Windows.
- Install: Run the downloaded file and follow the on-screen instructions to install iCloud for Windows.
3.2. Setting Up iCloud
- Sign In: Open iCloud for Windows and sign in with your Apple ID and password.
- Choose Features: Select “Photos” and any other features you want to sync.
- Options: Click the “Options” button next to “Photos.”
3.3. Configuring Photo Options
- iCloud Photo Library: Enable “iCloud Photo Library” to automatically upload and store your photos in iCloud.
- Download New Photos: Select “Download new photos and videos to my PC.” Choose the location on your PC where you want to save the photos.
- Keep High Efficiency Original: Check “Keep high efficiency original if available” to keep the original quality.
3.4. Accessing iCloud Photos on Your PC
- iCloud Photos Folder: Your photos will be downloaded to the folder you specified. They will also be available in the iCloud Photos app on your PC.
3.5. Managing Storage
- Check iCloud Storage: iCloud offers 5GB of free storage. If you have many photos, you might need to purchase additional storage.
- Manage Storage: In iCloud settings, you can manage your storage and see how much space each feature is using.
3.6. Troubleshooting iCloud Sync Issues
- Check Internet Connection: Ensure both your iPhone and PC have a stable internet connection.
- Sign In: Make sure you are signed in to iCloud on both devices with the same Apple ID.
- Restart: Restart both your iPhone and PC.
- Update iCloud: Ensure you have the latest version of iCloud for Windows.
- Check Storage: Verify you have enough iCloud storage.
4. Using Third-Party Applications
Several third-party applications can help transfer photos.
4.1. Apowersoft Phone Manager
- Download and Install: Download Apowersoft Phone Manager from their website and install it on your PC.
- Connect iPhone: Launch the application and connect your iPhone to your PC using a USB cable.
- Trust Computer: Tap “Trust This Computer” on your iPhone.
- Go to Pictures: In Apowersoft Phone Manager, go to the “Pictures” section.
- Select and Export: Select the photos you want to transfer and click “Export.” Choose a folder on your PC to save them.
4.2. WinX MediaTrans
- Download and Install: Download WinX MediaTrans from their website and install it on your PC.
- Connect iPhone: Launch the application and connect your iPhone to your PC using a USB cable.
- Trust Computer: Tap “Trust This Computer” on your iPhone.
- Photo Transfer: Use the “Photo Transfer” feature to select and transfer photos to your PC.
4.3. Other Third-Party Options
Other applications like iMazing and AnyTrans offer similar functionalities. Research and choose the one that best fits your needs.
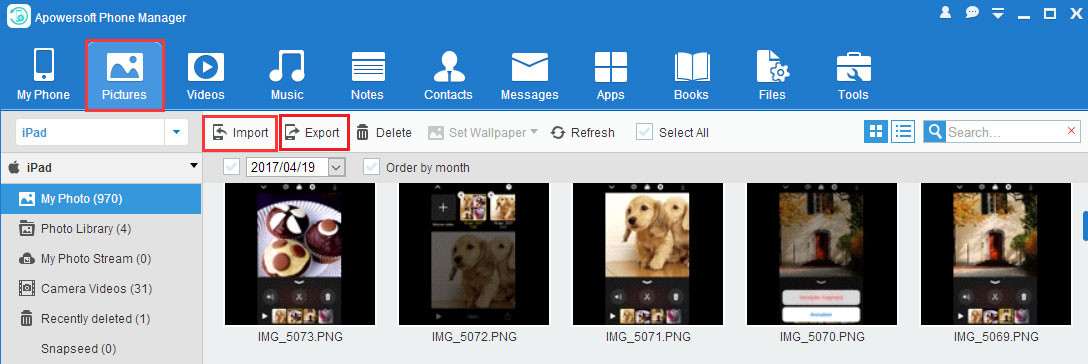 Apowersoft Phone Manager interface showing photo selection for transfer from iPhone to PC
5. Addressing Common Issues and Errors
Sometimes, you may encounter issues during the transfer process.
5.1. iPhone Not Recognized
- USB Connection: Ensure the USB cable is properly connected.
- Trust This Computer: Make sure you have tapped “Trust This Computer” on your iPhone.
- Apple Mobile Device Support Service: Ensure the Apple Mobile Device Support service is running on your PC.
- Drivers: Update the Apple Mobile Device USB Driver.
5.2. Missing Photos
- Hidden Folders: Check if the photos are in hidden folders. In Windows Explorer, go to “View” and enable “Hidden items.”
- iCloud: If using iCloud, ensure the photos have been downloaded to your PC.
- HEIC Format: iPhones may save photos in HEIC format, which might not be fully supported by Windows 7. Consider converting HEIC to JPG.
5.3. HEIC to JPG Conversion
HEIC (High Efficiency Image Container) is a modern image format used by iPhones. Windows 7 may not fully support HEIC.
- Online Converters: Use online HEIC to JPG converters like Convertio or HEICtoJPG.
- Third-Party Software: Install third-party software that supports HEIC and can convert them to JPG.
- Change iPhone Settings: You can set your iPhone to capture photos in “Most Compatible” format (JPG) instead of HEIC:
- Go to “Settings” on your iPhone.
- Tap “Camera.”
- Tap “Formats.”
- Choose “Most Compatible.”
6. Optimizing Photos for Windows 7
Once you have transferred your photos, you can optimize them for viewing and storage on your Windows 7 PC.
6.1. Photo Management Software
- Windows Photo Gallery: Windows 7 comes with Windows Photo Gallery, which allows you to view, organize, and edit your photos.
- Picasa: Although no longer supported by Google, Picasa is a free photo management tool that many users still find useful.
- Adobe Photoshop Elements: For more advanced editing, consider Adobe Photoshop Elements.
6.2. Organizing Your Photos
- Create Folders: Organize your photos into folders by date, event, or category.
- Tagging: Use tags to add keywords to your photos, making them easier to search.
- Rating: Rate your photos to prioritize and easily find your favorites.
6.3. Editing Your Photos
- Basic Adjustments: Use Windows Photo Gallery or Picasa for basic adjustments like brightness, contrast, and color correction.
- Advanced Editing: Use Adobe Photoshop Elements or other professional software for advanced editing tasks.
7. Best Practices for Photo Transfer and Storage
- Regular Backups: Regularly back up your photos to an external hard drive or cloud storage to prevent data loss.
- Multiple Locations: Store your photos in multiple locations for redundancy.
- Original Quality: Always transfer photos in their original quality to preserve details.
- Secure Storage: Use secure storage solutions to protect your photos from unauthorized access.
8. Understanding iPhone Photo Storage
Comprehending how your iPhone stores photos is crucial for effective transfer and management.
8.1. Camera Roll/Photos App
- Location: The Photos app is the central location for all photos on your iPhone, including those taken with the camera and those saved from other sources.
8.2. iCloud Photo Library
- Syncing: When enabled, iCloud Photo Library automatically syncs your photos and videos across all your Apple devices.
8.3. Photo Stream
- Recent Photos: Photo Stream automatically uploads your most recent photos to iCloud and shares them with your other devices.
*Note: Photo Stream stores photos for a limited time (typically 30 days).
8.4. Albums
- Organization: You can create albums within the Photos app to organize your photos into categories.
8.5. Understanding File Formats (HEIC vs. JPEG)
- HEIC: High Efficiency Image Container is a modern format that saves storage space while maintaining image quality.
- JPEG: A widely compatible format but less efficient in terms of storage.
- Compatibility: Windows 7 may require additional codecs or converters to fully support HEIC.
9. Advanced Tips and Tricks
Enhance your photo transfer and management skills with these advanced tips.
9.1. Using iTunes for Photo Syncing (Not Recommended for Simple Transfer)
- iTunes: While iTunes can sync photos, it’s primarily designed for syncing music and other media. It’s not the most straightforward method for simple photo transfer.
- Selective Syncing: iTunes allows you to sync selected albums from your PC to your iPhone, but it doesn’t offer as much flexibility as other methods.
9.2. Wireless Transfer Options
- Wi-Fi Transfer Apps: Apps like Wireless Transfer App allow you to transfer photos wirelessly between your iPhone and PC.
- Cloud Services: Services like Google Drive, Dropbox, and OneDrive can be used to upload photos from your iPhone and download them to your PC.
9.3. Using Email (For Small Batches)
- Emailing Photos: You can email photos from your iPhone to yourself and then download them to your PC.
- Limitations: This method is only practical for small batches of photos due to email size limitations.
10. Understanding the Implications of Deleting Photos
Be aware of what happens when you delete photos from your iPhone or iCloud.
10.1. Deleting from iPhone
- Recently Deleted: When you delete a photo from your iPhone, it goes to the “Recently Deleted” album.
- Permanent Deletion: Photos in the “Recently Deleted” album are permanently deleted after 30 days unless you manually delete them sooner.
10.2. Deleting from iCloud Photo Library
- Synced Deletion: When you delete a photo from iCloud Photo Library, it is deleted from all your synced devices.
- Recovery Period: There is a period (typically 30 days) during which you can recover deleted photos from the “Recently Deleted” album in iCloud.
10.3. Impact on Backups
- Backup Integrity: Deleting photos from your iPhone or iCloud will also remove them from your backups if the backups are synced.
- Archival Backups: Keep archival backups separate from synced backups to ensure you have a copy of all your photos.
11. Utilizing Windows 7 Built-In Tools
Windows 7 has built-in features that can help manage your photos.
11.1. Windows Explorer
- File Management: Use Windows Explorer for basic file management tasks like copying, pasting, and organizing photos.
- Preview Pane: Enable the preview pane to quickly view photos without opening them.
11.2. Windows Photo Viewer
- Viewing Photos: Windows Photo Viewer is a simple tool for viewing photos.
- Basic Editing: It offers basic editing features like rotating and zooming.
11.3. Burning Photos to CD/DVD
- Archival Storage: You can burn your photos to CD or DVD for long-term archival storage.
12. Maintaining Image Quality During Transfer
Preserving the original image quality is essential.
12.1. Avoid Compression
- Original Files: Always transfer the original, uncompressed files to avoid loss of quality.
- Emailing: Be cautious when emailing photos, as they may be compressed.
12.2. HEIC vs. JPEG
- HEIC Retention: If possible, retain HEIC files for better quality and smaller file size.
- Conversion: If converting to JPEG, use a high-quality setting to minimize loss.
12.3. Transfer Settings
- iCloud Settings: In iCloud settings, choose “Download Originals” to ensure you get the full-resolution versions of your photos.
13. Integrating with dfphoto.net for Inspiration and Learning
Enhance your photography journey with dfphoto.net.
13.1. Exploring dfphoto.net
- Inspiration: Browse dfphoto.net for inspiring photography and creative ideas.
- Techniques: Learn new techniques and tips from our expert articles and tutorials.
13.2. Community Engagement
- Share Your Work: Share your photos on dfphoto.net and get feedback from other photographers.
- Connect: Connect with a community of passionate photographers.
13.3. Learning Resources
- Guides: Access detailed guides and tutorials on various photography topics.
- Reviews: Read reviews of the latest cameras, lenses, and accessories.
14. Security Considerations for Photo Transfers
Protect your valuable photos during and after transfer.
14.1. Secure Connections
- USB Security: Using a direct USB connection is generally secure, but ensure your computer is protected with antivirus software.
- Wi-Fi Security: When transferring wirelessly, use a secure Wi-Fi network to prevent unauthorized access.
14.2. Data Encryption
- Encrypted Storage: Consider using encrypted storage solutions for your photos, especially if they contain sensitive information.
14.3. Privacy Settings
- iCloud Privacy: Review your iCloud privacy settings to control who can access your photos.
- Third-Party Apps: Be cautious when using third-party apps and review their privacy policies.
15. Automating Photo Transfers
Streamline your workflow by automating photo transfers.
15.1. Scheduled Backups
- Automated Backups: Set up scheduled backups to automatically transfer photos from your iPhone to your PC.
- Windows Backup: Use Windows Backup to create regular backups of your entire system, including your photos.
15.2. Third-Party Tools
- Backup Software: Explore third-party backup software that offers advanced features like incremental backups and cloud integration.
15.3. Cloud Syncing
- Real-Time Syncing: Cloud services like iCloud, Google Photos, and Dropbox offer real-time syncing, ensuring your photos are always backed up and accessible.
16. Utilizing External Hard Drives for Photo Storage
External hard drives are an excellent option for storing large photo libraries.
16.1. Choosing the Right Hard Drive
- Capacity: Select a hard drive with enough capacity to store your entire photo library.
- Speed: Consider the speed of the hard drive (RPM or SSD) for faster access times.
- Reliability: Choose a reputable brand known for reliability.
16.2. Organizing Photos on External Hard Drive
- Folder Structure: Create a clear folder structure for easy navigation.
- Backup Strategy: Implement a backup strategy to protect your photos from hard drive failure.
16.3. Security
- Encryption: Encrypt your external hard drive to protect your photos from unauthorized access.
17. Cloud Storage Solutions for Photos
Cloud storage provides convenient access and backup for your photos.
17.1. iCloud Photo Library
- Seamless Syncing: Seamlessly sync your photos across all your Apple devices.
- Storage Plans: Apple offers various storage plans to suit your needs.
17.2. Google Photos
- Free Storage: Google Photos offers free storage for compressed photos.
- Unlimited Storage: Paid plans provide unlimited storage for original-quality photos.
- Cross-Platform Compatibility: Available on iOS, Android, and web.
17.3. Dropbox and OneDrive
- File Syncing: Dropbox and OneDrive are versatile cloud storage solutions that can be used to sync and share your photos.
- Collaboration: Easily collaborate with others by sharing photo folders.
18. Understanding Photo Metadata
Metadata provides valuable information about your photos.
18.1. What is Metadata?
- Information: Metadata includes information like date, time, location, camera settings, and more.
- Organization: Use metadata to organize and search your photos.
18.2. Accessing Metadata
- Windows Explorer: Right-click on a photo in Windows Explorer and select “Properties” to view its metadata.
- Photo Management Software: Photo management software like Windows Photo Gallery and Picasa provide tools for viewing and editing metadata.
18.3. Editing Metadata
- Correcting Errors: Correct errors in metadata to ensure accurate organization.
- Adding Information: Add keywords and descriptions to make your photos easier to find.
19. Creating a Photo Workflow
Establish a consistent workflow for managing your photos.
19.1. Capture
- iPhone Settings: Optimize your iPhone camera settings for the best image quality.
19.2. Transfer
- Choose a Method: Choose the most convenient method for transferring photos to your Windows 7 PC.
19.3. Organize
- Folder Structure: Organize your photos into folders by date, event, or category.
19.4. Edit
- Enhancements: Edit your photos to enhance their appearance.
19.5. Backup
- Multiple Locations: Back up your photos to multiple locations to prevent data loss.
19.6. Share
- Social Media: Share your best photos on social media.
- dfphoto.net: Share your photos on dfphoto.net to get feedback from other photographers.
20. Troubleshooting Specific Error Messages
Address common error messages you might encounter during photo transfer.
20.1. “Device is Unreachable”
- USB Connection: Ensure the USB cable is properly connected.
- Drivers: Update the Apple Mobile Device USB Driver.
20.2. “Insufficient Storage”
- Free Up Space: Free up space on your iPhone or PC.
- External Hard Drive: Use an external hard drive for additional storage.
20.3. “File is Corrupted”
- Retransfer: Retransfer the file.
- Check Source: Check if the file is corrupted on the iPhone.
21. Optimizing iPhone Storage
Manage your iPhone storage effectively to ensure smooth photo transfers.
21.1. Delete Unnecessary Photos and Videos
- Review: Regularly review your photos and videos and delete those you no longer need.
21.2. Use iCloud Photo Library
- Optimize Storage: Enable “Optimize iPhone Storage” in iCloud settings to store smaller versions of your photos on your iPhone and the full-resolution versions in iCloud.
21.3. Clear App Cache
- App Storage: Clear the cache of apps that store photos and videos to free up space.
22. Keyboard Shortcuts for Photo Management
Use keyboard shortcuts to speed up your photo management tasks.
22.1. Windows Explorer Shortcuts
- Ctrl + C: Copy
- Ctrl + V: Paste
- Ctrl + X: Cut
- Ctrl + A: Select All
- Delete: Delete
22.2. Windows Photo Viewer Shortcuts
- Left Arrow: Previous Photo
- Right Arrow: Next Photo
- Ctrl + Plus: Zoom In
- Ctrl + Minus: Zoom Out
- Ctrl + R: Rotate Right
23. How dfphoto.net Supports Your Photography Journey
At dfphoto.net, we are dedicated to supporting your passion for photography.
23.1. Community Features
- Forums: Join our forums to connect with other photographers, ask questions, and share your experiences.
- Galleries: Showcase your best work in our galleries and get feedback from the community.
23.2. Educational Resources
- Tutorials: Access a wealth of tutorials on various photography topics, from basic techniques to advanced editing.
- Articles: Read insightful articles on composition, lighting, gear reviews, and more.
23.3. Inspiration
- Featured Photographers: Discover inspiring work from featured photographers around the world.
- Photo Challenges: Participate in our photo challenges to test your skills and get creative.
24. Staying Updated with the Latest Photography Trends
Keep up with the latest trends and technologies in photography.
24.1. dfphoto.net Newsletter
- Subscribe: Subscribe to our newsletter to receive the latest news, articles, and tutorials directly in your inbox.
24.2. Social Media
- Follow Us: Follow us on social media to stay updated with the latest trends and inspiration.
24.3. Industry Events
- Workshops and Seminars: Attend workshops and seminars to learn from industry experts and network with other photographers.
25. Final Checklist Before Transferring Photos
Ensure a smooth transfer process with this final checklist.
25.1. iPhone Preparation
- Unlock: Unlock your iPhone.
- Trust Computer: Tap “Trust This Computer.”
- Storage: Ensure you have enough storage space on your iPhone.
25.2. PC Preparation
- USB Connection: Ensure the USB cable is properly connected.
- Drivers: Update the Apple Mobile Device USB Driver.
- Storage: Ensure you have enough storage space on your PC.
25.3. Backup
- Recent Backup: Ensure you have a recent backup of your iPhone.
26. Conclusion: Seamless Photo Transfer and Management
Transferring photos from your iPhone to a Windows 7 PC can be straightforward with the right methods and practices. Whether you choose a USB cable, iCloud, or third-party applications, understanding the steps and troubleshooting tips ensures your photos are safe and accessible. At dfphoto.net, we encourage you to explore our resources, connect with our community, and continue your journey in photography. Embrace the art, capture the moments, and preserve your visual memories for years to come. Visit dfphoto.net today to discover a world of photography inspiration, education, and community.
FAQ: Importing Photos From iPhone to Windows 7 PC
Q1: Why won’t my Windows 7 PC recognize my iPhone when I plug it in?
Your Windows 7 PC might not recognize your iPhone due to several reasons. Ensure your iPhone is unlocked and that you’ve tapped “Trust This Computer” when prompted. Also, check your USB cable for any damage and try using a different USB port. Outdated or corrupted Apple Mobile Device USB drivers can also cause this issue. Update the drivers through Device Manager.
Q2: How do I update the Apple Mobile Device USB driver on Windows 7?
To update the Apple Mobile Device USB driver on Windows 7, open Device Manager, expand “Portable Devices,” right-click on your Apple iPhone, and select “Update driver.” Choose “Search automatically for updated driver software,” and Windows will find and install the latest driver.
Q3: Can I use iCloud to automatically transfer photos from my iPhone to my Windows 7 PC?
Yes, you can use iCloud for Windows to automatically sync your photos. Download and install iCloud for Windows, sign in with your Apple ID, and select “Photos.” Configure the photo options to download new photos and videos to your PC. Your photos will then be downloaded to the specified folder on your PC.
Q4: What should I do if some of my photos are missing after transferring them from my iPhone to my Windows 7 PC?
If some photos are missing, check if the photos are in hidden folders by enabling “Hidden items” in Windows Explorer. If you’re using iCloud, ensure the photos have been fully downloaded to your PC. Also, check if your iPhone is saving photos in HEIC format, which might not be fully supported by Windows 7 without additional codecs.
Q5: How can I convert HEIC photos to JPG on Windows 7?
You can convert HEIC photos to JPG using online converters like Convertio or HEICtoJPG. Alternatively, install third-party software that supports HEIC and can convert them to JPG. You can also change your iPhone settings to capture photos in “Most Compatible” format (JPG) instead of HEIC under “Settings” > “Camera” > “Formats.”
Q6: What is the best way to organize my photos after transferring them to my Windows 7 PC?
The best way to organize your photos is to create a clear folder structure by date, event, or category. Use tags to add keywords to your photos, making them easier to search. Additionally, rate your photos to prioritize and easily find your favorites using photo management software like Windows Photo Gallery or Picasa.
Q7: How can I back up my photos on Windows 7 to prevent data loss?
Regularly back up your photos to an external hard drive or cloud storage to prevent data loss. Store your photos in multiple locations for redundancy. You can also use Windows Backup to create regular backups of your entire system, including your photos.
Q8: Is it safe to use third-party apps to transfer photos from my iPhone to my Windows 7 PC?
Using third-party apps like Apowersoft Phone Manager and WinX MediaTrans can be helpful, but ensure you download them from reputable sources. Always review the app’s privacy policies to understand how your data is handled. Using a direct USB connection is generally more secure.
Q9: What should I do if I get an “Insufficient Storage” error when transferring photos from my iPhone to my Windows 7 PC?
If you get an “Insufficient Storage” error, free up space on your iPhone or PC by deleting unnecessary files. You can also use an external hard drive or cloud storage for additional storage. Consider enabling “Optimize iPhone Storage” in iCloud settings to store smaller versions of your photos on your iPhone.
Q10: How does dfphoto.net support my photography journey and help me manage my photos better?
dfphoto.net supports your photography journey by providing a wealth of educational resources, including tutorials and articles on various photography topics. You can join our community forums to connect with other photographers, share your work in our galleries, and get valuable feedback. Additionally, dfphoto.net helps you stay updated with the latest photography trends and techniques.
If you’re eager to delve deeper into the art of photography and connect with a vibrant community, don’t hesitate to visit dfphoto.net. For more information, you can reach us at Address: 1600 St Michael’s Dr, Santa Fe, NM 87505, United States, Phone: +1 (505) 471-6001, or visit our Website: dfphoto.net.