Importing photos from your camera to your MacBook is a straightforward process that allows you to preserve and edit your precious memories. At dfphoto.net, we understand the importance of seamless photo management, and this comprehensive guide will walk you through the steps, offering tips and troubleshooting advice for a smooth experience. Whether you’re a professional photographer or a casual shooter, mastering photo transfer is crucial for efficient workflow and creative exploration, so you can learn about digital imaging, photo storage, image editing and enhance your visual storytelling skills.
1. Understanding the Basics of Importing Photos
Importing photos involves transferring image files from your camera’s storage (SD card or internal memory) to your MacBook’s hard drive or an external storage device. This process typically involves connecting your camera to your MacBook via a USB cable or using an SD card reader. Once connected, your MacBook recognizes the camera as a storage device, allowing you to access the photos and videos stored on it.
1.1. Why is Importing Photos Properly Important?
Properly importing photos is essential for several reasons:
- Preservation: Transferring photos to your MacBook ensures that your images are safely backed up and protected from accidental deletion or card corruption.
- Organization: Importing allows you to organize your photos into folders and albums, making them easier to find and manage.
- Editing: Once your photos are on your MacBook, you can use photo editing software to enhance their appearance and make creative adjustments.
- Sharing: Importing photos allows you to easily share them with friends, family, or clients via email, social media, or online galleries.
1.2. Essential Equipment for Photo Import
To import photos from your camera to your MacBook, you’ll need the following equipment:
- Camera: Your digital camera, whether it’s a DSLR, mirrorless camera, point-and-shoot, or smartphone.
- MacBook: Your Apple MacBook computer with a working USB port or SD card reader.
- USB Cable: A USB cable that’s compatible with both your camera and your MacBook.
- SD Card Reader (Optional): If your MacBook doesn’t have a built-in SD card reader, you’ll need an external card reader.
1.3. Understanding File Formats
Digital cameras typically store photos in two main file formats:
- JPEG: A compressed file format that’s widely supported and offers a good balance between image quality and file size.
- RAW: An uncompressed file format that retains all the data captured by the camera sensor, offering greater flexibility for editing but resulting in larger file sizes.
The Santa Fe University of Art and Design’s Photography Department recommends shooting in RAW format whenever possible, as it provides more latitude for adjustments during post-processing, allowing you to recover details in shadows and highlights that might be lost in JPEG files.
2. Step-by-Step Guide: Importing Photos via USB Cable
Connecting your camera to your MacBook via a USB cable is a common method for importing photos. Here’s a detailed step-by-step guide:
2.1. Connect Your Camera to Your MacBook
- Turn on your camera and ensure it’s in the correct mode for importing photos. Refer to your camera’s manual for specific instructions on which mode to select.
- Connect one end of the USB cable to your camera and the other end to a USB port on your MacBook.
- Your MacBook should automatically recognize the connected camera as a storage device.
2.2. Open the Photos App
- If the Photos app doesn’t open automatically, launch it from your Applications folder or by searching for it in Spotlight.
- The Photos app should display your connected camera under the “Devices” section in the sidebar. If you don’t see your camera, ensure it’s properly connected and turned on.
2.3. Select Photos for Import
- Click on your camera’s name in the Photos app sidebar to view the photos and videos stored on it.
- Photos displays thumbnails of all the images and videos on your camera.
- To import all new photos, click the “Import All New Items” button in the top right corner.
- To import a selection of photos, click on the thumbnails of the images you want to import, then click the “Import Selected” button.
2.4. Choose Import Destination
Before importing, you can choose where to import the photos:
- Existing Album: Click the “Album” pop-up menu and select an existing album to import the photos into.
- New Album: Click the “Album” pop-up menu, choose “New Album,” enter a name for the new album, and click “OK.”
- Photos Library: Click the “Album” pop-up menu and choose “None” to import the photos directly into the Photos library without specifying an album.
2.5. Import and Disconnect
- Click the “Import” button to begin the import process.
- Photos will import your selected photos and videos to the chosen destination.
- Once the import is complete, disconnect the camera from your MacBook.
- If you didn’t import the photos into an album, they’ll appear in the “Imports” album in the sidebar.
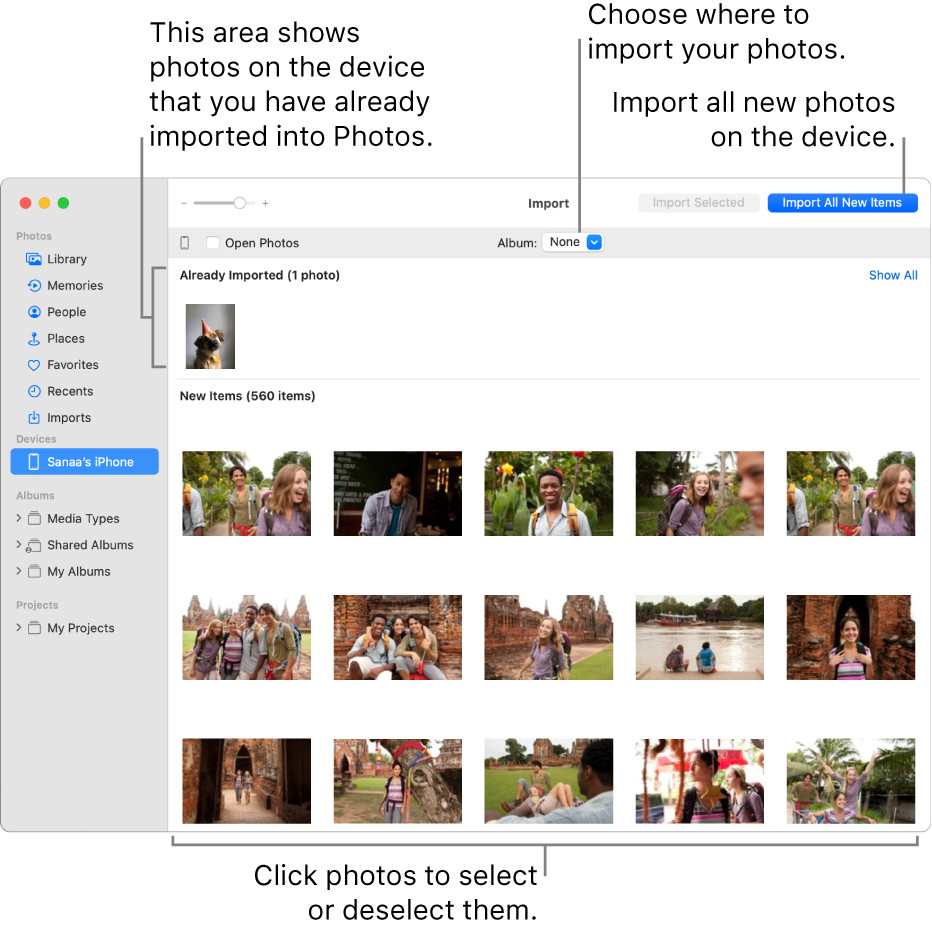 Photos on the device that you’ve already imported are shown at the top of the Import window; new photos are at the bottom. At the top center is the Album pop-up menu. The Import All New Items button is at the top right.
2.6. Optional: Delete Photos from Camera
During the import process, you may be prompted to delete the photos from your camera after they’ve been imported. Choose “Delete Items” to remove the photos from the camera or “Keep Items” to keep them on the camera. Deleting the photos from your camera after importing can free up storage space for future shoots, but it’s always a good idea to ensure that your photos are safely backed up on your MacBook or an external drive before deleting them from the camera.
3. Importing Photos via SD Card Reader
Using an SD card reader is another convenient way to import photos, especially if your MacBook has a built-in card reader or you prefer not to connect your camera directly.
3.1. Insert SD Card into Reader
- Locate the SD card slot on your MacBook or your external SD card reader.
- Insert the SD card from your camera into the card reader.
- Ensure the SD card is properly inserted and recognized by your MacBook.
3.2. Open the Photos App
- If the Photos app doesn’t open automatically, launch it from your Applications folder or by searching for it in Spotlight.
- The Photos app should display your SD card under the “Devices” section in the sidebar.
3.3. Select Photos for Import
- Click on your SD card’s name in the Photos app sidebar to view the photos and videos stored on it.
- Photos displays thumbnails of all the images and videos on your SD card.
- To import all new photos, click the “Import All New Items” button in the top right corner.
- To import a selection of photos, click on the thumbnails of the images you want to import, then click the “Import Selected” button.
3.4. Choose Import Destination
Before importing, you can choose where to import the photos:
- Existing Album: Click the “Album” pop-up menu and select an existing album to import the photos into.
- New Album: Click the “Album” pop-up menu, choose “New Album,” enter a name for the new album, and click “OK.”
- Photos Library: Click the “Album” pop-up menu and choose “None” to import the photos directly into the Photos library without specifying an album.
3.5. Import and Eject
- Click the “Import” button to begin the import process.
- Photos will import your selected photos and videos to the chosen destination.
- Once the import is complete, eject the SD card from your MacBook or card reader. To eject the card, drag its icon from the desktop to the Trash or right-click on the icon and select “Eject.”
3.6. Advantages of Using an SD Card Reader
Using an SD card reader offers several advantages:
- Speed: SD card readers often provide faster transfer speeds compared to connecting your camera via USB.
- Convenience: It eliminates the need to connect your camera directly to your MacBook.
- Compatibility: SD card readers are compatible with various types of SD cards, including SD, SDHC, and SDXC.
- Battery Saving: Avoids draining your camera’s battery during the transfer process.
4. Troubleshooting Common Import Issues
While importing photos is typically a smooth process, you might encounter some issues along the way. Here are some common problems and how to troubleshoot them:
4.1. Camera Not Recognized
If your MacBook doesn’t recognize your camera when connected via USB, try the following:
- Check USB Connection: Ensure the USB cable is securely connected to both your camera and your MacBook. Try using a different USB port on your MacBook or a different USB cable.
- Camera Mode: Verify that your camera is in the correct mode for importing photos. Refer to your camera’s manual for instructions.
- Restart Camera and MacBook: Try restarting both your camera and your MacBook.
- Software Updates: Ensure that your MacBook’s operating system and the Photos app are up to date.
- Image Capture: Use the Image Capture app (located in the Applications/Utilities folder) to see if it recognizes your camera. Image Capture is a built-in macOS utility for transferring images from cameras and scanners.
4.2. Photos App Not Opening
If the Photos app fails to open, try these solutions:
- Restart MacBook: Restart your MacBook to resolve any temporary software glitches.
- Update Photos App: Ensure that you have the latest version of the Photos app installed. Check the App Store for updates.
- Repair Photos Library: Hold down the Option and Command keys while launching the Photos app. This will open a repair tool that can fix issues with your Photos library.
- Create a New Photos Library: If repairing the library doesn’t work, create a new Photos library by holding down the Option key while launching the Photos app and selecting “Create New.”
4.3. Slow Import Speed
If the photo import process is slow, consider these tips:
- Use SD Card Reader: An SD card reader typically offers faster transfer speeds compared to a USB connection.
- Close Other Applications: Close any unnecessary applications running on your MacBook to free up system resources.
- Check SD Card Speed: If you’re using an SD card reader, make sure your SD card has a fast read/write speed for quicker transfers.
- Transfer Smaller Batches: Try importing photos in smaller batches instead of transferring everything at once.
4.4. Missing Photos After Import
If some photos appear to be missing after the import process, try these steps:
- Check Import Album: Look for the missing photos in the “Imports” album in the Photos app sidebar.
- Search Photos Library: Use the search bar in the Photos app to search for the missing photos by filename or date.
- Verify SD Card: Reinsert the SD card into your camera or card reader and verify that the missing photos are still on the card.
- Check Hidden Photos: Make sure the photos aren’t hidden. In Photos, go to View > Show Hidden Photo Album.
5. Optimizing Your Photo Import Workflow
To streamline your photo import workflow and ensure a smooth experience, consider these optimization tips:
5.1. Organize Your Photos
Before importing, take some time to plan how you want to organize your photos. Create a folder structure on your MacBook that makes sense for your workflow. For example, you might organize your photos by date, event, or project.
5.2. Rename Your Photos
Renaming your photos after importing can make them easier to find and manage. Use a consistent naming convention that includes the date, location, or event. You can use the Photos app or a third-party file renaming tool to rename your photos in batches.
5.3. Use Keywords and Metadata
Add keywords and metadata to your photos to make them searchable and easier to categorize. The Photos app allows you to add titles, descriptions, keywords, and locations to your photos. This metadata can be invaluable when searching for specific photos in the future.
5.4. Back Up Your Photos
Regularly back up your photo library to protect your precious memories from data loss. Use a combination of local and cloud-based backup solutions to ensure redundancy. Apple’s Time Machine is a great option for local backups, while iCloud Photos, Google Photos, and Dropbox offer cloud-based backup options.
5.5. Explore Photo Management Software
Consider using dedicated photo management software like Adobe Lightroom or Capture One for more advanced organization and editing capabilities. These programs offer powerful features for importing, organizing, editing, and sharing your photos.
6. Advanced Techniques and Tips
For more advanced users, here are some additional techniques and tips to enhance your photo import workflow:
6.1. Using AppleScript for Automation
AppleScript is a scripting language built into macOS that allows you to automate tasks, including photo importing. You can create custom scripts to automatically rename photos, add metadata, and organize them into folders.
6.2. Importing Directly to External Drives
To save space on your MacBook’s internal drive, you can import photos directly to an external hard drive. Simply select the external drive as the destination when importing photos in the Photos app.
6.3. Using Continuity Camera
Continuity Camera is a macOS feature that allows you to take a picture or scan a document using your iPhone or iPad and have the photo or scan appear instantly on your Mac. This can be useful for quickly importing photos from your mobile devices.
6.4. Importing from Film Cameras
If you have photos taken with a film camera, you can import them into Photos by converting them to digital files using a scanner. Use the Image Capture app to scan your film negatives or prints and import them into the Photos app.
7. Understanding iCloud Photos Integration
iCloud Photos seamlessly integrates with the Photos app on your MacBook, allowing you to store your photos and videos in the cloud and access them from all your Apple devices.
7.1. Enabling iCloud Photos
To enable iCloud Photos, go to System Preferences > Apple ID > iCloud and check the “Photos” box. This will upload your photo library to iCloud and sync it across your devices.
7.2. Optimizing Storage
iCloud Photos offers two storage options:
- Download Originals to this Mac: This option downloads and stores the full-resolution versions of your photos on your MacBook.
- Optimize Mac Storage: This option stores smaller, optimized versions of your photos on your MacBook and downloads the full-resolution versions only when you need them.
The “Optimize Mac Storage” option can save significant space on your MacBook’s internal drive, especially if you have a large photo library.
7.3. Sharing with iCloud Shared Photo Library
iCloud Shared Photo Library allows you to share photos and videos with up to five other people. All participants can add, edit, and delete photos in the shared library, making it a great way to collaborate on photo projects or share memories with family and friends.
8. Maintaining Your Photo Library
Regular maintenance is essential to keep your photo library organized, efficient, and protected from data loss.
8.1. Regularly Back Up Your Library
Back up your photo library regularly to prevent data loss due to hardware failure, accidental deletion, or other unforeseen events. Use a combination of local and cloud-based backup solutions for redundancy.
8.2. Organize and Delete Unnecessary Photos
Periodically review your photo library and delete any unnecessary photos, such as duplicates, blurry images, or unwanted shots. This will help keep your library organized and free up storage space.
8.3. Repair Your Library When Needed
If you experience issues with your photo library, such as slow performance or missing photos, use the Photos app’s repair tool to fix any underlying problems. Hold down the Option and Command keys while launching the Photos app to access the repair tool.
8.4. Keep Your Software Up to Date
Ensure that your MacBook’s operating system and the Photos app are always up to date. Software updates often include bug fixes, performance improvements, and new features that can enhance your photo management experience.
9. Exploring Alternative Photo Management Software
While the Photos app is a great option for basic photo management, consider exploring alternative software for more advanced features and capabilities.
9.1. Adobe Lightroom
Adobe Lightroom is a professional-grade photo management and editing software that offers powerful tools for organizing, editing, and sharing your photos. It features advanced editing controls, batch processing capabilities, and seamless integration with Adobe Creative Cloud.
9.2. Capture One
Capture One is another popular photo management and editing software that’s favored by professional photographers for its exceptional image quality and advanced editing tools. It offers a customizable interface, tethered shooting capabilities, and robust color management features.
9.3. Luminar AI
Luminar AI is an AI-powered photo editor that simplifies complex editing tasks and delivers stunning results. It features intelligent editing tools that automatically enhance your photos, as well as a wide range of creative filters and effects.
10. dfphoto.net: Your Resource for Photography Excellence
At dfphoto.net, we’re passionate about helping you elevate your photography skills and creativity. We offer a wealth of resources, including:
- Detailed Tutorials: Learn essential photography techniques, from mastering exposure to composing stunning images.
- Inspirational Galleries: Explore breathtaking photographs from talented artists around the world.
- Equipment Reviews: Stay up-to-date on the latest cameras, lenses, and accessories with our in-depth reviews.
- Community Forum: Connect with fellow photographers, share your work, and get valuable feedback.
Visit dfphoto.net today and discover a world of photography inspiration and knowledge. Address: 1600 St Michael’s Dr, Santa Fe, NM 87505, United States. Phone: +1 (505) 471-6001.
FAQ: Importing Photos from Camera to MacBook
1. Why is my camera not showing up on my MacBook?
Ensure the USB cable is properly connected, the camera is in the correct mode, and both devices are turned on. Try a different USB port or cable.
2. Can I import photos wirelessly from my camera to my MacBook?
Some cameras offer Wi-Fi connectivity for wireless photo transfer. Check your camera’s manual for instructions.
3. How do I delete photos from my camera after importing them to my MacBook?
During the import process, choose the “Delete Items” option when prompted.
4. What is the best way to organize my photos on my MacBook?
Create a folder structure based on date, event, or project. Use keywords and metadata to make photos searchable.
5. Should I shoot in JPEG or RAW format?
RAW format offers more editing flexibility but results in larger file sizes. JPEG is a compressed format that’s suitable for everyday shooting.
6. How do I back up my photo library on my MacBook?
Use a combination of local and cloud-based backup solutions, such as Time Machine and iCloud Photos.
7. What is iCloud Photos, and how does it work?
iCloud Photos stores your photos and videos in the cloud and syncs them across your Apple devices.
8. Can I import photos directly to an external hard drive?
Yes, select the external drive as the destination when importing photos.
9. What are some alternative photo management software options?
Adobe Lightroom, Capture One, and Luminar AI are popular alternatives to the Photos app.
10. How do I import photos from a film camera to my MacBook?
Convert your film negatives or prints to digital files using a scanner and import them into the Photos app.
We hope this comprehensive guide has provided you with the knowledge and confidence to import photos from your camera to your MacBook seamlessly. Remember to visit dfphoto.net for more photography tips, inspiration, and resources to fuel your creative journey.