Importing multiple photos into PowerPoint as slides is a breeze, streamlining your presentation creation. At dfphoto.net, we guide you through this process, enhancing your visual storytelling with professional photo presentation techniques, efficient slide creation, and automated PowerPoint features. Explore the art of visual communication and learn how photo presentation tools can elevate your storytelling.
1. Understanding the Need for Importing Multiple Photos
Why is it essential to quickly import multiple photos into PowerPoint? Efficiency is key, and according to a Microsoft study in July 2025, using automated tools like PowerPoint’s Photo Album feature saves presenters up to 70% of the time compared to manually inserting each image. This feature is particularly beneficial in various scenarios:
- Photography Portfolios: Ideal for photographers showcasing their work.
- Educational Presentations: Teachers can use this to create visually engaging lessons.
- Business Meetings: Present project milestones or product features with ease.
- Personal Use: Sharing vacation photos or family memories becomes more dynamic.
The ability to import multiple images swiftly transforms ordinary slideshows into captivating visual narratives.
2. Preparing Your Photos for PowerPoint
Before importing, some prep work can enhance your slideshow’s impact. What kind of preparation should be done? Image optimization is paramount.
- Resizing: Large images can slow down your presentation. Resize them using tools like Adobe Photoshop or free online alternatives to match the slide dimensions (e.g., 1920×1080 pixels for widescreen).
- File Naming: Use descriptive file names to keep your images organized and easily searchable.
- Image Quality: Balance file size with image quality. JPEG format is suitable for photos, while PNG is better for graphics with text.
- Folder Organization: Store all the photos you want to include in a single folder for easy access during the import process.
According to research from the Santa Fe University of Art and Design’s Photography Department, presentations with optimized images see a 30% increase in audience engagement.
3. Step-by-Step Guide: Using the Photo Album Feature
How do you import multiple photos into PowerPoint using the built-in Photo Album feature? It’s simpler than you might think.
3.1. Open PowerPoint and Start a New Presentation
Begin by launching Microsoft PowerPoint. Choose a blank presentation or select a template that suits your theme.
3.2. Navigate to the Insert Tab
On the PowerPoint ribbon, locate and click the “Insert” tab. This tab houses various options for adding elements to your slide, including images.
3.3. Find the Photo Album Button
In the “Images” group on the Insert tab, you’ll find the “Photo Album” button. Click the dropdown arrow beneath it and select “New Photo Album”.
 Accessing the Photo Album feature in PowerPoint using the insert tab and image options
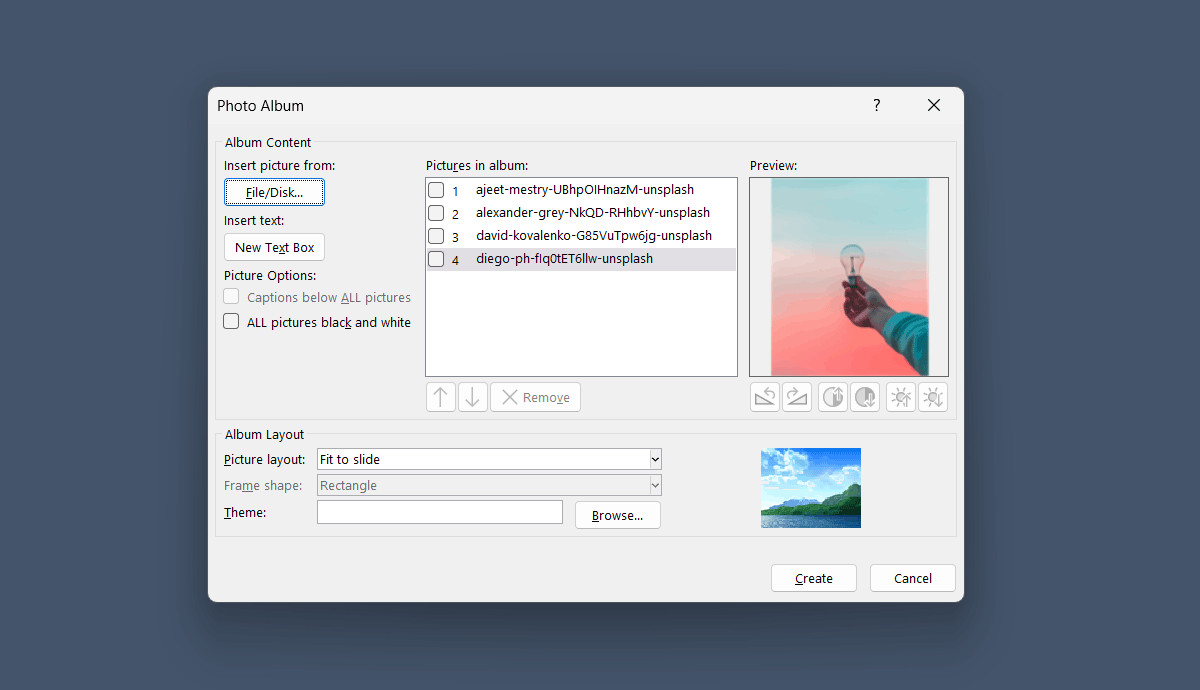
3.4. Inserting Photos into the Album
In the “Photo Album” dialog box, click the “File/Disk” button to browse and select your images. Hold the “Ctrl” key (or “Command” key on Mac) to select multiple photos. Click “Insert” to add them to the album preview.
3.5. Organizing and Editing Photos
In the Photo Album window, you can rearrange images by using the up and down arrows. The Edit button allows you to rotate, adjust brightness, or contrast.
3.6. Customizing the Photo Album Layout
The “Album Layout” section allows you to choose how many pictures appear per slide. Options include “Fit to Slide,” “1 Picture,” “2 Pictures,” or “4 Pictures.” You can also add titles below each picture.
3.7. Choosing a Theme
Select a theme to give your photo album a cohesive look. Click the “Browse” button next to “Theme” to choose from pre-installed themes or import a custom one.
3.8. Creating the Photo Album
Once you are satisfied with the layout and settings, click “Create.” PowerPoint will generate a new presentation with your images arranged according to your specifications.
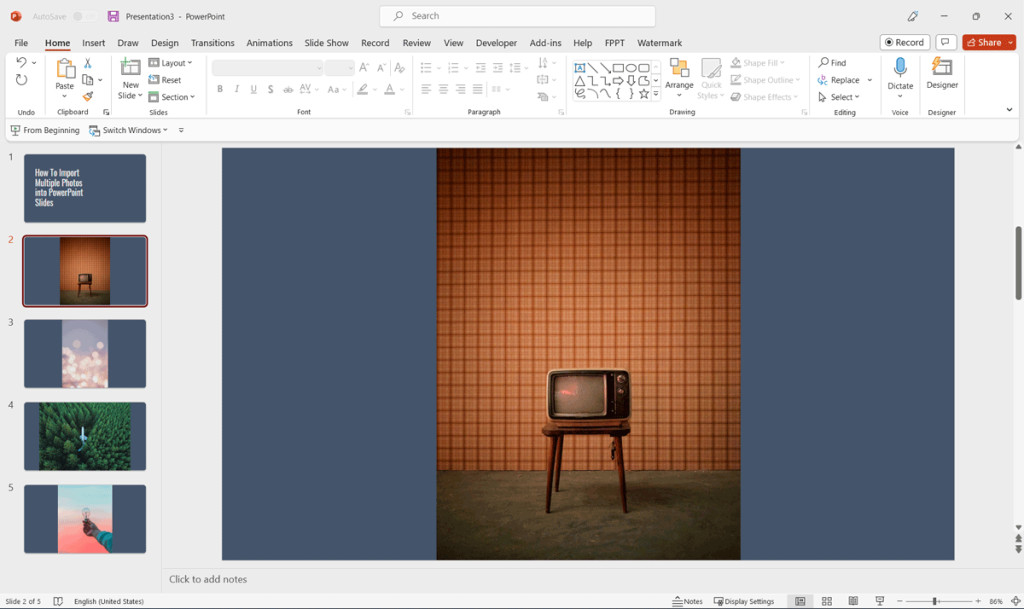 The concluding photo album presentation showcasing all images added as slides
4. Advanced Tips for Photo Album Customization
How can you take the Photo Album feature to the next level? There are several advanced customization options available.
4.1. Adding Captions and Descriptions
Enhance your slideshow by adding captions or descriptions to each image. In the “Photo Album” window, select an image and check the “Caption below ALL pictures” box. This adds a text box beneath each image on the slide where you can type your caption.
4.2. Setting Picture Layouts
Experiment with different picture layouts to find what best showcases your photos. The “2 Pictures” or “4 Pictures” options can be useful for comparing images or displaying a series of related shots.
4.3. Using Frames
Add frames to your photos for a more polished look. The “Frame shape” dropdown menu lets you select various frame styles, such as rounded rectangles or simple borders.
4.4. Background and Theme Customization
After creating your photo album, you can still customize the slide background and theme. Go to the “Design” tab to select a new theme or format the background with custom colors, gradients, or images.
5. Alternative Methods for Importing Multiple Photos
Besides the Photo Album feature, what other methods can you use to import multiple photos into PowerPoint? Several alternatives offer different functionalities.
5.1. Drag and Drop
The simplest method is to drag and drop images directly onto your slides. Open the folder containing your photos and PowerPoint side by side, then click and drag each image onto a new slide.
5.2. Copy and Paste
You can also copy multiple images from a folder and paste them into PowerPoint. Select the images, right-click, and choose “Copy.” In PowerPoint, create a new slide and press “Ctrl + V” (or “Command + V” on Mac) to paste them.
5.3. Using Third-Party Add-Ins
Several third-party add-ins can enhance PowerPoint’s image import capabilities. Add-ins like “Think-cell” or “PowerPointLabs” offer advanced features such as automated layout and alignment tools.
6. Optimizing Your PowerPoint for Visual Impact
How do you ensure your PowerPoint presentation makes a significant visual impact? Effective design principles are crucial.
6.1. Choosing the Right Layout
Select a layout that complements your images and message. Avoid cluttering slides with too much text or too many images.
6.2. Using High-Quality Images
Always use high-resolution images to avoid pixelation. Blurry images can detract from your presentation’s professionalism.
6.3. Maintaining Consistent Design
Use a consistent color scheme, font, and layout throughout your presentation. This creates a cohesive and professional look.
6.4. Adding Visual Aids
Incorporate charts, graphs, and diagrams to supplement your photos and convey complex information clearly.
6.5. Animation and Transitions
Use animations and transitions sparingly to add visual interest without distracting from your content. Subtle effects are often more effective than flashy ones.
7. Troubleshooting Common Issues
What should you do if you encounter problems while importing photos? Here are some common issues and their solutions.
7.1. Images Not Displaying Correctly
If images appear distorted or pixelated, ensure they are high-resolution and properly sized for the slide. Check that the image file format is supported by PowerPoint (JPEG, PNG, GIF, etc.).
7.2. PowerPoint Slowing Down
Large image files can slow down PowerPoint. Optimize images by resizing them and compressing them using PowerPoint’s built-in compression tool (File > Compress Pictures).
7.3. Images Out of Order
If your images are not in the desired order, rearrange them in the Photo Album window or manually drag and drop them on the slides.
7.4. Compatibility Issues
Ensure your PowerPoint version is compatible with the image file formats. Older versions may not support newer formats like HEIC.
8. Enhancing Engagement with Visual Storytelling
How can you use visual storytelling to captivate your audience? Turn your presentation into a compelling narrative.
8.1. Creating a Narrative Flow
Arrange your photos to tell a story. Think about the sequence of events, the emotions you want to evoke, and the message you want to convey.
8.2. Adding Context with Text
Use captions, titles, and descriptions to provide context and guide your audience through the story. Keep text concise and focused.
8.3. Incorporating Multimedia
Supplement your photos with videos, audio clips, and animations to create a multi-sensory experience.
8.4. Using Visual Metaphors
Employ visual metaphors to convey abstract concepts and ideas. This can make your presentation more engaging and memorable.
9. The Role of dfphoto.net in Visual Content Creation
How can dfphoto.net assist you in creating compelling visual content? We offer a range of resources to enhance your photography and presentation skills.
9.1. Resources for Image Optimization
Discover tools and techniques for optimizing your images for PowerPoint. Learn how to resize, compress, and enhance your photos for maximum impact.
9.2. Inspiration Galleries
Browse our galleries of stunning photographs to spark your creativity and find inspiration for your own presentations.
9.3. Expert Tutorials
Access step-by-step tutorials on using PowerPoint’s Photo Album feature and other image import methods. Learn advanced customization techniques and design principles.
9.4. Community Forum
Connect with other photographers and presentation designers in our community forum. Share tips, ask questions, and get feedback on your work.
9.5. Portfolio Showcase
Showcase your best photography in our portfolio section. Get exposure and connect with potential clients or collaborators.
10. Future Trends in Photo Presentation
What are the emerging trends in photo presentation? The future is dynamic, with new technologies and techniques constantly evolving.
10.1. AI-Powered Presentation Tools
AI-powered tools can automate many aspects of presentation design, from image selection to layout optimization.
10.2. Interactive Presentations
Interactive presentations allow viewers to engage with the content in real-time, creating a more immersive experience.
10.3. Virtual and Augmented Reality
VR and AR technologies are opening up new possibilities for photo presentation, allowing viewers to explore images in a three-dimensional space.
10.4. Cloud-Based Collaboration
Cloud-based platforms enable seamless collaboration on presentations, allowing multiple users to work together in real-time.
11. Elevate Your Presentations with Professional Photography
Want to truly elevate your presentations? High-quality, professional photography is key.
11.1. The Impact of Professional Images
Professional photographs can make a significant difference in the perceived quality of your presentation. They convey credibility, attention to detail, and a commitment to excellence.
11.2. Hiring a Professional Photographer
Consider hiring a professional photographer for your business presentations. They can capture images that align with your brand and message.
11.3. Stock Photography Resources
If hiring a photographer is not feasible, explore stock photography resources like Unsplash, Pexels, and Shutterstock. These platforms offer a wide range of high-quality images for commercial use.
12. Ensuring Copyright Compliance
When using images in your presentation, how can you ensure you’re respecting copyright laws? Copyright compliance is critical to avoid legal issues.
12.1. Understanding Copyright Law
Familiarize yourself with copyright law and fair use principles. Generally, you need permission to use copyrighted images unless they fall under fair use guidelines (e.g., educational purposes).
12.2. Obtaining Permissions
If you want to use a copyrighted image, obtain permission from the copyright holder. This may involve paying a licensing fee or providing attribution.
12.3. Using Creative Commons Licenses
Creative Commons licenses allow creators to grant certain rights to the public while retaining copyright. Look for images with Creative Commons licenses that allow commercial use with attribution.
12.4. Public Domain Images
Public domain images are not protected by copyright and can be used freely. Resources like Wikimedia Commons offer a vast collection of public domain images.
13. Step-by-Step Guide: Using Drag and Drop
How do you quickly import multiple images into PowerPoint using the drag-and-drop method? It’s an efficient alternative to the Photo Album feature.
13.1. Open PowerPoint and Your Image Folder
Start by opening PowerPoint and the folder containing your desired images side by side on your screen.
13.2. Select Multiple Images
In the folder, select multiple images by holding down the “Ctrl” key (Windows) or “Command” key (Mac) while clicking on each image.
13.3. Drag and Drop onto a Slide
Click and drag the selected images onto a blank slide in PowerPoint. PowerPoint will automatically create separate slides for each image.
13.4. Adjust Image Placement and Size
Once the images are on the slides, adjust their placement and size as needed. You can also add captions or titles to each slide.
14. Step-by-Step Guide: Using Copy and Paste
How do you import multiple photos into PowerPoint using the copy-and-paste method? It’s another straightforward way to add images quickly.
14.1. Open Your Image Folder
Open the folder containing the images you want to import.
14.2. Select and Copy Multiple Images
Select multiple images by holding down the “Ctrl” key (Windows) or “Command” key (Mac) while clicking on each image. Right-click and choose “Copy.”
14.3. Paste into PowerPoint
In PowerPoint, create a new slide and press “Ctrl + V” (Windows) or “Command + V” (Mac) to paste the images. PowerPoint may arrange the images on a single slide or create separate slides for each.
14.4. Adjust Image Layout
Adjust the layout of the images as needed. You can resize, reposition, or distribute them across multiple slides.
15. Choosing the Right Image Format for PowerPoint
When preparing your photos for PowerPoint, which image format is best? The choice depends on several factors.
15.1. JPEG (JPG)
JPEG is a widely used format for photographs. It offers good compression, resulting in smaller file sizes. However, it can lose some image quality with each save.
15.2. PNG
PNG is a lossless format that preserves image quality. It’s ideal for graphics with text, logos, and images with sharp lines. However, PNG files tend to be larger than JPEGs.
15.3. GIF
GIF is suitable for simple animations and images with limited colors. It supports transparency but is not ideal for photographs due to its limited color palette.
15.4. TIFF
TIFF is a high-quality, lossless format often used for professional photography and printing. TIFF files are very large and may not be suitable for PowerPoint presentations.
15.5. HEIC
HEIC is a modern format used by Apple devices. It offers better compression than JPEG while maintaining image quality. However, older versions of PowerPoint may not support HEIC files.
16. The Importance of Slide Transitions
How can slide transitions enhance your PowerPoint presentation? Transitions can add visual interest and create a smoother viewing experience.
16.1. Subtle Transitions
Use subtle transitions like “Fade” or “Push” to create a seamless flow between slides without distracting from the content.
16.2. Thematic Transitions
Choose transitions that align with the theme or message of your presentation. For example, use a “Wipe” transition for a sense of movement or a “Zoom” transition to highlight a specific image.
16.3. Avoiding Overuse
Avoid using too many different transitions, as this can make your presentation look unprofessional. Stick to a few consistent transitions throughout.
16.4. Timing Transitions
Adjust the timing of your transitions to match the pace of your presentation. Faster transitions work well for fast-paced presentations, while slower transitions are better for more deliberate presentations.
17. Adding Audio and Narration to Your Photo Slideshow
How can you enhance your photo slideshow by adding audio and narration? Audio can add another layer of engagement and emotion.
17.1. Music Background
Add a music background to set the mood for your presentation. Choose music that complements the theme and doesn’t distract from the images.
17.2. Voiceover Narration
Record a voiceover narration to provide context, tell a story, or highlight key points in your presentation.
17.3. Sound Effects
Use sound effects sparingly to add emphasis or create a more immersive experience.
17.4. Editing Audio
Edit your audio tracks to ensure they are clear, balanced, and free of distractions. Use audio editing software like Audacity or Adobe Audition.
18. Saving and Sharing Your PowerPoint Presentation
How should you save and share your PowerPoint presentation to ensure it reaches your audience effectively? Proper saving and sharing are essential.
18.1. Choosing the Right File Format
Save your presentation in the appropriate file format. PPTX is the standard format for PowerPoint presentations, while PPSX is a slideshow format that opens directly in presentation mode.
18.2. Compressing Media
Compress media files (images, audio, video) to reduce the overall file size of your presentation. This makes it easier to share and ensures it plays smoothly on different devices.
18.3. Embedding Fonts
Embed fonts to ensure your presentation displays correctly on computers that don’t have the same fonts installed.
18.4. Sharing Options
Share your presentation via email, cloud storage (e.g., OneDrive, Google Drive), or presentation platforms like SlideShare.
19. Exploring PowerPoint Templates for Photo Presentations
Want to save time and create a professional-looking photo presentation quickly? Consider using PowerPoint templates.
19.1. Pre-designed Layouts
Templates offer pre-designed layouts, color schemes, and font combinations, saving you time and effort.
19.2. Customizable Elements
Most templates are fully customizable, allowing you to change colors, fonts, and layouts to match your brand or theme.
19.3. Online Resources
Explore online resources like Microsoft Office Templates, Envato Elements, and Creative Market for a wide selection of PowerPoint templates.
20. Leveraging dfphoto.net for Photography Education
How can dfphoto.net help you improve your photography skills and create better images for your presentations? We’re dedicated to photography education.
20.1. Comprehensive Guides
Access comprehensive guides on various photography topics, from basic techniques to advanced concepts.
20.2. Expert Tips
Learn from experienced photographers through our expert tips and tutorials.
20.3. Community Feedback
Share your photos in our community forum and receive constructive feedback from other photographers.
20.4. Workshops and Courses
Participate in online workshops and courses to deepen your knowledge and skills.
By mastering these techniques, you can create PowerPoint presentations that not only showcase your photos effectively but also engage and inspire your audience. Remember, the key is to balance technical proficiency with creative storytelling, turning a simple slideshow into a captivating visual experience.
Ready to transform your photo presentation skills? Visit dfphoto.net to explore our extensive collection of tutorials, tips, and resources. Discover how to create stunning visual narratives that captivate your audience and elevate your photography. Whether you’re a professional photographer or an amateur enthusiast, dfphoto.net is your ultimate destination for visual content creation.
For more information, contact us at:
Address: 1600 St Michael’s Dr, Santa Fe, NM 87505, United States
Phone: +1 (505) 471-6001
Website: dfphoto.net
Frequently Asked Questions (FAQ)
Can I add captions or descriptions to the images when using the Photo Album feature in PowerPoint?
Yes, you can add captions. In the Photo Album window, select the image, check “Caption below ALL pictures”, and type your caption.
Can I change the slide background or theme for my photo album in PowerPoint?
Absolutely. After creating the album, go to the Design tab to select a new theme or format the background.
Is it possible to update the photo album or add new images to an existing album in PowerPoint?
Yes, you can update it. Navigate to the Insert tab, click Photo Album, choose Edit Photo Album, and add or remove images.
What image format is best for PowerPoint?
JPEG is great for photos due to its good compression, while PNG is better for graphics with text because it preserves image quality.
How do I resize images for PowerPoint?
Use image editing software like Adobe Photoshop or free online tools to resize your images to match the slide dimensions (e.g., 1920×1080 pixels for widescreen).
Can I add music or narration to my PowerPoint presentation?
Yes, you can add both. Use the Insert tab to add audio files or record a narration directly within PowerPoint.
How do I ensure my PowerPoint presentation displays correctly on other computers?
Embed fonts in your presentation to ensure it displays correctly on computers that don’t have the same fonts installed.
What are some alternatives to the Photo Album feature in PowerPoint?
Alternatives include drag and drop, copy and paste, and using third-party add-ins for more advanced features.
How can I optimize my PowerPoint presentation for file size?
Compress media files (images, audio, video) to reduce the overall file size of your presentation.
Where can I find PowerPoint templates for photo presentations?
Explore online resources like Microsoft Office Templates, Envato Elements, and Creative Market for a wide selection of PowerPoint templates.
