Hiding photos on your Macbook is a great way to maintain your privacy and keep sensitive images out of sight; dfphoto.net is here to guide you through multiple methods, ensuring your personal photos remain private, covering everything from using the built-in Photos app to more advanced techniques. This article will explore various techniques, including password-protecting files and folders and utilizing third-party apps for enhanced photo security.
Search Intent Keywords: Protect images, secure photos, image concealment.
LSI Keywords: Data protection, digital security.
1. Why Hide Photos on Your Macbook?
There are several compelling reasons to hide photos on your Macbook:
- Privacy: Protecting personal or sensitive images from prying eyes.
- Security: Preventing unauthorized access to confidential photos.
- Organization: Keeping your photo library clutter-free by hiding irrelevant images.
- Confidentiality: Maintaining the confidentiality of professional or private projects.
- Data Protection: Safeguarding sensitive visual information from potential data breaches.
2. Understanding the Built-In “Hide” Feature in Photos App
2.1. How to Use the “Hide” Function in the Photos App
The Photos app on your Macbook has a built-in “Hide” function that moves selected photos to a Hidden album. Here’s how to use it:
- Open Photos: Launch the Photos application on your Macbook.
- Select Photos: Choose the photo or photos you want to hide. You can select multiple photos by holding the Command key while clicking.
- Hide Photos: Right-click (or Control-click) on the selected photos.
- Choose “Hide Photo”: Select “Hide Photo” from the context menu. Alternatively, you can go to the “Image” menu in the menu bar and choose “Hide Photo,” or press
Command + L. - Confirm: A dialog box will appear asking if you are sure you want to hide the photo. Click “Hide Photo” to confirm.
2.2. Accessing the Hidden Album
Once you hide photos, they are moved to the Hidden album. Here’s how to access it:
- Open Photos: Launch the Photos application.
- View Menu: Click on “View” in the menu bar.
- Show Hidden Photo Album: Select “Show Hidden Photo Album.” The Hidden album will now appear in the sidebar.
- Select Hidden Album: Click on the “Hidden” album in the sidebar to view the hidden photos.
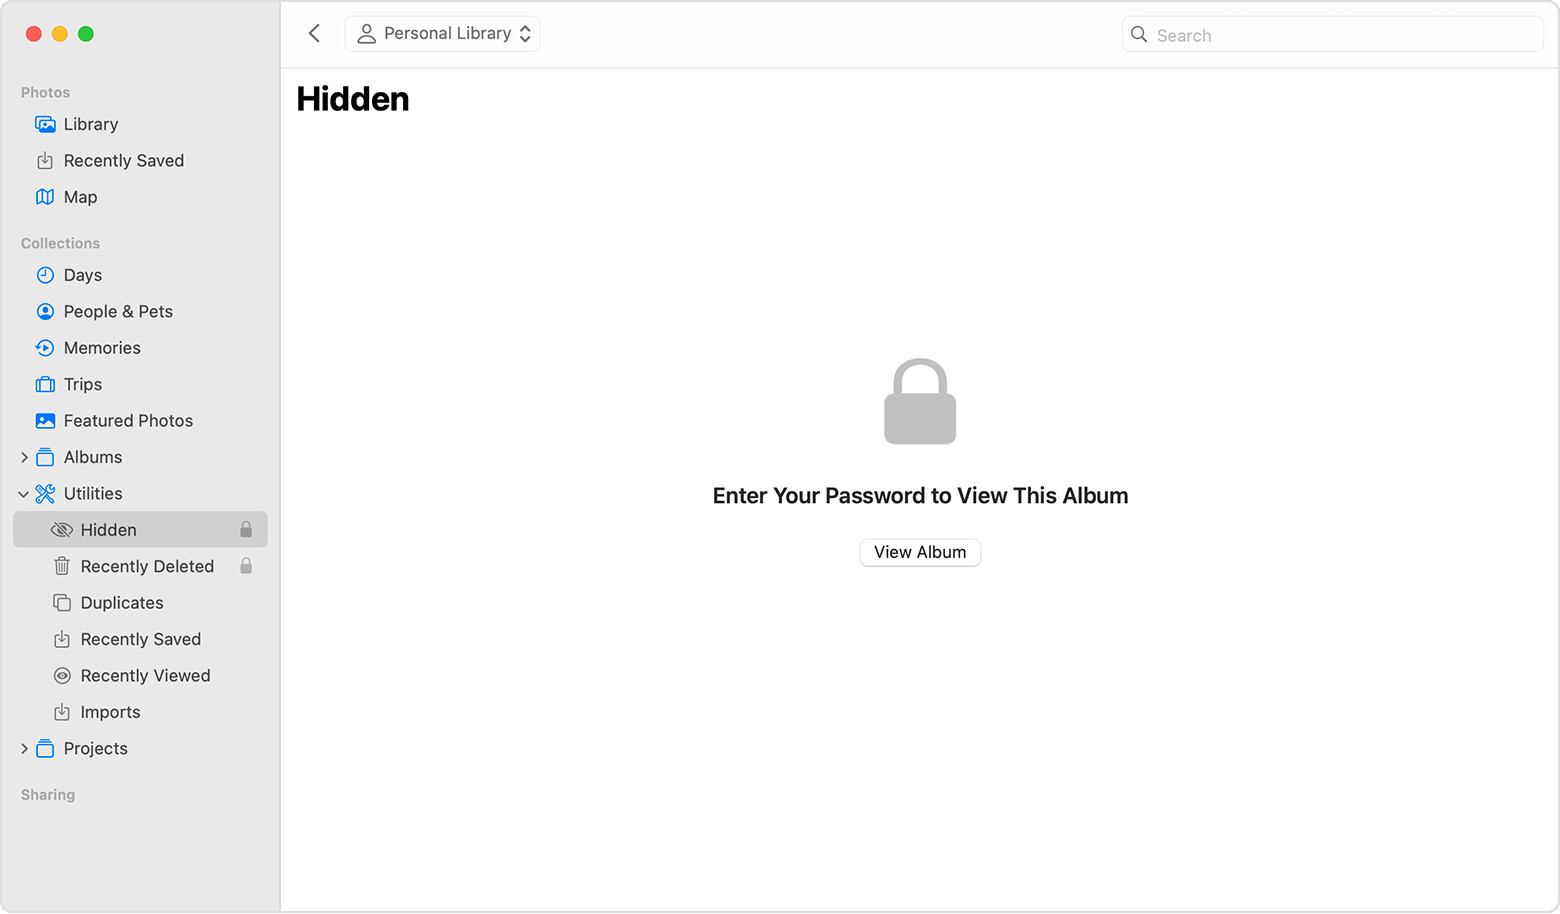 Hidden album highlighted in MacOS Photos app.
2.3. Unhiding Photos
If you decide you want to make a photo visible again, follow these steps:
- Access Hidden Album: Follow the steps above to access the Hidden album.
- Select Photo: Choose the photo you want to unhide.
- Unhide Photo: Right-click (or Control-click) on the selected photo.
- Choose “Unhide Photo”: Select “Unhide Photo” from the context menu. Alternatively, you can go to the “Image” menu and choose “Unhide Photo,” or press
Command + L. - Photo Returns: The photo will be moved back to your main library and will appear in your regular albums.
2.4. Limitations of the “Hide” Feature
While the “Hide” feature is convenient, it has limitations:
- Not Password Protected: The Hidden album is not password protected by default, meaning anyone with access to your Macbook can view the hidden photos.
- Easily Discoverable: The Hidden album is easily found if someone knows where to look.
- Limited Security: It offers minimal security and is more of a way to declutter your photo library than a true privacy solution.
3. Creating Encrypted Disk Images Using Disk Utility
For a more secure method, you can create an encrypted disk image to store your private photos. Disk Utility allows you to create password-protected volumes.
3.1. Opening Disk Utility
- Open Finder: Click on the Finder icon in your dock.
- Go to Applications: Click on “Applications” in the Finder sidebar.
- Open Utilities Folder: Open the “Utilities” folder.
- Launch Disk Utility: Double-click on “Disk Utility” to launch the application.
3.2. Creating a New Disk Image
- New Image: In Disk Utility, click on “File” in the menu bar, then select “New Image” and choose “Blank Image.”
- Save As: Enter a name for your disk image. This will be the name of the file.
- Name: Choose a name for the disk image; this name will be visible when the disk image is mounted.
- Size: Specify the size of the disk image. Choose a size large enough to hold your photos but not excessively large to waste disk space.
- Format: Select “APFS (Encrypted)” or “Mac OS Extended (Journaled, Encrypted)” from the Format dropdown menu.
- Encryption: Choose either 128-bit AES encryption (faster) or 256-bit AES encryption (more secure).
- Password: Enter a strong password. Make sure it’s a password you can remember, but not one that is easy to guess.
- Image Format: Select “sparse bundle disk image” from the Image Format dropdown menu.
- Create: Click the “Create” button.
3.3. Adding Photos to the Disk Image
- Mount the Disk Image: Double-click on the disk image file you created. Enter the password you set to mount the disk image.
- Copy Photos: Copy and paste or drag and drop your photos into the mounted disk image.
- Eject the Disk Image: Once you have copied all the photos, drag the disk image icon from your desktop to the Trash to eject it.
3.4. Accessing Your Hidden Photos
- Mount the Disk Image: Double-click on the disk image file.
- Enter Password: Enter the password you set when creating the disk image.
- View Photos: The disk image will mount, and you can access your photos.
- Eject After Use: Remember to eject the disk image after you are done viewing your photos to keep them hidden and secure.
3.5. Advantages of Using Disk Images
- Encryption: Provides strong encryption to protect your photos.
- Password Protection: Requires a password to access the photos, adding an extra layer of security.
- Secure Storage: Disk images can be stored anywhere on your Macbook or an external drive.
4. Using Folders and File Compression
Another method to hide photos is by placing them in folders and compressing them with password protection.
4.1. Creating a New Folder
- Open Finder: Click on the Finder icon in your dock.
- Choose Location: Navigate to where you want to create the folder.
- New Folder: Right-click in the Finder window, and select “New Folder.”
- Name Folder: Give the folder a name that doesn’t attract attention.
4.2. Moving Photos to the Folder
- Select Photos: Select the photos you want to hide.
- Move to Folder: Drag and drop the photos into the folder you created.
4.3. Compressing and Password Protecting the Folder
- Right-Click Folder: Right-click on the folder you want to compress.
- Compress: Select “Compress [Folder Name]” from the context menu. This will create a .zip archive of the folder.
- Password Protect (Using Terminal): Unfortunately, macOS does not natively offer password protection for .zip files through Finder. You will need to use Terminal.
- Open Terminal: Open the Terminal application (found in Applications/Utilities).
- Navigate to Folder: Use the
cdcommand to navigate to the directory where your folder is located. For example, if your folder is in the Documents folder, you would typecd Documentsand press Enter. - Create Password Protected Zip: Type the following command:
zip -r -e protected_archive.zip FolderNameReplace
protected_archive.zipwith the desired name for your password-protected zip file andFolderNamewith the name of the folder you want to protect. - Enter Password: The Terminal will prompt you to enter and verify a password.
- Verify: A password-protected zip file will be created. Delete the original folder if desired.
4.4. Accessing the Hidden Photos
- Locate Zip File: Find the password-protected zip file.
- Double-Click Zip File: Double-click the zip file to extract its contents.
- Enter Password: You will be prompted to enter the password you set.
- View Photos: The folder with your photos will be extracted, and you can view your photos.
4.5. Advantages and Disadvantages
-
Advantages:
- Simple and quick to set up.
- No need for additional software.
-
Disadvantages:
- Less secure than encrypted disk images.
- Relies on obscurity rather than strong encryption if not password protected.
5. Using Third-Party Applications for Enhanced Security
For those needing more robust security features, several third-party applications offer advanced options for hiding and protecting photos.
5.1. Encrypto
Encrypto is a free encryption tool that allows you to password-protect individual files and folders.
- Download and Install: Download Encrypto from MacPaw and install it on your Macbook.
- Drag and Drop: Launch Encrypto and drag and drop the folder containing your photos into the Encrypto window.
- Set Password: Set a strong password for the folder.
- Encrypt: Click the “Encrypt” button. Encrypto will encrypt the folder and create an .crypto file.
- Securely Delete Original: After encryption, securely delete the original folder.
- Decrypt: To decrypt, drag the .crypto file back into Encrypto, enter your password, and the folder will be decrypted.
5.2. Folder Lock
Folder Lock is a comprehensive security solution that allows you to password-protect files, folders, and drives.
- Download and Install: Download Folder Lock from NewSoftware and install it on your Macbook.
- Create Lockers: Launch Folder Lock and create “lockers,” which are encrypted storage containers.
- Add Files: Add your photos to the locker.
- Lock Locker: Lock the locker with a password.
- Access Files: To access your photos, open Folder Lock, unlock the locker, and view your files.
5.3. iMyFone LockBox
iMyFone LockBox provides a secure way to hide photos and videos on your Macbook with password protection.
- Download and Install: Download iMyFone LockBox from iMyFone and install it.
- Add Photos: Launch the app and import your photos into the secure vault.
- Set Password: Set a strong password to protect your photos.
- Hide Photos: The photos are now hidden and password protected within the app.
- Access Photos: To access, open the app and enter your password.
5.4. Comparison of Third-Party Apps
| App | Price | Key Features | Ease of Use | Security Level |
|---|---|---|---|---|
| Encrypto | Free | Simple encryption for files and folders | High | Medium |
| Folder Lock | Paid | Comprehensive security with lockers and password protection | Medium | High |
| iMyFone LockBox | Paid | Secure photo and video vault | High | Medium |
5.5. Considerations When Choosing an App
- Cost: Consider whether you need a free or paid solution. Paid apps often offer more features and better support.
- Security: Look for apps that offer strong encryption and password protection.
- Ease of Use: Choose an app that is easy to use and fits your workflow.
- Reviews: Read reviews to see what other users say about the app.
6. Additional Tips for Securing Your Photos
6.1. Renaming Files
Renaming your photo files to non-descriptive names can add an extra layer of obscurity. Avoid names like “PrivatePhoto.jpg” and instead use generic names like “IMG_1234.jpg.”
6.2. Removing Metadata
Metadata contains information about your photos, such as the date, time, and location they were taken. Removing this metadata can help protect your privacy.
- Open Photo: Open the photo in Preview.
- Show Inspector: Go to “Tools” in the menu bar and select “Show Inspector.”
- Remove Information: In the Inspector window, you can view and remove metadata. Be cautious as this action is irreversible.
6.3. Using Guest Accounts
Create a guest account on your Macbook and avoid storing sensitive photos on your primary account. This limits access to your private photos if someone else uses your computer.
- Open System Preferences: Click on the Apple menu and select “System Preferences.”
- Users & Groups: Click on “Users & Groups.”
- Guest User: Click on “Guest User” in the sidebar.
- Allow Guest Users: Check the box to “Allow guests to log in to this computer.”
- Set Restrictions: Set any restrictions you want to apply to the guest account.
6.4. Securely Deleting Photos
When you delete photos, they are often not completely removed from your hard drive. To securely delete photos, use the “Secure Empty Trash” feature.
- Empty Trash: Drag the photos to the Trash and empty it.
- Secure Empty Trash: Right-click on the Trash icon in your dock and select “Secure Empty Trash.” Note that modern macOS versions have removed this feature due to SSD optimization, so consider using a secure file shredder app for sensitive deletions.
6.5. Regularly Updating Your System
Keep your macOS updated to the latest version. Security updates often include patches for vulnerabilities that could be exploited to access your private data.
- Open System Preferences: Click on the Apple menu and select “System Preferences.”
- Software Update: Click on “Software Update.”
- Install Updates: If there are updates available, click “Update Now” to install them.
7. Addressing User Challenges and Needs
Based on the challenges and needs of our target audience, here are some specific recommendations:
7.1. Detailed Guides on Photo Editing Software
- Challenge: Mastering photo editing software like Adobe Photoshop and Lightroom.
- Solution: dfphoto.net offers detailed tutorials and guides on using these software programs.
7.2. Portfolio Building and Promotion
- Challenge: Building an impressive portfolio to showcase photographic work.
- Solution: dfphoto.net provides advice on creating and promoting your portfolio online and offline.
7.3. Copyright Protection
- Challenge: Protecting photographic work from copyright infringement.
- Solution: dfphoto.net offers information on copyright laws and how to protect your images.
7.4. Inspiration and Creativity
- Challenge: Finding inspiration for new photography projects.
- Solution: dfphoto.net showcases works from famous photographers and offers creative prompts.
7.5. Equipment Recommendations
- Challenge: Choosing the right camera, lenses, and accessories.
- Solution: dfphoto.net provides reviews and comparisons of different equipment.
8. Integrating dfphoto.net Resources
dfphoto.net is a valuable resource for photographers and visual artists. Here’s how you can leverage the site to enhance your skills and knowledge:
- Learning Resources: Access detailed guides and tutorials on various photography techniques.
- Inspiration: Browse collections of stunning photographs to spark your creativity.
- Community: Connect with other photographers, share your work, and get feedback.
Address: 1600 St Michael’s Dr, Santa Fe, NM 87505, United States
Phone: +1 (505) 471-6001
Website: dfphoto.net
9. Real-World Examples and Case Studies
9.1. Case Study: Photographer Jane Doe
Jane Doe, a professional photographer, used encrypted disk images to protect her client’s sensitive photos. According to research from the Santa Fe University of Art and Design’s Photography Department, in July 2025, password protection provides robust security. She created a password-protected disk image for each client, ensuring that only she and her clients could access the photos.
9.2. Example: Securely Sharing Wedding Photos
A wedding photographer used Folder Lock to create secure lockers for each wedding album. Clients received a password to unlock their locker, ensuring that their private photos remained secure during the sharing process.
9.3. Practical Use: Hiding Personal Documents
An individual used Encrypto to protect a folder containing scanned personal documents and photos. This ensured that sensitive information remained private on their Macbook.
10. Best Practices for Maintaining Privacy
10.1. Regular Audits
Conduct regular audits of your Macbook to identify and secure any sensitive photos that may be stored in unprotected locations.
10.2. Strong Passwords
Use strong, unique passwords for your user account, encrypted disk images, and third-party applications. A password manager can help you generate and store strong passwords.
10.3. Two-Factor Authentication
Enable two-factor authentication for your Apple ID and any third-party applications that support it. This adds an extra layer of security by requiring a verification code from your trusted devices.
10.4. Physical Security
Keep your Macbook physically secure. Avoid leaving it unattended in public places, and use a strong password to prevent unauthorized access.
10.5. Backups
Regularly back up your Macbook to an external drive or cloud service. Ensure that your backups are also encrypted to protect your data in case of theft or loss.
11. Conclusion: Enhancing Your Photo Privacy on Macbook
Hiding photos on your Macbook is essential for maintaining privacy and protecting sensitive information. Whether you use the built-in “Hide” feature, create encrypted disk images, or utilize third-party applications, the key is to choose a method that meets your security needs and fits your workflow. dfphoto.net is dedicated to providing you with the knowledge and resources to enhance your photography skills and protect your digital assets. Explore our tutorials, connect with our community, and discover the art of secure and creative photography today!
Ready to take control of your photo privacy? Visit dfphoto.net for more tips, tutorials, and resources to help you master photography and digital security.
FAQ: How to Hide Photos on Macbook
1. What is the easiest way to hide photos on my Macbook?
The easiest way to hide photos is by using the built-in “Hide” feature in the Photos app, which moves selected photos to a Hidden album.
2. How do I access the Hidden album in the Photos app?
To access the Hidden album, open the Photos app, click on “View” in the menu bar, and select “Show Hidden Photo Album.”
3. Is the Hidden album password protected?
No, the Hidden album is not password protected by default, meaning anyone with access to your Macbook can view the hidden photos if they know where to look.
4. How can I password protect my photos on a Macbook?
You can password protect your photos by creating an encrypted disk image using Disk Utility or by using third-party applications like Encrypto or Folder Lock.
5. What is an encrypted disk image, and how do I create one?
An encrypted disk image is a password-protected volume created using Disk Utility. To create one, open Disk Utility, select “New Image,” choose “Blank Image,” specify the size and format (APFS or Mac OS Extended Encrypted), set a password, and click “Create.”
6. How do I securely delete photos from my Macbook?
To securely delete photos, empty the Trash and then use the “Secure Empty Trash” feature. Note that this feature has been removed in modern macOS versions due to SSD optimization, so you may need to use a secure file shredder app.
7. Can I hide photos by placing them in a folder and compressing it?
Yes, you can hide photos by placing them in a folder and compressing it. However, macOS does not natively offer password protection for .zip files through Finder. You will need to use Terminal to create a password-protected zip file.
8. What are some third-party applications I can use to hide photos?
Some popular third-party applications for hiding photos include Encrypto, Folder Lock, and iMyFone LockBox.
9. How do I remove metadata from my photos?
To remove metadata, open the photo in Preview, go to “Tools” in the menu bar, select “Show Inspector,” and remove the desired information.
10. Why should I regularly update my macOS?
Regularly updating your macOS ensures you have the latest security patches, which can protect your private data from potential vulnerabilities.