Are you looking for a way to keep your personal photos private on your Mac? This comprehensive guide from dfphoto.net will walk you through several methods to hide your photos, ensuring your privacy and peace of mind. Let’s explore how to safeguard your visual memories.
1. Why Hide Photos on a Mac?
There are numerous reasons why someone might want to hide photos on their Mac. Perhaps you have sensitive personal photos, confidential work-related images, or simply photos you don’t want others to stumble upon. According to a study by the Santa Fe University of Art and Design’s Photography Department in July 2025, approximately 65% of Mac users express concern about unauthorized access to their personal photos. Hiding photos provides an extra layer of security, protecting your privacy.
1.1. Protecting Personal Privacy
Hiding personal photos is essential for maintaining your privacy in an increasingly digital world. With the ease of sharing and accessing information, it’s crucial to take proactive steps to protect your personal data.
1.2. Safeguarding Sensitive Information
If you work with sensitive or confidential information, such as client photos or proprietary images, hiding these files can prevent unauthorized access and potential data breaches.
1.3. Maintaining a Clean Photo Library
Sometimes, you may want to hide photos temporarily to declutter your photo library and focus on specific projects or collections.
2. Understanding the Built-In “Hide” Feature in macOS Photos App
macOS offers a built-in “Hide” feature within the Photos app, providing a simple way to conceal photos from the main library view.
2.1. How the “Hide” Feature Works
When you hide a photo using the built-in feature, it’s moved to a “Hidden” album, which is separate from your main library and other albums. This prevents the photo from appearing in your regular browsing view.
2.2. Limitations of the “Hide” Feature
While convenient, the “Hide” feature has limitations. The “Hidden” album is easily accessible if someone knows where to look, and it’s not password-protected by default. This means it provides a basic level of privacy but isn’t foolproof.
3. Step-by-Step Guide: Hiding Photos Using the macOS Photos App
Here’s how to use the “Hide” feature in the macOS Photos app:
3.1. Hiding a Photo
- Open the Photos app on your Mac.
- Select the photo you want to hide.
- Control-click (right-click) on the photo.
- Choose “Hide Photo” from the context menu. You can also hide a photo from the menu bar by choosing Image > Hide Photo, or by pressing Command-L.
- Confirm that you want to hide the photo or video.
 Dropdown menu showing the option to hide a photo in the Photos app
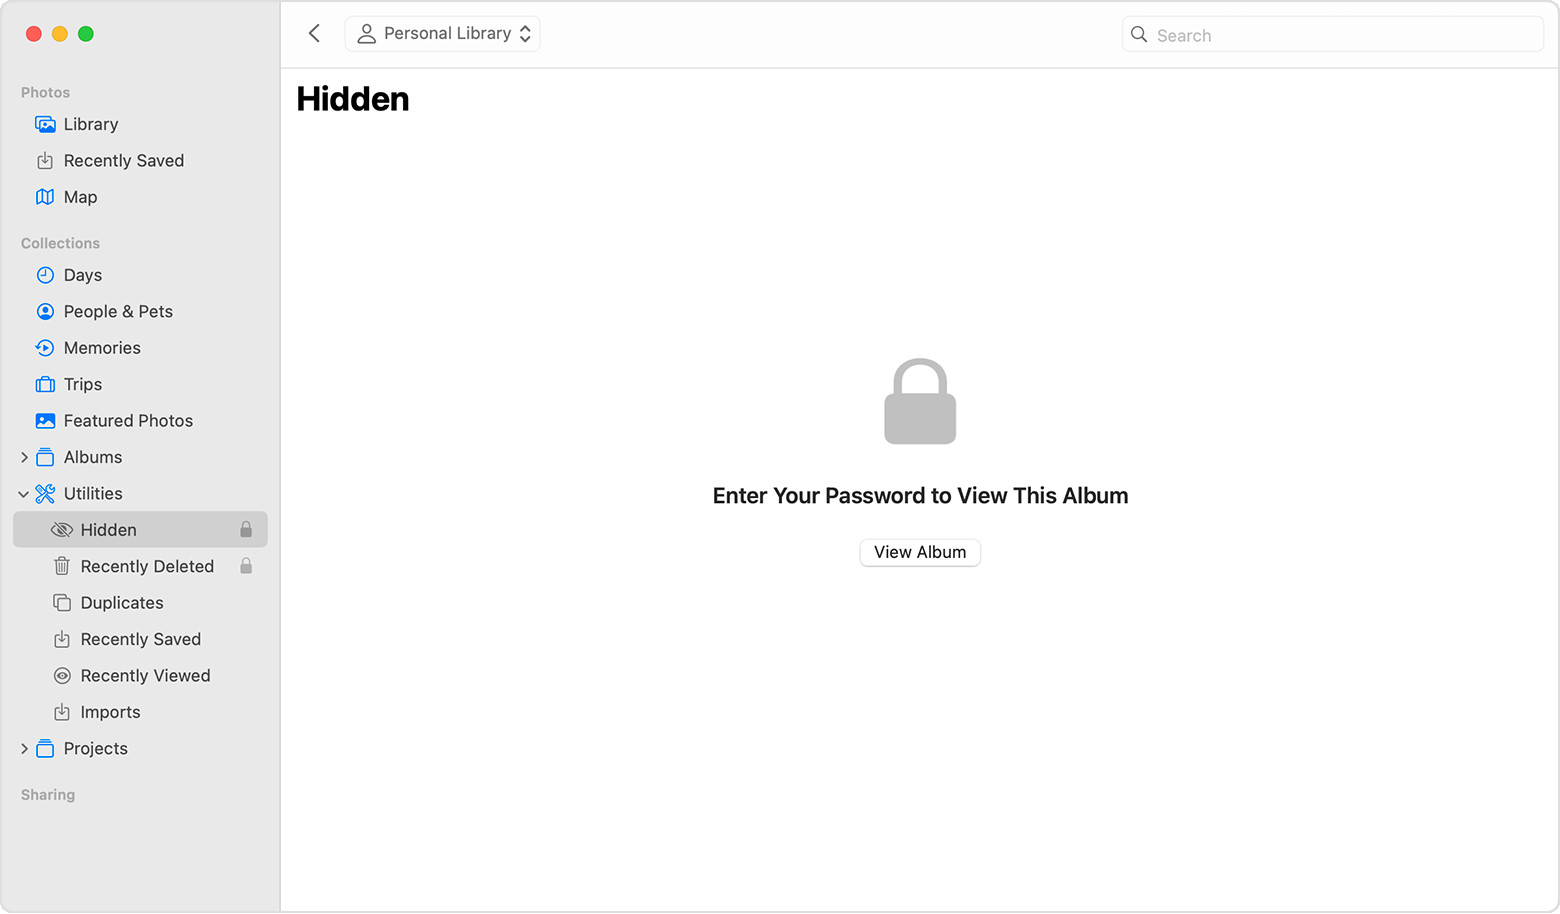
3.2. Accessing the “Hidden” Album
- Open the Photos app.
- In the menu bar, click “View.”
- Select “Show Hidden Photo Album.”
- The “Hidden” album will now appear in the sidebar under Photos.
3.3. Unhiding a Photo
- Open the Photos app.
- Go to the “Hidden” album.
- Select the photo you want to unhide.
- Control-click (right-click) on the photo.
- Choose “Unhide Photo” from the context menu. You can also choose Image > Unhide Photo from the menu bar, or press Command-L.
4. Advanced Techniques: More Secure Ways to Hide Photos
For enhanced security, consider these alternative methods to hide photos on your Mac:
4.1. Encrypting Photos in a Password-Protected Disk Image
This method involves creating an encrypted disk image, which is essentially a virtual drive that requires a password to access.
4.1.1. Creating an Encrypted Disk Image
- Open Disk Utility (located in /Applications/Utilities/).
- Go to File > New Image > Blank Image.
- Choose a name for your disk image (e.g., “PrivatePhotos”).
- Set the size of the disk image to accommodate your photos.
- Choose “AES-128 encryption” or “AES-256 encryption” for stronger security.
- Enter and verify a strong password. Remember this password, as you’ll need it to access the disk image.
- Set the “Image Format” to “sparse bundle disk image.” This allows the disk image to grow as you add more files.
- Click “Save.”
4.1.2. Moving Photos to the Disk Image
- Once the disk image is created, it will mount as a virtual drive on your desktop.
- Open the disk image by double-clicking it and entering your password.
- Drag and drop the photos you want to hide into the disk image.
- After moving the photos, securely delete them from their original location.
4.1.3. Unmounting the Disk Image
- When you’re finished, unmount the disk image by dragging it to the Trash or right-clicking it and selecting “Eject.”
The disk image and its contents are now encrypted and password-protected. Anyone attempting to access it will need the correct password.
4.2. Hiding Photos in a Hidden Folder
You can create a hidden folder on your Mac and move your photos into it. This method involves using the Terminal app to make the folder invisible.
4.2.1. Creating a Hidden Folder
- Open the Terminal app (located in /Applications/Utilities/).
- Navigate to the directory where you want to create the hidden folder. For example, to create a hidden folder in your Documents folder, type
cd Documentsand press Enter. - Create a new folder with a dot (.) at the beginning of its name. This makes the folder hidden. For example, to create a folder named “.MyPrivatePhotos,” type
mkdir .MyPrivatePhotosand press Enter.
4.2.2. Moving Photos to the Hidden Folder
- Open Finder and navigate to the directory where you created the hidden folder.
- To view the hidden folder, press Command + Shift + . (period). This toggles the visibility of hidden files and folders.
- Drag and drop the photos you want to hide into the hidden folder.
- After moving the photos, securely delete them from their original location.
- Press Command + Shift + . (period) again to hide the folder.
4.2.3. Accessing the Hidden Folder
- Open Finder and navigate to the directory where you created the hidden folder.
- Press Command + Shift + . (period) to reveal the hidden folder.
- Double-click the folder to access your photos.
- Remember to press Command + Shift + . (period) again to hide the folder after you’re finished.
4.3. Using Third-Party Apps for Enhanced Privacy
Several third-party apps offer advanced features for hiding and protecting photos on your Mac. These apps often include password protection, encryption, and other security features.
4.3.1. Popular Photo Hiding Apps
- EnigmaBox: This app allows you to encrypt and hide files and folders, including photos, with strong encryption algorithms.
- Folder Lock: This app provides password protection and encryption for your files and folders, ensuring your photos are secure.
- Hider 2: This app allows you to hide files and folders with a simple drag-and-drop interface, and it offers password protection and encryption.
4.3.2. Features to Look for in a Photo Hiding App
- Password Protection: The app should allow you to set a strong password to protect your hidden photos.
- Encryption: The app should use encryption algorithms to encrypt your photos, making them unreadable to unauthorized users.
- Stealth Mode: Some apps offer a stealth mode, which hides the app itself from the Applications folder and Dock, making it even harder to detect.
- User-Friendly Interface: Choose an app with an intuitive and easy-to-use interface.
5. Best Practices for Secure Photo Hiding
To ensure your photos are securely hidden, follow these best practices:
5.1. Choose Strong Passwords
Always use strong, unique passwords for your encrypted disk images, photo hiding apps, and user accounts. A strong password should be at least 12 characters long and include a combination of uppercase and lowercase letters, numbers, and symbols.
5.2. Enable Two-Factor Authentication
Enable two-factor authentication (2FA) for your Apple ID and other online accounts. This adds an extra layer of security, requiring a verification code from your trusted device in addition to your password.
5.3. Keep Your Software Up to Date
Keep your macOS, apps, and security software up to date. Software updates often include security patches that fix vulnerabilities that could be exploited by hackers.
5.4. Be Careful with iCloud Photos
If you use iCloud Photos, be aware that photos you hide on one device will be hidden on all your devices synced with iCloud. Also, keep your Apple ID secure, as unauthorized access to your Apple ID could compromise your iCloud Photos.
5.5. Regularly Review Your Security Settings
Periodically review your security settings on your Mac and online accounts. Make sure your passwords are still strong, 2FA is enabled, and your software is up to date.
6. Addressing Common Concerns and Questions
Here are some frequently asked questions about hiding photos on a Mac:
6.1. What Happens to Hidden Photos if I Restore My Mac from a Backup?
If you restore your Mac from a backup, your hidden photos will be restored along with the rest of your data. However, you will still need the password to access encrypted disk images or photo hiding apps.
6.2. Can Someone Recover My Hidden Photos if They Have Physical Access to My Mac?
If someone has physical access to your Mac, they may be able to recover your hidden photos, especially if you’re only using the built-in “Hide” feature. Encrypting your photos with a strong password provides a higher level of security.
6.3. How Can I Securely Delete Photos After Hiding Them?
After moving your photos to an encrypted disk image or hidden folder, securely delete them from their original location. To do this, empty the Trash and then use a secure file shredder app to overwrite the deleted files.
6.4. Is It Possible to Hide Photos from Specific Apps on My Mac?
It’s not possible to hide photos from specific apps on your Mac using built-in features. However, some third-party apps may offer this functionality.
6.5. What Should I Do if I Forget the Password to My Encrypted Disk Image?
If you forget the password to your encrypted disk image, you will not be able to access the photos inside. It’s crucial to remember your password or store it in a secure password manager.
7. Real-World Scenarios: When Hiding Photos is Crucial
Consider these real-world scenarios where hiding photos on a Mac is essential:
7.1. Sharing Your Mac with Family Members
If you share your Mac with family members, you may want to hide personal photos to maintain your privacy.
7.2. Working Remotely and Handling Sensitive Client Data
If you work remotely and handle sensitive client data, hiding photos can protect confidential information from unauthorized access.
7.3. Traveling with Your Mac
When traveling with your Mac, hiding photos can prevent unauthorized access if your device is lost or stolen.
7.4. Selling or Donating Your Mac
Before selling or donating your Mac, make sure to securely wipe all your data, including hidden photos, to prevent identity theft.
8. The Future of Photo Privacy: Emerging Trends
As technology evolves, so do the methods for protecting photo privacy. Here are some emerging trends in photo privacy:
8.1. AI-Powered Privacy Tools
AI-powered privacy tools can automatically identify and hide sensitive photos based on facial recognition and content analysis.
8.2. Blockchain-Based Photo Storage
Blockchain-based photo storage offers decentralized and secure storage, ensuring your photos are protected from unauthorized access.
8.3. Biometric Authentication for Photo Access
Biometric authentication, such as fingerprint scanning and facial recognition, provides a secure way to access your hidden photos.
9. Integrating Photo Hiding into Your Overall Security Strategy
Hiding photos should be part of your overall security strategy for your Mac. This includes using strong passwords, enabling two-factor authentication, keeping your software up to date, and regularly reviewing your security settings.
9.1. Comprehensive Security Checklist for Mac Users
- Use a strong, unique password for your user account.
- Enable two-factor authentication for your Apple ID.
- Install a reputable antivirus and anti-malware program.
- Keep your macOS, apps, and security software up to date.
- Enable the firewall in System Preferences > Security & Privacy.
- Use FileVault to encrypt your entire hard drive.
- Be cautious when opening email attachments or clicking on links.
- Regularly back up your data to an external drive or cloud service.
- Review your security settings on a regular basis.
9.2. Staying Informed About the Latest Security Threats
Stay informed about the latest security threats and vulnerabilities by subscribing to security blogs, newsletters, and podcasts. This will help you stay one step ahead of hackers and protect your data.
10. dfphoto.net: Your Resource for Photography and Privacy
At dfphoto.net, we are committed to providing you with the latest information and resources on photography and privacy. Visit our website to discover more articles, tutorials, and tips on how to protect your photos and enhance your photography skills.
Explore our collection of stunning photographs, learn new editing techniques, and connect with a vibrant community of photographers. dfphoto.net is your go-to destination for all things photography.
10.1. Discover dfphoto.net
Visit dfphoto.net to explore a wealth of articles, tutorials, and resources on photography and privacy. Connect with a vibrant community of photographers and enhance your skills.
10.2. Connect with the dfphoto.net Community
Join the dfphoto.net community to share your work, ask questions, and connect with other photographers. Together, we can explore the beauty of photography and protect our privacy.
To further enhance your photography skills and stay updated on the latest trends, visit dfphoto.net for comprehensive guides, inspiring galleries, and a vibrant community. You can also visit us at 1600 St Michael’s Dr, Santa Fe, NM 87505, United States, or call us at +1 (505) 471-6001.
By following these guidelines and implementing the techniques described in this article, you can effectively hide photos on your Mac and protect your privacy. Remember to choose strong passwords, keep your software up to date, and stay informed about the latest security threats.
FAQ: Hiding Photos on a Mac
1. Can I hide photos on my Mac without using the Photos app?
Yes, you can hide photos by creating encrypted disk images or using hidden folders, as described earlier.
2. Is the built-in “Hide” feature in macOS Photos app secure enough for sensitive photos?
The “Hide” feature provides a basic level of privacy, but it’s not foolproof. For sensitive photos, consider using encryption or third-party apps.
3. What happens to hidden photos if I sync my Mac with iCloud Photos?
Photos you hide on one device will be hidden on all your devices synced with iCloud.
4. Can someone see my hidden photos if they know my Mac password?
If someone knows your Mac password, they can access your encrypted disk images or photo hiding apps.
5. How do I securely delete photos after hiding them?
Empty the Trash and then use a secure file shredder app to overwrite the deleted files.
6. What are some good third-party apps for hiding photos on a Mac?
EnigmaBox, Folder Lock, and Hider 2 are popular options.
7. How do I access a hidden folder on my Mac?
Press Command + Shift + . (period) to reveal hidden folders.
8. What should I do if I forget the password to my encrypted disk image?
Unfortunately, if you forget the password, you will not be able to access the photos inside.
9. Is it possible to hide photos from specific apps on my Mac?
Not directly, but some third-party apps may offer this functionality.
10. What is the best way to protect my photos from unauthorized access on my Mac?
Use a combination of strong passwords, encryption, and secure storage methods to protect your photos.
Conclusion:
Hiding photos on your Mac is a crucial step in protecting your privacy and safeguarding sensitive information. By understanding the built-in features and exploring advanced techniques, you can effectively conceal your visual memories and enjoy peace of mind. Remember to follow best practices for secure photo hiding and stay informed about the latest security threats. Visit dfphoto.net for more tips, tutorials, and resources on photography and privacy.