Are you looking to declutter your iPhone photo library? This guide from dfphoto.net will provide you with easy-to-follow instructions on how to delete photos on your iPhone, recover accidentally deleted images, and manage your photo storage effectively. By learning these simple techniques, you’ll be able to curate a visually appealing collection of photographic memories and free up valuable space on your device. Master iPhone photography management with dfphoto.net, where you will find expert tips and tutorials.
1. Understanding Photo Deletion on iPhone
1.1. Where Do Deleted Photos Go?
When you delete a photo or video from your iPhone, it doesn’t immediately disappear. Instead, it’s moved to the “Recently Deleted” album within the Photos app. This album acts as a temporary holding place, giving you a 30-day grace period to recover any accidentally deleted items. According to Apple’s support documentation, this feature is designed to prevent permanent data loss and provide a safety net for users who may have unintentionally removed valuable memories.
1.2. The 30-Day Grace Period
The “Recently Deleted” album holds your deleted photos and videos for 30 days. During this time, you can easily restore them to your main photo library. After 30 days, the items are permanently deleted from your device and iCloud, if you’re using iCloud Photos.
1.3. iCloud Photos and Deletion
If you use iCloud Photos, deleting a photo or video on one device (like your iPhone) will also delete it from all other devices signed in to the same Apple ID. This synchronization ensures that your photo library is consistent across all your devices. However, it also means that deleting something on your iPhone will remove it from your iPad, Mac, and any other devices connected to your iCloud account.
1.4. Photos Synced From a Computer
If you add photos to your iPhone by syncing them from your computer using Finder (or iTunes on older macOS versions), you can’t delete them directly from the Photos app on your iPhone. The delete option will be grayed out. To remove these photos, you need to stop syncing them from your computer.
2. Step-by-Step Guide: Deleting Photos on Your iPhone
2.1. Deleting a Single Photo or Video
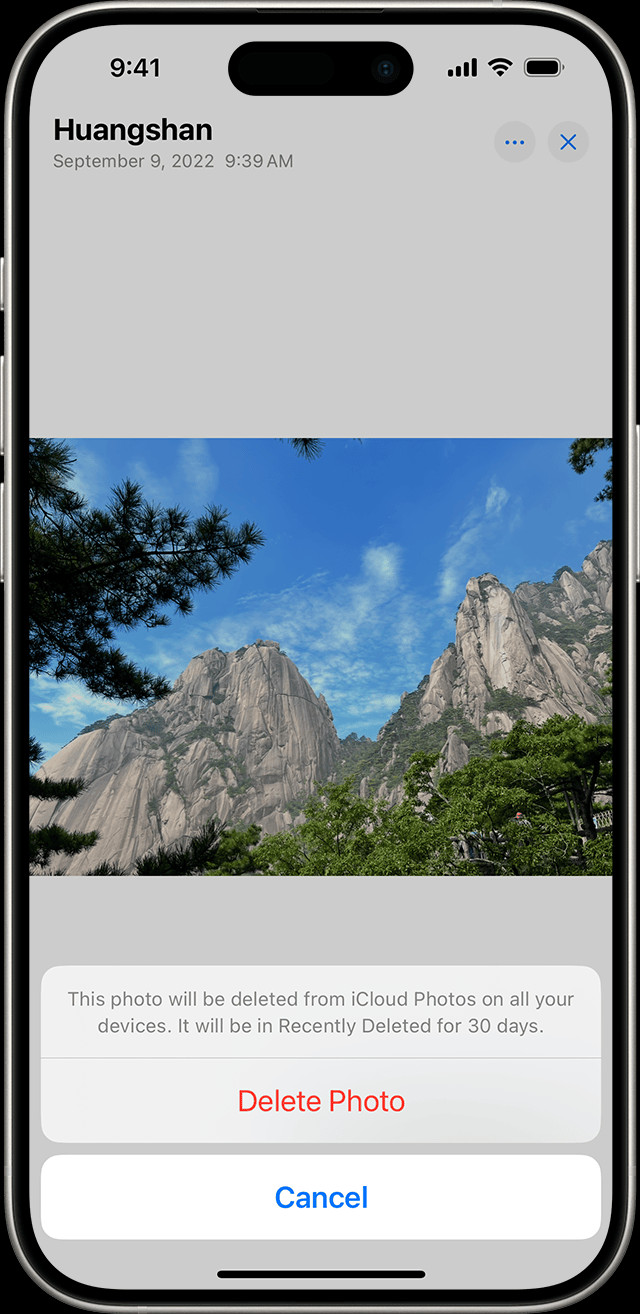
- Open the Photos App: Locate and open the Photos app on your iPhone’s home screen.
- Select the Photo or Video: Browse your photo library and tap on the photo or video you want to delete.
- Tap the Trash Icon: Look for the trash can icon (usually located at the bottom of the screen). Tap it.
- Confirm Deletion: A pop-up message will appear asking you to confirm the deletion. Tap “Delete Photo” (or “Delete Video”).
 iPhone showing Delete Photo option
2.2. Deleting Multiple Photos or Videos
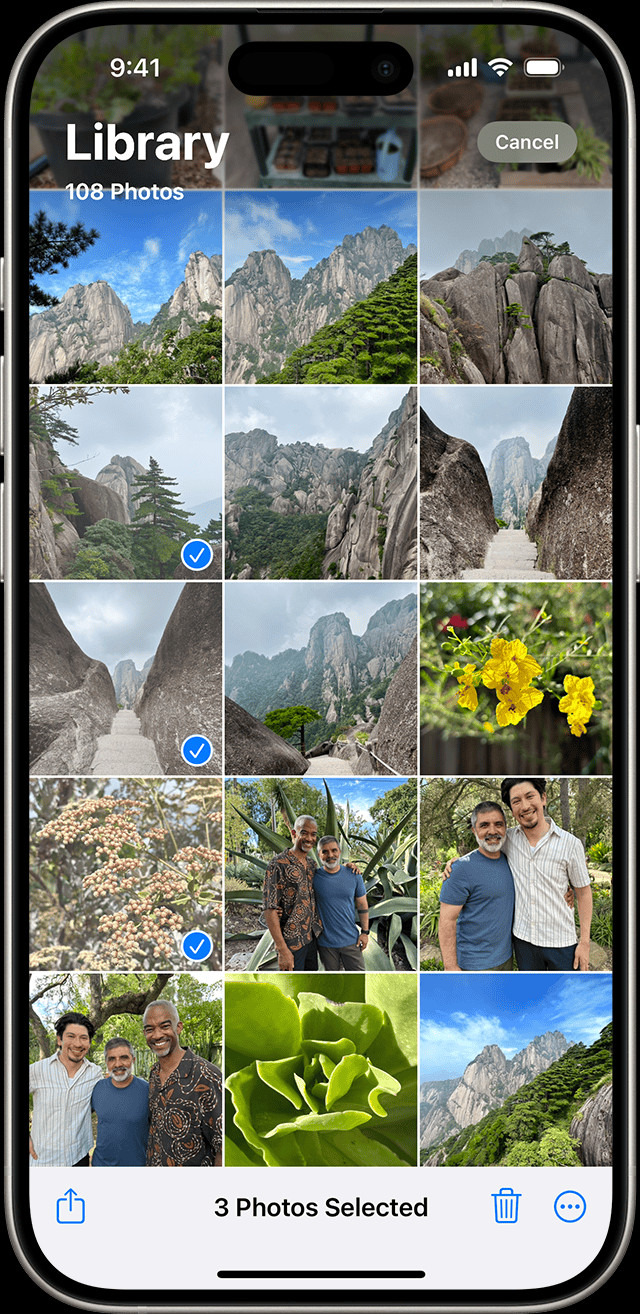
- Open the Photos App: Launch the Photos app on your iPhone.
- Tap “Select”: In the upper-right corner of the screen, tap the “Select” button.
- Select Multiple Items: Tap on each photo or video you want to delete. A checkmark will appear on each selected item. You can also slide your finger across multiple photos to select them quickly.
- Tap the Trash Icon: Tap the trash can icon at the bottom of the screen.
- Confirm Deletion: Confirm that you want to delete the selected items.
 iPhone showing multiple photos selected in the Photos app
2.3. Deleting Photos From Albums
Deleting a photo from an album doesn’t necessarily delete it from your entire photo library. Here’s what happens:
- Standard Albums: If you delete a photo from a standard album you created, it will be removed from the album but will still remain in your main photo library (in the “All Photos” view).
- Smart Albums: Smart Albums, like “People” or “Places,” automatically organize photos based on criteria. Deleting a photo from a Smart Album removes it from the album but not from your library.
To completely delete a photo, you need to delete it from the “All Photos” view or the “Recently Deleted” album.
3. Recovering Deleted Photos and Videos
3.1. Accessing the “Recently Deleted” Album
- Open the Photos App: Launch the Photos app on your iPhone.
- Tap “Albums”: At the bottom of the screen, tap the “Albums” tab.
- Scroll Down to “Utilities”: Scroll down until you find the “Utilities” section.
- Tap “Recently Deleted”: Tap on the “Recently Deleted” album. In iOS 16 and later, you might need to use Face ID or Touch ID to unlock this album.
3.2. Recovering Individual Photos or Videos
- Open the “Recently Deleted” Album: Follow the steps above to access the “Recently Deleted” album.
- Select the Item: Tap on the photo or video you want to recover.
- Tap “Recover”: Tap the “Recover” button at the bottom of the screen.
- Confirm Recovery: Confirm that you want to recover the item. It will be restored to your main photo library.
3.3. Recovering All Photos and Videos
- Open the “Recently Deleted” Album: Access the “Recently Deleted” album.
- Tap “Select”: Tap the “Select” button in the upper-right corner.
- Tap “Recover All”: In the bottom-right corner, tap “Recover All.”
- Confirm Recovery: Confirm that you want to recover all items.
3.4. What Happens After 30 Days?
After 30 days in the “Recently Deleted” album, photos and videos are permanently deleted. Once this happens, they cannot be recovered from your iPhone or iCloud. It’s essential to regularly check your “Recently Deleted” album to ensure you don’t lose any important memories.
4. Permanently Deleting Photos and Videos
4.1. Emptying the “Recently Deleted” Album
To permanently delete photos and videos and free up storage space on your iPhone and iCloud, you need to empty the “Recently Deleted” album.
- Open the “Recently Deleted” Album: Access the “Recently Deleted” album.
- Tap “Select”: Tap the “Select” button in the upper-right corner.
- Tap “Delete All”: In the bottom-left corner, tap “Delete All.”
- Confirm Deletion: Confirm that you want to permanently delete all items.
4.2. Deleting Individual Items Permanently
If you only want to permanently delete specific items:
- Open the “Recently Deleted” Album: Access the “Recently Deleted” album.
- Select the Item: Tap on the photo or video you want to permanently delete.
- Tap “Delete”: Tap the “Delete” button at the bottom of the screen.
- Confirm Deletion: Confirm that you want to permanently delete the item.
5. Managing Storage Space on Your iPhone
5.1. Checking Your Storage Usage
It’s important to monitor your iPhone’s storage to ensure you have enough space for new photos, videos, and apps.
- Open the Settings App: Launch the Settings app on your iPhone.
- Tap “General”: Scroll down and tap “General.”
- Tap “iPhone Storage”: Tap on “iPhone Storage.” This screen will show you a breakdown of how your storage is being used.
5.2. Identifying Large Photos and Videos
The “iPhone Storage” screen will also provide recommendations for optimizing your storage. It might identify large photos and videos that are taking up significant space. You can review these items and delete them if they are no longer needed.
5.3. Optimizing Photo Storage with iCloud Photos
iCloud Photos offers a feature called “Optimize iPhone Storage.” When enabled, your iPhone will store smaller, optimized versions of your photos and videos on your device, while the full-resolution versions are stored in iCloud. This can save a significant amount of space on your iPhone.
- Open the Settings App: Launch the Settings app on your iPhone.
- Tap Your Name: Tap on your name at the top of the screen to access your Apple ID settings.
- Tap “iCloud”: Tap on “iCloud.”
- Tap “Photos”: Tap on “Photos.”
- Choose “Optimize iPhone Storage”: Select “Optimize iPhone Storage.”
5.4. Other Ways to Free Up Storage
- Delete Unnecessary Apps: Review your installed apps and delete any that you no longer use.
- Clear Browser Cache: Clear the cache and browsing history in Safari or other web browsers.
- Remove Downloaded Files: Delete downloaded files that you no longer need.
- Use Cloud Storage Services: Consider using other cloud storage services like Google Photos or Dropbox to back up and store your photos and videos.
6. Dealing with Duplicate Photos and Videos
6.1. Identifying Duplicate Photos
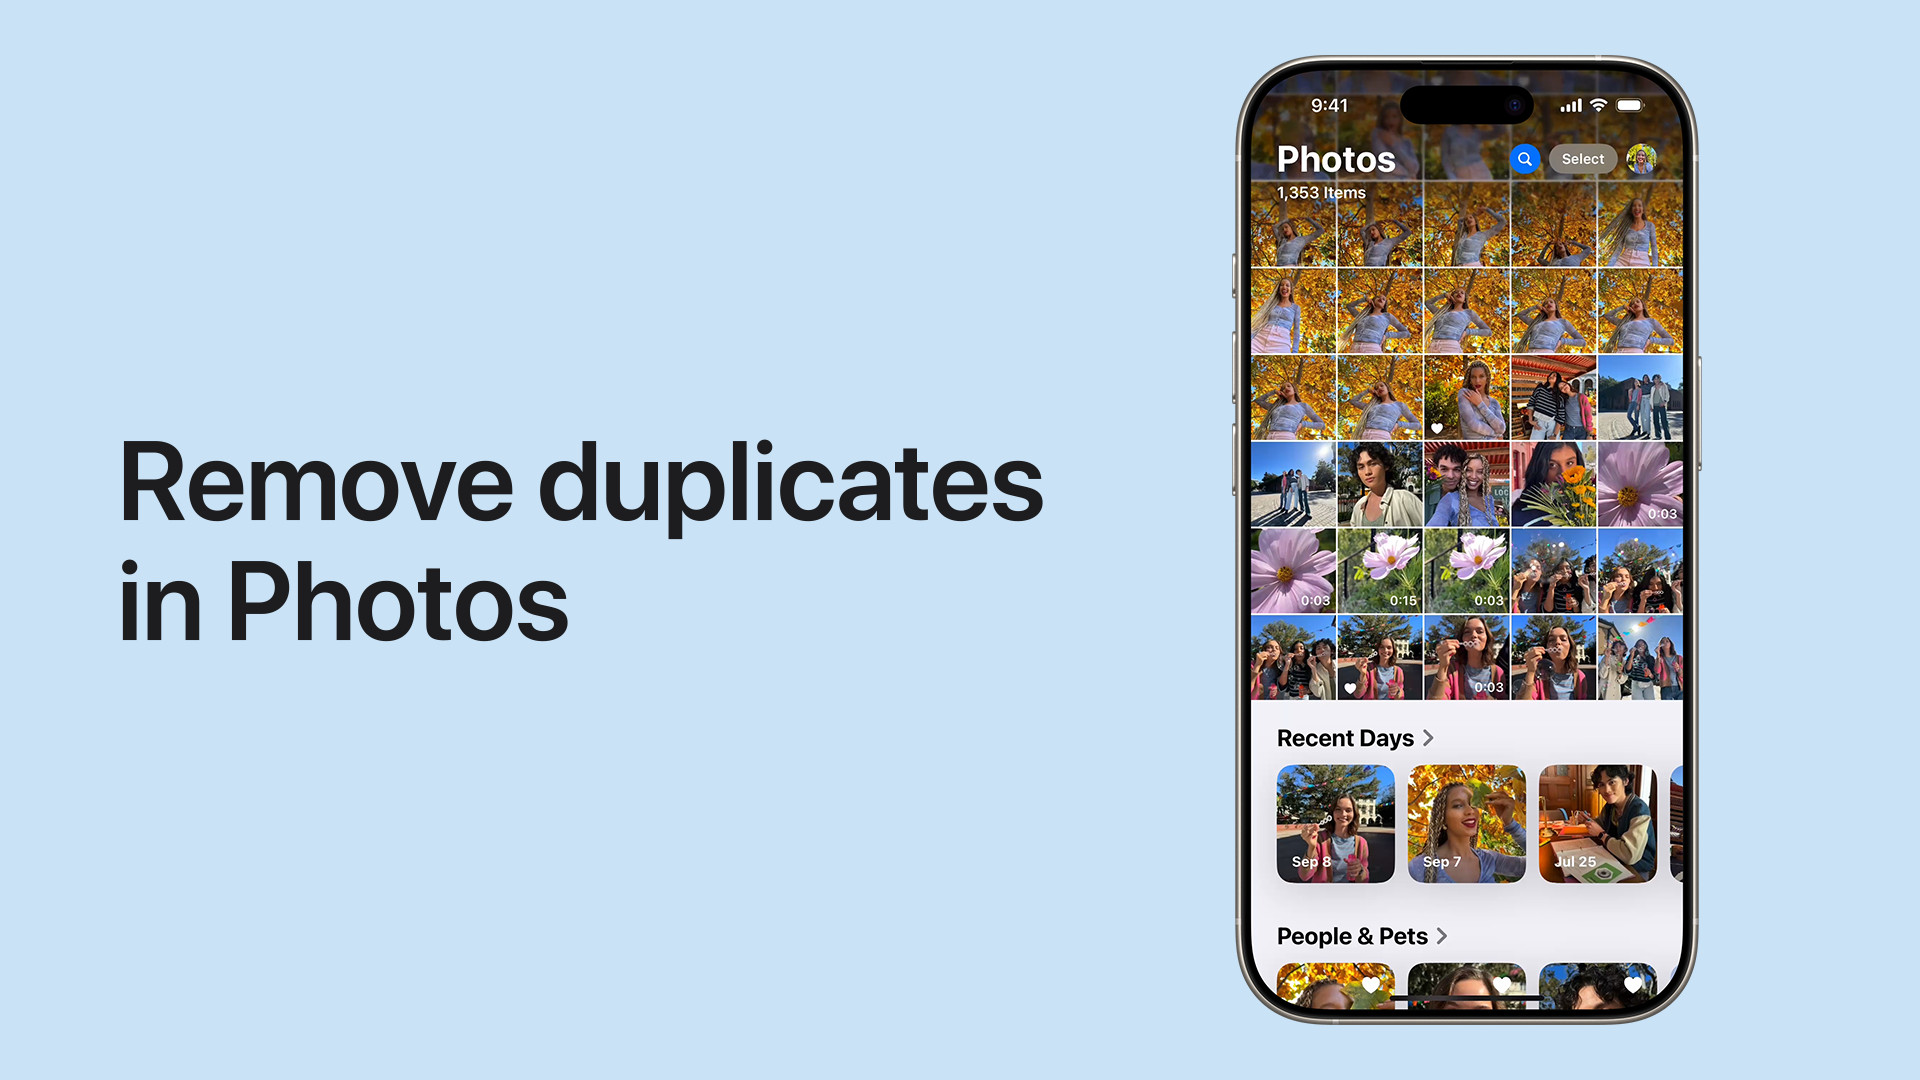
Duplicate photos can take up unnecessary storage space on your iPhone. iOS 16 and later have a built-in feature to identify duplicate photos and videos.
- Open the Photos App: Launch the Photos app on your iPhone.
- Tap “Albums”: At the bottom of the screen, tap the “Albums” tab.
- Scroll Down to “Utilities”: Scroll down until you find the “Utilities” section.
- Look for “Duplicates”: If you have duplicate photos or videos, you’ll see a “Duplicates” album.
6.2. Merging Duplicate Photos
- Open the “Duplicates” Album: Access the “Duplicates” album.
- Tap “Merge”: Tap “Merge” to combine a set of duplicates. The highest quality image and relevant data will be kept, and the other duplicates will be moved to the “Recently Deleted” album.
- Merge Multiple Sets: To merge multiple sets or all duplicates, tap “Select,” tap “Select” on each set, or tap “Select All,” then tap “Merge.”
- Confirm Merge: Confirm that you want to merge the items.
 Showing how to remove duplicates in Photos iPhone
6.3. Why Duplicate Detection May Take Time
The duplicate detection process happens automatically in the background and may take some time, especially if you have a large photo library. Ensure your iPhone is connected to Wi-Fi and charging to speed up the process.
7. Managing iCloud Shared Photo Library
7.1. Understanding Shared Library Deletion
In iOS 16.1, iPadOS 16.1, and later, you can create an iCloud Shared Photo Library and invite up to five contacts. Anyone in the Shared Library can add, edit, or delete items.
- If someone else deletes a photo or video from the Shared Library, it will no longer appear for you.
- Only the person who added the photo or video to the Shared Library can permanently delete it from the “Recently Deleted” folder.
7.2. Recovering Photos From a Shared Library
If someone deletes a photo from the Shared Library, you have 30 days to recover it from the “Recently Deleted” album, but only if you were the one who added it.
7.3. Best Practices for Shared Libraries
- Communicate with Participants: Establish clear guidelines with the other participants in the Shared Library regarding deletions and modifications.
- Regularly Review the Library: Periodically review the Shared Library to ensure that important photos and videos are not accidentally deleted.
- Back Up Important Items: Consider backing up important photos and videos from the Shared Library to your personal storage to prevent data loss.
8. Troubleshooting Common Issues
8.1. “Delete” Option is Grayed Out
If the “Delete” option is grayed out when you try to delete a photo from your iPhone, it usually means that the photo was synced from your computer. To remove these photos, you need to stop syncing photos from your computer using Finder (or iTunes on older macOS versions).
8.2. Photos Not Deleting From iCloud
If you’re having trouble deleting photos from iCloud, make sure that:
- You’re Signed In to iCloud: Verify that you’re signed in to iCloud with the correct Apple ID on all your devices.
- iCloud Photos is Enabled: Ensure that iCloud Photos is enabled in the Settings app (Settings > Your Name > iCloud > Photos).
- You Have Enough iCloud Storage: If your iCloud storage is full, you may not be able to delete photos. Upgrade your iCloud storage plan if necessary.
- Check Your Internet Connection: A stable internet connection is required to sync deletions across your devices.
8.3. Photos Reappearing After Deletion
If photos reappear after you delete them, it could be due to a syncing issue with iCloud. Try the following steps:
- Restart Your iPhone: Restart your iPhone to refresh the connection with iCloud.
- Disable and Re-enable iCloud Photos: Turn off iCloud Photos in the Settings app, wait a few minutes, and then turn it back on.
- Check for Software Updates: Make sure your iPhone is running the latest version of iOS.
9. Advanced Photo Management Tips
9.1. Using Third-Party Photo Management Apps
While the Photos app on iPhone is quite powerful, several third-party apps offer advanced features for photo management:
- Google Photos: Offers unlimited free storage (with some limitations on quality) and excellent organization features.
- Adobe Lightroom Mobile: Provides professional-grade editing tools and advanced organization options.
- Ente Photos: Focuses on privacy and secure photo storage.
9.2. Creating and Managing Albums
Albums are essential for organizing your photos and videos. You can create custom albums to group photos by:
- Events: Vacations, weddings, parties, etc.
- People: Family members, friends, colleagues.
- Places: Cities, countries, landmarks.
- Themes: Nature, architecture, portraits.
To create a new album:
- Open the Photos app.
- Tap “Albums”.
- Tap the plus (+) button.
- Select “New Album”.
- Give your album a name and add photos.
9.3. Using Keywords and Captions
Adding keywords and captions to your photos can make them easier to find and organize.
- Open a photo.
- Swipe up to see the photo information.
- Tap “Add a Caption” to write a description.
- Use the caption to add keywords or tags that describe the photo.
9.4. Regularly Backing Up Your Photos
Backing up your photos is crucial to prevent data loss. Besides iCloud, consider using other backup methods:
- External Hard Drive: Copy your photos to an external hard drive for local storage.
- Cloud Storage Services: Use services like Google Photos, Dropbox, or Amazon Photos for cloud-based backups.
- Computer Backup: Regularly back up your iPhone to your computer using Finder (or iTunes on older macOS versions).
According to a study by the Santa Fe University of Art and Design’s Photography Department, backing up photos to multiple locations significantly reduces the risk of permanent data loss.
10. Best Practices for iPhone Photography in 2024
10.1. Mastering the iPhone Camera Settings
The iPhone camera offers a wide range of settings that can help you take better photos. Familiarize yourself with these settings:
- Exposure: Adjust the exposure by tapping on the screen and sliding your finger up or down.
- Focus: Tap on the screen to focus on a specific subject.
- HDR: Use HDR (High Dynamic Range) to capture more detail in scenes with high contrast.
- Night Mode: Use Night mode to take brighter and clearer photos in low-light conditions.
- Portrait Mode: Use Portrait mode to create a shallow depth of field effect, blurring the background and highlighting the subject.
- ProRes and ProRAW: Capturing with these formats give you much more flexibility in post processing and editing, but at the expense of storage space.
10.2. Composition Techniques
Composition is key to creating visually appealing photos. Here are some essential composition techniques:
- Rule of Thirds: Divide the frame into nine equal parts and place key elements along the lines or at the intersections.
- Leading Lines: Use lines to guide the viewer’s eye through the photo.
- Symmetry: Use symmetry to create a sense of balance and harmony.
- Framing: Use elements in the foreground to frame the subject and add depth to the photo.
10.3. Editing Photos on Your iPhone
The Photos app on your iPhone offers a variety of editing tools that can help you enhance your photos:
- Adjust Light and Color: Adjust the exposure, contrast, brightness, highlights, shadows, and saturation.
- Apply Filters: Use filters to quickly change the look and feel of your photos.
- Crop and Rotate: Crop your photos to improve the composition and straighten the horizon.
- Use Third-Party Editing Apps: Explore third-party editing apps like Adobe Lightroom Mobile, VSCO, or Snapseed for more advanced editing tools.
10.4. Staying Updated With the Latest iPhone Photography Trends
The world of iPhone photography is constantly evolving. Stay updated with the latest trends and techniques by:
- Following Photography Blogs and Websites: Read articles and tutorials from photography experts.
- Watching Online Tutorials: Watch videos on YouTube or other platforms to learn new techniques.
- Joining Photography Communities: Join online forums or social media groups to connect with other photographers and share your work.
FAQ: Deleting Photos on iPhone
-
How do I permanently delete photos from my iPhone?
To permanently delete photos, go to the “Recently Deleted” album in the Photos app, select the photos, and tap “Delete.” This removes them from your device and iCloud after 30 days. -
Can I recover photos after they’ve been permanently deleted?
No, once photos are permanently deleted from the “Recently Deleted” album, they cannot be recovered from your iPhone or iCloud. -
Why can’t I delete certain photos from my iPhone?
If the “Delete” option is grayed out, it means the photos were synced from your computer. You need to stop syncing photos from your computer to remove them. -
How do I free up storage space on my iPhone?
To free up storage, delete unnecessary photos and videos, remove unused apps, clear browser cache, and consider using iCloud Photos with the “Optimize iPhone Storage” feature. -
What happens to photos I delete if I use iCloud Photos?
When you delete a photo on one device, it gets deleted on all other devices where you’re signed in with the same Apple Account and have iCloud Photos enabled. -
How can I find duplicate photos on my iPhone?
On iOS 16 and later, the Photos app has a “Duplicates” album under Utilities. Tap “Merge” to combine duplicate photos and save storage space. -
How does deleting photos work in a Shared iCloud Photo Library?
Anyone can delete photos in a Shared Library, but only the person who added the photo can permanently delete it from the “Recently Deleted” folder. -
What should I do if photos reappear after I delete them?
Restart your iPhone, disable and re-enable iCloud Photos, and check for software updates to resolve syncing issues with iCloud. -
How do I optimize storage on my iPhone using iCloud Photos?
Enable “Optimize iPhone Storage” in the Settings app (Your Name > iCloud > Photos) to store smaller, optimized versions of your photos on your device while keeping full-resolution versions in iCloud. -
Is there a way to lock the “Recently Deleted” album for privacy?
Yes, in iOS 16, iPadOS 16.1, and later, Face ID or Touch ID is required to view the Hidden and Recently Deleted albums by default, adding an extra layer of security.
Conclusion
Mastering the art of managing your photos on your iPhone is essential for keeping your memories organized and freeing up valuable storage space. By following the steps outlined in this guide, you can confidently delete photos, recover accidentally deleted items, and optimize your photo storage for a seamless user experience. Remember to regularly back up your photos and explore advanced photo management techniques to enhance your iPhone photography journey.
For more in-depth tutorials, inspiration, and a vibrant community of fellow photography enthusiasts, be sure to visit dfphoto.net. Discover a wealth of resources to elevate your photography skills and unlock your creative potential. Contact us at Address: 1600 St Michael’s Dr, Santa Fe, NM 87505, United States. Phone: +1 (505) 471-6001 or visit Website: dfphoto.net.