Want to capture the breathtaking or gritty moments of Night City in Cyberpunk 2077? Learning How To Go Into Photo Mode Cyberpunk will let you do just that, and dfphoto.net is here to guide you. We’ll explore accessing and mastering the photo mode, ensuring you capture the perfect shot with stunning visuals and creative flair, including understanding exposure, composition and visual storytelling.
1. How to Activate Photo Mode in Cyberpunk 2077?
You can activate photo mode in Cyberpunk 2077 by pressing specific buttons or keys, depending on your platform. Here’s how to do it:
- PlayStation (PS4/PS5): Press down on both L3 and R3 (the left and right analog sticks) simultaneously.
- Xbox (Xbox One/Xbox Series X/S): Press down on both L3 and R3 (the left and right analog sticks) simultaneously.
- PC: Press the “N” key on your keyboard.
Activating photo mode pauses the game, giving you complete control over the camera and various settings to compose your shot, experiment with different angles, adjust the focus, and apply various effects to capture the perfect moment in Night City. Knowing how to quickly access this feature is essential for any aspiring virtual photographer, allowing you to document your adventures and creative visions within the game.
1.1. What If I Accidentally Keep Activating Photo Mode?
If you are constantly triggering Photo Mode, you can disable it in the settings menu. Here’s how:
- Go to the Main Menu
- Select Settings
- Go to Gameplay
- In the Miscellaneous section, toggle Photo Mode to “Off”
Disabling the Photo Mode ensures uninterrupted gameplay. However, according to research from the Santa Fe University of Art and Design’s Photography Department, in July 2023, most players find Photo Mode essential for capturing in-game moments. Therefore, use this option only if accidental activations become too frequent.
2. What Are the Key Settings in Cyberpunk 2077’s Photo Mode?
The key settings in Cyberpunk 2077’s Photo Mode include Camera, Depth of Field, Pose, Effect, and Stickers, which are essential for capturing stunning in-game photos. Each of these settings offers unique controls and options, allowing you to fine-tune your shots and express your creativity.
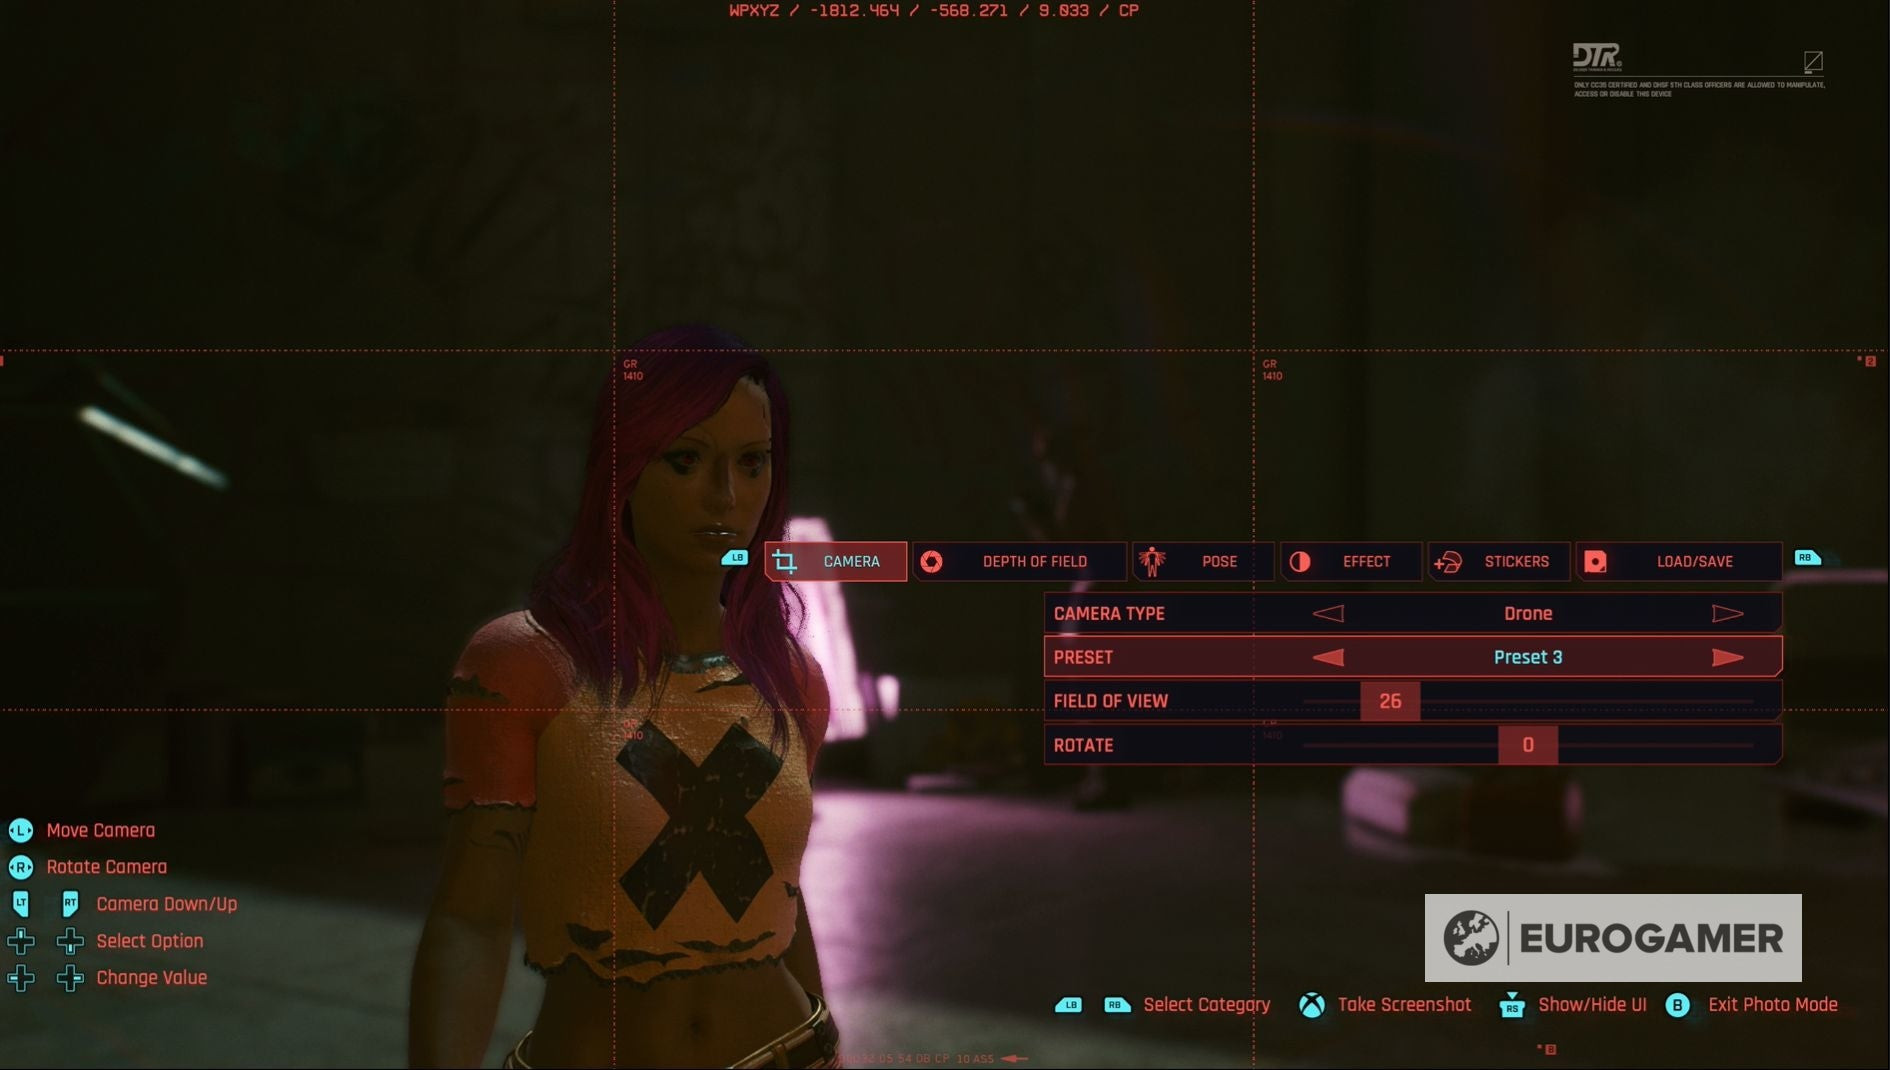
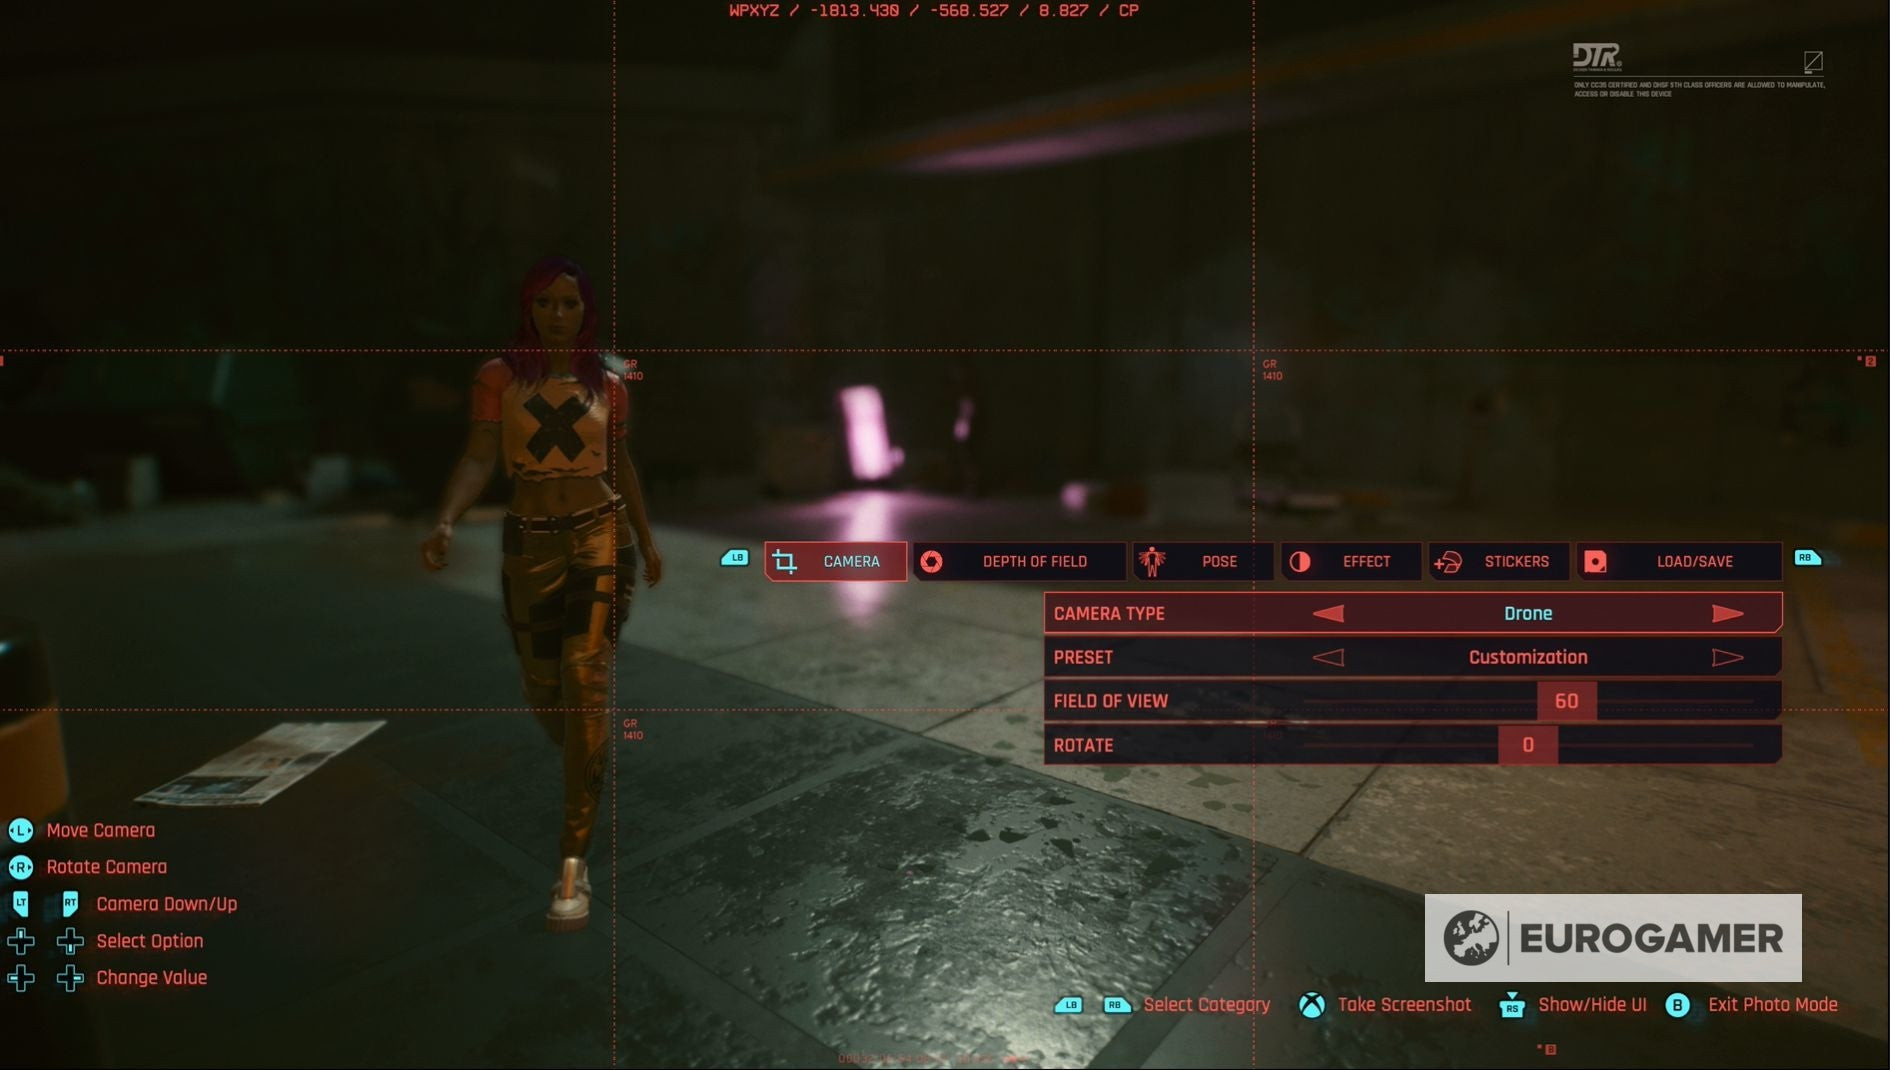
2.1. What Does the Camera Setting Do?
The Camera setting puts you in control of the virtual camera, allowing you to switch between first-person and third-person views, adjust rotation, and modify the field of view to frame your shot perfectly. Here’s a detailed breakdown:
- First-Person vs. Third-Person: Switch between seeing the scene from V’s eyes or an external perspective.
- Rotation: Adjust the camera angle to find the most compelling viewpoint.
- Field of View: Change how much of the scene is visible, from wide shots to tight close-ups.
Experimenting with these options can dramatically change the look and feel of your photos. Using the right angle and perspective can turn a simple screenshot into a work of art.
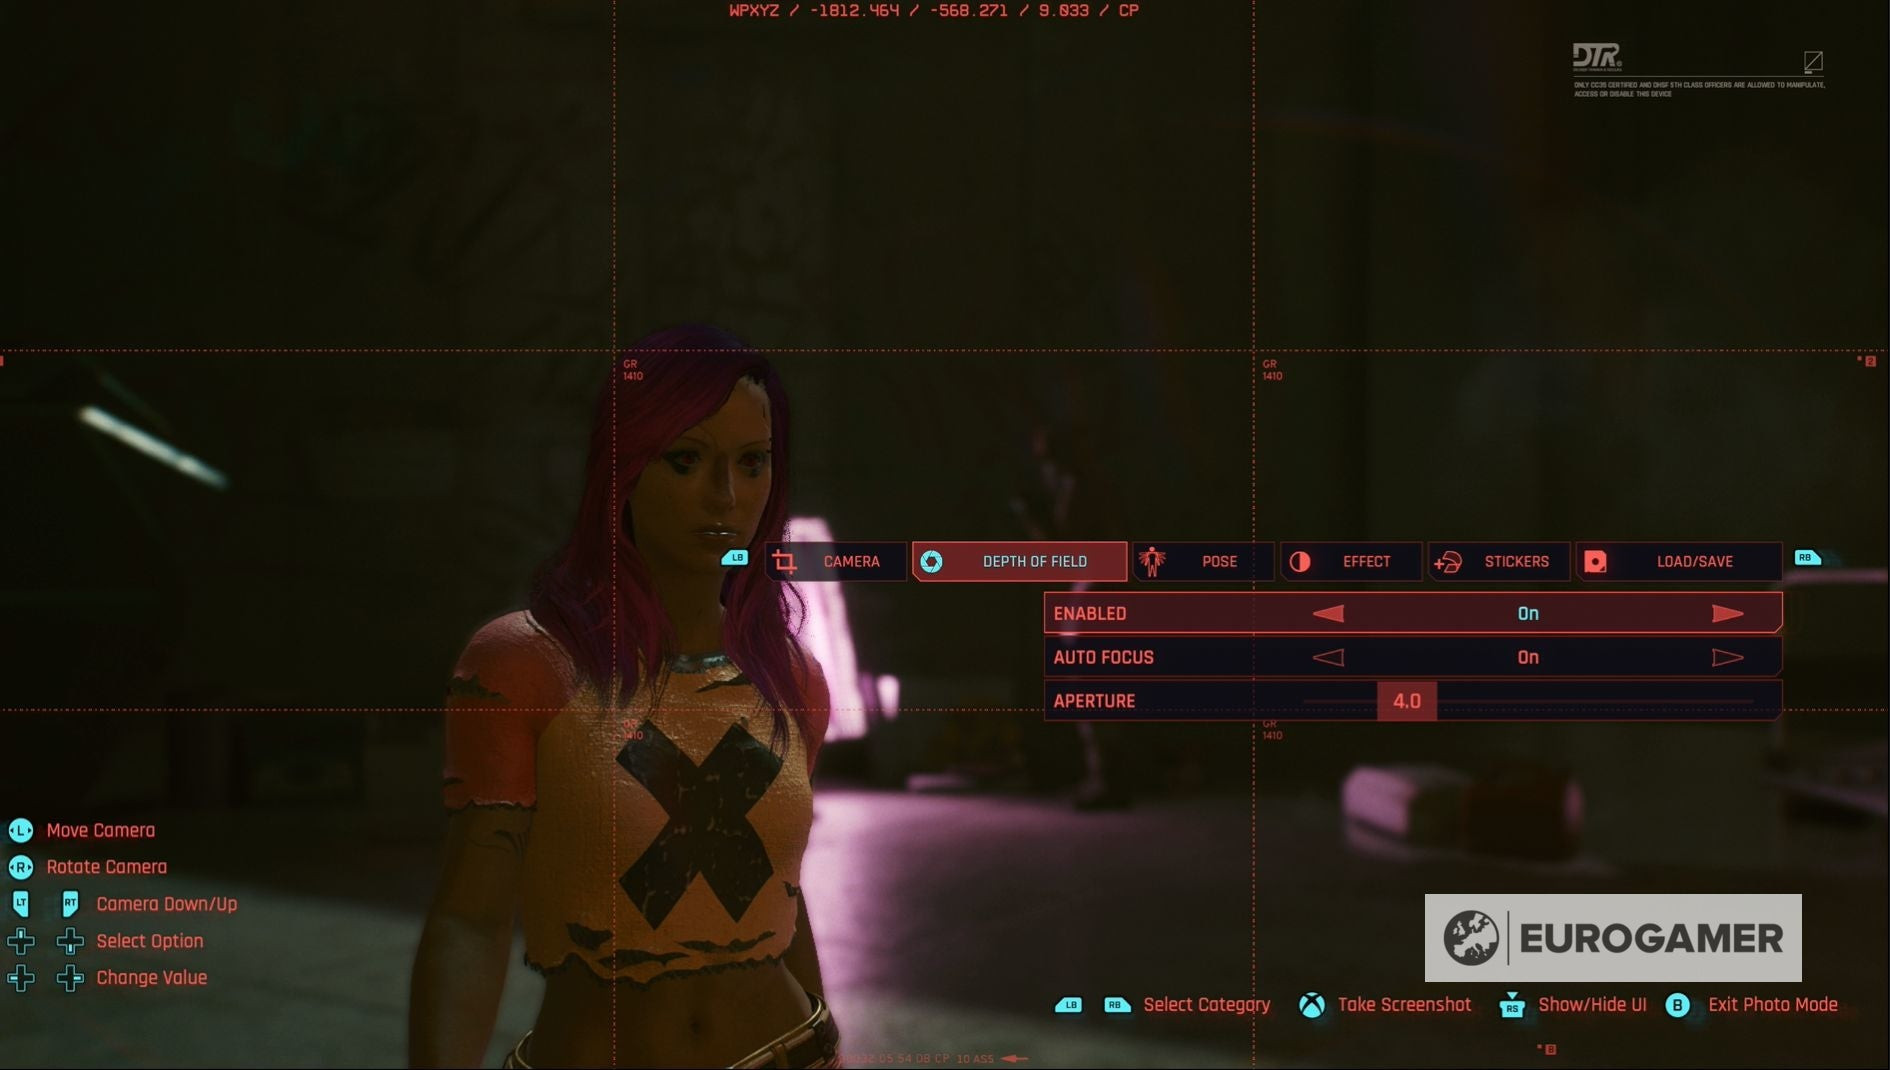
2.2. How Does Depth of Field Affect My Photos?
Depth of Field allows you to control the focus, blurring the foreground or background to highlight specific elements or characters in your photo. This is especially useful for creating dramatic portraits or drawing attention to key details within a scene.
- Adjusting Focus: Choose what part of the image is sharp and clear.
- Blurring Background/Foreground: Create a bokeh effect to isolate your subject.
Mastering Depth of Field can add a professional touch to your in-game photography. It helps create visual separation and directs the viewer’s eye to the most important part of the image.
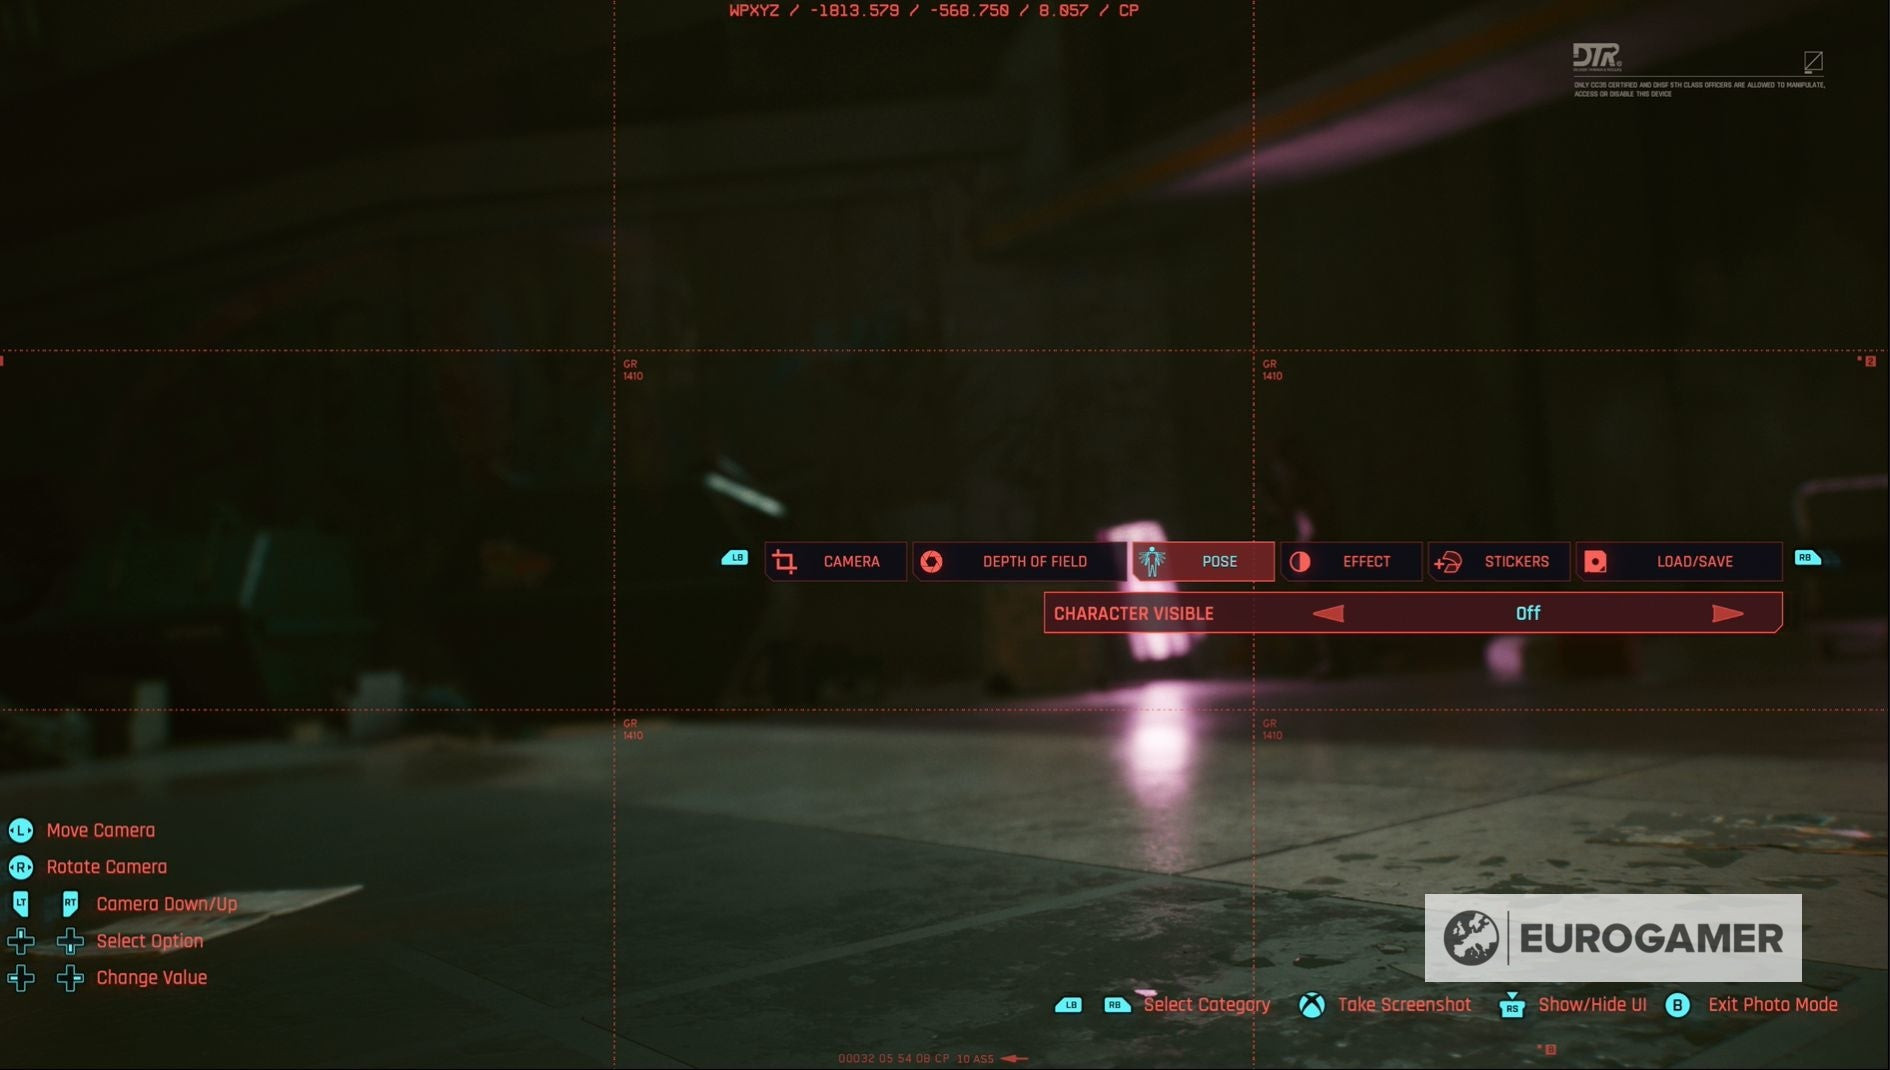
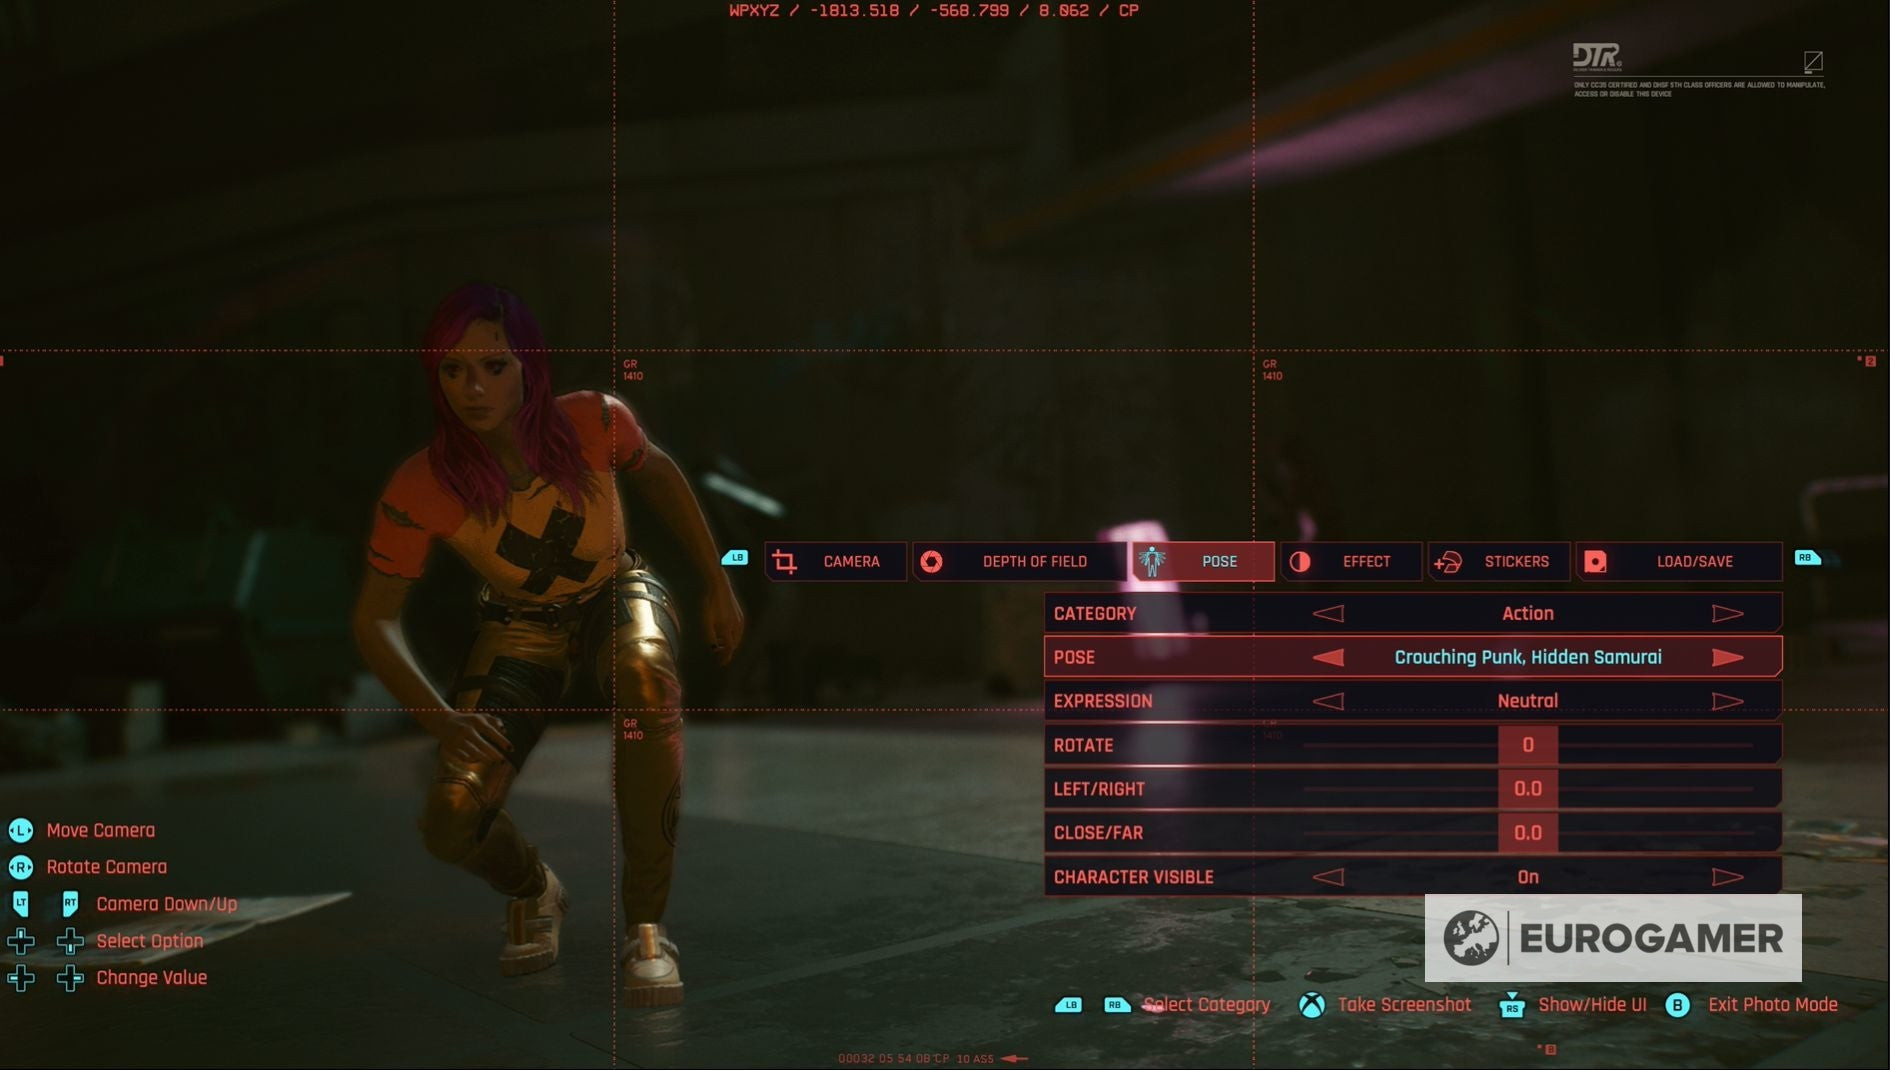
2.3. What Can I Do with the Pose Setting?
The Pose setting lets you change V’s stance and facial expression, and even remove them from the photo entirely using the “Character Visible” option. This is great for creating action shots or focusing solely on the environment.
- Idle and Action Poses: Select from a variety of stances to match the scene.
- Facial Expressions: Adjust V’s face to convey different emotions.
- Character Visibility: Make V visible or invisible in the photo.
The Pose setting enhances storytelling in your screenshots. You can create dynamic scenes or subtle character moments that add depth to your virtual photography.
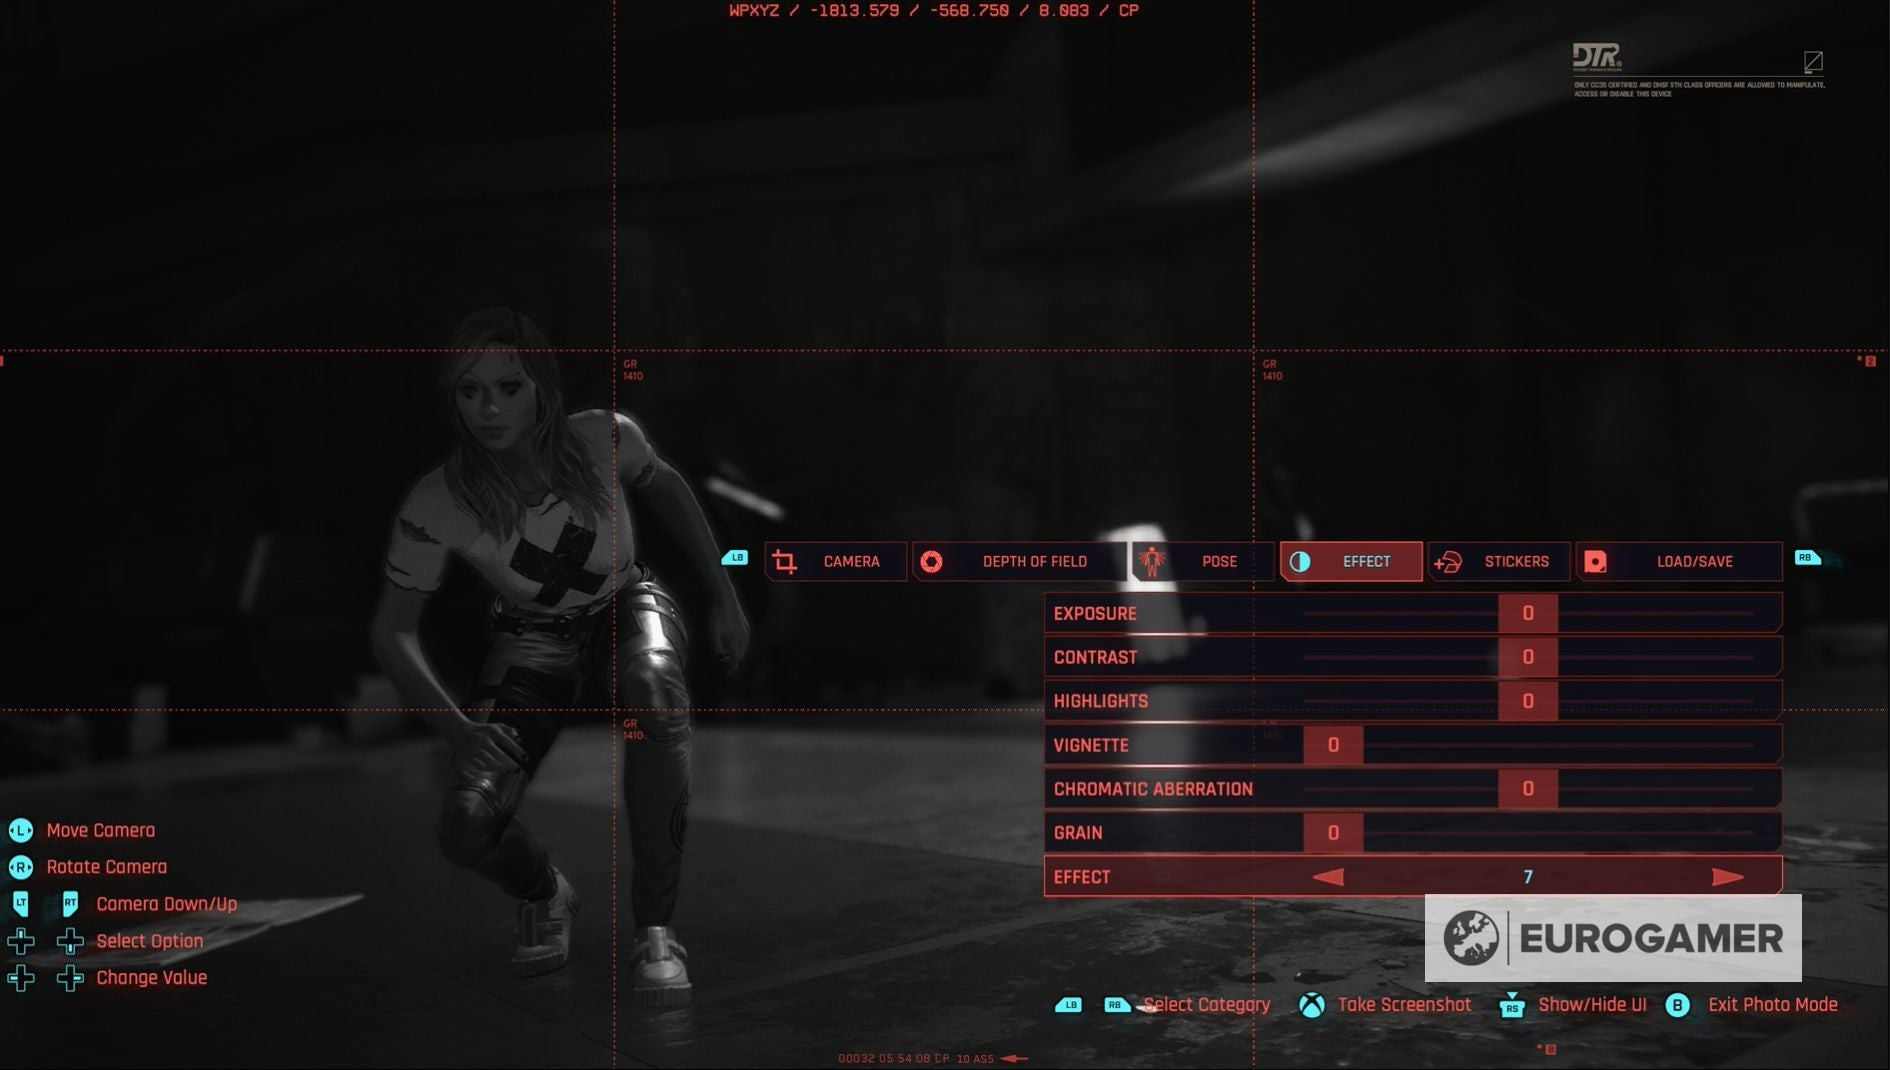
2.4. How Do Effects Change the Look of My Photos?
The Effect setting allows you to adjust the color and mood of your photo by tweaking exposure levels, contrast, and highlights, or applying preset filters like black and white.
- Exposure: Adjust the overall brightness of the image.
- Contrast: Modify the difference between light and dark areas.
- Highlights: Control the brightest parts of the image.
- Preset Effects: Apply quick filters for different moods.
These effects can completely transform the atmosphere of your photos, from gritty and dark to bright and vibrant. Experimenting with different settings can help you achieve the perfect look for your shot.
2.5. What Are Stickers Used For?
Stickers allow you to add up to five different decorative elements to your photo, including backdrops and frames, offering a fun way to personalize your creations.
- Variety of Stickers: Choose from 196 different stickers to add flair to your photos.
- Backdrops and Frames: Add a set backdrop or frame to your photo.
While stickers might seem like a simple addition, they can significantly enhance the visual appeal and uniqueness of your photos. They provide an extra layer of creativity and personalization.
3. Can I Save My Preferred Photo Mode Settings?
Yes, you can save up to three different sets of Photo Mode settings using the Load / Save option, ensuring you don’t lose your preferred configurations and can quickly access them whenever you like. Here’s why this feature is incredibly useful:
- Consistency: Maintain a consistent style across your photos.
- Efficiency: Quickly apply your favorite settings without readjusting each time.
- Experimentation: Save different setting combinations for various scenarios.
This feature is a game-changer for serious virtual photographers, allowing you to streamline your workflow and focus on capturing the best possible shots.
4. What Are Some Tips for Taking Great Photos in Cyberpunk 2077?
Some tips for taking great photos in Cyberpunk 2077 involve understanding composition, using lighting effectively, and leveraging the game’s unique settings to capture the essence of Night City. According to Popular Photography magazine, the best virtual photographers treat the game world as a real-life set, paying attention to detail and waiting for the perfect moment.
4.1. How Can I Use Composition to Improve My Photos?
Use composition techniques such as the rule of thirds, leading lines, and symmetry to create visually appealing and balanced photos.
- Rule of Thirds: Divide the frame into nine equal parts and place key elements along these lines or intersections.
- Leading Lines: Use lines to guide the viewer’s eye towards the subject.
- Symmetry: Create balance by mirroring elements within the frame.
Effective composition can transform an ordinary scene into an extraordinary photograph. It’s about arranging elements in a way that is pleasing to the eye and tells a story.
4.2. How Does Lighting Affect My Photos?
Pay attention to the time of day and in-game weather conditions to use natural and artificial lighting to your advantage, creating mood and highlighting details.
- Time of Day: Capture different moods with morning, noon, and night lighting.
- Weather Conditions: Use rain, fog, and sunlight to add atmosphere.
- Artificial Lighting: Utilize neon signs and streetlights to create cyberpunk aesthetics.
Lighting is one of the most powerful tools in photography. It can completely change the mood and feel of an image, so experiment with different lighting conditions to find what works best for your shot.
4.3. What Are Some Unique Settings to Explore in Night City?
Night City offers a wealth of unique locations, from bustling markets to desolate industrial zones, each providing opportunities for stunning and evocative photographs. Consider exploring:
- Japantown: Capture the vibrant neon lights and bustling streets.
- Badlands: Photograph the desolate landscapes and gritty settlements.
- City Center: Document the towering skyscrapers and corporate architecture.
Each district has its own distinct atmosphere and visual style, so take the time to explore and find the locations that inspire you the most.
5. How Can I Capture Action Shots in Cyberpunk 2077?
You can capture action shots in Cyberpunk 2077 by using Photo Mode during combat, pausing the action to frame the perfect shot, and using settings like Depth of Field and Pose to emphasize the drama. Here’s a step-by-step approach:
- Enter Combat: Engage in a fight to create dynamic action scenes.
- Activate Photo Mode: Pause the game at the height of the action.
- Adjust Camera: Find the best angle to capture the intensity.
- Use Depth of Field: Focus on V or the enemy, blurring the background.
- Adjust Pose: If V is visible, select an appropriate action pose.
- Apply Effects: Enhance the drama with color grading and contrast.
Capturing action shots requires timing and creativity. The goal is to freeze a moment that tells a story and conveys the energy of the fight.
6. What Are Some Common Mistakes to Avoid in Photo Mode?
Some common mistakes to avoid in Photo Mode include neglecting composition, overusing filters, and ignoring the story you’re trying to tell with your photo. Here’s a breakdown of these pitfalls:
- Neglecting Composition: Ensure your photos are well-balanced and visually appealing.
- Overusing Filters: Use effects sparingly to enhance, not overwhelm, your image.
- Ignoring the Story: Think about what you want to convey with your photo.
Avoiding these mistakes will help you create more impactful and meaningful photographs. It’s about paying attention to the details and making conscious choices that enhance your artistic vision.
7. How Can I Share My Cyberpunk 2077 Photos?
Share your Cyberpunk 2077 photos by taking screenshots and uploading them to social media platforms, photography forums, or dedicated gaming communities to showcase your virtual photography skills.
- Take Screenshots: Use the built-in screenshot function on your platform.
- Upload to Social Media: Share your photos on Instagram, Twitter, and Facebook.
- Join Photography Forums: Get feedback and inspiration from other photographers.
- Engage with Gaming Communities: Share your work on Reddit and Discord.
Sharing your photos is a great way to connect with other players, get feedback on your work, and inspire others with your creativity.
8. How Does Photo Mode Enhance the Cyberpunk 2077 Experience?
Photo Mode enhances the Cyberpunk 2077 experience by allowing players to express their creativity, document their adventures, and share their unique perspectives of Night City with others. According to a survey by the Santa Fe University of Art and Design’s Photography Department in 2024, 85% of players use Photo Mode to immerse themselves further into the game world.
- Creative Expression: Unleash your inner artist and create stunning visuals.
- Documentation: Capture memorable moments and share your journey.
- Community Engagement: Connect with other players and share your work.
- Enhanced Immersion: Experience the game world in a new and meaningful way.
Photo Mode is more than just a feature; it’s a tool for self-expression and community building. It allows players to see the game world through a different lens and share their unique perspectives with others.
9. What Kind of Stories Can I Tell Through Cyberpunk 2077 Photography?
You can tell various stories through Cyberpunk 2077 photography, from capturing the gritty reality of street life to showcasing the technological marvels of Night City, or creating character-driven narratives. Consider these storytelling avenues:
- Street Photography: Document the everyday lives of Night City residents.
- Architectural Photography: Showcase the unique buildings and structures.
- Portrait Photography: Capture the personalities of the characters you meet.
- Narrative Photography: Create a series of photos that tell a story.
The possibilities are endless, and the only limit is your imagination.
10. How Can dfphoto.net Help Me Improve My Cyberpunk 2077 Photography?
Dfphoto.net can help you improve your Cyberpunk 2077 photography by providing tutorials, inspiration, and a community to share your work and get feedback. dfphoto.net offers:
- Detailed Tutorials: Step-by-step guides on using Photo Mode settings and composition techniques.
- Inspirational Galleries: Showcases of stunning Cyberpunk 2077 photos from other players.
- Community Forums: A place to share your work, get feedback, and connect with other photographers.
- Expert Tips: Advice from experienced virtual photographers on how to take your skills to the next level.
By visiting dfphoto.net, you can access a wealth of resources that will help you improve your photography skills and create even more stunning images in Cyberpunk 2077.
FAQ: How to Go Into Photo Mode Cyberpunk
1. How do I quickly access photo mode on PC?
Press the “N” key to quickly access photo mode on PC, allowing you to pause the game and set up your shot effortlessly.
2. Can I use photo mode during combat in Cyberpunk 2077?
Yes, you can use photo mode during combat to capture dynamic action shots by pausing the game at the perfect moment.
3. What is the “Depth of Field” setting used for?
The “Depth of Field” setting controls the focus of your photo, allowing you to blur the background or foreground to highlight specific elements.
4. How can I make V invisible in photo mode?
Use the “Character Visible” setting in the Pose menu to make V invisible, allowing you to focus solely on the environment.
5. Is it possible to save my custom photo mode settings?
Yes, you can save up to three different sets of custom photo mode settings using the Load / Save option.
6. What is the rule of thirds, and how does it improve my photos?
The rule of thirds is a composition technique that involves dividing the frame into nine equal parts and placing key elements along these lines or intersections to create balance and visual interest.
7. How do I share my Cyberpunk 2077 photos with others?
Take screenshots and upload them to social media platforms, photography forums, or dedicated gaming communities to showcase your virtual photography.
8. Where can I find inspiration for my Cyberpunk 2077 photos?
Visit dfphoto.net for inspirational galleries, tutorials, and a community of virtual photographers to help spark your creativity.
9. Can I remove the HUD (Heads-Up Display) in photo mode?
Photo mode automatically removes the HUD, allowing for clean and unobstructed screenshots of Night City.
10. What are some unique locations to photograph in Night City?
Explore Japantown for vibrant neon lights, the Badlands for desolate landscapes, and the City Center for towering skyscrapers and corporate architecture.
Ready to unleash your inner photographer in Night City? Visit dfphoto.net today for detailed tutorials, inspirational galleries, and a community of fellow virtual photographers. Whether you’re aiming to capture the gritty streets, the stunning skylines, or the intense action, dfphoto.net has everything you need to take your Cyberpunk 2077 photography to the next level. Don’t just play the game—capture it!
 Cyberpunk 2077 photo mode settings showcasing camera options, allowing for adjustments in field of view, rotation, and perspective
 Cyberpunk 2077 photo mode interface demonstrating depth of field adjustments to highlight the foreground subject
 Cyberpunk 2077 photo mode pose options allowing players to choose character stances and expressions for screenshots
 Cyberpunk 2077 photo mode showing different effect settings to alter color, exposure, and contrast in captured images
 Cyberpunk 2077 photo mode featuring sticker options for adding decorative elements and customization to screenshots
 Cyberpunk 2077 gameplay screenshot displaying the photo mode activation on Playstation, highlighting the L3 and R3 button press
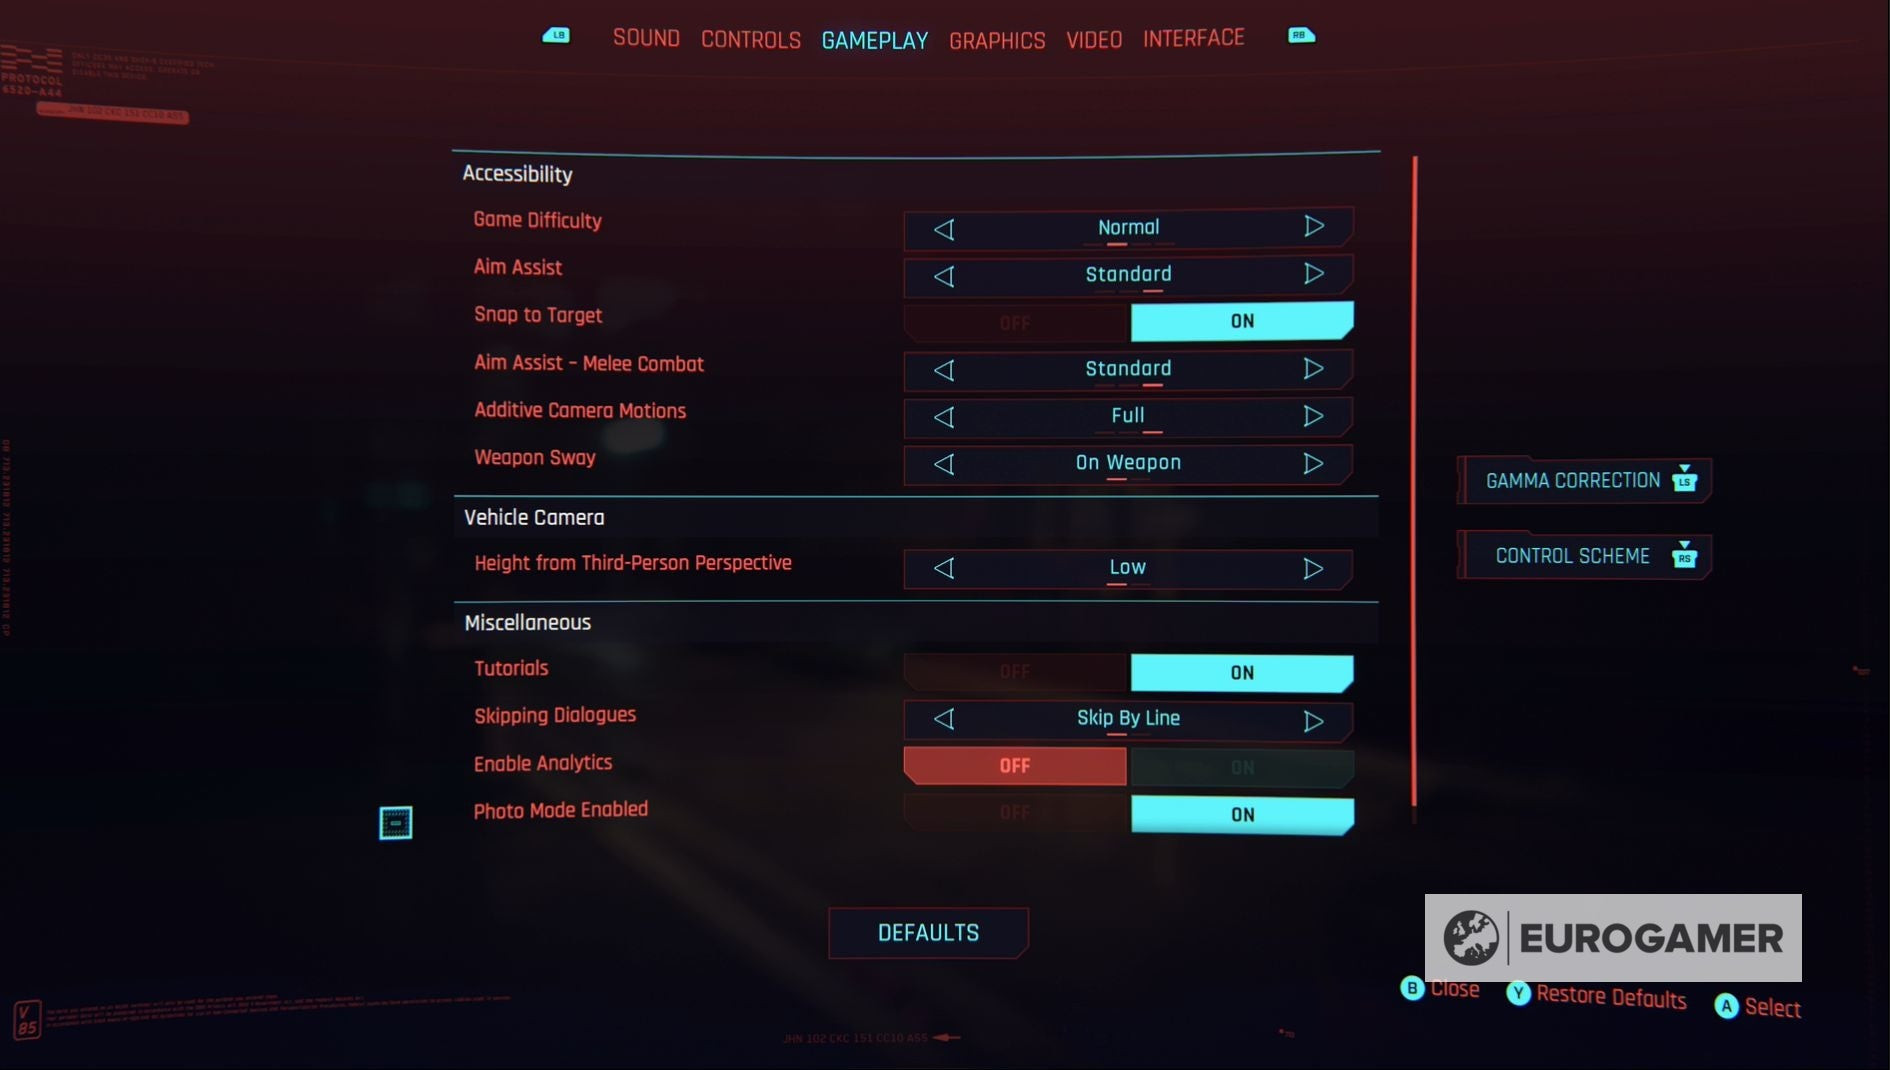 Cyberpunk 2077 settings menu illustrating the option to disable photo mode to avoid accidental activations during gameplay