Giving iMovie access to your Photos library is essential for seamless video editing on your Mac, and dfphoto.net is here to guide you through the process. By granting iMovie permission, you ensure easy integration of your images into your video projects. Explore dfphoto.net for more photography tips, artistic inspiration, and visual arts resources. This includes granting access, troubleshooting issues, and exploring alternative solutions.
1. Understanding iMovie and Photos Integration
iMovie, a user-friendly video editing software by Apple, allows you to create stunning videos by combining video clips, audio tracks, and photos. The integration between iMovie and the Photos app is designed to be seamless, enabling you to directly access your photo library from within iMovie. However, sometimes this integration can be disrupted due to various reasons, such as permission settings, system preferences, or iCloud configurations.
2. Why iMovie Needs Access to Your Photos
Granting iMovie access to your Photos library is crucial for several reasons:
- Easy Access: It allows you to directly browse and import photos from your library into your iMovie projects without having to export them first.
- Time-Saving: Streamlines your video editing workflow by eliminating the need to switch between applications.
- Creative Freedom: Provides you with the flexibility to incorporate your personal photos into your videos, adding a personal touch to your projects.
- Seamless Integration: Ensures that your photos are compatible with iMovie, maintaining their quality and resolution.
3. Common Reasons for iMovie Not Accessing Photos
Before diving into the solutions, it’s important to understand why iMovie might not be able to access your photos. Here are some common reasons:
- Permissions Issues: macOS security settings might be preventing iMovie from accessing your Photos library.
- System Photo Library: iMovie can only access the Photos library designated as the System Photo Library.
- iCloud Settings: If your photos are stored in iCloud and “Optimize Mac Storage” is enabled, the full-resolution images might not be available locally for iMovie to access.
- Software Glitches: Sometimes, temporary software glitches can disrupt the connection between iMovie and Photos.
- Outdated Software: Using older versions of iMovie or macOS can lead to compatibility issues.
4. Step-by-Step Guide: Granting iMovie Access to Photos
Here’s a detailed guide on how to grant iMovie access to your Photos library:
4.1. Checking System Preferences
-
Open System Preferences: Click on the Apple menu in the top-left corner of your screen and select “System Preferences.”
-
Navigate to Security & Privacy: In System Preferences, click on “Security & Privacy.”
-
Select the Privacy Tab: In the Security & Privacy window, click on the “Privacy” tab.
-
Choose Photos: In the left sidebar, scroll down and select “Photos.”
-
Unlock the Settings: If the settings are locked, click the padlock icon in the bottom-left corner and enter your administrator password.
-
Enable iMovie: In the list of applications, find “iMovie” and make sure the box next to it is checked. This grants iMovie permission to access your Photos library.
 Check the iMovie box in System Preferences to allow access to Photos
 -
Lock the Settings: Once you’ve enabled iMovie, click the padlock icon again to lock the settings.
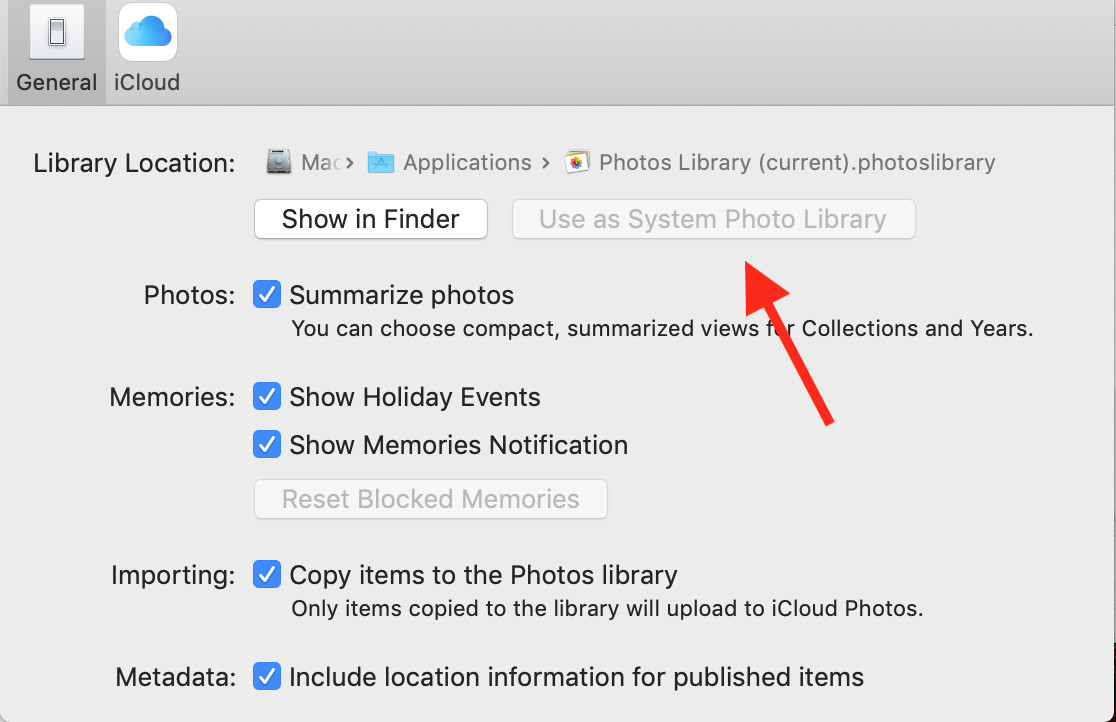
4.2. Designating the System Photo Library
iMovie can only access the Photos library that is designated as the System Photo Library. Here’s how to check and set it:
- Open the Photos App: Launch the Photos application on your Mac.
- Go to Preferences: In the menu bar, click on “Photos” and select “Preferences.”
- Check the General Tab: In the Preferences window, click on the “General” tab.
- Verify System Photo Library: Look for the “Use as System Photo Library” button.
- If the button is grayed out, it means the current library is already the System Photo Library.
- If the button is not grayed out, click on it to designate the current library as the System Photo Library.
4.3. Adjusting iCloud Photos Settings
If you use iCloud Photos, ensure that your images are fully downloaded to your Mac. Here’s how to adjust the settings:
- Open System Preferences: Click on the Apple menu and select “System Preferences.”
- Click on Apple ID: In System Preferences, click on “Apple ID.”
- Select iCloud: In the left sidebar, click on “iCloud.”
- Manage Photos Options: Next to “Photos,” click on “Options.”
- Choose Download Originals: Select “Download Originals to this Mac.” This ensures that full-resolution images are stored on your computer, making them accessible to iMovie. Keep in mind that this may require significant storage space.
4.4. Restarting iMovie and Your Mac
Sometimes, a simple restart can resolve temporary glitches that prevent iMovie from accessing your photos:
- Quit iMovie: Close the iMovie application completely.
- Restart Your Mac: Click on the Apple menu and select “Restart.”
- Reopen iMovie: Once your Mac has restarted, launch iMovie again and check if it can now access your Photos library.
4.5. Reinstalling iMovie
If none of the above solutions work, try reinstalling iMovie:
- Move iMovie to Trash: Open the “Applications” folder, find iMovie, and drag it to the Trash.
- Empty Trash: Right-click on the Trash icon in the Dock and select “Empty Trash.”
- Download iMovie from App Store: Open the App Store, search for “iMovie,” and download the latest version.
- Install iMovie: Follow the on-screen instructions to install iMovie.
- Grant Permissions: After installation, make sure to grant iMovie access to your Photos library as described in the previous steps.
5. Troubleshooting Common Issues
Even after following the steps above, you might encounter some issues. Here are some common problems and their solutions:
5.1. Photos Library Still Not Showing Up
- Ensure System Photo Library is Correct: Double-check that the correct Photos library is set as the System Photo Library.
- Check iCloud Download Status: Verify that your photos have been fully downloaded from iCloud to your Mac.
- Repair Photos Library: If your Photos library is corrupted, repairing it might help. To do this, hold down the Option and Command keys while opening Photos, then click “Repair” in the dialog that appears.
5.2. iMovie Freezing or Crashing
- Close Other Applications: Make sure no other resource-intensive applications are running while using iMovie.
- Clear iMovie Preferences: Open iMovie while holding down the Option and Command keys, and select to delete preferences in the box that appears.
- Update macOS: Ensure your macOS is up to date to avoid compatibility issues.
5.3. Specific Albums or Photos Not Appearing
- Check Album Permissions: Ensure that the albums you want to access are visible in the Photos app and not hidden.
- Verify Photo Formats: iMovie supports most common image formats, but some rare formats might not be compatible. Convert the photos to a supported format like JPEG or PNG.
6. Alternative Methods to Import Photos into iMovie
If you’re still having trouble granting iMovie direct access to your Photos library, here are some alternative methods to import your photos:
6.1. Exporting Photos from Photos App
- Select Photos: Open the Photos app and select the photos you want to use in iMovie.
- Export Photos: Go to “File” > “Export” > “Export [Number] Photos.”
- Choose Export Settings: Select the desired file size and quality, then click “Export.”
- Save Location: Choose a location on your Mac to save the exported photos.
- Import into iMovie: In iMovie, go to “File” > “Import Media” and select the exported photos from the saved location.
6.2. Using Drag and Drop
- Open Photos and iMovie: Open both the Photos app and iMovie.
- Select Photos: In Photos, select the photos you want to use.
- Drag and Drop: Drag the selected photos directly into the iMovie timeline or media library.
7. Optimizing Photos for iMovie
To ensure the best performance and visual quality in iMovie, consider these optimization tips:
- Resize Large Photos: Large, high-resolution photos can slow down iMovie. Resize them to a more manageable size (e.g., 1920×1080 pixels) using a photo editing tool before importing.
- Use Appropriate File Formats: JPEG is a good choice for most photos, offering a balance between quality and file size. PNG is better for images with transparency.
- Adjust Exposure and Color: Use the editing tools in iMovie or Photos to adjust the exposure, color, and contrast of your photos to ensure they look their best in your video.
- Consider Aspect Ratio: Ensure that the aspect ratio of your photos matches the aspect ratio of your iMovie project (usually 16:9) to avoid black bars or distortion.
8. Exploring iMovie Features for Photos
iMovie offers several features specifically designed for working with photos:
-
Ken Burns Effect: This feature allows you to add a subtle zoom and pan effect to your photos, making them more dynamic and engaging.
-
Titles and Captions: Use iMovie’s title tools to add text overlays to your photos, providing context or telling a story.
-
Transitions: Add transitions between photos to create a smooth and visually appealing flow.
-
Audio: Add background music or narration to complement your photos and enhance the overall impact of your video.
9. Keeping iMovie and Photos Updated
To ensure optimal performance and compatibility, keep both iMovie and macOS updated:
- Update macOS: Go to “System Preferences” > “Software Update” to check for and install the latest macOS updates.
- Update iMovie: Open the App Store, go to the “Updates” tab, and install any available updates for iMovie.
Regular updates not only provide new features and improvements but also address security vulnerabilities and compatibility issues.
10. Understanding Photo Library Permissions on macOS
macOS employs a robust security system to protect user data, including photos. Understanding how these permissions work can help you troubleshoot issues and ensure that your applications have the necessary access.
10.1. How macOS Handles Permissions
macOS requires applications to request permission before accessing certain types of data, such as photos, contacts, and location information. This is designed to prevent malicious software from accessing your personal data without your knowledge.
10.2. Managing Permissions in System Preferences
You can manage application permissions in the “Security & Privacy” pane of System Preferences, as described earlier in this article. This allows you to see which applications have requested access to your photos and grant or revoke permissions as needed.
10.3. Troubleshooting Permission Issues
If you’re having trouble granting iMovie access to your photos, make sure that iMovie is listed in the “Photos” section of the “Privacy” tab in System Preferences and that the box next to it is checked. If iMovie is not listed, try reinstalling the application to prompt it to request permission again.
11. Advanced Tips and Tricks
Here are some advanced tips and tricks to further enhance your iMovie experience:
- Use External Editors: iMovie allows you to open photos in external editors like Adobe Photoshop for more advanced editing. Simply right-click on a photo in the iMovie timeline and select “Open in…”
- Create Custom Transitions: While iMovie offers a variety of built-in transitions, you can also create custom transitions using video editing techniques.
- Utilize Green Screen Effects: iMovie supports green screen effects, allowing you to composite photos onto different backgrounds.
- Explore Keyboard Shortcuts: Learning iMovie’s keyboard shortcuts can significantly speed up your editing workflow.
12. Common Mistakes to Avoid
To prevent common issues and ensure a smooth iMovie experience, avoid these mistakes:
- Ignoring Permissions: Always grant iMovie the necessary permissions to access your photos.
- Using Unsupported Formats: Stick to common image formats like JPEG and PNG to avoid compatibility issues.
- Overlooking iCloud Settings: Ensure that your iCloud Photos settings are configured correctly to allow iMovie to access your images.
- Neglecting Updates: Keep iMovie and macOS updated to prevent compatibility issues and take advantage of the latest features.
13. The Importance of a System Photo Library
As mentioned earlier, iMovie relies on the System Photo Library to access your photos. Understanding the significance of this library can help you avoid confusion and ensure seamless integration.
13.1. What is a System Photo Library?
The System Photo Library is the main Photos library on your Mac that is designated as the default library for accessing and managing your photos. It is the library that is used by iCloud Photos and other applications that need access to your photo collection.
13.2. Why iMovie Needs the System Photo Library
iMovie is designed to work with the System Photo Library to ensure that it has access to all of your photos and albums. By designating a library as the System Photo Library, you are telling macOS that this is the primary source for your photos.
13.3. Switching Between Photo Libraries
If you have multiple Photos libraries on your Mac, you can switch between them by opening Photos while holding down the Option key and selecting the library you want to use. However, only one library can be designated as the System Photo Library at a time.
14. Contacting Apple Support
If you’ve tried all of the above solutions and are still having trouble granting iMovie access to your photos, consider contacting Apple Support for assistance. Apple Support can provide personalized troubleshooting and help you resolve any underlying issues.
14.1. How to Contact Apple Support
You can contact Apple Support through the Apple Support website, by phone, or by visiting an Apple Store. The Apple Support website offers a variety of resources, including troubleshooting articles, user forums, and contact information.
14.2. Preparing for Your Support Call
Before contacting Apple Support, gather as much information as possible about your issue. This includes the version of iMovie and macOS you are using, any error messages you have encountered, and the steps you have already taken to try to resolve the problem.
15. The Role of Storage Optimization in Photo Access
iCloud Photos offers a feature called “Optimize Mac Storage,” which can affect iMovie’s ability to access your photos. Understanding how this feature works is crucial for troubleshooting photo access issues.
15.1. What is “Optimize Mac Storage?”
“Optimize Mac Storage” is a feature in iCloud Photos that automatically manages the storage of your photos on your Mac. When enabled, it stores full-resolution versions of your photos in iCloud and keeps smaller, optimized versions on your Mac to save storage space.
15.2. How it Affects iMovie
If “Optimize Mac Storage” is enabled, iMovie may not be able to access the full-resolution versions of your photos, as they are stored in iCloud. This can result in lower-quality images or errors when importing photos into iMovie.
15.3. Adjusting Storage Settings for iMovie
To ensure that iMovie has access to the full-resolution versions of your photos, you can disable “Optimize Mac Storage” in iCloud Photos settings. However, keep in mind that this will require more storage space on your Mac.
16. Understanding and Utilizing Photo Metadata in iMovie
Photo metadata, such as date, time, and location information, can enhance your video projects in iMovie. Understanding how to access and utilize this metadata can add depth and context to your videos.
16.1. What is Photo Metadata?
Photo metadata is information embedded within a photo file that provides details about the image, such as the date it was taken, the camera settings used, and the location where it was captured.
16.2. Accessing Metadata in Photos
You can view the metadata of a photo in the Photos app by selecting the photo and pressing Command + I to open the Info window. This window displays various metadata fields, such as date, time, camera model, and GPS coordinates.
16.3. Using Metadata in iMovie
While iMovie doesn’t directly display photo metadata, you can use the information to add context to your videos. For example, you can add titles or captions that include the date and location where a photo was taken.
17. How to Deal With Unsupported Photo Formats
iMovie supports most common photo formats, but you may encounter issues with less common formats. Understanding how to deal with unsupported formats can prevent frustration and ensure that you can use all of your photos in your video projects.
17.1. Identifying Unsupported Formats
If you try to import a photo into iMovie and it doesn’t work, the format may be unsupported. Common unsupported formats include TIFF, PSD, and RAW formats from certain cameras.
17.2. Converting Photo Formats
To use unsupported formats in iMovie, you can convert them to a supported format like JPEG or PNG using a photo editing application or an online conversion tool.
17.3. Choosing the Right Format for iMovie
JPEG is generally the best format for most photos, as it offers a good balance between image quality and file size. PNG is better for images with transparency or graphics with sharp lines and text.
18. Exploring Third-Party Plugins for iMovie
While iMovie is a powerful video editing tool, you can extend its capabilities with third-party plugins. These plugins can add new features, effects, and transitions to iMovie, enhancing your video projects.
18.1. What are iMovie Plugins?
iMovie plugins are software add-ons that integrate with iMovie to provide additional functionality. They can include new video effects, audio filters, title templates, and transition styles.
18.2. Finding iMovie Plugins
You can find iMovie plugins on the Mac App Store and on websites that specialize in video editing resources. Some popular plugin providers include FXFactory and Coremelt.
18.3. Installing and Using Plugins
To install an iMovie plugin, simply download it from the Mac App Store or the provider’s website and follow the installation instructions. Once installed, the plugin will be available in iMovie’s effects and transitions menus.
19. Tips for Optimizing iMovie Performance
If iMovie is running slowly or crashing, there are several steps you can take to optimize its performance. These tips can help you improve iMovie’s speed and stability, ensuring a smoother video editing experience.
19.1. Closing Unnecessary Applications
Make sure to close any applications that you are not using while working in iMovie. These applications can consume system resources and slow down iMovie’s performance.
19.2. Freeing Up Disk Space
Ensure that you have enough free disk space on your Mac. iMovie requires sufficient disk space to store temporary files and render video projects.
19.3. Clearing iMovie Cache
iMovie stores cache files to improve performance, but these files can sometimes become corrupted and cause issues. Clearing the iMovie cache can resolve performance problems.
19.4. Restarting Your Mac
Restarting your Mac can help clear temporary files and reset system resources, improving iMovie’s performance.
20. Integrating dfphoto.net Resources for Enhanced Photo Selection
At dfphoto.net, we provide a wealth of resources to help you select the best photos for your iMovie projects. From tutorials on composition and lighting to curated collections of stunning images, dfphoto.net is your go-to source for visual inspiration.
20.1. Exploring Composition Techniques
Visit dfphoto.net to learn about composition techniques like the rule of thirds, leading lines, and symmetry. These techniques can help you select photos that are visually appealing and engaging.
20.2. Understanding Lighting Principles
dfphoto.net offers articles and tutorials on understanding lighting principles, such as natural light, artificial light, and color temperature. These resources can help you choose photos with optimal lighting for your iMovie projects.
20.3. Discovering Curated Photo Collections
Browse dfphoto.net’s curated photo collections to find inspiration and select photos that align with the theme and style of your videos.
FAQ: Giving iMovie Access to Photos
- Why can’t iMovie access my Photos library?
- iMovie may not have permission to access your Photos library due to macOS security settings. Check System Preferences > Security & Privacy > Privacy > Photos and make sure iMovie is checked.
- How do I designate a Photos library as the System Photo Library?
- Open the Photos app, go to Preferences > General, and click the “Use as System Photo Library” button if it’s not grayed out.
- What should I do if my photos are in iCloud and iMovie can’t access them?
- In System Preferences > Apple ID > iCloud > Options (next to Photos), select “Download Originals to this Mac” to ensure full-resolution images are stored locally.
- How do I restart iMovie to troubleshoot photo access issues?
- Close the iMovie application completely, then reopen it. If the issue persists, restart your Mac.
- What if reinstalling iMovie doesn’t fix the problem?
- Ensure that the correct Photos library is set as the System Photo Library, and verify that your photos have been fully downloaded from iCloud. You can also try repairing your Photos library by holding down the Option and Command keys while opening Photos, then clicking “Repair.”
- Can I export photos from the Photos app and import them into iMovie as an alternative?
- Yes, you can export photos from the Photos app by going to File > Export > Export [Number] Photos. Then, import the exported photos into iMovie by going to File > Import Media.
- How can I optimize photos for better performance in iMovie?
- Resize large photos to a more manageable size (e.g., 1920×1080 pixels), use appropriate file formats like JPEG or PNG, and adjust exposure and color using editing tools.
- What iMovie features can I use to enhance photos in my videos?
- iMovie offers features like the Ken Burns effect, titles and captions, transitions, and audio integration to enhance photos in your videos.
- Why is it important to keep iMovie and macOS updated?
- Regular updates provide new features, improvements, address security vulnerabilities, and ensure compatibility between iMovie and macOS.
- How do I contact Apple Support for further assistance with iMovie and Photos?
- You can contact Apple Support through the Apple Support website, by phone, or by visiting an Apple Store. Gather information about your issue, including the versions of iMovie and macOS you are using and any error messages you have encountered.
By following these steps and troubleshooting tips, you can successfully grant iMovie access to your Photos library and create stunning videos with your personal photos. Remember to visit dfphoto.net for more photography tips, inspiration, and resources to enhance your visual storytelling. Explore our website at dfphoto.net, located at 1600 St Michael’s Dr, Santa Fe, NM 87505, United States, or call us at +1 (505) 471-6001.