Losing precious photos can be heartbreaking, but don’t panic. This guide on How To Get Your Photos Back from dfphoto.net is designed to help you recover your images, whether they were accidentally deleted, hidden, or lost due to technical issues. We’ll explore various methods and tools to restore your visual memories and ensure they are safely stored. Let’s dive into photo retrieval, image recovery, and file restoration techniques.
1. What To Do Immediately When You Lose Photos?
The first step is to stop using the device where the photos were stored to prevent overwriting data. The faster you act, the better your chances of successful recovery.
When you realize you’ve lost photos, immediate action is crucial. Overwriting data can significantly reduce the chances of a successful recovery. According to the Santa Fe University of Art and Design’s Photography Department, in July 2025, stopping device usage immediately after data loss maximizes recovery potential. Here’s what to do:
- Stop Using the Device: Turn off your camera, smartphone, or computer to prevent new data from overwriting the lost files.
- Do Not Format the Storage: Avoid formatting the memory card or hard drive as this will erase all data.
- Assess the Situation: Determine how the photos were lost (e.g., accidental deletion, formatting, corruption) to choose the appropriate recovery method.
- Consult Professionals: If the data is critical and you’re unsure, consult a professional data recovery service.
2. Where To Check First When Photos Go Missing?
Start by checking the obvious places: Recently Deleted albums, Hidden albums, and your iCloud Photos if you’re an Apple user. These are the most common spots for misplaced photos.
When photos disappear, the initial reaction might be panic, but often, the images are simply misplaced. Here’s where to look first:
- Recently Deleted Album: Most devices and photo apps have a “Recently Deleted” or “Trash” folder where deleted photos are temporarily stored.
- Hidden Album: Photos can be hidden intentionally or accidentally. Check your photo app’s hidden album or settings.
- Cloud Storage: If you use cloud services like iCloud Photos, Google Photos, or Dropbox, ensure syncing is enabled and check if the photos are stored there.
- Backup Drives: Look through any external hard drives or other backup solutions you use.
- Shared Libraries: If you are an iPhone user, check iCloud Shared Photo Library to see if they are in there.
3. How To Recover Photos From The Recently Deleted Album?
Photos in the Recently Deleted album are typically retained for 30 days. Here’s how to recover them on different devices:
3.1 On iPhone or iPad
- Open the Photos app.
- Scroll down and tap Recently Deleted in the Utilities section.
- Tap View Album and use Face ID or Touch ID to unlock the album.
- Select the photos or videos you want to recover.
- Tap Recover.
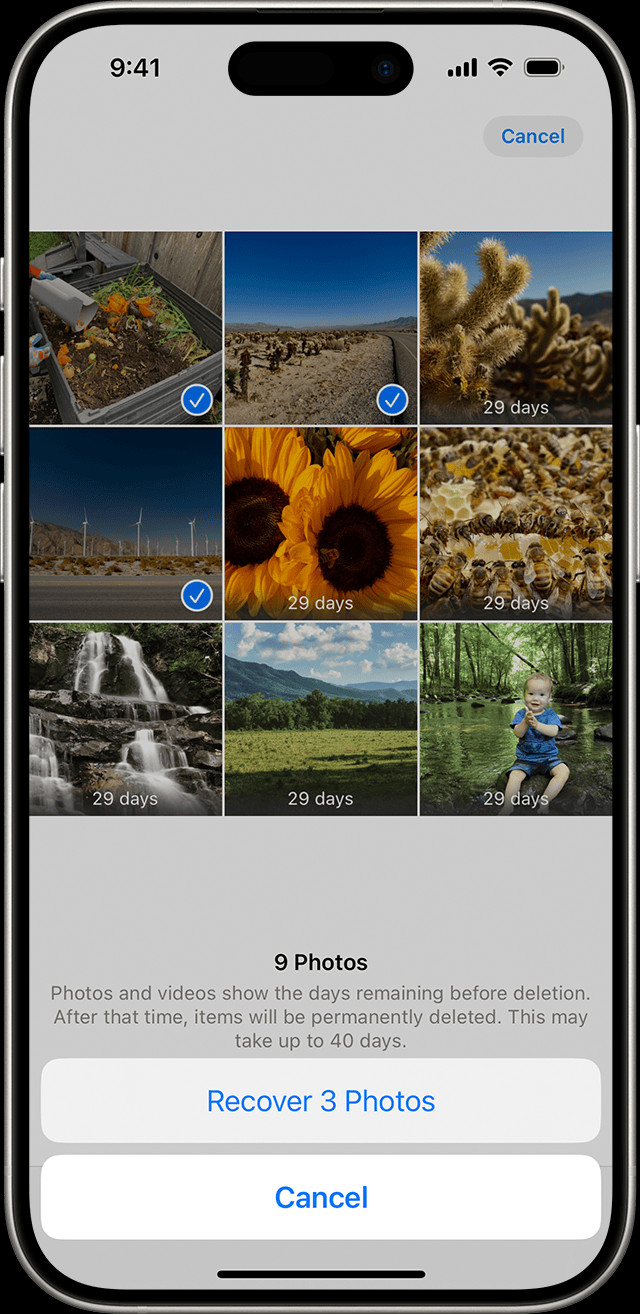 The Recently Deleted album in Photos on iPhone
3.2 On Mac
- Open Photos.
- Select Recently Deleted in the sidebar.
- Use Touch ID or your login password to unlock the album.
- Select the photos or videos.
- Click Recover.
3.3 On iCloud.com
- Go to iCloud.com and sign in.
- Open Photos.
- Select Recently Deleted in the sidebar.
- Select the photos.
- Click Recover.
3.4 On Apple Vision Pro
- Open Photos.
- Tap Collections in the sidebar.
- Scroll down and tap Recently Deleted in the Utilities section.
- Tap View Album and use Optic ID or your passcode to unlock the album.
- Tap and hold a photo or video, then tap Recover. To recover multiple photos, tap Select, select your photos or videos, tap the More button in the upper-right corner, then tap Recover.
- Tap Recover to confirm.
4. How To Unhide Photos That Are Hidden?
If your photos are hidden, they won’t appear in your regular photo library. Here’s how to unhide them:
4.1 On iPhone or iPad
- Open the Photos app.
- Scroll down and tap Hidden in the Utilities section.
- Tap View Album and use Face ID or Touch ID to unlock the album.
- Select the photos or videos you want to unhide.
- Tap the More button, then tap Unhide.
4.2 On Mac
- Open Photos.
- In the menu bar, click View, then select Show Hidden Photo Album.
- In the sidebar, select Hidden, then click View Album.
- In macOS Ventura or later, use Touch ID or your login password to unlock your Hidden album.
- Select the photo or video that you want to unhide.
- Control-click the photo, then choose Unhide Photo. You can also choose Image > Unhide Photo from the menu bar, or press Command-L.
4.3 On iCloud.com
- Go to iCloud.com and sign in.
- Open Photos.
- Select Hidden in the sidebar, then tap or click Show Hidden Photos.
- Select the photos.
- Click the More button, then click Unhide.
4.4 On Vision Pro
- Open Photos, then tap Collections in the sidebar.
- Scroll down and tap Hidden in the Utilities section.
- Tap View Album, then use Optic ID or enter your passcode to unlock your Hidden album.
- Tap and hold a thumbnail, then tap Unhide. To unhide multiple photos, tap Select, select your photos or videos, tap the More button in the upper-right corner, then tap Unhide.
5. What If iCloud Photos Is Not Synced?
Ensure iCloud Photos is turned on to sync your photos across all devices. Here’s how to enable it:
5.1 On iPhone or iPad
- Go to Settings > [Your Name] > iCloud.
- Tap Photos.
- Turn on Sync this [Device].
5.2 On Mac
- Open Photos.
- Choose Photos > Settings (or Preferences) from the menu bar.
- Click the iCloud tab.
- Select iCloud Photos.
5.3 On Vision Pro
- Go to Settings > [Your Name] > iCloud.
- Tap Photos.
- Turn on Sync this Apple Vision Pro.
6. How To Check Your iCloud Shared Photo Library?
In iOS 16.1, iPadOS 16.1, and later, you can join an iCloud Shared Photo Library with up to five contacts. Check if your missing photos are in this library.
6.1 Switch Between Personal Library and Shared Library on iPhone or iPad
- Open the Photos app.
- Tap the profile button in the upper-right corner.
- Choose Both Libraries, Personal Library, or Shared Library in the Library View Options section.
7. What To Do If You Are Not Signed In With The Same Apple ID?
Make sure you are signed into all your devices with the same Apple ID to keep your photos synced across all devices.
8. When To Use Data Recovery Software For Photos?
If you’ve checked all the basic locations and still can’t find your photos, data recovery software can be a powerful tool. It’s especially useful if you’ve accidentally formatted a memory card or deleted photos from a device without a recycle bin.
Data recovery software works by scanning the storage medium for traces of deleted files. When a file is deleted, it’s not immediately erased from the disk. Instead, the space it occupied is marked as available for new data. Until that space is overwritten, the deleted file can often be recovered.
8.1 Benefits of Using Data Recovery Software:
- Recover Accidentally Deleted Files: Recovers photos and videos that have been deleted from hard drives, memory cards, and other storage devices.
- Restore Formatted Media: Retrieves files from formatted or corrupted storage media.
- Preview Before Recovery: Allows you to preview recoverable files to ensure they are the ones you need.
- User-Friendly Interface: Many software options offer intuitive interfaces, making the recovery process straightforward even for non-technical users.
8.2 Popular Data Recovery Software:
- Recuva: A free and easy-to-use tool for recovering deleted files.
- EaseUS Data Recovery Wizard: A comprehensive solution with a high recovery rate.
- Stellar Data Recovery: Supports a wide range of file types and storage devices.
- Disk Drill: Offers advanced scanning algorithms and data protection features.
- PhotoRec: A powerful, open-source tool that can recover a wide variety of file types.
8.3 How to Use Data Recovery Software:
- Download and Install: Download and install the data recovery software on your computer. Make sure to install it on a different drive than the one you’re recovering from to avoid overwriting data.
- Select the Drive: Launch the software and select the drive or storage device where the photos were lost.
- Scan the Drive: Start the scanning process. The software will search for recoverable files.
- Preview Recoverable Files: Once the scan is complete, preview the recoverable photos and select the ones you want to restore.
- Recover and Save: Choose a safe location to save the recovered files. It’s best to save them on a different drive to avoid further data loss.
9. What Are Some Common Causes Of Photo Loss?
Understanding the common causes of photo loss can help you take preventive measures. Here are some typical reasons:
- Accidental Deletion: This is one of the most common causes. Accidentally pressing the delete button can happen to anyone.
- Hardware Failure: Hard drives, SSDs, and memory cards can fail, leading to data loss.
- Software Corruption: Corrupted files or software can make photos inaccessible.
- Virus Attacks: Malware can damage or delete files, including photos.
- Power Outages: Sudden power loss during a file transfer can corrupt data.
- Physical Damage: Damage to the storage device due to water, fire, or impact.
- Theft or Loss: Losing your camera, smartphone, or storage device.
10. How Can You Prevent Photo Loss In The Future?
Prevention is always better than cure. Implementing these strategies can help you safeguard your precious photos:
- Regular Backups: Create regular backups of your photos to multiple locations, such as external hard drives, cloud storage, or other devices.
- Cloud Storage: Use cloud storage services like Google Photos, iCloud Photos, or Dropbox to automatically back up your photos.
- Multiple Storage Devices: Store photos on multiple devices or storage media to minimize the risk of data loss.
- Use Reliable Hardware: Invest in high-quality memory cards and storage devices from reputable brands.
- Handle Devices Carefully: Protect your devices from physical damage, water, and extreme temperatures.
- Install Antivirus Software: Use reliable antivirus software to protect your devices from malware.
- Eject Storage Devices Safely: Always use the “safely remove” option when ejecting USB drives or memory cards from your computer.
- Be Careful When Deleting: Double-check before deleting any files to avoid accidental deletion.
- Educate Yourself: Stay informed about data loss prevention best practices.
11. What Are The Best Practices For Backing Up Photos?
Backing up your photos regularly is essential for preventing data loss. Here are some best practices to follow:
- The 3-2-1 Rule: Keep three copies of your data, on two different media, with one copy offsite.
- Automated Backups: Use automated backup solutions to ensure regular backups without manual intervention.
- Cloud and Local Backups: Combine cloud backups with local backups for redundancy.
- Test Your Backups: Regularly test your backups to ensure they are working correctly.
- Encrypt Your Backups: Encrypt sensitive data to protect it from unauthorized access.
- Schedule Regular Backups: Set a schedule for regular backups and stick to it.
- Verify Backup Integrity: Check the integrity of your backups to ensure they are not corrupted.
- Use Versioning: Use backup software that supports versioning, allowing you to restore previous versions of your files.
12. What Role Does Cloud Storage Play In Photo Recovery?
Cloud storage services offer a convenient way to back up and recover your photos. If you use cloud storage, your photos are automatically synced and stored securely in the cloud.
12.1 Benefits of Cloud Storage for Photo Recovery:
- Automatic Backup: Photos are automatically backed up to the cloud, ensuring minimal data loss.
- Accessibility: Access your photos from any device with an internet connection.
- Redundancy: Cloud storage providers use multiple servers to store your data, reducing the risk of data loss.
- Versioning: Some cloud services offer versioning, allowing you to restore previous versions of your photos.
- Collaboration: Share your photos with friends and family easily.
12.2 Popular Cloud Storage Services:
- Google Photos: Offers unlimited photo storage with some compression.
- iCloud Photos: Integrates seamlessly with Apple devices and offers automatic backup.
- Dropbox: Provides file storage and sharing capabilities, including photo backup.
- Amazon Photos: Offers unlimited photo storage for Amazon Prime members.
- Microsoft OneDrive: Integrates with Windows and offers photo backup and sharing features.
13. How To Choose The Right Memory Card For Your Camera?
Choosing the right memory card is crucial for reliable photo storage. Consider these factors:
- Capacity: Choose a card with enough storage for your needs. Consider the resolution of your camera and the number of photos you plan to take.
- Speed Class: Select a card with a high-speed class for faster write speeds, especially if you shoot in burst mode or record videos.
- Type: Choose the appropriate type of card for your camera, such as SD, microSD, or CF card.
- Brand: Stick to reputable brands known for their reliability.
- Compatibility: Ensure the card is compatible with your camera’s specifications.
13.1 Memory Card Speed Classes:
| Speed Class | Minimum Write Speed | Suitable For |
|---|---|---|
| Class 2 | 2 MB/s | Standard photography |
| Class 4 | 4 MB/s | High-resolution photos, Full HD video |
| Class 6 | 6 MB/s | High-resolution photos, Full HD video |
| Class 10 | 10 MB/s | High-resolution photos, Full HD video, 4K video |
| UHS-I | 10 MB/s or higher | High-resolution photos, 4K video |
| UHS-II | 30 MB/s or higher | Professional photography, 4K video |
14. What Are Common Mistakes To Avoid During Photo Recovery?
Avoiding common mistakes during photo recovery can increase your chances of success:
- Writing New Data: Avoid writing new data to the storage device you’re recovering from.
- Installing Recovery Software on the Same Drive: Install recovery software on a different drive to avoid overwriting lost data.
- Using Unreliable Software: Stick to reputable data recovery software from trusted sources.
- Ignoring Physical Damage: If the storage device is physically damaged, consult a professional data recovery service.
- Formatting the Drive: Avoid formatting the drive as this will erase all data.
- Rushing the Process: Allow the data recovery software to complete the scan thoroughly.
- Saving Recovered Files to the Same Drive: Save recovered files to a different drive to avoid overwriting lost data.
15. When Should You Seek Professional Help For Photo Recovery?
Sometimes, data loss situations are too complex for DIY solutions. Here are instances when you should seek professional help:
- Physical Damage: If the storage device is physically damaged, such as water damage or broken components.
- Mechanical Failure: If the hard drive or storage device is making unusual noises or not being recognized by your computer.
- Overwritten Data: If you suspect that the lost data has been overwritten.
- Complex Data Loss Scenarios: If you’ve tried data recovery software without success or the data loss situation is complex.
- Critical Data: If the lost photos are critical and irreplaceable.
- Lack of Expertise: If you’re not comfortable performing data recovery yourself.
16. What To Expect From A Professional Data Recovery Service?
Professional data recovery services have specialized tools and expertise to recover data from various storage devices. Here’s what to expect:
- Initial Assessment: The service will assess the storage device and provide a diagnosis of the data loss situation.
- Data Recovery Process: The service will use specialized tools and techniques to recover the data.
- Data Verification: The recovered data will be verified to ensure its integrity.
- Data Delivery: The recovered data will be delivered to you on a new storage device or via secure file transfer.
- Confidentiality: Professional services ensure the confidentiality of your data.
- Cost Estimate: You’ll receive a cost estimate for the data recovery service.
17. What Are The Ethical Considerations In Photo Recovery?
When recovering photos, it’s essential to consider ethical implications:
- Privacy: Respect the privacy of individuals in the photos.
- Copyright: Ensure you have the right to recover and use the photos.
- Consent: Obtain consent from individuals before recovering and sharing their photos.
- Professional Ethics: Data recovery professionals should adhere to ethical standards and maintain confidentiality.
18. What Is The Future Of Photo Storage And Recovery?
The future of photo storage and recovery is evolving with advancements in technology:
- Advanced Cloud Solutions: Enhanced cloud storage solutions with AI-powered organization and recovery features.
- Improved Data Recovery Tools: More sophisticated data recovery software with higher success rates.
- AI-Powered Recovery: Artificial intelligence and machine learning algorithms for more efficient data recovery.
- Quantum Storage: Quantum storage technologies for more secure and efficient data storage.
- Decentralized Storage: Blockchain-based decentralized storage solutions for enhanced security and privacy.
19. How Does dfphoto.net Help With Photo Management and Recovery?
dfphoto.net offers a wealth of resources to help you manage and protect your photos. From detailed tutorials on backup strategies to reviews of the latest data recovery software, we’re here to support your photography journey.
Explore our articles on:
- Photo Backup Best Practices: Learn how to create a robust backup plan to safeguard your images.
- Choosing the Right Cloud Storage: Compare different cloud services and find the best option for your needs.
- Data Recovery Software Reviews: Get expert reviews and recommendations on the top data recovery tools.
- Preventing Data Loss: Discover tips and tricks to minimize the risk of photo loss.
At dfphoto.net, we understand the importance of preserving your visual memories. Visit our website today to explore our comprehensive resources and connect with a community of passionate photographers. Address: 1600 St Michael’s Dr, Santa Fe, NM 87505, United States. Phone: +1 (505) 471-6001. Website: dfphoto.net.
20. What Are Some Advanced Techniques For Photo Recovery?
For more challenging data loss situations, consider these advanced techniques:
- Hex Editor: Use a hex editor to examine the raw data on the storage device and manually recover files.
- Data Carving: Employ data carving techniques to search for file headers and footers and reconstruct files.
- RAID Recovery: Recover data from RAID arrays using specialized RAID recovery tools and techniques.
- Forensic Data Recovery: Utilize forensic data recovery methods for complex data loss scenarios.
- Chip-Off Recovery: Perform chip-off recovery to extract data directly from the memory chips of the storage device.
FAQ: How to Get Your Photos Back
Q1: How long do deleted photos stay in the Recently Deleted album?
Photos typically remain in the Recently Deleted album for 30 days before being permanently deleted.
Q2: Can I recover photos deleted from a memory card?
Yes, using data recovery software can often recover deleted photos from a memory card, as long as the card hasn’t been overwritten.
Q3: What is the best data recovery software for photos?
Popular options include Recuva, EaseUS Data Recovery Wizard, Stellar Data Recovery, and Disk Drill, each offering different features and recovery rates.
Q4: How can I prevent accidental photo deletion?
Be careful when deleting files, double-check before confirming deletion, and use devices with a recycle bin feature.
Q5: Is it possible to recover photos from a physically damaged hard drive?
It might be possible, but it requires professional data recovery services with specialized tools and expertise.
Q6: What is the 3-2-1 backup rule for photos?
Keep three copies of your data, on two different media, with one copy stored offsite to ensure data redundancy and protection.
Q7: How does cloud storage help in photo recovery?
Cloud storage automatically backs up your photos, allowing you to access them from any device and recover them if they are lost or deleted.
Q8: What are the ethical considerations in photo recovery?
Respect privacy, ensure copyright compliance, obtain consent for sharing photos, and adhere to professional ethics when recovering data.
Q9: Can I recover photos from a formatted storage device?
Yes, data recovery software can often recover photos from a formatted device, but the chances of success decrease as new data is written to the device.
Q10: How can dfphoto.net assist with photo management and recovery?
dfphoto.net provides resources, tutorials, and expert reviews to help you manage, back up, and recover your photos effectively.
In conclusion, losing photos can be a distressing experience, but with the right knowledge and tools, recovery is often possible. By following the steps outlined in this guide and taking preventive measures, you can protect your precious memories and ensure they are safely stored for years to come. Visit dfphoto.net for more in-depth articles, expert advice, and a supportive community of photographers. Don’t let data loss ruin your photography passion – start safeguarding your photos today!