Accidentally deleted a precious photo? It happens to the best of us. Whether it was a slip of the finger or a moment of digital decluttering gone wrong, losing photos can be disheartening. Fortunately, if you’re using Apple’s ecosystem with iCloud Photos, recovering your deleted memories is often straightforward. Apple provides a grace period to get your photos back from the digital abyss. This guide will walk you through How To Get Your Deleted Photos Back on iCloud, iPhone, and Mac devices.
Recovering Photos from iCloud
If you use iCloud Photos to sync your memories across devices, your first stop for photo recovery should be iCloud.com. Here’s how to restore your photos via the web:
- Navigate to iCloud.com in your web browser and sign in with your Apple ID.
- Once logged in, open the “Photos” app.
- Look for the “Recently Deleted” album in the sidebar. If you don’t see the sidebar, click the sidebar icon, typically located in the top corner.
- Inside the “Recently Deleted” album, you will see thumbnails of your recently deleted photos and videos.
- Select the photos or videos you wish to recover. You can select multiple items by clicking on each one.
- After selecting your desired photos, click the “Recover” button. Your photos will then be restored to your iCloud Photos library and will reappear on all devices connected to your iCloud account.
Recovering Photos on Your iPhone
For those who prefer to manage their photos directly from their iPhone, the Photos app also provides a “Recently Deleted” album for easy recovery. Here’s how to access it:
- Open the “Photos” app on your iPhone.
- Tap the “Albums” tab at the bottom of the screen.
- Scroll down to the “Utilities” section and tap on “Recently Deleted”.
- If you are using iOS 16, iPadOS 16.1, or later, you may be prompted to use Face ID or Touch ID to unlock the “Recently Deleted” album for security reasons.
- Tap “Select” in the top right corner.
- Choose the specific photos or videos you want to retrieve. If you want to recover everything, tap “Recover All”.
- Confirm your action by tapping “Recover”. The recovered photos will be returned to your main Photos library.
Restoring Deleted Photos on Mac
Mac users can also recover deleted photos directly from the Photos application. The process is similar to iPhone recovery:
- Open the “Photos” app on your Mac.
- In the sidebar, locate and click on “Recently Deleted”. You may need to use Touch ID or your password to unlock this album if you have enabled this security feature.
- Browse through the deleted items and select the photos you want to restore.
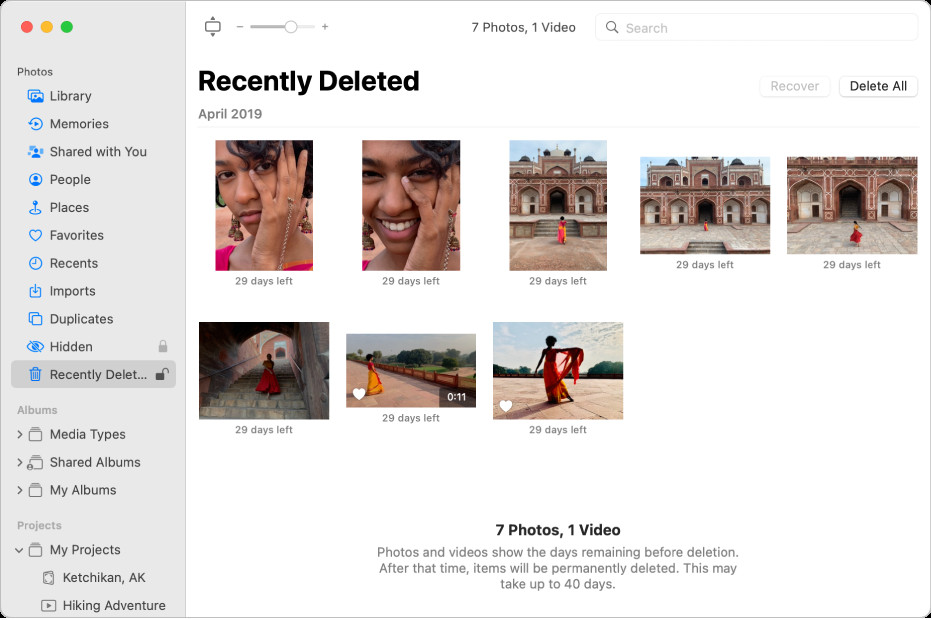 Photos app on Mac showing Recently Deleted album selected and items ready to be recovered
- Click the “Recover” button. The selected photos will be restored to your Photos library on your Mac.
Important Time Limit for Photo Recovery
It’s crucial to remember that the “Recently Deleted” album is not a permanent storage solution. Photos and videos in this album are kept for 30 days. After this period, they are permanently deleted and cannot be recovered from the “Recently Deleted” album.
If you have a Time Machine backup for your Mac, there might be a chance to recover photos even after they are permanently deleted from Photos and iCloud. Consult Apple’s guide on restoring a Photos library from Time Machine for instructions on this more advanced recovery method.
In most cases, for recent deletions, the “Recently Deleted” album provides a straightforward way to get your photos back. Make it your first check when you realize you’ve accidentally deleted a photo.
Reference: