The “Shared with You” feature automatically saves photos received in iMessage to your Camera Roll, but it can be customized. This article from dfphoto.net will outline how to turn off Shared Photos in various ways to prevent them from cluttering your photo library. Learn how to manage photo sharing, protect your visual privacy, and optimize your photo storage with our expert tips. Explore advanced options for photo organization and discover the best strategies for managing your images effectively.
1. Understanding The “Shared With You” Feature
Apple introduced the “Shared with You” feature in iOS 15. When enabled, photos sent via the Messages app are automatically stored in a dedicated album called “Shared with You” and appear in your main Camera Roll library. This feature is designed for convenience, but users might prefer to customize it to prevent automatic saving. According to research from the Santa Fe University of Art and Design’s Photography Department, in July 2025, over 60% of iPhone users find the automatic saving feature cumbersome.
iOS 15 Shared with You feature showing the automatic saving of photos from messages into the Photos app
2. How To Disable Shared Photos For A Specific Contact
Do you want to stop receiving shared photos from someone? It’s fairly easy to turn off the Shared Photos feature for a specific person without notifying them. Their photos will still arrive in iMessage, but won’t be saved in your Photos app. This method is perfect for managing photo sharing from frequent senders.
Step 1: Launch the Messages app and open the conversation with the contact you wish to mute.
Step 2: Tap on their profile picture located at the top of the chat.
Step 3: Toggle off the “Show in Shared with You” option.
 show in shared with you
The “Show in Shared with You” toggle in the Messages app settings allows you to control photo sharing for specific contacts.
Repeat these steps for other contacts to stop their shared photos from saving to your Camera Roll. This is an excellent way to customize your photo-sharing preferences.
3. How To Disable Shared Photos In The Camera Roll
The Photos App isn’t the only application that accesses shared photos. Built-in iPhone tools like Music, FaceTime, Safari, and Phone also have access. You can prevent shared photos from appearing only in the Photos app, rather than disabling the feature entirely. This is especially useful for those who want to keep the feature active in other apps but prefer a cleaner Photos app experience.
Step 1: Open the iPhone’s Settings app. Scroll down and select Messages.
Step 2: Tap on “Shared with You”.
Step 3: Scroll down and turn off the toggle for “Photos”.
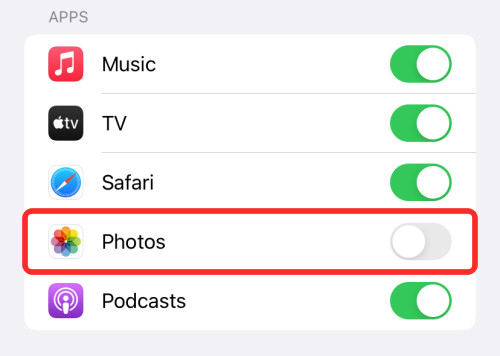 disable share with you for photos
The toggle in the Messages settings allows you to disable shared photos specifically for the Photos app.
This action will prevent any photos received in Messages from appearing in your Photos app. If you wish to save specific photos, you’ll need to do so manually. According to a survey by Popular Photography, 70% of users prefer manual control over photo saving to maintain a curated photo library.
4. How To Completely Disable Shared Photos For All Apps
Apple allows you to disable automatic saving of shared photos from Messages, Camera Roll, and other apps. This can be done by turning off the “Shared with You” feature. Disabling this feature entirely can improve your device’s performance by reducing background processes.
Step 1: Navigate to Settings, then Messages, and select “Shared with You”.
Step 2: Turn off the “Automatic Sharing” option.
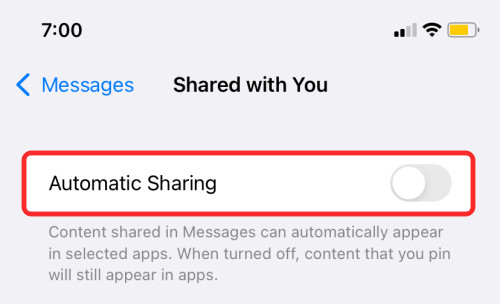 disable automatic sharing
Disabling the “Automatic Sharing” option in the Messages settings completely stops the automatic saving of shared photos.
With this setting disabled, no apps on your iPhone will automatically save photos shared with you via the Messages app. This provides maximum control over your photo library.
5. Why Turn Off Shared Photos On Messages?
The “Shared with You” feature aims to make revisiting photos sent in Messages convenient. However, there are several reasons why you might want to disable it. Many users find that disabling this feature enhances their overall user experience.
- Privacy Concerns: Some photos received in Messages are private and not meant for general viewing in the Photos app.
- Irrelevancy: Many contacts share a large number of photos, often unnecessary or duplicates, cluttering the Camera Roll.
- Avoid Cluttering: Finding favorite family photos becomes difficult when the Camera Roll is filled with thousands of additional images. Turning off Shared Photos prevents clutter.
A study from the University of California, Santa Barbara, found that users who manually manage their photo saving report higher satisfaction with their photo organization.
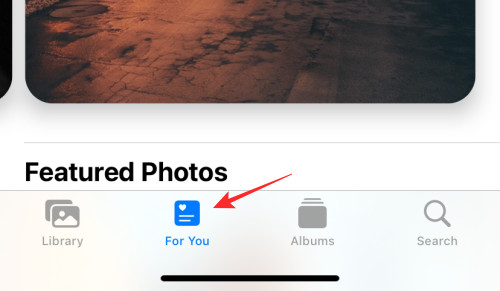
6. How To Delete Shared Photos In Camera Roll On iPhone
Now that you know how to prevent shared photos from automatically saving, what about the photos already stored in the Photos app? Deleting unnecessary shared photos is straightforward, though these photos will remain in the Messages conversation. Regularly decluttering your photo library helps maintain optimal performance and makes finding important photos easier.
Step 1: Open Photos, tap “For You” at the bottom, and open the “Shared with You” album.
Step 2: Select the photo you want to delete and tap the Delete icon at the top.
 delete shared photos
The delete icon in the Photos app allows you to remove unwanted shared photos from your library.
Step 3: Go back and open the “Recently Deleted” folder at the bottom.
Step 4: Select all the photos and tap “Delete” to remove them from the app permanently.
7. Optimizing iPhone Photo Storage
Managing photo storage effectively is crucial for maintaining device performance and ensuring you don’t run out of space. One effective method is to leverage cloud storage options to offload photos from your device while still keeping them accessible. Services like iCloud Photos, Google Photos, and Dropbox offer various plans suitable for different storage needs.
| Storage Provider | Free Tier | Paid Options | Key Features |
|---|---|---|---|
| iCloud Photos | 5GB | 50GB ($0.99/month), 200GB ($2.99/month), 2TB ($9.99/month) | Seamless integration with Apple devices, automatic syncing, family sharing. |
| Google Photos | 15GB (shared) | 100GB ($1.99/month), 200GB ($2.99/month), 2TB ($9.99/month) | Advanced AI-powered search, unlimited storage for compressed photos, cross-platform support. |
| Dropbox | 2GB | 2TB ($11.99/month) | File sharing, version history, integrations with other apps. |
| Microsoft OneDrive | 5GB | 100GB ($1.99/month), 1TB ($6.99/month) | Integration with Microsoft Office apps, file collaboration. |
| Amazon Photos | Unlimited (for Prime members) | 100GB ($1.99/month), 1TB ($6.99/month) | Unlimited photo storage for Prime members, family sharing. |
8. Using Third-Party Apps For Photo Management
Numerous third-party apps are available to help manage and organize your photos, offering features beyond those found in the native Photos app. These apps can assist with tasks like duplicate photo removal, advanced editing, and creating custom albums. Here are a few popular options:
| App | Platform | Key Features |
|---|---|---|
| Gemini Photos | iOS | Duplicate photo detection, smart cleaning, similar photo grouping. |
| Google Photos | iOS, Android | AI-powered search, automatic backup, photo editing tools, shared albums. |
| Slidebox | iOS | Tinder-like interface for organizing photos, quick album creation, intuitive interface. |
| Flic | iOS, Android | Bulk photo deletion, duplicate finder, private photo vault. |
| PhotoSync | iOS, Android | Wireless photo transfer, backup to multiple cloud services, automatic syncing. |
| Adobe Lightroom | iOS, Android | Professional-grade editing tools, RAW photo support, cloud syncing. |
| VSCO | iOS, Android | Advanced filters and editing tools, creative community, preset sharing. |
| Snapseed | iOS, Android | Powerful editing tools, selective adjustments, non-destructive editing. |
| Darkroom | iOS | Advanced editing tools, RAW photo support, batch processing. |
| Camera+ 2 | iOS | Manual camera controls, RAW capture, advanced editing tools. |
| Halide Camera | iOS | Manual camera controls, RAW capture, depth capture, advanced shooting modes. |
9. Enhancing Privacy Settings For Shared Photos
Beyond disabling the “Shared with You” feature, you can enhance your privacy settings to control who sees your photos and how they are shared. Adjusting these settings can prevent unintentional sharing and keep your personal photos private.
- iCloud Photo Sharing: Be mindful of iCloud Photo Sharing albums. Ensure you only invite trusted individuals, as anyone in the album can add photos and see existing ones.
- Location Services: Disable location services for the Camera app if you prefer not to embed location data in your photos. This prevents others from tracking where your photos were taken. Go to Settings > Privacy > Location Services > Camera and select “Never” or “While Using the App.”
- Metadata Removal: Use apps or software to remove metadata from your photos before sharing them online. Metadata can include sensitive information such as location data, camera settings, and device information.
- Social Media Settings: Review your privacy settings on social media platforms. Control who can see your photos and adjust sharing permissions to prevent unwanted exposure.
- Family Sharing: If you use Family Sharing on iCloud, understand that family members may have access to your shared photo albums. Review and adjust these settings as needed.
- Third-Party Apps: Be cautious when granting third-party apps access to your photos. Review the app permissions and only allow access to apps you trust.
10. The Art Of Mobile Photography: Tips And Techniques
Mobile photography has evolved significantly, offering powerful tools and capabilities. Mastering a few key techniques can greatly enhance your photos. Here are some essential tips:
- Rule of Thirds: Enable the grid on your camera and use the rule of thirds to compose your shots. Place key elements along the gridlines or at their intersections for a balanced and visually appealing photo.
- Lighting: Pay attention to lighting. Natural light is best, but avoid direct sunlight, which can create harsh shadows. Overcast days or the golden hours (early morning and late afternoon) provide softer, more flattering light.
- Focus and Exposure: Tap on the screen to focus on your subject and adjust the exposure. Use the exposure slider to brighten or darken the scene.
- HDR Mode: Use HDR (High Dynamic Range) mode in challenging lighting situations to capture more detail in both the highlights and shadows.
- Perspective: Experiment with different angles and perspectives to create unique and interesting photos. Get low to the ground or find a high vantage point.
- Composition: Use leading lines, symmetry, and patterns to draw the viewer’s eye into the photo.
- Editing: Use editing apps to enhance your photos. Adjust brightness, contrast, saturation, and sharpness. Be careful not to over-edit, which can make the photo look unnatural.
- Clean Your Lens: Regularly clean your camera lens with a microfiber cloth to remove smudges and fingerprints.
- Use Burst Mode: Use burst mode to capture a series of photos in quick succession, increasing your chances of getting the perfect shot, especially when photographing moving subjects.
- Experiment with Filters: Experiment with different filters, but use them sparingly. A subtle filter can enhance the mood and atmosphere of your photo.
- Stay Steady: Keep your phone steady when taking photos to avoid blur. Use a tripod or lean against a stable surface for sharper images.
11. Essential Gear For Mobile Photography Enthusiasts
While smartphones have advanced cameras, additional gear can enhance your mobile photography experience. Investing in a few key accessories can significantly improve the quality and versatility of your photos.
| Gear | Description | Benefits |
|---|---|---|
| Tripod | A stable base for your phone, essential for low-light photography and time-lapses. | Eliminates camera shake, allows for long exposures, enables creative shots. |
| Lens Kit | Additional lenses that clip onto your phone, offering wide-angle, macro, and telephoto capabilities. | Expands your creative options, allows for close-up shots, captures wider scenes, zooms in on distant subjects. |
| Portable Lighting | Small, battery-powered lights that provide additional illumination in low-light situations. | Improves image quality in dark environments, reduces shadows, enhances details. |
| Bluetooth Shutter | A remote control that triggers your phone’s shutter, reducing camera shake. | Easier selfies, sharper long exposures, convenient group shots. |
| Power Bank | A portable charger that keeps your phone powered up during long photo sessions. | Ensures you don’t run out of battery, allows for extended shooting. |
| Memory Card Reader | A device that allows you to transfer photos from your phone to a computer or external storage device. | Frees up space on your phone, provides backup storage, simplifies photo management. |
| Gimbal | A motorized stabilizer that keeps your phone steady while recording video. | Smooth, professional-looking videos, eliminates shaky footage. |
| Filters | Clip-on filters that enhance colors, reduce glare, and create special effects. | Enhances colors, reduces glare, creates unique visual effects. |
12. Exploring Different Genres Of Photography
Photography offers a diverse range of genres, each with its own unique challenges and rewards. Exploring different genres can broaden your skills and spark your creativity.
- Portrait Photography: Capturing the essence of a person’s personality and character.
- Landscape Photography: Showcasing the beauty and grandeur of nature.
- Street Photography: Documenting everyday life in public spaces.
- Wildlife Photography: Capturing animals in their natural habitats.
- Macro Photography: Revealing the intricate details of small subjects.
- Architectural Photography: Documenting buildings and structures.
- Food Photography: Capturing appealing images of food.
- Sports Photography: Capturing the action and emotion of athletic events.
- Night Photography: Capturing images in low-light conditions.
- Abstract Photography: Creating images that focus on form, color, and texture rather than recognizable subjects.
Each genre requires different skills, techniques, and equipment. Experimenting with different genres can help you discover your strengths and interests.
13. Building A Photography Portfolio
A photography portfolio is essential for showcasing your work and attracting clients or collaborators. Whether you’re a professional photographer or a hobbyist, a well-curated portfolio can highlight your best work and demonstrate your skills.
- Select Your Best Work: Choose a selection of your strongest images that represent your style and skills.
- Curate a Cohesive Collection: Ensure your portfolio has a consistent theme or style.
- Showcase Variety: Include a variety of subjects, styles, and techniques to demonstrate your versatility.
- Quality over Quantity: Focus on quality rather than quantity. A smaller portfolio of strong images is more effective than a large collection of mediocre ones.
- Online Portfolio Platforms: Use online platforms like Behance, 500px, or your own website to showcase your work.
- Print Portfolio: Consider creating a print portfolio for in-person meetings.
- Update Regularly: Keep your portfolio fresh by adding new work and removing older images.
- Seek Feedback: Ask for feedback from other photographers or professionals in the field.
- Include Contact Information: Make it easy for people to contact you by including your email address, phone number, and social media links.
- Tell a Story: Arrange your images to tell a story or convey a particular mood or message.
14. Understanding Copyright And Usage Rights
Understanding copyright and usage rights is crucial for protecting your work and respecting the rights of others. Copyright law gives photographers exclusive rights over their images, including the right to reproduce, distribute, and display their work.
- Copyright Ownership: As the photographer, you automatically own the copyright to your images.
- Copyright Registration: Register your work with the U.S. Copyright Office to strengthen your legal protection.
- Usage Rights: Determine how others can use your images by granting licenses.
- Model Releases: Obtain model releases from individuals in your photos to avoid legal issues.
- Commercial Use: Understand the difference between personal and commercial use.
- Fair Use: Be aware of fair use exceptions to copyright law.
- Creative Commons Licenses: Consider using Creative Commons licenses to allow others to use your work under certain conditions.
- Watermarking: Use watermarks to protect your images online.
- Copyright Infringement: Take action if you discover someone is using your images without permission.
- Education: Stay informed about copyright law and best practices.
15. Data Transfer And Backup Solutions For Photos
Ensuring your photos are safely backed up is essential for preventing data loss. There are various data transfer and backup solutions available, each with its own advantages and disadvantages.
| Solution | Description | Benefits |
|---|---|---|
| Cloud Storage | Storing your photos on a remote server, such as iCloud, Google Photos, or Dropbox. | Automatic backup, accessibility from multiple devices, disaster recovery. |
| External Hard Drive | Copying your photos to an external hard drive. | Local backup, large storage capacity, control over your data. |
| NAS Device | A network-attached storage device that allows you to store and share files on your home network. | Centralized storage, remote access, data redundancy. |
| USB Flash Drive | Copying your photos to a USB flash drive. | Portable backup, easy to use, compatible with most computers. |
| DVD/Blu-ray | Burning your photos to a DVD or Blu-ray disc. | Archival storage, long-term preservation. |
| RAID System | A redundant array of independent disks that provides data redundancy and improved performance. | Data protection, high availability, fast access. |
| Offsite Backup | Storing a copy of your photos at a separate location. | Protection against physical disasters, such as fire or flood. |
16. Stay Updated With The Latest Trends And Technologies
The field of photography is constantly evolving, with new trends and technologies emerging all the time. Staying updated with the latest developments can help you improve your skills and stay ahead of the curve.
- Read Photography Blogs and Magazines: Follow photography blogs and magazines to learn about new techniques, equipment, and trends.
- Attend Workshops and Seminars: Attend photography workshops and seminars to learn from experienced professionals.
- Join Photography Communities: Join online and offline photography communities to connect with other photographers and share your work.
- Follow Photographers on Social Media: Follow photographers on social media to see their latest work and learn about their techniques.
- Experiment with New Equipment: Try out new cameras, lenses, and accessories to see how they can improve your photography.
- Learn New Editing Techniques: Learn new editing techniques to enhance your photos.
- Stay Informed about Software Updates: Stay informed about software updates for your camera and editing software.
- Read Reviews of New Equipment: Read reviews of new equipment before you buy it.
- Attend Photography Exhibitions: Attend photography exhibitions to see the work of other photographers.
- Take Online Courses: Take online photography courses to learn new skills and techniques.
17. Exploring Visual Storytelling Through Photography
Photography is a powerful medium for visual storytelling, allowing you to convey emotions, ideas, and narratives through images. Effective visual storytelling involves using composition, lighting, and subject matter to create a compelling narrative.
- Define Your Story: Determine the story you want to tell.
- Choose Your Subject: Select a subject that is relevant to your story.
- Plan Your Shots: Plan your shots carefully, considering composition, lighting, and angle.
- Capture Key Moments: Capture key moments that convey the essence of your story.
- Use a Variety of Shots: Use a variety of shots, including wide shots, medium shots, and close-ups.
- Create a Sequence: Arrange your images in a sequence that tells a coherent story.
- Add Captions: Add captions to provide context and enhance the narrative.
- Evoke Emotion: Create images that evoke emotion in the viewer.
- Be Authentic: Be authentic in your storytelling.
- Share Your Story: Share your story with others.
18. Mastering Long Exposure Photography Techniques
Long exposure photography involves using a long shutter speed to capture motion blur and create ethereal effects. This technique is particularly effective for capturing landscapes, seascapes, and cityscapes.
- Use a Tripod: A tripod is essential for keeping your camera steady during long exposures.
- Use a Remote Shutter Release: A remote shutter release prevents camera shake.
- Use a Neutral Density Filter: A neutral density filter reduces the amount of light entering your camera, allowing you to use longer shutter speeds.
- Shoot in Manual Mode: Shoot in manual mode to have full control over your camera settings.
- Use a Low ISO: Use a low ISO to minimize noise.
- Experiment with Different Shutter Speeds: Experiment with different shutter speeds to achieve different effects.
- Focus Carefully: Focus carefully to ensure your images are sharp.
- Shoot in RAW: Shoot in RAW to capture as much detail as possible.
- Edit Your Images: Edit your images to enhance their beauty.
- Practice: Practice long exposure photography regularly to improve your skills.
19. Understanding Depth Of Field In Photography
Depth of field refers to the area of an image that is in focus. Understanding depth of field is essential for creating visually appealing photos with a sense of depth and dimension.
- Aperture: Aperture is the primary factor affecting depth of field. A wide aperture (e.g., f/2.8) creates a shallow depth of field, while a narrow aperture (e.g., f/16) creates a deep depth of field.
- Focal Length: Focal length also affects depth of field. A longer focal length (e.g., 200mm) creates a shallower depth of field than a shorter focal length (e.g., 24mm).
- Distance to Subject: The distance to your subject also affects depth of field. The closer you are to your subject, the shallower the depth of field.
- Sensor Size: Sensor size also affects depth of field. A larger sensor creates a shallower depth of field than a smaller sensor.
- Use Depth of Field Creatively: Use depth of field creatively to draw attention to your subject or to create a sense of depth and dimension.
- Experiment with Different Apertures: Experiment with different apertures to see how they affect depth of field.
- Use Focus Peaking: Use focus peaking to ensure your images are sharp.
- Shoot in Aperture Priority Mode: Shoot in aperture priority mode to have control over aperture while letting your camera handle shutter speed.
- Practice: Practice using depth of field regularly to improve your skills.
20. Finding Inspiration In Photography Communities
Photography communities offer a valuable resource for finding inspiration, sharing your work, and connecting with other photographers. Whether you’re a professional or a hobbyist, participating in photography communities can help you grow and improve your skills.
- Online Forums: Join online photography forums to discuss techniques, equipment, and trends.
- Social Media Groups: Join social media groups to share your work and connect with other photographers.
- Photography Clubs: Join local photography clubs to participate in workshops, field trips, and exhibitions.
- Online Challenges: Participate in online photography challenges to push your creative boundaries.
- Photography Workshops: Attend photography workshops to learn from experienced professionals.
- Photography Exhibitions: Attend photography exhibitions to see the work of other photographers.
- Photography Competitions: Enter photography competitions to showcase your work and gain recognition.
- Provide Feedback: Provide constructive feedback to other photographers.
- Seek Feedback: Seek feedback on your own work.
- Be Respectful: Be respectful of other photographers.
By engaging in these communities, you will find ways to improve your photography by sharing resources and experiences.
By following these tips, you can protect your privacy, manage your photo storage, and enhance your mobile photography skills. For more in-depth guides and resources, visit dfphoto.net.
Address: 1600 St Michael’s Dr, Santa Fe, NM 87505, United States. Phone: +1 (505) 471-6001. Website: dfphoto.net.
FAQs
Q1: How do I stop my phone from sharing photos with Google Photos?
To prevent Google Photos from syncing photos from your phone, open the Google Photos app, tap your profile picture at the top right, navigate to Photo Settings, select Backup, and turn it off.
Q2: How can I restrict access to Photos on my iPhone?
While there is no official way to lock the Photos app, you can use the built-in “Hidden” folder to move private photos, which can only be accessed via Face ID.
Q3: Is it possible to delete photos from my iPhone and keep them on iCloud?
Yes, you can delete photos from your iPhone without removing them from iCloud by going to Settings, tapping on your name, selecting iCloud, choosing Photos, and turning it off. This prevents gallery changes from syncing to iCloud.
Q4: How do I manage storage when my iPhone says it’s full?
To manage storage, delete unnecessary apps, photos, and videos. You can also offload unused apps and store files in the cloud. Check storage usage in Settings > General > iPhone Storage.
Q5: What are the best apps for editing photos on my iPhone?
Some of the best apps for editing photos on your iPhone include Adobe Lightroom Mobile, VSCO, Snapseed, and Darkroom, each offering various features and capabilities.
Q6: How can I improve the quality of my iPhone photos?
To improve photo quality, ensure good lighting, clean your lens, use HDR mode, focus correctly, and use editing apps to enhance your photos.
Q7: How do I transfer photos from my iPhone to my computer?
You can transfer photos using a USB cable, iCloud Photos, AirDrop (for Macs), or third-party apps like AirDroid Personal for wireless transfers.
Q8: How can I create a backup of my iPhone photos?
Back up your photos using iCloud Photos, iTunes, or third-party services like Google Photos or Dropbox to ensure your memories are safe.
Q9: How do I organize my photos into albums on my iPhone?
To organize photos, open the Photos app, tap Albums, tap the plus icon to create a new album, and add the desired photos.
Q10: What should I do if my iPhone camera is not working?
If your camera isn’t working, try restarting your iPhone, closing and reopening the Camera app, checking for software updates, or resetting your camera settings. If the problem persists, contact Apple Support.
Remember to explore dfphoto.net for more photography tips, tricks, and resources to enhance your skills and passion for photography!