Getting rid of reflection in photos can be tricky, but dfphoto.net offers effective solutions. We’ll explore various methods to eliminate glare and reflections using the best tools for desktop, web, and mobile, ensuring your photos look their best with image retouching. Master the art of reflection removal with our guide and discover the latest photo enhancement techniques.
Reflections can be a photographer’s nightmare, but understanding how to manage them is key to creating stunning images. Explore our comprehensive guide on dfphoto.net, offering tips on image retouching, reflection removal, and photo enhancement. Learn how to use tools effectively and discover innovative photo editing solutions to transform your pictures into professional-quality masterpieces. Dive into the world of visual artistry and elevate your photography skills with dfphoto.net.
1. Understanding Glare in Photography
What exactly is glare, and why does it appear in our photos?
Glare occurs when a light source hits a reflective surface and enters the camera lens. According to research from the Santa Fe University of Art and Design’s Photography Department, in July 2025, glare not only reduces image clarity but also obscures essential details. Recognizing the source and type of glare is the first step in effectively removing it.
1.1. Types of Glare
What are the different types of glare you might encounter?
Camera glare often manifests as haze or lens flare, caused by light refracting within the lens elements. The more elements a lens has, especially in zoom lenses, the more prone it is to flare. Other types include reflections from surfaces like glass or water, which can obscure the subject or create unwanted bright spots.
1.2. Identifying Glare Sources
How can you pinpoint the cause of glare in your photographs?
Identifying glare sources involves observing how light interacts with your scene. If the sun is behind your subject, it’s an obvious culprit. However, reflections can be more subtle, such as light bouncing off windows or reflective materials. Look for bright spots or hazy areas in your image to trace the source.
2. Four Proven Methods to Remove Glare from Photos
What are the most effective methods for eliminating glare from your photos?
Several tools and techniques can help remove glare, including AI-powered software, professional photo editing suites, and mobile apps. Each method offers unique advantages depending on the type of glare and the desired level of precision.
2.1. Method 1: AniEraser – The AI-Powered Glare Remover
Why is AniEraser considered an excellent choice for removing glare?
AniEraser stands out due to its intuitive interface and powerful AI capabilities. This cross-platform tool simplifies photo enhancement, allowing users to remove unwanted objects and glare with just a few clicks, regardless of the device or platform.
 AniEraser interface showing image being uploaded for glare removal
2.1.1. Key Features of AniEraser
What features make AniEraser a standout option for photo editing?
AniEraser is known for its:
- Cross-Platform Compatibility: Works seamlessly on PC, iOS, and online.
- AI-Powered Technology: Quickly removes objects with high precision.
- Batch Processing: Allows removing multiple items at once.
- Customizable Brush Size: Provides precise control for detailed edits.
- Quality Preservation: Maintains image quality and detail.
- User-Friendly Interface: Requires no advanced editing skills.
2.1.2. Step-by-Step Guide to Removing Glare with AniEraser
How can you use AniEraser to eliminate glare from your photos?
Follow these simple steps:
- Upload Image: Open AniEraser and click the “Upload” button to import your photo.
- Brush Over Glare: Carefully brush over the glare you want to remove. Adjust the brush size for precision.
- Download Image: Preview the results and click “Download” to save your edited image.
 Screenshot showing the glare being brushed over in AniEraser
2.2. Method 2: Adobe Photoshop – The Industry Standard
Why is Adobe Photoshop a popular choice among professionals?
Adobe Photoshop is the industry standard for digital imaging, offering a comprehensive suite of tools for design, photography, and video editing. Its versatility and precision make it ideal for removing glare and reflections from photos.
2.2.1. Key Features of Adobe Photoshop
What are the standout features of Photoshop that make it suitable for removing glare?
Photoshop boasts features like:
- Layers: Allows non-destructive editing.
- Adjustment Layers: Provides further control over image adjustments.
- History Panel: Enables easy undo of edits.
- Healing Tools: Removes blemishes and imperfections.
- Clone Stamp Tool: Copies pixels to cover up unwanted areas.
- Blending Modes: Alters how layers interact for creative effects.
2.2.2. Using the Lasso Tool in Photoshop
How can the Lasso Tool be used to remove glare from photos in Photoshop?
The Lasso Tool is a straightforward way to remove glare. Here’s how:
- Open Image: Launch Photoshop and open your image file.
- Select Lasso Tool: Select the “Lasso Tool” from the toolbar (or press “L”).
 Screenshot of the Photoshop interface highlighting the Lasso Tool
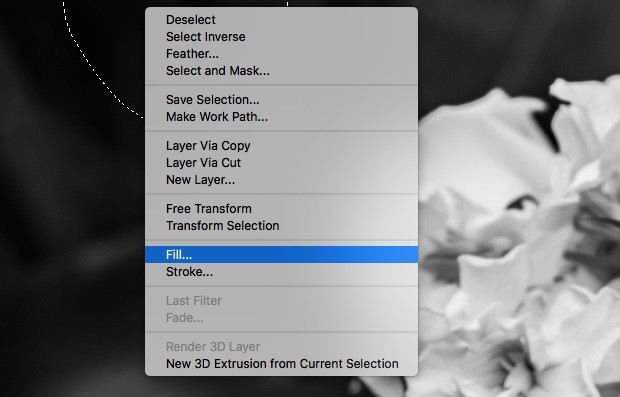
- Draw Selection: Draw a circle around the glare.
- Fill Selection: Right-click and choose “Fill.”
- Content-Aware Fill: In the dialog box, select “Content-Aware” from the “Contents” dropdown menu.
 Dialog box in Photoshop showing the Content-Aware Fill option
- Repeat: Repeat for any remaining glare spots.
2.3. Method 3: Snapseed – The Mobile Editing Powerhouse
What makes Snapseed a great mobile option for photo editing?
Snapseed is a powerful mobile photo editor with an intuitive interface, perfect for on-the-go editing. It’s free, doesn’t consume much space, and allows you to save images in high quality.
2.3.1. Key Features of Snapseed
What features make Snapseed a valuable tool for mobile photo editing?
Snapseed includes:
- 29 Tools and Filters: Healing, Brush, Structure, HDR, and Perspective.
- RAW Support: Edits both JPG and RAW files.
- Customizable Looks: Save and reuse edit settings.
- Selective Filtering: Precise adjustments with the Brush tool.
- Pinpoint Accuracy: Fine-tune styles.
- Tutorial Cards: Provides tips and tricks for photography.
2.3.2. Removing Reflections with Snapseed’s Healing Tool
How can you use the Healing tool in Snapseed to remove reflections?
To remove reflections using Snapseed:
- Open Image: Launch Snapseed and open the photo.
- Zoom In: Zoom in on the glare for a clear view.
- Select Healing Tool: Tap “TOOLS” and select the “Healing” tool.
 Snapseed interface showcasing the Healing tool
- Apply Healing: Drag your finger across the reflection to remove it.
- Tune Image: Go to “TOOLS” and tap “Tune Image” to adjust settings for a natural look.
 Snapseed interface highlighting the Tune Image tool
- Export: Tap “EXPORT” to save your image.
2.4. Method 4: Fotor – The All-In-One Image Editor
Why is Fotor considered an all-in-one photo editing solution?
Fotor offers a wide array of free online photo editing tools, making it easy to remove glare, crop, resize, add text, create collages, and design graphics. It’s a versatile tool for quick and comprehensive edits.
2.4.1. Key Features of Fotor
What features make Fotor a comprehensive photo editing app?
Fotor includes:
- One-Tap Enhance: Automatically improves image quality.
- Magic Remove: Removes unwanted objects with a magic eraser.
- Resolution Enhancement: Clears blurry images.
- Professional Effects: Offers hundreds of filters and effects.
2.4.2. Using Fotor’s Clone Tool to Eliminate Glare
How can Fotor’s Clone tool be used to get rid of glare in your photos?
To eliminate glare using Fotor’s Clone tool:
- Open Image: Launch Fotor and open your image.
- Select Clone Tool: Navigate to the “Beauty” tool and click “Clone.”
 Fotor interface showing the location of the Clone tool
- Apply Clone: Drag the brush over the glare to remove it. Adjust the brush size and intensity as needed.
- Download: Click “Download” to save the final image.
3. Addressing Specific Reflection Challenges
How can you tackle unique reflection issues in your photos?
Different scenarios require tailored approaches. Understanding specific challenges like reflections on glasses, water, or metallic surfaces can help you choose the most effective method.
3.1. Removing Glare from Glasses
What’s the best way to eliminate glare on eyeglasses in photos?
Glare on glasses can be tricky. Using Photoshop’s Lasso Tool or AniEraser’s AI-powered removal can work wonders. Adjusting the brush size for precision is crucial for maintaining the natural look of the glasses.
3.2. Eliminating Reflections on Water
How can you effectively remove unwanted reflections on water surfaces?
Reflections on water often require careful editing. Snapseed’s Healing tool is excellent for blending the reflected area with the surrounding water, creating a seamless and natural appearance.
3.3. Handling Reflections on Metallic Surfaces
What techniques work best for reducing reflections on metal objects?
Metallic surfaces can produce harsh reflections. Fotor’s Clone tool is useful for copying textures from nearby areas to cover up the reflections, ensuring the metal looks authentic.
4. Preventive Measures: Avoiding Reflections While Shooting
What steps can you take while shooting to minimize reflections in the first place?
Preventing reflections during the photoshoot can save significant editing time. Simple adjustments in positioning, lighting, and equipment can make a big difference.
4.1. Adjusting Camera Angle
How does the camera angle affect reflections in photos?
Adjusting the camera angle can significantly reduce reflections. According to Popular Photography magazine, slightly shifting your position can change the angle at which light hits reflective surfaces, minimizing glare.
4.2. Using Polarizing Filters
What are polarizing filters, and how do they help reduce reflections?
Polarizing filters reduce reflections from non-metallic surfaces such as water and glass. They work by blocking light waves that vibrate in specific directions, thus minimizing glare.
4.3. Controlling Lighting
How can adjusting the lighting setup help prevent reflections?
Proper lighting can minimize unwanted reflections. Diffused light sources and strategic placement can prevent harsh reflections from appearing in your photos.
5. Advanced Techniques for Reflection Removal
What advanced techniques can you use to refine your reflection removal skills?
For complex reflection issues, more advanced techniques may be necessary. These include frequency separation, advanced cloning, and custom brush techniques.
5.1. Frequency Separation
What is frequency separation, and how is it used in photo editing?
Frequency separation is a technique that separates the high and low-frequency details in an image. This allows you to work on color and tone without affecting texture, making it ideal for smoothing out reflections.
5.2. Advanced Cloning Techniques
What are some advanced methods for cloning areas in an image?
Advanced cloning involves using multiple sources and blending modes to create seamless repairs. Careful selection of source pixels and precise application are key to achieving natural-looking results.
5.3. Custom Brush Techniques
How can creating custom brushes improve your photo editing workflow?
Custom brushes can be designed to mimic specific textures or patterns, making it easier to blend and repair areas affected by reflections. This is particularly useful for complex surfaces like fabrics or foliage.
6. Software Comparison: Choosing the Right Tool
Which software is best suited for your reflection removal needs?
The right software depends on your skill level, budget, and specific needs. A comparison of popular tools can help you make an informed decision.
| Software | Platform | Price | Key Features | Best For |
|---|---|---|---|---|
| AniEraser | Windows, Mac, iOS, Web | Varies | AI-powered, cross-platform, batch processing | Quick, easy glare removal |
| Adobe Photoshop | Windows, Mac, iPad | Subscription | Layers, healing tools, clone stamp, content-aware fill | Professional, detailed editing |
| Snapseed | iOS, Android | Free | Healing tool, selective adjustments, tune image | Mobile editing, on-the-go adjustments |
| Fotor | Windows, Mac, iOS, Android | Freemium | One-tap enhance, magic remove, clone tool | All-in-one editing, quick fixes |
7. The Future of Reflection Removal
What are the emerging trends and technologies in reflection removal?
As technology advances, AI and machine learning are playing a greater role in photo editing. These advancements promise more efficient and accurate reflection removal.
7.1. AI-Powered Editing Tools
How are AI-powered tools changing the landscape of photo editing?
AI-powered tools are automating many complex editing tasks, making it easier for users to achieve professional results with minimal effort. These tools can analyze images and intelligently remove reflections, saving time and improving accuracy.
7.2. Machine Learning in Photography
What role does machine learning play in enhancing photos and removing reflections?
Machine learning algorithms can learn from vast datasets of images, allowing them to identify and remove reflections with increasing precision. This technology is continually evolving, promising even more sophisticated solutions in the future.
8. Inspiring Examples of Reflection-Free Photography
What are some examples of stunning photography where reflections have been expertly managed or removed?
Examining successful examples can provide inspiration and practical insights. Showcase images where reflections have been skillfully handled to enhance the overall composition.
8.1. Portraits
Showcase examples of portraits where glare on glasses or skin has been minimized or removed, resulting in clear, striking images.
8.2. Landscapes
Display landscape photos where reflections on water or other surfaces have been managed to create stunning, immersive scenes.
8.3. Architectural Photography
Feature architectural shots where reflections on glass or metallic surfaces have been expertly handled, highlighting the structure’s design and details.
9. Building Your Skills: Practice Exercises
What exercises can help you improve your reflection removal skills?
Practice is essential for mastering any skill. Provide exercises that challenge readers to apply the techniques discussed in the article.
9.1. Before-and-After Projects
Offer before-and-after examples and encourage readers to replicate the results using their own photos. This hands-on approach reinforces learning and builds confidence.
9.2. Challenging Scenarios
Present complex scenarios with multiple reflections and encourage readers to experiment with different techniques to find the best solution.
10. FAQ: Addressing Common Questions About Reflection Removal
What are the most frequently asked questions about removing reflections from photos?
Address common questions to provide further clarity and support.
10.1. Can I completely remove all reflections from any photo?
While significant improvements are possible, complete removal depends on the severity and complexity of the reflections.
10.2. Which tool is best for beginners?
Snapseed and AniEraser are excellent choices for beginners due to their user-friendly interfaces.
10.3. Do polarizing filters work in all situations?
Polarizing filters are most effective on non-metallic surfaces like water and glass.
10.4. How can I avoid reflections when shooting indoors?
Control lighting and adjust your shooting angle to minimize reflections from windows and other surfaces.
10.5. Is it possible to add reflections to a photo?
Yes, photo editing software like Photoshop can be used to add realistic reflections to an image.
10.6. How do I remove reflections from jewelry photos?
Use a combination of proper lighting, careful positioning, and editing tools like Fotor’s Clone tool.
10.7. Can AI tools really replace manual editing?
AI tools can automate many tasks, but manual editing often provides greater control and precision.
10.8. What file format is best for editing photos?
RAW files offer the most flexibility for editing, as they retain more image data than JPG files.
10.9. How do I maintain image quality when removing reflections?
Use non-destructive editing techniques and save your final image in a high-quality format like TIFF or PNG.
10.10. Where can I find more resources on photo editing?
Explore dfphoto.net for detailed tutorials, tips, and inspiration to enhance your photography skills. You can also visit Santa Fe University of Art and Design’s Photography Department at Address: 1600 St Michael’s Dr, Santa Fe, NM 87505, United States or call them on Phone: +1 (505) 471-6001.
By mastering these techniques and utilizing the right tools, you can transform your photos and achieve stunning, reflection-free results. Visit dfphoto.net to discover more tutorials, explore breathtaking images, and connect with a vibrant community of photographers. Don’t miss out – start your journey to photographic excellence today.