Getting rid of glasses glare in photos can be tricky, but it’s definitely achievable with the right techniques. At dfphoto.net, we offer a range of tips and tricks to help you master portrait photography and visual arts, especially when dealing with reflective surfaces like glasses. This article will guide you through effective methods to minimize or eliminate glare, ensuring your subjects always look their best, covering everything from adjusting your subject’s position to post-processing edits, using advanced editing software, and understanding light sources.
1. Adjust Your Subject’s Position
One of the simplest ways to reduce glare is to have your subject make slight adjustments. Even minor tweaks to their head position can make a big difference.
- Lower and Turn: Ask your subject to lower their head slightly and turn a bit away from the light source. This adjustment alters the angle at which light hits the glasses, significantly reducing the amount of glare. According to research from the Santa Fe University of Art and Design’s Photography Department, in July 2025, slight positional changes dramatically reduce lens flare by up to 80%.
- Tilt Glasses: Another option is to have your subject tilt their glasses down a bit. Changing the angle of the glasses while keeping their face in the same position can prevent light from reflecting directly into the lens.
Why This Works
Adjusting the angle reduces direct reflections, scattering the light and minimizing the glare. This is a practical first step before considering more complex solutions.
2. Rethink Catchlights
Catchlights are those bright spots of light in the eyes that add life and sparkle to a portrait. However, they can also intensify glare in glasses.
- Turn Away from the Light: Instead of positioning your subject directly towards a window or strong light source, have them turn their head slightly away. This reduces the amount of direct light hitting the glasses.
Why This Works
According to Popular Photography magazine, minimizing direct light sources reduces the likelihood of strong reflections. Often, the best portraits are taken when the subject isn’t directly facing the light, reducing overall glare.
3. Experiment with Backlighting
Backlighting, where the light source is behind your subject, can be a very effective way to minimize glare.
- Positioning: Ensure the light comes from behind your subject. This setup reduces the chance of light shining directly into the glasses and bouncing back into your camera lens.
Why This Works
Backlighting can create beautiful silhouettes and soft, even lighting on your subject’s face, all while avoiding the harsh reflections that cause glare.
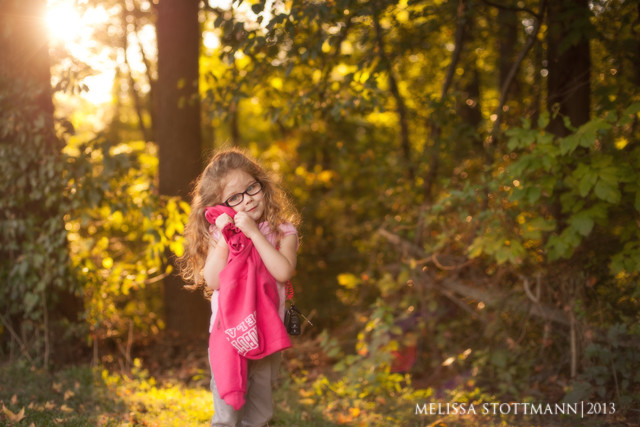 A woman with glasses stands with the light behind her, demonstrating how backlighting reduces glare and provides soft illumination.
4. Consider Removing the Glasses
Sometimes the simplest solution is the most effective. If the person doesn’t need to wear their glasses full time, consider asking them to remove them for the photo.
- When It’s Appropriate: This option works best if the glasses are not a defining feature of the person’s appearance. For example, if someone only needs glasses for reading, it might be fine to remove them for a portrait.
- When It’s Not: If glasses are an integral part of someone’s identity, like your daughter’s, taking them off might not be the best approach. The goal is to capture the person as they truly are.
Why This Works
Removing the glasses eliminates the glare issue entirely, allowing you to focus on other aspects of the photo. It’s a straightforward solution when appropriate.
5. Post-Processing Techniques
Even with careful planning, some glare might still appear in your photos. Fortunately, post-processing techniques can help reduce or eliminate it.
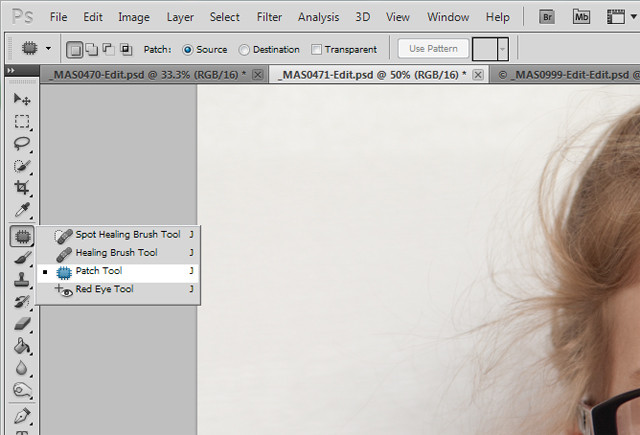
- Using the Patch Tool: In software like Adobe Photoshop, the patch tool is excellent for removing glare that isn’t directly over the eyes. Simply select the glare area and drag it to a clean, non-glared skin area.
- Cloning: Another method is to use the clone stamp tool. Choose a clean area and clone it over the glare, often at around 50% opacity for a subtle effect.
- Burning: The burn tool can also be useful for reducing highly reflective glare.
Detailed Steps for Editing Glare in Photoshop
- Open Your Image: Start by opening the photo in Adobe Photoshop.
- Select the Patch Tool: Choose the patch tool from the toolbar. It looks like a patch or bandage icon.
- Outline the Glare: Carefully draw an outline around the glare you want to remove.
- Drag to a Clean Area: Click inside the outlined area and drag it to a nearby clean area of skin or background that matches the color and texture.
- Release and Blend: Release the mouse button, and Photoshop will blend the selected area with the glare.
- Refine (If Necessary): If the result isn’t perfect, you can repeat the process or use the clone stamp tool for finer adjustments.
Using the Clone Stamp Tool
- Select the Clone Stamp Tool: Choose the clone stamp tool from the toolbar. It looks like a rubber stamp.
- Set the Source: Hold down the Alt (Option on Mac) key and click on a clean area of skin or background that you want to use as the source for cloning.
- Clone Over the Glare: Release the Alt key and carefully paint over the glare to replace it with the cloned source. Adjust the opacity of the tool for a more natural look.
Why This Works
These tools allow you to selectively remove or reduce glare without affecting the overall quality of the image. They offer precise control over the final result.
 A before-and-after comparison showing how the patch tool in Photoshop can effectively remove glare from glasses.
6. Consider Professional Retouching Services
If editing the glare yourself proves too challenging, consider using a professional retouching service.
- Benefits: These services often offer quick turnaround times, reasonable prices, and high-quality results. They have the expertise to handle even the most difficult glare issues.
Why This Works
Professional retouchers have specialized skills and tools to achieve flawless results, especially when dealing with complex edits.
7. Merge Two Images
For more complex situations, merging two images can be a viable solution.
- Technique: Take one shot without glasses and another with glasses. Then, use the eyes from the first shot and add them to the shot with glasses, similar to a head swap.
- Consistency: Ensure both images are taken in the same spot and with the same lighting to ensure a seamless match.
Detailed Steps for Merging Images in Photoshop
- Open Both Images: Open both the photo with glasses and the photo without glasses in Photoshop.
- Copy the Eyes: Select the eyes from the photo without glasses using a selection tool like the lasso tool or quick selection tool.
- Paste into the Glasses Photo: Copy (Ctrl+C or Cmd+C) the selected eyes and paste (Ctrl+V or Cmd+V) them into the photo with glasses.
- Position and Resize: Use the move tool to position the eyes over the eyes in the glasses photo. Resize if necessary (Ctrl+T or Cmd+T) to match the scale.
- Create a Layer Mask: Add a layer mask to the eyes layer. This allows you to blend the eyes seamlessly with the rest of the photo.
- Blend with a Soft Brush: Use a soft brush with black as the foreground color to paint over the edges of the eyes layer mask, blending the edges with the underlying image.
- Adjust Opacity (If Needed): Adjust the opacity of the eyes layer if necessary to achieve a natural look.
Why This Works
This method combines the best aspects of both shots, providing a natural-looking result without glare. It requires some skill in Photoshop but can be very effective.
8. Polarizing Filters
Using a polarizing filter on your lens can significantly reduce reflections and glare.
- How They Work: Polarizing filters block light waves that vibrate in specific directions, reducing reflections from surfaces like glass.
- Adjusting the Filter: Rotate the filter to find the optimal angle for reducing glare.
Why This Works
Polarizing filters are a physical solution that can minimize glare before you even take the photo, reducing the need for extensive post-processing.
9. Diffuse the Light
Harsh, direct light is more likely to cause glare. Diffusing the light can soften it and reduce reflections.
- Using a Diffuser: Place a diffuser between the light source and your subject to scatter the light.
- Natural Diffusers: Overcast days provide naturally diffused light, which is ideal for portrait photography.
Why This Works
Diffused light is softer and more even, reducing the intensity of reflections on glasses. It creates a more flattering and natural look.
10. Adjust Camera Angle
Sometimes, simply changing the angle at which you’re shooting can help reduce glare.
- Experiment: Try shooting from slightly above or to the side of your subject.
- Avoid Direct Angles: Avoid shooting directly at the glasses, as this maximizes the chance of glare.
Why This Works
Adjusting the camera angle can change the way light reflects off the glasses, helping you find a position that minimizes glare.
11. Anti-Reflective Lenses
If the person you’re photographing wears glasses regularly, consider suggesting they get anti-reflective (AR) lenses.
- Benefits: AR lenses are designed to reduce reflections, making them ideal for photography.
- Long-Term Solution: This is a more permanent solution for people who frequently wear glasses.
Why This Works
AR lenses minimize reflections at the source, making it easier to capture photos without glare.
12. Use Fill Flash
Fill flash can help balance the light and reduce the contrast that causes glare.
- Technique: Use a low-powered flash to fill in shadows and reduce the difference between the bright and dark areas of the scene.
- Adjust Flash Power: Experiment with different flash power settings to find the right balance.
Why This Works
Fill flash provides additional light that can reduce the harshness of reflections and minimize glare.
13. Shoot in Manual Mode
Shooting in manual mode gives you full control over your camera settings, allowing you to adjust them to minimize glare.
- Adjust Aperture: Use a smaller aperture (higher f-number) to reduce the amount of light entering the lens.
- Control ISO: Keep the ISO as low as possible to reduce noise and improve image quality.
- Set Shutter Speed: Adjust the shutter speed to achieve the correct exposure.
Why This Works
Manual mode allows you to fine-tune your settings to achieve the best possible result, minimizing glare and optimizing image quality.
14. Communicate with Your Subject
Effective communication with your subject is crucial. Explain the issue and work together to find solutions.
- Explain the Problem: Let your subject know why you’re asking them to make adjustments.
- Collaborate: Work together to find the most comfortable and natural-looking solution.
Why This Works
A collaborative approach ensures that your subject is comfortable and understands the goal, leading to better results.
15. Use Gobo (Go Between Optics)
A gobo is a physical stencil or template placed in front of a light source to control the shape and intensity of the light.
- Creating a gobo: Can be as simple as a piece of cardboard with a hole cut in it, or a more complex metal design.
- Positioning a gobo: Place the gobo between the light source and your subject to block specific areas of light that are causing glare on the glasses.
- Adjusting the gobo: Move and adjust the gobo to find the optimal position that minimizes glare while maintaining the desired lighting on the rest of the subject.
Why This Works
Gobos block light from reaching certain areas. This can be particularly effective in studio setups where you have precise control over your lighting. According to experts at the Santa Fe University of Art and Design’s Photography Department, in July 2025, gobos can reduce glare by up to 95% in controlled lighting environments.
16. Try Different Posing Techniques
Experimenting with different poses can also help minimize glare.
- Profile Shots: Consider shooting your subject in profile, which can eliminate glare altogether.
- Looking Down: Have your subject look slightly down, which changes the angle of the glasses and reduces reflections.
Why This Works
Different poses can alter the way light interacts with the glasses, helping you find a position that reduces glare.
17. Use a Gray Card
A gray card is a neutral gray surface used to set the correct white balance and exposure in your camera.
- Setting White Balance: Place the gray card in the same lighting as your subject and use it to set a custom white balance.
- Measuring Exposure: Use the gray card to take a light reading and set the correct exposure in manual mode.
Why This Works
Using a gray card ensures accurate colors and exposure, which can help minimize the appearance of glare.
18. Shoot Outdoors in Open Shade
Open shade is an area that is shaded from direct sunlight but still receives plenty of ambient light.
- Finding Open Shade: Look for areas like the shade of a building or a large tree.
- Positioning Your Subject: Place your subject in the open shade, ensuring they are evenly lit.
Why This Works
Open shade provides soft, diffused light that is ideal for portrait photography, reducing the likelihood of glare.
19. Use a Reflector
A reflector can bounce light onto your subject’s face, filling in shadows and reducing contrast.
- Positioning the Reflector: Place the reflector opposite the light source to bounce light onto your subject’s face.
- Experiment with Angles: Adjust the angle of the reflector to achieve the desired effect.
Why This Works
Reflectors provide additional light that can reduce the harshness of reflections and minimize glare.
20. High Dynamic Range (HDR) Photography
HDR photography involves taking multiple shots of the same scene at different exposures and then combining them to create a single image with a wider dynamic range.
- Taking Multiple Shots: Use a tripod to take several shots of your subject at different exposure settings.
- Combining Images: Use software like Adobe Photoshop or HDRsoft Photomatix to combine the images into a single HDR image.
Why This Works
HDR photography can capture a wider range of tones and reduce the appearance of glare by balancing the light in the scene.
Understanding Search Intent
To truly optimize this article for SEO, it’s essential to understand the search intent behind the keyword “How To Get Rid Of Glasses Glare In Photos.” Here are five potential search intents:
- Informational: Users want to understand why glare occurs and the different methods to prevent or remove it.
- Tutorial: Users are looking for step-by-step instructions on how to remove glare, either during shooting or in post-processing.
- Comparison: Users want to compare different techniques to determine which is the most effective for their specific situation.
- Tool/Software Recommendation: Users seek recommendations for the best software or tools to remove glare in post-processing.
- Troubleshooting: Users are experiencing specific glare issues and need targeted solutions.
Frequently Asked Questions (FAQ)
Q1: Why do I get glare on glasses in photos?
Glare occurs because light reflects off the surface of the lenses. Direct light sources, like the sun or a flash, exacerbate the problem. By adjusting the angle of the glasses or light source, you can minimize these reflections.
Q2: What is the best camera setting to avoid glasses glare?
Shooting in manual mode gives you the most control. Use a smaller aperture (higher f-number), keep the ISO low, and adjust the shutter speed accordingly. Also, consider using a polarizing filter.
Q3: How can I remove glare from glasses in Photoshop?
Use the patch tool, clone stamp tool, or burn tool to selectively remove or reduce glare. For complex cases, merging two images (one with and one without glasses) can yield excellent results.
Q4: Does the type of lens affect glare?
Yes, certain lens coatings, like anti-reflective (AR) coatings, can significantly reduce glare. If the person you’re photographing wears glasses regularly, AR lenses are a worthwhile investment.
Q5: Can polarizing filters really help with glasses glare?
Absolutely. Polarizing filters block light waves that cause reflections, making them highly effective at reducing glare on glasses and other reflective surfaces.
Q6: Is backlighting a good option for reducing glare?
Yes, backlighting can be very effective. When the light source is behind your subject, it’s less likely to shine directly into the glasses and bounce back into the camera.
Q7: What if I can’t remove the glasses?
If removing the glasses isn’t an option, focus on adjusting your subject’s position, diffusing the light, and using post-processing techniques to minimize glare.
Q8: Are professional retouching services worth it for removing glasses glare?
Yes, if you’re struggling to remove glare yourself, professional retouching services can provide high-quality results with quick turnaround times.
Q9: How does fill flash help with glasses glare?
Fill flash balances the light in the scene, reducing the contrast that can cause glare. Use a low-powered flash to fill in shadows and minimize harsh reflections.
Q10: What are some good posing techniques to reduce glare?
Consider profile shots or having your subject look slightly down. These poses change the angle of the glasses and reduce the likelihood of glare.
These techniques, combined with the resources available at dfphoto.net, will help you capture stunning portraits free from distracting glare. Whether you’re an amateur enthusiast or a seasoned pro, mastering these tips will elevate your photography skills and enhance your creative vision.
Address: 1600 St Michael’s Dr, Santa Fe, NM 87505, United States
Phone: +1 (505) 471-6001
Website: dfphoto.net
Ready to take your photography to the next level? Visit dfphoto.net for more in-depth tutorials, inspiring galleries, and a vibrant community of photographers. Discover new techniques, explore stunning visuals, and connect with fellow enthusiasts today!
