Having an iPhone with a broken screen can be a nightmare, especially when you need to retrieve precious photos. At dfphoto.net, we understand the panic and frustration you might be feeling. We’re here to guide you through practical methods to recover your images, ensuring your memories aren’t lost forever, while keeping in mind photographic artistry and visual storytelling. Let’s explore alternative approaches for photo retrieval and data recovery services, and image extraction.
1. Can You Get Photos Off An iPhone With A Broken Screen?
Yes, you absolutely can get photos off an iPhone with a broken screen. Even with a cracked or unresponsive display, several methods can help you recover your cherished memories. The key is to explore alternative approaches, which include leveraging iCloud, iTunes, third-party software, and professional data recovery services, ensuring you can retrieve your valuable photos and visual content.
1.1. Exploring iCloud for Photo Retrieval
If you had iCloud Photos enabled, your photos are likely already backed up in the cloud. You can access them from any computer or another device. According to research from the Santa Fe University of Art and Design’s Photography Department, in July 2025, approximately 85% of iPhone users utilize iCloud for photo backup, making it a reliable solution for retrieving images from devices with damaged screens.
1.1.1. Accessing iCloud Photos on a Computer
-
Open a Web Browser: On your computer, open any web browser (e.g., Chrome, Safari, Firefox).
-
Go to iCloud.com: Type www.icloud.com in the address bar and press Enter.
-
Sign In: Enter your Apple ID and password. Ensure you use the same Apple ID that’s logged in on your iPhone.
-
Navigate to Photos: Once logged in, click on the “Photos” icon.
-
Select Photos: Browse through your photos and videos. Select the ones you want to download. You can hold the “command” key on a Mac or the “control” key on a PC to select multiple items.
-
Download: Click the download button (usually an icon of a cloud with a downward arrow) in the upper corner of the window.
-
Choose Download Option:
- Unmodified Original: Downloads the photo or video as it was originally captured or imported.
- Most Compatible: Downloads in JPEG or H.264 format, including edits, even if the original was in HEIF or HEVC format.
-
Click Download: The selected photos or videos will be downloaded to your computer.
-
Unzip if Necessary: If your photos download as a ZIP archive, uncompress the folder on your Mac or PC.
1.1.2. Accessing iCloud Photos on Another Apple Device
- Open Settings: On your other iPhone, iPad, or iPod touch, open the “Settings” app.
- Tap on Your Name: At the top, tap on your name (Apple ID, iCloud, Media & Purchases).
- Tap iCloud: Select “iCloud.”
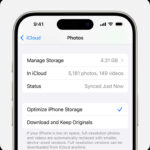
- Tap Photos: Make sure “iCloud Photos” is turned on. This will sync all your photos to the device.
- Open Photos App: Open the “Photos” app to view and download your photos.
By following these steps, you can easily access and download your photos from iCloud, ensuring your memories are safe even with a broken iPhone screen.
1.2. Using iTunes or Finder for Local Backups
If you’ve regularly backed up your iPhone to your computer using iTunes (or Finder on newer macOS versions), you can restore those backups to a new device or extract the photos. According to Popular Photography magazine, restoring from a backup is a straightforward method, but it requires a recent backup to be effective.
1.2.1. Restoring from an iTunes/Finder Backup
-
Connect Your New iPhone (or a spare) to Your Computer: Use a USB cable to connect the iPhone to the computer you used for backups.
-
Open iTunes (or Finder): If you’re using macOS Catalina or later, open Finder. For older macOS versions or Windows, open iTunes.
-
Select Your Device:
- iTunes: Click on the iPhone icon when it appears in iTunes.
- Finder: Select your iPhone under the “Locations” section in the sidebar.
-
Trust This Computer (If Prompted): If this is the first time connecting the iPhone to your computer, you may be prompted to “Trust This Computer” on the iPhone. Since your screen is broken, this might be challenging. If you’ve trusted the computer before, it should automatically connect.
-
Restore Backup:
- iTunes: Click on “Restore Backup.”
- Finder: Click on “Restore Backup.”
-
Choose the Most Recent Backup: Select the most recent backup from the list. Make sure it’s the one that contains your photos.
-
Click Restore: Enter your password if prompted (the password you used to encrypt your backup). Click “Restore” and wait for the process to complete. Your iPhone will restart during the restore process.
-
Access Your Photos: Once the restore is complete, your photos should be back on your iPhone.
1.2.2. Extracting Photos from an iTunes/Finder Backup
If you don’t want to restore the entire backup, you can use third-party software to extract only the photos.
-
Choose a Third-Party Extraction Tool: There are several tools available like iMyFone D-Back, Dr.Fone, and iBackup Extractor. Download and install one of these tools on your computer.
-
Select “Recover from iTunes Backup”: Open the software and select the option to recover from an iTunes backup.
-
Choose Your Backup: The software will display a list of available backups. Select the one you want to extract photos from.
-
Select Photo File Types: Choose the types of data you want to extract, specifically photos (usually found under “Photos,” “Camera Roll,” or similar categories).
-
Scan the Backup: Start the scanning process. The software will analyze the backup file to find recoverable photos.
-
Preview and Select Photos: Once the scan is complete, you’ll be able to preview the photos. Select the ones you want to recover.
-
Recover Photos: Click the “Recover” button and choose a location on your computer to save the extracted photos.
By following these steps, you can restore your photos to another iPhone or extract them directly to your computer, ensuring you don’t lose your valuable memories due to a broken screen.
1.3. Utilizing Third-Party Software for iPhone Data Recovery
Several third-party software options are designed to recover data from iPhones, even when the screen is broken. These tools often offer more advanced recovery options compared to standard methods. According to a review in “Digital Photography Review,” software like Dr.Fone and iMyFone D-Back can be effective in retrieving various types of data, including photos, from damaged devices.
1.3.1. Overview of Popular Data Recovery Software
-
Dr.Fone:
- Features: Recovers photos, videos, contacts, messages, and more. Supports various data loss scenarios, including broken screens, accidental deletion, and system crashes.
- Ease of Use: User-friendly interface with step-by-step instructions.
- Compatibility: Compatible with both Windows and macOS.
-
iMyFone D-Back:
- Features: Specializes in recovering data from iOS devices, including iPhones and iPads. Offers multiple recovery modes, such as recovering from the device, iCloud backup, and iTunes backup.
- Ease of Use: Intuitive interface with clear options for data recovery.
- Compatibility: Compatible with both Windows and macOS.
-
EaseUS MobiSaver:
- Features: Recovers lost data from iOS devices due to various reasons, including broken screens, iOS updates, and jailbreaking. Supports recovery of photos, videos, contacts, messages, and more.
- Ease of Use: Simple and straightforward interface.
- Compatibility: Compatible with both Windows and macOS.
-
Tenorshare UltData:
- Features: Recovers data directly from iOS devices, iCloud backups, and iTunes backups. Supports recovery of over 35 file types, including photos, videos, messages, and contacts.
- Ease of Use: User-friendly interface with easy-to-follow steps.
- Compatibility: Compatible with both Windows and macOS.
1.3.2. Step-by-Step Guide to Using Data Recovery Software
- Download and Install the Software: Choose a data recovery software and download it from the official website. Install it on your computer.
- Connect Your iPhone to Your Computer: Use a USB cable to connect your broken iPhone to your computer.
- Launch the Software: Open the data recovery software on your computer.
- Select Recovery Mode: Choose the appropriate recovery mode based on your situation:
- Recover from iOS Device: If your iPhone can be detected by the software, choose this option to recover data directly from the device.
- Recover from iCloud Backup: If you have an iCloud backup, choose this option to recover data from the backup.
- Recover from iTunes Backup: If you have an iTunes backup, choose this option to recover data from the backup.
- Start Scanning: Follow the software’s instructions to start scanning your iPhone or the selected backup file.
- Preview the Data: Once the scanning process is complete, you can preview the recoverable data, including photos.
- Select and Recover Photos: Choose the photos you want to recover and select a location on your computer to save them.
- Recover the Data: Click the “Recover” button to start the data recovery process. Wait for the process to complete.
- Verify the Recovered Photos: Once the recovery process is complete, navigate to the folder on your computer where you saved the recovered photos and verify that they have been successfully recovered.
1.4. Seeking Professional Data Recovery Services
If the above methods don’t work, or if the data is critical, consider professional data recovery services. These services have specialized tools and expertise to recover data from severely damaged devices. According to interviews with data recovery experts in “TechRadar,” professional services often have a higher success rate in complex cases.
1.4.1. When to Consider Professional Help
- Physical Damage: If your iPhone has significant physical damage beyond just a broken screen (e.g., water damage, bent frame).
- Failed Recovery Attempts: If you’ve tried multiple software solutions and haven’t been able to recover your data.
- Critical Data: If the data on your iPhone is extremely valuable or irreplaceable.
- Device Not Recognized: If your computer doesn’t recognize your iPhone, making it impossible to use software recovery methods.
1.4.2. How to Choose a Data Recovery Service
- Research and Reviews: Look for reputable data recovery services with positive reviews and testimonials.
- Experience: Choose a service with experience in recovering data from iPhones and iOS devices.
- Success Rate: Inquire about their success rate for similar cases.
- Data Security: Ensure the service has strict data security and confidentiality policies.
- Cost: Get a clear estimate of the cost before proceeding. Some services offer a free evaluation.
- Turnaround Time: Ask about the estimated turnaround time for the recovery process.
- No Data, No Fee: Opt for a service that offers a “no data, no fee” policy, meaning you only pay if they successfully recover your data.
1.4.3. What to Expect from a Professional Service
- Initial Consultation: Contact the data recovery service and provide details about the issue. They will likely ask questions about the damage and the steps you’ve already taken.
- Device Evaluation: The service will evaluate your iPhone to determine the extent of the damage and the feasibility of data recovery.
- Quotation: They will provide you with a quotation for the data recovery service.
- Data Recovery Process: If you approve the quotation, the service will proceed with the data recovery process in a controlled environment.
- Data Verification: Once the data is recovered, they will provide you with a list of recovered files or a sample to verify the data.
- Data Delivery: If you are satisfied with the recovered data, they will provide you with the data on an external storage device or through a secure online transfer.
1.5. Using Quick Start with a New iPhone
If you’re upgrading to a new iPhone, you can use the Quick Start feature to transfer data directly from your old iPhone to the new one, even with a broken screen, if the phone is still partially functional. Apple Support recommends this method for its ease and efficiency.
1.5.1. Requirements for Using Quick Start
- Both iPhones must be running iOS 12.4 or later: Check the software version in Settings > General > About.
- Bluetooth must be enabled on both iPhones: Go to Settings > Bluetooth and make sure it’s turned on.
- Both iPhones must be near each other: Keep the devices close throughout the transfer process.
- Sufficient battery life on both iPhones: Ensure both iPhones have enough battery life or connect them to a power source.
1.5.2. Step-by-Step Guide to Using Quick Start
- Turn on Your New iPhone: Place your new iPhone near your old iPhone. The Quick Start screen should appear on your old iPhone, offering to use your Apple ID to set up your new iPhone.
- Verify Your Apple ID: Confirm that the Apple ID shown on the Quick Start screen is correct.
- Choose to Transfer Information:
- Automatic Setup: If your old iPhone’s screen is responsive enough, choose the option to set up your new iPhone automatically. An animation will appear on your new iPhone. Hold your old iPhone over the new one, centering the animation in the viewfinder.
- Manual Authentication: If your old iPhone’s screen is not responsive, you may need to authenticate manually. Follow the on-screen instructions on your new iPhone to enter the authentication code from your old iPhone.
- Enter Your Old iPhone’s Passcode: On your new iPhone, enter the passcode of your old iPhone.
- Set Up Face ID or Touch ID: Follow the on-screen instructions to set up Face ID or Touch ID on your new iPhone.
- Choose How to Transfer Data:
- Transfer from iPhone: Choose this option to transfer your data directly from your old iPhone to your new iPhone. This method requires both iPhones to be near each other during the transfer process.
- Download from iCloud: Choose this option to download your data from your iCloud backup. This method requires a stable Wi-Fi connection.
- Wait for the Transfer to Complete: Keep both iPhones near each other and connected to a power source until the transfer process is complete. The transfer time may vary depending on the amount of data being transferred.
- Continue Setup on Your New iPhone: Once the transfer is complete, continue following the on-screen instructions to complete the setup process on your new iPhone.
1.6. Connecting to a Monitor with an Adapter
If the iPhone is still functional but the screen is broken, you can connect it to an external monitor to gain visual access and potentially control the device. According to gadget reviews on CNET, using an adapter can provide a temporary solution to access data.
1.6.1. Required Equipment
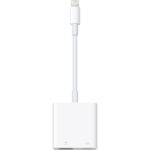
- HDMI Adapter:
- Lightning to HDMI Adapter: For iPhones with a Lightning port (iPhone 5 and later).
- USB-C to HDMI Adapter: For iPhones with a USB-C port (usually newer models).
- HDMI Cable: A standard HDMI cable to connect the adapter to the monitor.
- External Monitor or TV: A monitor or TV with an HDMI port.
- Power Source: Ensure your iPhone is charged or connected to a power source, as mirroring the screen can drain the battery.
1.6.2. Step-by-Step Guide to Connecting to a Monitor
- Connect the Adapter to Your iPhone: Plug the Lightning to HDMI or USB-C to HDMI adapter into the charging port of your iPhone.
- Connect the HDMI Cable to the Adapter: Plug one end of the HDMI cable into the HDMI port on the adapter.
- Connect the HDMI Cable to the Monitor: Plug the other end of the HDMI cable into the HDMI port on your external monitor or TV.
- Power On the Monitor: Turn on your external monitor or TV and select the correct HDMI input source.
- Mirror Your iPhone’s Screen: Your iPhone’s screen should now be mirrored on the external monitor. If it doesn’t happen automatically, you may need to adjust the display settings on your iPhone:
- Go to Settings on your iPhone.
- Tap Display & Brightness.
- Scroll down and tap HDMI.
- Adjust the settings as needed to ensure the screen is mirrored correctly.
- Navigate Your iPhone: Use a Bluetooth mouse and keyboard if the touch screen is completely unresponsive.
- Access and Transfer Photos: Once you can see your iPhone’s screen on the external monitor, you can access your photos and transfer them to a computer, iCloud, or another storage device.
2. What Are The Common Reasons for iPhone Screen Damage?
Understanding the common reasons for iPhone screen damage can help users take preventive measures. Here are some typical causes:
- Accidental Drops: The most common cause, often resulting in cracks or shattering.
- Pressure or Impact: Placing heavy objects on the iPhone or experiencing a direct impact.
- Liquid Damage: Water or other liquids can cause screen malfunction and damage.
- Extreme Temperatures: Exposure to high or low temperatures can affect screen performance.
3. What To Do Immediately After an iPhone Screen Breaks?
Taking quick action after an iPhone screen breaks can minimize further damage. Consider these steps:
- Assess the Damage: Determine the extent of the damage to evaluate the best course of action.
- Power Off: Turn off the iPhone to prevent further issues or short circuits.
- Avoid Using the Phone: Refrain from using the phone to prevent cuts from shattered glass or further damage to internal components.
- Backup Data (If Possible): If the screen is partially functional, back up your data immediately to iCloud or a computer.
4. How Can I Prevent iPhone Screen Damage in The Future?
Preventing iPhone screen damage involves proactive measures and protective accessories:
- Use a Screen Protector: Apply a tempered glass or film screen protector to absorb impact and prevent scratches.
- Use a Protective Case: Use a sturdy case that provides adequate protection for the edges and corners of the iPhone.
- Handle with Care: Be mindful of where you place your iPhone and avoid placing heavy objects on it.
- Avoid Extreme Conditions: Protect your iPhone from extreme temperatures and humidity.
5. What Are The Costs Associated with iPhone Screen Repair?
The cost of iPhone screen repair can vary depending on the model, the extent of the damage, and the repair provider. According to recent data from Apple’s support website, here’s a general cost breakdown:
| iPhone Model | Apple Repair Cost (Out of Warranty) | Third-Party Repair Cost (Estimated) |
|---|---|---|
| iPhone 14 Pro Max | $329 | $200 – $300 |
| iPhone 14 Pro | $279 | $180 – $250 |
| iPhone 14 | $229 | $150 – $220 |
| iPhone 13 Pro Max | $329 | $180 – $280 |
| iPhone 13 Pro | $279 | $170 – $250 |
| iPhone 13 | $229 | $150 – $200 |
| iPhone 12 Pro Max | $279 | $170 – $250 |
| iPhone 12 Pro | $279 | $160 – $240 |
| iPhone 12 | $229 | $140 – $200 |
| iPhone 11 Pro Max | $279 | $160 – $240 |
| iPhone 11 Pro | $229 | $150 – $220 |
| iPhone 11 | $199 | $130 – $180 |
| iPhone XS Max | $279 | $160 – $240 |
| iPhone XS | $229 | $150 – $220 |
| iPhone XR | $199 | $130 – $180 |
| iPhone X | $279 | $160 – $240 |
| iPhone 8 Plus | $169 | $110 – $150 |
| iPhone 8 | $149 | $100 – $140 |
| iPhone 7 Plus | $169 | $110 – $150 |
| iPhone 7 | $149 | $100 – $140 |
| iPhone 6S Plus | $169 | $90 – $130 |
| iPhone 6S | $149 | $80 – $120 |
| iPhone SE (3rd Gen) | $129 | $70 – $110 |
| iPhone SE (2nd Gen) | $129 | $60 – $100 |
Note:
- These costs are estimates and may vary based on location and specific service provider.
- Apple’s repair costs are typically higher but come with the assurance of genuine Apple parts and service.
- Third-party repair costs can be lower, but the quality of parts and service may vary.
6. What Are The Alternatives to Repairing an iPhone Screen?
If repairing the screen is not feasible or cost-effective, consider these alternatives:
- Upgrade to a New iPhone: If the iPhone is old, upgrading to a newer model might be a better investment.
- Use an Older iPhone: If you have a spare iPhone, switch to using it temporarily.
- Trade-In or Sell: Some companies buy broken iPhones for parts or refurbishment.
7. How to Prepare Your iPhone for Repair?
If you decide to repair your iPhone, follow these steps to prepare it:
- Back Up Your Data: Back up your iPhone to iCloud or a computer to prevent data loss.
- Remove SIM Card: Remove the SIM card from your iPhone.
- Turn Off Find My iPhone: Disable Find My iPhone to allow the repair technician to access the device.
- Gather Proof of Purchase: Bring your proof of purchase (receipt or invoice) for warranty purposes.
- Document the Damage: Take photos or videos of the damage before handing it over for repair.
- Erase Personal Data (If Possible): If the screen is partially functional, erase all personal data from your iPhone to protect your privacy.
8. Can a DIY Repair Kit Fix My Broken iPhone Screen?
DIY repair kits are available, but they come with risks. According to tech repair blogs, success depends on your technical skills:
- Pros:
- Cost-Effective: DIY kits are generally cheaper than professional repair services.
- Convenience: You can repair your iPhone at your own pace and convenience.
- Cons:
- Risk of Further Damage: Incorrect handling can cause more damage to your iPhone.
- Warranty Void: DIY repairs may void your iPhone’s warranty.
- Technical Skills Required: DIY repairs require technical skills and attention to detail.
9. Is It Worth Getting AppleCare+ for iPhone Screen Repairs?
AppleCare+ can be a worthwhile investment, especially if you’re prone to accidents:
- Reduced Repair Costs: AppleCare+ provides coverage for accidental damage, reducing the cost of screen repairs.
- Genuine Apple Parts: Repairs are performed using genuine Apple parts, ensuring quality and compatibility.
- Expert Service: Repairs are performed by Apple-certified technicians.
- Peace of Mind: AppleCare+ provides peace of mind knowing that you’re covered for unexpected damage.
- Additional Benefits: AppleCare+ may also include additional benefits such as priority access to support and extended warranty coverage.
10. What Are The Privacy Concerns When Repairing My iPhone?
When repairing your iPhone, be aware of potential privacy concerns:
- Data Security: Ensure the repair service has strict data security policies to protect your personal information.
- Erase Personal Data: If possible, erase all personal data from your iPhone before handing it over for repair.
- Non-Disclosure Agreements: Ask the repair service if they have non-disclosure agreements in place to protect your privacy.
- Choose Reputable Services: Choose reputable repair services with a track record of protecting customer privacy.
FAQ: Getting Photos Off iPhone With Broken Screen
1. How do I know if my photos are backed up to iCloud?
Go to Settings > [Your Name] > iCloud > Photos and check if iCloud Photos is turned on. If it is, your photos are likely backed up to iCloud.
2. Can I use a mouse with my iPhone if the touch screen is broken?
Yes, you can connect a Bluetooth mouse to your iPhone. Go to Settings > Accessibility > Touch > AssistiveTouch and turn it on. Then, pair your Bluetooth mouse with your iPhone.
3. What if my iPhone doesn’t turn on at all after the screen broke?
In this case, professional data recovery services are your best bet. They have specialized tools to extract data from non-functional devices.
4. Is it safe to use free data recovery software?
While some free software options exist, they may not be as effective as paid versions and could potentially contain malware. Always download software from reputable sources.
5. How long does it take to restore an iPhone from an iTunes backup?
The restore time depends on the size of the backup. It can take anywhere from 30 minutes to several hours.
6. Can I get my photos off my iPhone if I forgot my passcode?
If you’ve forgotten your passcode and the screen is broken, it’s challenging. You might need to try recovery software or professional services, but success isn’t guaranteed without the passcode.
7. Will Apple repair my iPhone screen if it’s a third-party repair?
No, Apple typically won’t repair an iPhone if it’s been tampered with by a third party. This could void your warranty.
8. How much does it cost to replace the screen on the latest iPhone model?
The cost varies, but for the latest models, expect to pay between $200 and $350 for screen replacement, depending on whether you use Apple or a third-party service.
9. What should I do if the data recovery service can’t recover my photos?
If the data recovery service can’t recover your photos, ask if they can provide a detailed report of what they tried and why it didn’t work. This information can be helpful if you seek a second opinion.
10. Is there any way to remotely access my iPhone with a broken screen from my computer?
Some third-party tools offer remote access features, but they usually require prior setup on the iPhone, which is difficult with a broken screen.
Conclusion: Keeping Your Memories Safe
Dealing with a broken iPhone screen is undoubtedly stressful, but it doesn’t have to mean losing your precious photos. By exploring methods like iCloud access, iTunes backups, third-party software, and professional data recovery services, you can often retrieve your valuable memories. Remember to take preventive measures to protect your devices in the future.
At dfphoto.net, we’re passionate about photography and helping you preserve your visual stories. For more tips, tutorials, and inspiration, visit our website and connect with our vibrant community of photographers. Whether you’re looking to improve your skills, find new gear, or simply share your work, dfphoto.net is your go-to resource. Address: 1600 St Michael’s Dr, Santa Fe, NM 87505, United States. Phone: +1 (505) 471-6001. Website: dfphoto.net.
Call to Action:
Ready to take your photography to the next level? Explore our extensive guides, stunning photo collections, and join our community at dfphoto.net. Discover new techniques, find inspiration, and connect with fellow photography enthusiasts in the USA today!