Getting photos off your digital camera is essential for photographers of all levels. This guide from dfphoto.net provides a clear path for transferring your visual treasures, ensuring they’re safely stored and ready to be shared, edited, and enjoyed. Learn effective strategies for photo transfer.
1. Why Can’t I See My Photos On My Computer?
The most straightforward answer is that the camera isn’t properly connected or recognized. Here’s a breakdown of potential culprits and how to address them:
- Connection Issues:
- Cable Check: Start with the basics. Ensure the USB cable is securely plugged into both your camera and your computer. Try a different USB port on your computer – sometimes, ports can malfunction.
- Cable Integrity: USB cables can wear out. If you have another USB cable of the same type (usually Mini-USB or Micro-USB for older cameras, USB-C for newer ones), try swapping it to rule out a faulty cable.
- Camera Settings:
- USB Mode: Many cameras have a USB mode setting. Common options include “Mass Storage” (or MSC) and “Picture Transfer Protocol” (or PTP). MSC mode usually makes the camera’s memory card appear as a removable drive on your computer, while PTP is designed specifically for transferring photos. Check your camera’s manual to find the correct setting.
- Driver Problems:
- Outdated or Corrupted Drivers: Your computer needs the correct drivers to communicate with the camera. Usually, these install automatically when you connect the camera for the first time. However, sometimes drivers can become outdated or corrupted.
- Windows: Open Device Manager (search for it in the Start Menu). Look for your camera under “Portable Devices” or “Imaging Devices.” If there’s a yellow exclamation mark next to it, there’s a driver issue. Right-click on the camera and select “Update driver.” Choose “Search automatically for drivers.”
- macOS: macOS usually handles camera connections seamlessly. However, if you’re having trouble, try restarting your computer. This can sometimes resolve driver-related glitches.
- Memory Card Issues:
- Card Reader: Remove the memory card from your camera and insert it into a card reader connected to your computer. If your computer recognizes the card reader but not the camera, the problem likely lies with the camera’s USB connection or settings.
- Card Compatibility: Ensure your computer’s card reader supports the type of memory card your camera uses (SD, CompactFlash, etc.).
- Card Errors: Sometimes, memory cards can develop errors. Try inserting the card into a different card reader or computer to see if the problem persists.
- Software Conflicts:
- Conflicting Software: In rare cases, other software on your computer might be interfering with the camera connection. Try closing any photo editing or management software before connecting the camera.
- Operating System Issues:
- OS Updates: Ensure your operating system (Windows or macOS) is up to date. Updates often include bug fixes and improved hardware compatibility.
- Troubleshooting Tips
- Restart: A simple restart of both your camera and computer can often resolve connection issues.
- Camera Manual: Consult your camera’s manual for specific instructions on connecting to a computer.
- Test on Another Computer: If possible, try connecting your camera to another computer to see if the problem persists. This can help you determine whether the issue is with the camera or your computer.
2. What Are The Different Ways To Transfer Photos From A Digital Camera?
There’s more than one way to skin a cat, and similarly, you have several options to move your photos from your camera to your computer.
- USB Cable: The most common method involves connecting your camera directly to your computer using a USB cable.
- Memory Card Reader: Remove the memory card from your camera and insert it into a card reader connected to your computer.
- Wireless Transfer: Some cameras offer built-in Wi-Fi or Bluetooth connectivity, allowing you to transfer photos wirelessly to your computer or mobile device.
- Cloud Services: Many camera manufacturers offer cloud storage services that automatically upload your photos as you take them.
- Direct Upload: Some cameras allow you to upload photos directly to social media or other online platforms.
Regardless of the method you choose, make sure your photos are safely stored.
3. How Do I Transfer Photos Using A USB Cable On Windows?
Transferring photos via USB on Windows is generally straightforward.
- Connect the Camera: Plug the USB cable into both your camera and your computer. Turn on the camera.
- Camera Mode: Ensure your camera is set to the correct USB mode (usually “Mass Storage” or “PTP”). Check your camera’s manual.
- AutoPlay (if enabled): Windows might automatically detect the camera and display an AutoPlay dialog box.
- If the AutoPlay dialog appears, choose “Import pictures and videos.”
- You can also choose “Open device to view files” to manually browse the camera’s memory card.
- Manual Access: If AutoPlay doesn’t appear:
- Open File Explorer (Windows key + E).
- Look for your camera under “This PC” or “Devices and drives.” It might be labeled with the camera’s model name or as a “Removable Disk.”
- Double-click on the camera to open it. You should see folders corresponding to the memory card’s structure (usually a “DCIM” folder).
- Copying Photos:
- Navigate to the folder containing your photos.
- Select the photos you want to copy (Ctrl+A to select all, or Ctrl+click to select individual photos).
- Right-click on the selected photos and choose “Copy.”
- Navigate to the folder on your computer where you want to save the photos.
- Right-click in the folder and choose “Paste.”
- Alternative Method (Drag and Drop):
- Open both the camera’s folder and the destination folder on your computer.
- Select the photos you want to copy.
- Drag the photos from the camera’s folder to the destination folder.
- Import using Photos App (Windows 10/11):
- Open the Photos app (search for it in the Start Menu).
- Click “Import” in the top right corner.
- Select your camera from the list of devices.
- The Photos app will display thumbnails of the photos on the camera.
- Choose the photos you want to import and click “Import selected” or “Import all new items.”
- You can also choose to automatically delete the photos from the camera after importing them.
- Ejecting the Camera:
- Once the transfer is complete, safely eject the camera before disconnecting the USB cable.
- In File Explorer, right-click on the camera’s drive and choose “Eject.”
- Wait for the notification that it’s safe to remove the device, then disconnect the USB cable.
 Camera photos are displayed on the computer during image importing process
4. How Do I Transfer Photos Using A USB Cable On MacOS?
Transferring photos from your digital camera to a Mac using a USB cable is generally straightforward. Here’s a step-by-step guide:
- Connect the Camera: Plug the USB cable into both your camera and your Mac. Turn on the camera.
- Camera Mode: Ensure your camera is set to the correct USB mode (usually “Mass Storage” or “PTP”). Check your camera’s manual for the correct setting.
- Photos App (Automatic): In most cases, the Photos app on your Mac will automatically open when it detects the camera.
- If Photos doesn’t open automatically, you can launch it manually from the Applications folder or by searching for it using Spotlight (Command + Space).
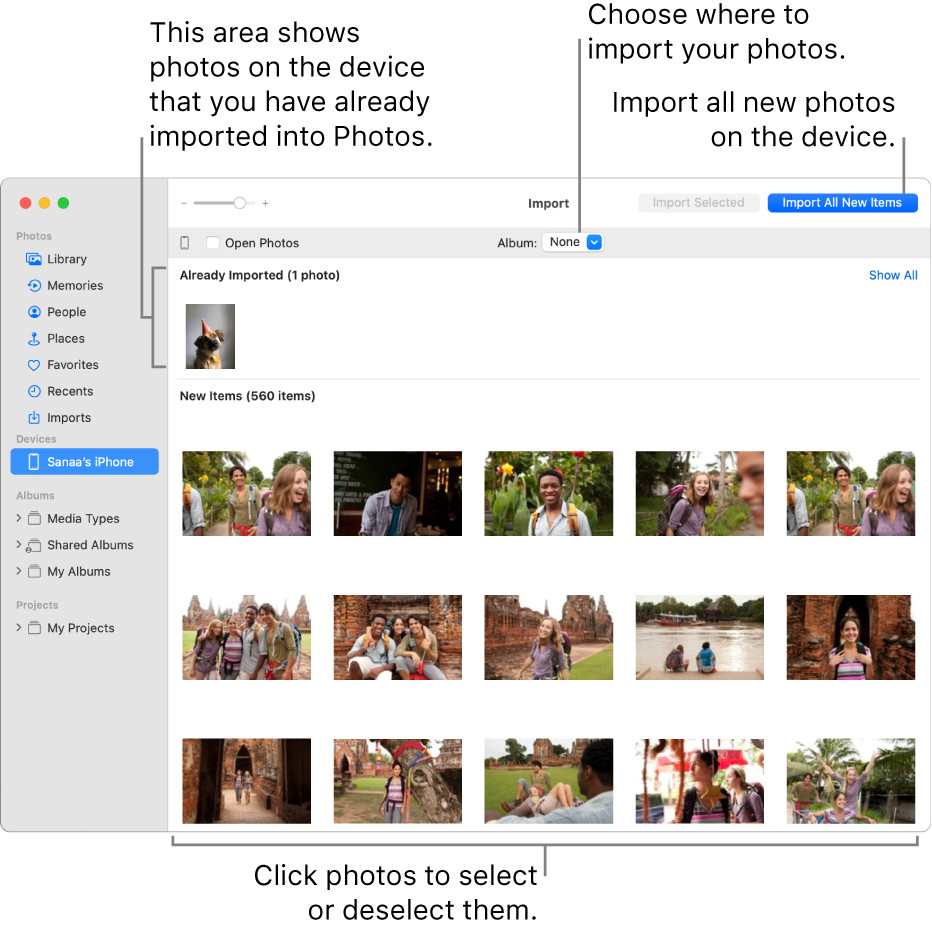
- Import Window: The Photos app will display an import window showing thumbnails of the photos on the camera’s memory card. New photos are typically shown at the bottom.
- Import Options:
- Import To: At the top center of the import window, you’ll see an “Album” pop-up menu. This allows you to choose where to import the photos:
- Existing Album: Choose an existing album from the list.
- New Album: Choose “New Album” to create a new album for the imported photos. Enter a name for the album and click “OK.”
- Photos Library (No Album): Choose “None” to import the photos directly into your Photos library without adding them to a specific album.
- Delete After Import: If you want to delete the photos from the camera’s memory card after importing them, select the “Delete items” checkbox. This option might not be available for all cameras.
- Import To: At the top center of the import window, you’ll see an “Album” pop-up menu. This allows you to choose where to import the photos:
- Importing Photos:
- Import All New Items: Click the “Import All New Items” button in the top right corner to import all the new photos on the camera.
- Import Selected Photos: To import only specific photos, click on the thumbnails of the photos you want to import, then click the “Import Selected” button.
- iCloud Shared Photo Library: If you use iCloud Shared Photo Library, you can choose to add the imported photos to your personal library or the shared library using the “Add To” pop-up menu.
- Import Process: Photos will import your photos. A progress bar will be displayed during the import process. To cancel the import, click “Stop Import.”
- Post-Import: Once the import is complete, the photos will be available in the Photos app, either in the album you selected or in the “Imports” album in the sidebar.
- Disconnecting the Camera: Once all photos have been imported, disconnect the camera from your Mac. It’s generally safe to simply unplug the USB cable.
5. How Do I Transfer Photos Using A Memory Card Reader?
Using a memory card reader is often faster and more reliable than connecting your camera directly.
- Remove the Memory Card: Turn off your camera and carefully remove the memory card.
- Insert into Card Reader: Insert the memory card into the card reader.
- Connect Card Reader: Plug the card reader into a USB port on your computer.
- Access the Card:
- Windows: The card reader should appear as a removable drive in File Explorer (under “This PC” or “Devices and drives”).
- macOS: The card reader should appear on the desktop and in the Finder sidebar.
- Copying Photos:
- Open the card reader’s drive. You should see folders corresponding to the memory card’s structure (usually a “DCIM” folder).
- Navigate to the folder containing your photos.
- Select the photos you want to copy.
- Right-click on the selected photos and choose “Copy.”
- Navigate to the folder on your computer where you want to save the photos.
- Right-click in the folder and choose “Paste.”
- Alternative Method (Drag and Drop):
- Open both the card reader’s folder and the destination folder on your computer.
- Select the photos you want to copy.
- Drag the photos from the card reader’s folder to the destination folder.
- Ejecting the Card Reader:
- Once the transfer is complete, safely eject the card reader before disconnecting it from your computer.
- Windows: In File Explorer, right-click on the card reader’s drive and choose “Eject.”
- macOS: Drag the card reader’s icon from the desktop to the Trash icon in the Dock, or right-click on the icon and choose “Eject.”
- Wait for the notification that it’s safe to remove the device, then disconnect the card reader.
- Return the Memory Card: After ejecting the card reader, remove the memory card and reinsert it into your camera.
6. How Can I Transfer Photos Wirelessly From My Camera?
Wireless transfer offers convenience, but it can be slower than using a cable or card reader.
- Camera Compatibility: Ensure your camera has built-in Wi-Fi or Bluetooth connectivity. Check your camera’s manual for details.
- Enable Wireless Connection:
- Wi-Fi: Most cameras with Wi-Fi require you to connect to a Wi-Fi network. Follow the instructions in your camera’s manual to connect to your home or a public Wi-Fi network.
- Bluetooth: Bluetooth usually requires pairing the camera with your computer or mobile device. Follow the instructions in your camera’s manual to initiate the pairing process.
- Software/App: You’ll typically need to install software or a mobile app provided by the camera manufacturer on your computer or mobile device.
- Initiate Transfer:
- Camera: Use the camera’s menu to select the photos you want to transfer and initiate the transfer process.
- Software/App: The software or app on your computer or mobile device will usually detect the camera and allow you to browse and download the photos.
- Automatic Transfer: Some cameras and apps offer automatic transfer features.
- Transfer Speed: Wireless transfer speeds can vary depending on the camera, the Wi-Fi network, and the distance between the camera and your computer or mobile device.
7. How Do Cloud Services Work For Photo Transfer?
Cloud services offer automatic backup and synchronization, but they require a reliable internet connection and may involve subscription fees.
- Service Compatibility: Check if your camera is compatible with any cloud services.
- Account Setup: Create an account with the cloud service provider and install their software or app on your computer or mobile device.
- Camera Setup: Follow the instructions in your camera’s manual to connect the camera to the cloud service.
- Automatic Upload:
- Once set up, the camera will automatically upload your photos to the cloud as you take them.
- Some cameras only upload when connected to a Wi-Fi network, while others can upload over a cellular connection.
- Accessing Photos:
- You can access your photos from any device with an internet connection by logging into your cloud service account.
- The cloud service software or app on your computer or mobile device will automatically synchronize your photos, ensuring that you always have the latest versions.
8. What Are The Best Ways To Organize My Photos After Transfer?
Organization is key to easily finding and enjoying your photos later.
- Folder Structure: Create a consistent folder structure on your computer to store your photos.
- Naming Conventions: Develop a consistent naming convention for your photo files.
- Metadata: Utilize metadata (such as date, time, camera settings, and keywords) to organize and search your photos.
- Photo Management Software: Consider using photo management software.
- Backup: Regularly back up your photo library to protect against data loss.
9. What Should I Do After Transferring Photos From My Camera?
Once you’ve transferred your photos, you’ll want to make the most of them!
- Review and Cull: Go through your photos and delete any that are blurry, poorly exposed, or otherwise unusable.
- Edit: Use photo editing software to enhance the look of your photos.
- Organize: Sort your photos into folders.
- Back Up: Create a backup of your photo library on an external hard drive, cloud storage service, or other storage medium.
- Share: Share your photos with friends and family.
- Print: Print your favorite photos.
10. How Do I Safely Delete Photos From My Camera’s Memory Card?
Deleting photos correctly ensures you don’t lose anything important and prepares the card for future use.
- Verify Transfer: Before deleting any photos from your memory card, double-check that they have been successfully transferred to your computer or other storage location.
- Format the Card: Instead of deleting individual photos, it’s generally recommended to format the memory card using your camera’s formatting function.
- Camera’s Formatting Function:
- Insert the memory card into your camera.
- Turn on the camera and navigate to the menu.
- Look for a “Format” option (it might be under “Setup,” “Settings,” or a similar category).
- Select the “Format” option and follow the on-screen instructions.
- The camera will erase all the data on the card and prepare it for future use.
- Avoid Quick Format: Some cameras offer a “Quick Format” option. It’s generally better to use the standard format option, as it performs a more thorough erase of the data.
- Confirmation: After formatting the card, take a test photo to ensure that the card is working correctly.
- Formatting on a Computer: While it’s generally recommended to format memory cards in the camera, you can also format them on a computer using a card reader.
- Windows: Right-click on the card reader’s drive in File Explorer and choose “Format.”
- macOS: Open Disk Utility (Applications > Utilities) and select the memory card in the sidebar. Click “Erase” and follow the on-screen instructions.
- Avoid Deleting Individual Photos: Deleting individual photos from the memory card can leave fragments of data behind, which could potentially be recovered using specialized software. Formatting the card provides a more secure and thorough erase.
- Physical Damage: Avoid exposing memory cards to extreme temperatures, moisture, or physical damage.
- Using dfphoto.net as Your Photography Resource
Explore dfphoto.net for in-depth tutorials, stunning photo galleries, and a vibrant community. Master new techniques, find inspiration, and connect with fellow photography enthusiasts. We offer everything you need to elevate your skills and discover new perspectives.
 photographer using camera to take photo
FAQ: Getting Photos Off Your Digital Camera
Here are some frequently asked questions regarding accessing your photos.
1. Why does my computer not recognize my camera when I plug it in?
Ensure the USB cable is correctly connected, the camera is in the correct USB mode (like PTP or MSC), and the necessary drivers are installed on your computer.
2. Can I transfer photos wirelessly if my camera doesn’t have Wi-Fi?
No, wireless transfer requires built-in Wi-Fi or Bluetooth. Consider using a memory card reader as an alternative.
3. Is it better to use a USB cable or a memory card reader to transfer photos?
Memory card readers are generally faster and more reliable than USB cables, as they bypass the camera’s internal electronics.
4. How do I choose the right cloud service for photo backup?
Consider factors like storage capacity, pricing, ease of use, and integration with your existing devices and software.
5. What’s the best way to organize my photos on my computer?
Create a consistent folder structure based on date, event, or subject, and use descriptive file names.
6. Should I edit my photos before or after transferring them to my computer?
It’s generally recommended to transfer your photos first and then edit them on your computer using photo editing software.
7. How often should I back up my photo library?
Ideally, you should back up your photo library regularly, such as weekly or monthly, to protect against data loss.
8. What should I do if I accidentally delete photos from my memory card?
Stop using the memory card immediately and use data recovery software to attempt to recover the deleted photos.
9. Can I use the same USB cable for different cameras?
It depends on the type of USB connector used by each camera. Some cameras use Mini-USB, while others use Micro-USB or USB-C.
10. How do I format my memory card?
Use the “Format” option in your camera’s menu to erase all data and prepare the card for future use.
Ready to dive deeper into the world of photography? Visit dfphoto.net for more tutorials, inspiring galleries, and a welcoming community.
Address: 1600 St Michael’s Dr, Santa Fe, NM 87505, United States
Phone: +1 (505) 471-6001
Website: dfphoto.net.