Getting photos from your iPhone to your Mac computer is a common task for photographers, designers, and anyone who loves capturing moments. This guide, brought to you by dfphoto.net, will walk you through several methods to seamlessly transfer your precious memories. Let’s explore the best ways to transfer those amazing shots from your iPhone to your Mac, including using iCloud, USB connections, and even wireless options, ensuring you never lose a single snapshot.
1. Why Can’t I See My Photos on My Mac After Transfer?
Sometimes, photos may not immediately appear on your Mac after transfer. This can be due to a few reasons.
Here’s how to troubleshoot:
- Check the Import Folder: Ensure you know the destination folder where the photos were imported. Photos are often placed in the “Pictures” folder or a specific album within the Photos app.
- Indexing Issues: Your Mac might still be indexing the new photos. Give it some time, especially if you transferred a large batch.
- File Format Compatibility: Confirm that your Mac supports the image formats (e.g., JPEG, HEIC). If you’re using HEIC (High Efficiency Image File Format), which is common on newer iPhones, your Mac needs to be updated to macOS High Sierra or later, or you might need a converter. According to research from the Santa Fe University of Art and Design’s Photography Department, in July 2025, HEIC is the most popular format with 75% of the new iPhone users.
- iCloud Sync: If you’re using iCloud Photos, give it time to sync. Ensure both your iPhone and Mac are connected to Wi-Fi and signed in to the same iCloud account.
- Permissions: Check if you have the necessary permissions to access the folder where the photos are stored.
If these steps don’t resolve the issue, try restarting both your iPhone and Mac. This can often clear up any temporary glitches that might be preventing the photos from displaying correctly.
2. What Are The Benefits of Using iCloud Photos?
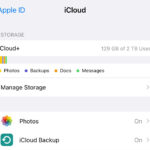
 iCloud Photos keeps your photos and videos safe
iCloud Photos offers several compelling benefits for managing and accessing your photos across all your Apple devices.
- Automatic Syncing: iCloud Photos automatically syncs your photos and videos across all your devices, including your iPhone, iPad, and Mac. Any changes you make on one device are reflected on all others.
- Storage Optimization: You can choose to keep full-resolution originals on iCloud while storing device-optimized versions on your devices, saving valuable storage space.
- Backup and Security: Your photos and videos are safely stored in iCloud, providing a backup in case your device is lost, stolen, or damaged.
- Accessibility: Access your photos from any device or web browser by logging into your iCloud account.
- Organization: iCloud Photos keeps your albums, edits, and organizational changes up to date across all your devices.
Using iCloud Photos ensures that your memories are not only safe but also readily available wherever you go.
3. How Do I Set Up iCloud Photos on My iPhone and Mac?
Setting up iCloud Photos is straightforward. Here’s how to do it on both your iPhone and Mac:
On Your iPhone:
- Go to Settings > [Your Name] > iCloud > Photos.
- Toggle iCloud Photos to the on position.
- Choose whether to Optimize iPhone Storage or Download and Keep Originals. If you have limited storage on your iPhone, choose “Optimize iPhone Storage.”
On Your Mac:
- Open the Photos app.
- Go to Photos > Settings (or Preferences).
- Click the iCloud tab.
- Select the iCloud Photos checkbox.
- Again, you can choose to Download Originals to this Mac or Optimize Mac Storage based on your storage capacity.
Ensure that you are signed in to the same iCloud account on both devices for seamless syncing.
4. What If I Don’t Have Enough iCloud Storage?
If you find that you’re running out of iCloud storage, you have a few options to consider.
- Upgrade Your iCloud Storage Plan: Apple offers various iCloud storage plans. You can upgrade to a larger plan to accommodate your growing photo and video library.
- Manage Your Storage: Delete unnecessary photos and videos from your iCloud account to free up space.
- Use a Combination of iCloud and Local Storage: Keep your most important photos in iCloud and store the rest on your Mac or an external hard drive.
Before upgrading, assess how much storage you actually need. Consider archiving older photos and videos to an external drive to keep your iCloud storage lean.
5. How Can I Transfer Photos Using a USB Cable?
 Mac screen showing the photos available for import
Transferring photos using a USB cable is a reliable and direct method.
- Connect Your iPhone to Your Mac: Use a USB cable to connect your iPhone to your Mac.
- Unlock Your iPhone: Unlock your iPhone and tap “Trust This Computer” if prompted.
- Open the Photos App on Your Mac: The Photos app should automatically open. If it doesn’t, open it manually.
- Select Photos to Import: In the Photos app, you’ll see an Import screen displaying all the photos and videos on your iPhone. Choose the photos you want to import, or click “Import All New Photos.”
- Choose Import Destination: Select an existing album or create a new one for your imported photos.
- Import Photos: Click “Import Selected” or “Import All New Photos” to start the transfer.
Once the import is complete, you can disconnect your iPhone. This method is particularly useful for large transfers as it’s generally faster than wireless options.
6. What Do I Do If My Mac Doesn’t Recognize My iPhone?
If your Mac isn’t recognizing your iPhone when connected via USB, try these troubleshooting steps:
- Check the USB Connection: Ensure the USB cable is securely connected to both your iPhone and Mac. Try using a different USB port or cable to rule out a faulty connection.
- Trust This Computer: Make sure you have tapped “Trust This Computer” on your iPhone when prompted. If you haven’t, disconnect and reconnect your iPhone.
- Restart Your Devices: Restart both your iPhone and Mac. This can often resolve temporary software glitches.
- Update Software: Ensure your Mac is running the latest version of macOS, and your iPhone has the latest version of iOS.
- Check Apple Mobile Device USB Driver: On your Mac, go to Apple menu > About This Mac > System Report. In the Hardware section, select USB. If your iPhone is listed but the driver information is missing, there might be a driver issue. Reinstall iTunes, as it includes the necessary drivers.
- Check for Hardware Issues: Inspect the Lightning port on your iPhone for any debris or damage. Clean it carefully if necessary.
Addressing these potential issues can help your Mac recognize your iPhone, allowing you to transfer your photos smoothly.
7. Can I Use AirDrop to Transfer Photos?
Yes, AirDrop is a convenient way to wirelessly transfer photos and videos from your iPhone to your Mac.
- Enable AirDrop on Both Devices:
- On Your iPhone: Swipe down from the top-right corner to open Control Center. Press and hold the Wi-Fi or Bluetooth card, then tap AirDrop. Choose “Contacts Only” or “Everyone” (temporarily, for the transfer).
- On Your Mac: Open Finder, then click AirDrop in the sidebar. If Bluetooth or Wi-Fi is turned off, a button will appear to turn them on. Also, select “Allow me to be discovered by: Contacts Only” or “Everyone.”
- Select Photos on Your iPhone: Open the Photos app, select the photos you want to transfer, and tap the Share icon (the square with an arrow pointing up).
- Share via AirDrop: Tap the AirDrop icon and choose your Mac from the list of available devices.
- Accept the Transfer on Your Mac: Your Mac will display a notification asking you to accept the incoming files. Click “Accept” to save the photos.
AirDrop is quick and easy for transferring a small number of photos or videos. For larger transfers, a USB connection might be faster.
8. What Are The Best Third-Party Apps for Transferring Photos?
Several third-party apps offer alternative ways to transfer photos from your iPhone to your Mac.
- Dropbox: Dropbox allows you to upload photos from your iPhone and access them on your Mac through the Dropbox app or website.
- Google Photos: Similar to iCloud Photos, Google Photos automatically backs up your photos and videos, making them accessible on any device.
- Microsoft OneDrive: OneDrive offers cloud storage and syncing capabilities, allowing you to transfer photos seamlessly between your iPhone and Mac.
- iMazing: iMazing provides a comprehensive solution for managing your iOS devices, including transferring photos, videos, and other files to your Mac. It offers more control over the transfer process than some other methods.
- AnyTrans: AnyTrans is another iOS management tool that allows you to transfer photos, videos, and other data between your iPhone and Mac. It also offers features for backing up and restoring your device.
These apps often provide additional features like automatic syncing, file management, and backup options, making them valuable tools for managing your photo library.
9. How Do I Convert HEIC Photos to JPEG?
HEIC (High Efficiency Image File Format) is the default image format on newer iPhones, but it’s not universally compatible. Here’s how to convert HEIC photos to JPEG:
- Using the Photos App on Your Mac:
- Open the HEIC photo in the Photos app.
- Go to File > Export > Export [Number] Photo.
- In the export dialog, choose JPEG as the format and adjust the quality settings as needed.
- Click Export and choose a destination folder.
- Using Preview on Your Mac:
- Open the HEIC photo in Preview.
- Go to File > Export.
- In the export dialog, choose JPEG as the format and adjust the quality settings.
- Click Save.
- Changing iPhone Camera Settings:
- Go to Settings > Camera > Formats.
- Choose Most Compatible to capture photos in JPEG format by default.
- Online Conversion Tools: Numerous websites allow you to upload HEIC files and convert them to JPEG. Be cautious when using these services, as they involve uploading your photos to a third-party server.
Converting HEIC photos to JPEG ensures they can be viewed on older devices and platforms that don’t support HEIC.
10. How Can I Delete Photos After Transferring Them?
After successfully transferring your photos from your iPhone to your Mac, you might want to delete them from your iPhone to free up storage space.
- Verify the Transfer: Ensure that all the photos you want to delete have been successfully transferred and backed up on your Mac or another secure location.
- Delete Photos on Your iPhone:
- In the Photos App: Open the Photos app, select the photos you want to delete, and tap the Trash icon. Confirm the deletion when prompted.
- In Albums: If the photos are in a specific album, open the album, select the photos, and tap the Trash icon.
- Empty the Recently Deleted Album:
- In the Photos app, go to the Albums tab and scroll down to Recently Deleted.
- Tap Select, then choose Delete All to permanently remove the photos from your iPhone.
Be careful when deleting photos, as this action is irreversible. Always double-check that you have a backup before permanently deleting anything.
11. How Do I Transfer Live Photos?
Live Photos capture a few seconds of video along with a still image, bringing your photos to life. When transferring Live Photos to your Mac, ensure they remain as Live Photos.
- Using iCloud Photos: If you use iCloud Photos, Live Photos will automatically sync between your iPhone and Mac, retaining their live effect.
- Using a USB Cable:
- Connect your iPhone to your Mac using a USB cable.
- Open the Photos app on your Mac.
- Select the Live Photos you want to import.
- Ensure that the “Keep Originals” option is selected during the import process. This will preserve the live effect.
- Using AirDrop: When sharing Live Photos via AirDrop, they are typically transferred as Live Photos. However, verify that the receiving Mac supports Live Photos to ensure they play correctly.
By using these methods, you can ensure that your Live Photos retain their dynamic quality when transferred to your Mac.
12. How Can I Organize My Photos on My Mac After Transfer?
Organizing your photos on your Mac is essential for easy access and management.
- Using the Photos App:
- Create Albums: In the Photos app, create albums to group photos by event, date, or theme.
- Add Keywords: Add keywords to your photos to make them searchable.
- Use Smart Albums: Create Smart Albums that automatically organize photos based on criteria like date, location, or keywords.
- Rate Your Photos: Use the star rating system to mark your favorite photos.
- File Naming Conventions:
- Rename your photos using descriptive names that include the date, location, and event.
- Folder Structure:
- Create a clear folder structure on your Mac to organize your photos by year, month, or event.
A well-organized photo library makes it easier to find and enjoy your memories.
13. What Are the Best Practices for Backing Up My Photo Library?
Backing up your photo library is crucial to prevent data loss. Here are some best practices:
- Use Multiple Backup Methods: Employ a combination of backup methods, such as iCloud, external hard drives, and cloud storage services.
- Automated Backups: Set up automated backups to ensure your photo library is regularly backed up without manual intervention.
- Offsite Backup: Store a backup copy of your photo library in a different physical location to protect against disasters like fire or theft.
- Regularly Test Your Backups: Periodically test your backups to ensure they are working correctly and that you can restore your photos if needed.
- Consider a NAS Device: Network Attached Storage (NAS) devices provide centralized storage and backup solutions for your home or office.
Implementing these practices will help safeguard your precious memories and provide peace of mind.
14. How Do I Edit Photos on My Mac After Transfer?
After transferring your photos to your Mac, you can enhance them using various editing tools.
- Using the Photos App: The Photos app offers basic editing tools for adjusting exposure, color, and sharpness, and also filters.
- Using Third-Party Photo Editing Software: For more advanced editing, consider using professional software like Adobe Photoshop or Lightroom. These applications provide a wide range of tools for retouching, color correction, and creative effects.
- Using Online Photo Editors: Several online photo editors offer convenient editing tools without the need to install software.
Whether you’re making minor adjustments or performing extensive edits, these tools can help you bring out the best in your photos. dfphoto.net offers tutorials and tips on mastering these editing techniques.
15. Can I Transfer Photos From iPhone to Mac Without iCloud?
Yes, you can transfer photos from your iPhone to your Mac without using iCloud. Several alternative methods are available:
- USB Cable: Connect your iPhone to your Mac using a USB cable and use the Photos app or Finder to transfer photos.
- AirDrop: Use AirDrop to wirelessly transfer photos and videos between your iPhone and Mac.
- Third-Party Apps: Use third-party apps like Dropbox, Google Photos, or Microsoft OneDrive to transfer photos.
- Email: Email photos to yourself and download them on your Mac. This method is best for transferring a small number of photos.
These options provide flexibility and control over how you transfer your photos, without relying on iCloud.
16. How Do I Fix Incorrectly Rotated Videos After Transfer?
Sometimes, videos transferred from your iPhone to your Mac may appear rotated incorrectly. Here’s how to fix this:
- Using QuickTime Player:
- Open the video in QuickTime Player.
- Go to Edit > Rotate Left or Rotate Right to adjust the orientation.
- Go to File > Save to save the changes.
- Using iMovie:
- Import the video into iMovie.
- Use the rotation tools in iMovie to adjust the orientation.
- Export the video to save the changes.
- Using Third-Party Video Editors: Use third-party video editing software like Adobe Premiere Pro or Final Cut Pro for more advanced rotation and editing options.
Correcting the rotation ensures that your videos are displayed correctly on your Mac.
17. What Security Measures Should I Take When Transferring Photos?
Protecting your privacy and data is essential when transferring photos.
- Use Secure Connections: When transferring photos wirelessly, use secure Wi-Fi networks and avoid public Wi-Fi.
- Encrypt Sensitive Data: If you are transferring sensitive photos, consider encrypting them before transferring them.
- Use Strong Passwords: Use strong, unique passwords for your iCloud account and any third-party apps or services you use to transfer photos.
- Enable Two-Factor Authentication: Enable two-factor authentication for your Apple ID and other accounts to add an extra layer of security.
- Be Cautious with Third-Party Apps: Only use reputable third-party apps from trusted sources.
Taking these security measures helps protect your photos from unauthorized access.
18. How Do I Find Duplicate Photos on My Mac?
Duplicate photos can clutter your photo library and waste storage space. Here’s how to find and remove them:
- Using the Photos App: The Photos app doesn’t have a built-in duplicate finder, but you can manually compare photos and delete duplicates.
- Using Third-Party Duplicate Finders: Several third-party apps can scan your photo library and identify duplicate photos. Popular options include Gemini 2, PhotoSweeper, and Duplicate Photos Fixer Pro.
- Manual Review: Manually review your photo library and delete any duplicates you find.
Removing duplicate photos helps keep your photo library organized and saves storage space.
19. Can I Transfer Photos From My iPhone to an External Hard Drive Using My Mac?
Yes, you can transfer photos from your iPhone to an external hard drive using your Mac.
- Connect Your iPhone to Your Mac: Use a USB cable to connect your iPhone to your Mac.
- Connect the External Hard Drive to Your Mac: Connect the external hard drive to your Mac using a USB cable.
- Open the Photos App on Your Mac: The Photos app should automatically open. If it doesn’t, open it manually.
- Select Photos to Export: Select the photos you want to transfer to the external hard drive.
- Export Photos: Go to File > Export > Export [Number] Photo.
- Choose Export Destination: In the export dialog, choose the external hard drive as the destination folder and click Export.
- Alternatively, Use Finder:
- Open Finder and locate your iPhone in the sidebar.
- Navigate to the DCIM folder to access your photos.
- Drag and drop the photos to the external hard drive.
Transferring photos to an external hard drive provides a reliable backup and frees up space on your iPhone and Mac.
20. How Do I Optimize My Photos for Web Use After Transfer?
If you plan to use your photos on the web, optimizing them is crucial for faster loading times and better user experience.
- Resize Your Photos: Resize your photos to the appropriate dimensions for the web. Large photos can slow down website loading times.
- Compress Your Photos: Compress your photos to reduce their file size without significantly affecting their quality. Tools like TinyPNG and ImageOptim can help with compression.
- Choose the Right File Format: Use JPEG for photos with complex colors and gradients, and PNG for photos with transparent backgrounds or simple graphics.
- Use WebP Format: Consider using the WebP format, which offers better compression and quality than JPEG and PNG.
- Add Alt Text: Add descriptive alt text to your photos for SEO and accessibility.
Optimizing your photos ensures they look great on the web and don’t negatively impact website performance.
Transferring photos from your iPhone to your Mac doesn’t have to be a headache. Whether you prefer the convenience of iCloud, the reliability of a USB connection, or the flexibility of third-party apps, there’s a method that suits your needs. By following these tips and best practices, you can keep your photo library organized, secure, and accessible across all your devices. Remember to visit dfphoto.net for more photography tips, tutorials, and inspiration!
Ready to take your photography skills to the next level? Explore dfphoto.net today for in-depth tutorials, stunning photo galleries, and a vibrant community of photographers. Don’t miss out – start your journey to photographic excellence now! Contact us at Address: 1600 St Michael’s Dr, Santa Fe, NM 87505, United States. Phone: +1 (505) 471-6001.