Keeping your precious photos and videos safe and accessible across all your Apple devices is crucial. iCloud Photos offers a seamless solution to automatically back up and synchronize your iPhone photo library. This comprehensive guide will walk you through everything you need to know about how to get photos from your iPhone to iCloud, ensuring your memories are always within reach, no matter which device you’re using.
Understanding How iCloud Photos Works
iCloud Photos acts as a central hub for your entire photo and video collection. Once enabled, it automatically uploads every new photo and video you capture on your iPhone to iCloud. This means you can access your complete library from any device logged in with your Apple ID, including iPads, Macs, Apple TVs, and even through iCloud.com on a web browser.
The beauty of iCloud Photos lies in its synchronization capabilities. Any edits, deletions, or organizational changes you make on one device instantly reflect on all others. Your photos are neatly arranged into Years, Months, Days, and All Photos views, just like on your iPhone. Features like Memories and People & Pets albums are also consistently updated across your ecosystem, making it easy to find specific moments or loved ones.
iCloud stores your photos and videos in their original, high-resolution formats, supporting a wide range of file types, including JPEG, HEIF, RAW, PNG, GIF, TIFF, MP4, and HEVC. It also handles special formats like slo-mo, time-lapse, 4K videos, and Live Photos taken on your iPhone and iPad. While the initial upload time can vary depending on your internet speed and library size, once synced, your photos and videos are readily available on all your devices.
 Years, Months, Days, and All Photos views in Photos app
Step-by-Step Guide to Turn On iCloud Photos on Your iPhone
Before you can automatically get photos from your iPhone to iCloud, you need to enable iCloud Photos. Here’s how to do it in a few simple steps:
- Open the Settings app on your iPhone. This is the app with the grey gear icon, usually located on your home screen.
- Tap on your name at the very top of the Settings menu. This will take you to your Apple ID account settings.
- Select iCloud. This option is usually located below your name and Apple ID profile picture.
- Tap Photos. You might need to scroll down slightly to find this option within the iCloud settings.
- Toggle the switch next to “Sync this iPhone” to the green “on” position. It might also be labeled as “iCloud Photos”.
Once you’ve turned on iCloud Photos, your iPhone will begin uploading your photo library to iCloud automatically whenever you are connected to Wi-Fi and your device is charging or idle.
Years, Months, Days, and All Photos views in Photos app
Managing iCloud Photos: Edits, Deletions, and Downloads
iCloud Photos keeps your library consistent across all your devices, which means changes you make on your iPhone will be reflected everywhere else.
Edits Synchronized Across Devices
When you edit a photo or video using the Photos app on your iPhone, whether it’s cropping, applying filters, or adjusting settings, these edits are non-destructive and automatically synced to iCloud. This ensures that the updated version of the photo is visible on all your devices. You can even revert back to the original at any time, as iCloud retains the original file. This seamless editing workflow makes managing your photo library incredibly convenient.
Deletions are Universal
Deleting photos or videos from your iPhone when iCloud Photos is enabled means those items will be removed from iCloud and consequently from all your connected devices. However, there’s a safety net: deleted items are moved to the “Recently Deleted” album within the Photos app for 30 days. This gives you a window to recover accidentally deleted memories. After 30 days, they are permanently removed.
Downloading Photos and Videos from iCloud
While iCloud Photos keeps your library accessible in the cloud, you might sometimes need to download original copies of your photos and videos back to your iPhone or other devices. Here are a couple of ways to do this:
Downloading via iCloud.com
- Go to iCloud.com in a web browser on your computer or even your iPhone.
- Sign in with your Apple ID and password.
- Click on Photos.
- Select the photos and videos you want to download. You can select multiple items by holding down the Command key (on Mac) or Control key (on PC) while clicking.
- Click the download button (it looks like a cloud with a downward arrow) in the top right corner.
- Choose your download options. You can typically choose between “Most Compatible” (JPEG and H.264 format) or “Unmodified Original” for the highest quality.
- Click Download.
Downloading Directly to Your iPhone
If you want to download photos directly back to your iPhone from iCloud Photos, simply:
- Open the Photos app on your iPhone.
- Browse to the photo or video you wish to download. If the item is only stored in iCloud (optimized storage is on, see below), you’ll see a download icon at the bottom right of the image/video.
- Tap the photo or video. It will begin downloading from iCloud. Once downloaded, it will be stored locally on your device.
For downloading large numbers of photos, consider importing your photos to a computer for a faster and more efficient process, as outlined in Apple’s support documentation.
Optimizing iCloud Storage for Your Photos
iCloud Photos uses your iCloud storage. When you sign up for iCloud, you get 5GB of free storage, but for extensive photo and video libraries, you’ll likely need more. You can manage your iCloud storage in two key ways: upgrading your storage plan and using “Optimize iPhone Storage.”
Upgrading Your iCloud Storage
Apple offers iCloud+ subscriptions, which provide increased storage capacity and additional premium features. If you are running out of iCloud storage, upgrading is a straightforward solution. You can upgrade directly from your iPhone settings:
- Go to Settings > [Your Name] > iCloud.
- Tap Manage Storage or iCloud Storage.
- Tap Upgrade to iCloud+ or Change Storage Plan.
- Choose a storage plan that suits your needs and follow the on-screen instructions to subscribe.
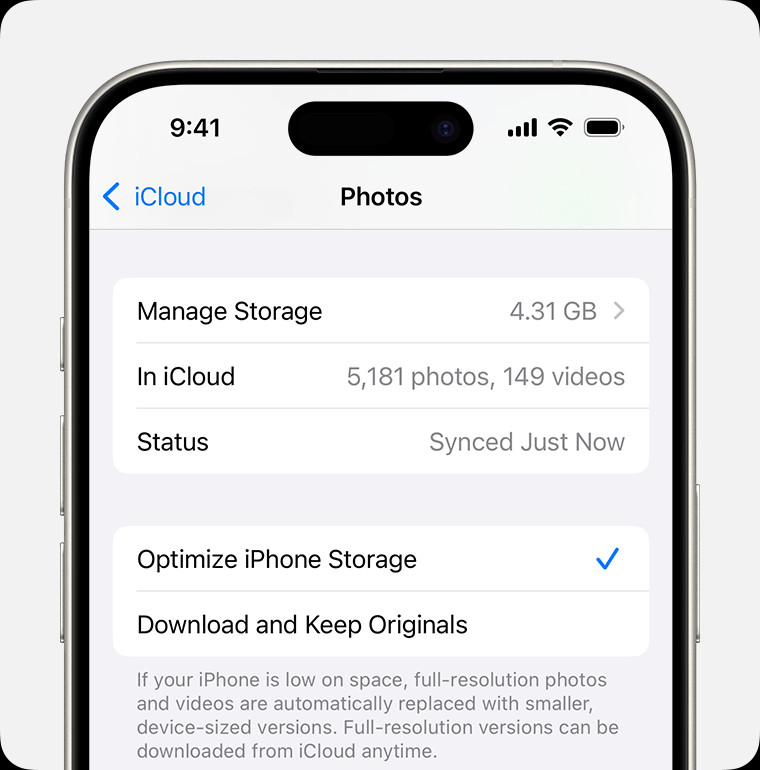
Using “Optimize iPhone Storage”
To save space on your iPhone itself while still keeping all your photos in iCloud, you can enable “Optimize iPhone Storage.” This setting automatically manages your device storage by keeping smaller, space-saving versions of your photos on your iPhone while storing the original, high-resolution versions in iCloud.
- Go to Settings > [Your Name] > iCloud > Photos.
- Choose “Optimize iPhone Storage.”
With “Optimize iPhone Storage” enabled, you can still view all your photos and videos on your iPhone. When you need to access an original, full-resolution version, it will be downloaded from iCloud on demand, provided you have a Wi-Fi or cellular connection.
Pausing iCloud Photo Uploads
In situations where you might have a slow internet connection or want to limit data usage temporarily, you can pause iCloud Photos uploads from your iPhone.
- Open the Photos app on your iPhone.
- Scroll to the bottom of the “Library” tab and tap “All Photos.”
- Scroll to the very bottom. You should see a message indicating upload progress and a “Pause” option. Tap “Pause” to temporarily stop uploads.
Alternatively, in newer iOS versions:
- Open the Photos app.
- Tap on your profile picture in the top left corner.
- Tap “Pause” if the option is available based on your upload status.
Pausing uploads can be useful when on limited data plans or during periods of slow internet connectivity. Remember to resume uploads later to ensure your new photos are safely backed up to iCloud.
Conclusion: Keeping Your Photo Memories Safe with iCloud
Getting photos from your iPhone to iCloud is a simple yet powerful way to safeguard your memories and access them across all your Apple devices. By following this guide, you can confidently set up, manage, and optimize iCloud Photos to ensure your precious moments are always backed up, synchronized, and within reach. Embrace the convenience and peace of mind that iCloud Photos offers, and never worry about losing your valuable photo and video collection again.
