Are you struggling to retrieve precious memories trapped on your iPhone? This guide from dfphoto.net provides a comprehensive approach on How To Get Old Photos Off Iphone, covering everything from basic transfer methods to advanced recovery techniques, ensuring your visual legacy is safe and accessible for years to come. Discover the best ways to preserve your photographic artistry!
1. Understanding Your Options: How to Access Photos on Your iPhone?
Do you know all the ways to access your photos on your iPhone? It’s crucial to understand your options before deciding how to transfer them.
Accessing your photos on an iPhone can be done through several methods. Understanding these options is the first step in deciding how to transfer and manage your precious memories. Here’s a breakdown:
1.1 The Photos App
The primary way to view and manage photos on your iPhone is through the built-in Photos app. It organizes your images into:
- Library: This section contains all your photos and videos, sorted by date.
- Albums: You can create custom albums to organize photos by event, location, or any other criteria. The Photos app also automatically creates albums like “Selfies,” “Live Photos,” and “Panoramas.”
- Memories: This feature intelligently creates slideshows and short videos from your photos and videos, often grouped by date or location. It’s a fun way to rediscover old memories.
- Utilities: Contains “Imports,” “Hidden,” and “Recently Deleted” albums.
1.2 iCloud Photos
If you have iCloud Photos enabled, your photos and videos are automatically synced to iCloud. This allows you to access them on all your Apple devices (iPhones, iPads, Macs) and even on a Windows computer through the iCloud website or iCloud for Windows app.
- Benefits: Automatic backup, access from multiple devices, and easy sharing.
- Considerations: Requires sufficient iCloud storage, which may require a paid subscription.
1.3 Third-Party Cloud Services
Besides iCloud, many other cloud storage services, like Google Photos, Dropbox, and OneDrive, can automatically back up your photos.
- Benefits: Cross-platform compatibility (access your photos on any device, regardless of operating system), often offer more free storage than iCloud.
- Considerations: Requires installing the respective app and setting up automatic backups.
1.4 Connecting to a Computer
You can connect your iPhone to a computer using a Lightning or USB-C cable and access your photos as if they were on an external drive.
- Benefits: Direct transfer, no internet connection required, good for large transfers.
- Considerations: Requires a computer, manual transfer process.
1.5 AirDrop
AirDrop is a wireless file transfer service built into iOS and macOS. It allows you to quickly and easily share photos and videos with nearby Apple devices.
- Benefits: Fast, easy, and direct transfer between Apple devices.
- Considerations: Only works between Apple devices, requires both devices to be nearby and have Wi-Fi and Bluetooth enabled.
1.6 Email and Messaging Apps
You can also share photos directly from the Photos app via email or messaging apps like iMessage, WhatsApp, or Telegram.
- Benefits: Convenient for sharing individual photos or small selections.
- Considerations: Not ideal for large transfers, may compress photos.
1.7 Using iTunes/Finder (for older methods)
In older versions of iOS and macOS, iTunes (or Finder in macOS Catalina and later) was used to sync photos between your iPhone and computer. This method is less common now but may still be relevant for older devices.
- Benefits: Can be used to manage and sync photos.
- Considerations: More complex than other methods, can sometimes lead to photo loss or duplication if not used carefully.
Understanding these different methods will help you choose the best approach to get your old photos off your iPhone, depending on your specific needs and circumstances. Remember to consider factors like the number of photos, the available storage space, and your preferred level of convenience.
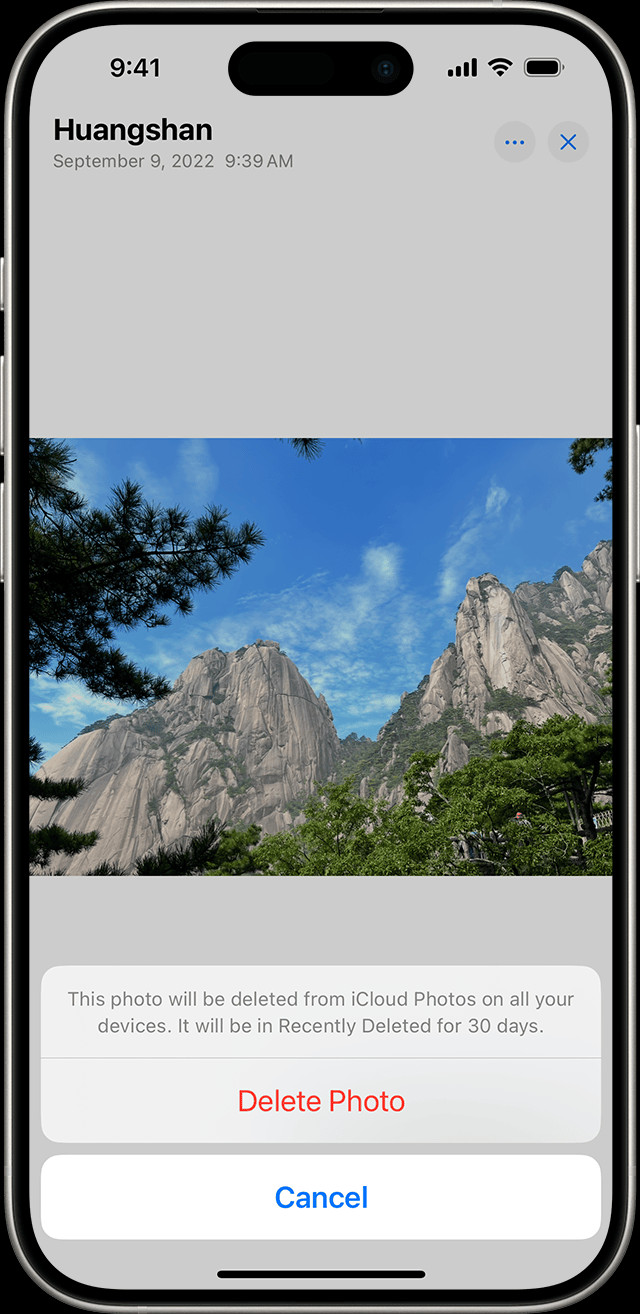 iPhone showing Delete Photo option
2. Preparing for Transfer: What to Consider Before Moving Your Old Photos?
What should you keep in mind to ensure a smooth transfer process? Planning ahead can prevent data loss and frustration.
Before you dive into the process of transferring your old photos off your iPhone, it’s crucial to take a few preparatory steps. These considerations will help ensure a smooth, efficient, and secure transfer.
2.1 Assess Your Storage Needs
- On Your iPhone: Check how much storage your photos and videos are currently occupying on your iPhone. Go to Settings > General > iPhone Storage. This will give you an idea of how much space you need on your destination device or cloud service.
- On Your Destination: Ensure that you have enough free space on your computer, external drive, or cloud storage account to accommodate all the photos and videos you intend to transfer.
2.2 Choose the Right Transfer Method
Different transfer methods have different pros and cons. Consider these factors when choosing a method:
| Method | Pros | Cons |
|---|---|---|
| iCloud Photos | Automatic backup, access from multiple devices, easy sharing. | Requires sufficient iCloud storage, may require a paid subscription. |
| Google Photos | Cross-platform compatibility, often more free storage than iCloud. | Requires installing the app and setting up automatic backups. |
| Connecting to a Computer | Direct transfer, no internet connection required, good for large transfers. | Requires a computer, manual transfer process. |
| AirDrop | Fast, easy, and direct transfer between Apple devices. | Only works between Apple devices, requires both devices to be nearby and have Wi-Fi and Bluetooth enabled. |
| Email/Messaging Apps | Convenient for sharing individual photos or small selections. | Not ideal for large transfers, may compress photos. |
| iTunes/Finder (Older) | Can be used to manage and sync photos (less common now). | More complex than other methods, can sometimes lead to photo loss or duplication if not used carefully. |
2.3 Back Up Your iPhone
It’s always a good idea to back up your entire iPhone before making any significant changes, including transferring a large number of photos. This ensures that you have a complete copy of your data in case something goes wrong. You can back up your iPhone to iCloud or to your computer using Finder (macOS Catalina and later) or iTunes (older macOS or Windows).
2.4 Clean Up Your Photo Library
Before transferring your photos, take some time to declutter your photo library. Delete any blurry, duplicate, or unwanted photos and videos. This will not only save you storage space but also make it easier to manage your photos in the future.
2.5 Check Photo and Video Formats
iPhones capture photos and videos in various formats, such as JPEG, HEIC, and MOV. Ensure that the destination device or software supports these formats. If necessary, you may need to convert the photos and videos to a more compatible format before transferring them. You can change the capture format in Settings > Camera > Formats. “Most Compatible” will use JPEG, while “High Efficiency” will use HEIC (which offers better compression but may not be compatible with all devices).
2.6 Optimize Storage (if using iCloud Photos)
If you’re using iCloud Photos, you might have “Optimize iPhone Storage” enabled. This means that your iPhone stores smaller, optimized versions of your photos and videos, while the full-resolution versions are stored in iCloud. Before transferring, you may want to download the full-resolution versions to your iPhone. To do this, go to Settings > Photos and select “Download and Keep Originals.” Note that this will require significant storage space on your iPhone.
2.7 Consider Privacy
If your photos contain sensitive or personal information, consider encrypting them before transferring them to a computer or external drive. You can use built-in encryption tools or third-party software to protect your privacy.
2.8 Update Your iPhone
Ensure that your iPhone is running the latest version of iOS. Software updates often include bug fixes and performance improvements that can make the transfer process smoother and more reliable.
By taking these considerations into account, you can minimize the risk of data loss, ensure compatibility, and make the process of getting your old photos off your iPhone as smooth and efficient as possible.
3. Transferring Photos to a Computer: Which Method Suits You Best?
What are the different methods for transferring photos to a computer, and which one is the most efficient? Explore wired and wireless options.
Transferring photos from your iPhone to a computer is a common task, and there are several methods to choose from, each with its own advantages and disadvantages. Here’s a detailed look at the most popular methods:
3.1 Using a USB Cable (Wired Transfer)
This is often the most reliable and fastest way to transfer large numbers of photos and videos.
- Connect your iPhone to your computer: Use a Lightning or USB-C cable to connect your iPhone to a USB port on your computer.
- Unlock your iPhone: If prompted, unlock your iPhone and tap “Trust This Computer” to allow access.
- Access your photos on Windows:
- Open File Explorer (Windows Explorer).
- Your iPhone should appear as a portable device under “This PC.”
- Double-click on your iPhone, then navigate to the “Internal Storage” > “DCIM” folder.
- Your photos and videos will be in folders named with a number (e.g., “100APPLE”).
- Access your photos on macOS:
- Open the Photos app.
- Your iPhone should appear in the sidebar under “Devices.”
- Click on your iPhone and select the photos you want to import.
- Click “Import Selected” or “Import All New Photos.”
- Alternatively, you can use Finder: Open Finder, and your iPhone should appear in the sidebar. Click on it, and you’ll see the “Files” tab, where you can access the DCIM folder.
- Copy the photos: Simply drag and drop the photos and videos from your iPhone’s DCIM folder to a folder on your computer.
Pros:
- Fast transfer speeds.
- Reliable and stable connection.
- No internet connection required.
- Good for transferring large files and large quantities of photos.
Cons:
- Requires a USB cable.
- Manual process can be time-consuming for large libraries.
3.2 Using iCloud Photos (Wireless Transfer)
If you have iCloud Photos enabled, your photos and videos are automatically synced to iCloud, and you can access them on your computer.
- Enable iCloud Photos on your iPhone: Go to Settings > Photos and turn on “iCloud Photos.”
- Access your photos on Windows:
- Download and install iCloud for Windows from the Microsoft Store.
- Sign in with your Apple ID.
- Enable “Photos” in the iCloud settings.
- Your photos and videos will be downloaded to a folder on your computer (usually in the “Pictures” folder).
- Access your photos on macOS:
- Open the Photos app.
- Your iCloud photos should automatically sync and appear in your library.
Pros:
- Automatic syncing and backup.
- Access photos on multiple devices.
- Convenient and seamless integration with Apple ecosystem.
Cons:
- Requires an active internet connection.
- Depends on iCloud storage capacity (may require a paid subscription).
- Initial sync can take a long time, especially for large libraries.
- “Optimize iPhone Storage” setting can affect the availability of full-resolution photos on your computer.
3.3 Using Third-Party Cloud Services (Wireless Transfer)
Services like Google Photos, Dropbox, and OneDrive offer similar wireless transfer capabilities.
- Install the app: Download and install the app for your chosen cloud service on your iPhone and your computer.
- Enable automatic backup: In the app settings on your iPhone, enable automatic photo and video backup.
- Access your photos on your computer: Open the app on your computer, and your photos and videos will be synced and available for viewing and downloading.
Pros:
- Cross-platform compatibility (works on Windows, macOS, Android, etc.).
- Often offers more free storage than iCloud.
- Automatic syncing and backup.
Cons:
- Requires an active internet connection.
- Depends on the storage capacity of the cloud service.
- Can consume significant bandwidth and battery life on your iPhone.
- Privacy concerns with storing data on third-party servers.
3.4 Using AirDrop (Wireless Transfer – macOS Only)
AirDrop is a quick and easy way to transfer photos and videos wirelessly between Apple devices.
- Enable AirDrop on both your iPhone and Mac:
- On your iPhone, swipe down from the top-right corner to open Control Center.
- Press and hold the Wi-Fi or Bluetooth card, then tap “AirDrop.”
- Choose “Contacts Only” or “Everyone” (note that “Everyone” is less secure).
- On your Mac, open Finder, click “AirDrop” in the sidebar, and choose “Allow me to be discovered by: Contacts Only” or “Everyone.”
- Share photos from your iPhone:
- Open the Photos app and select the photos you want to transfer.
- Tap the “Share” button (the square with an arrow pointing up).
- Tap “AirDrop” and select your Mac from the list of available devices.
- Accept the transfer on your Mac: Your Mac will receive a notification asking if you want to accept the files. Click “Accept,” and the photos will be saved to your Downloads folder by default.
Pros:
- Fast and convenient for transferring small to medium-sized batches of photos.
- No internet connection required (uses Wi-Fi Direct).
- Direct transfer between devices.
Cons:
- Only works between Apple devices (iPhone, iPad, Mac).
- Requires both devices to be nearby.
- Can be unreliable for very large transfers.
- Security concerns with “Everyone” setting.
3.5 Using Email or Messaging Apps (Wireless Transfer)
You can email photos to yourself or send them via messaging apps like iMessage, WhatsApp, or Telegram.
- Share photos from your iPhone:
- Open the Photos app and select the photos you want to transfer.
- Tap the “Share” button.
- Choose “Mail” or your preferred messaging app.
- Enter your own email address or phone number.
- Access the photos on your computer: Open the email or messaging app on your computer and download the photos.
Pros:
- Simple and straightforward for transferring a few photos.
- Works on any device with email or messaging capabilities.
Cons:
- Not suitable for transferring large numbers of photos.
- Photos may be compressed, resulting in lower quality.
- Can be time-consuming and inconvenient for multiple photos.
The best method for you will depend on your specific needs and circumstances. If you have a large photo library and want the fastest transfer speeds, a USB cable is the way to go. If you prefer wireless syncing and access across multiple devices, iCloud Photos or a third-party cloud service might be a better choice. And if you just need to transfer a few photos quickly to a Mac, AirDrop is a great option.
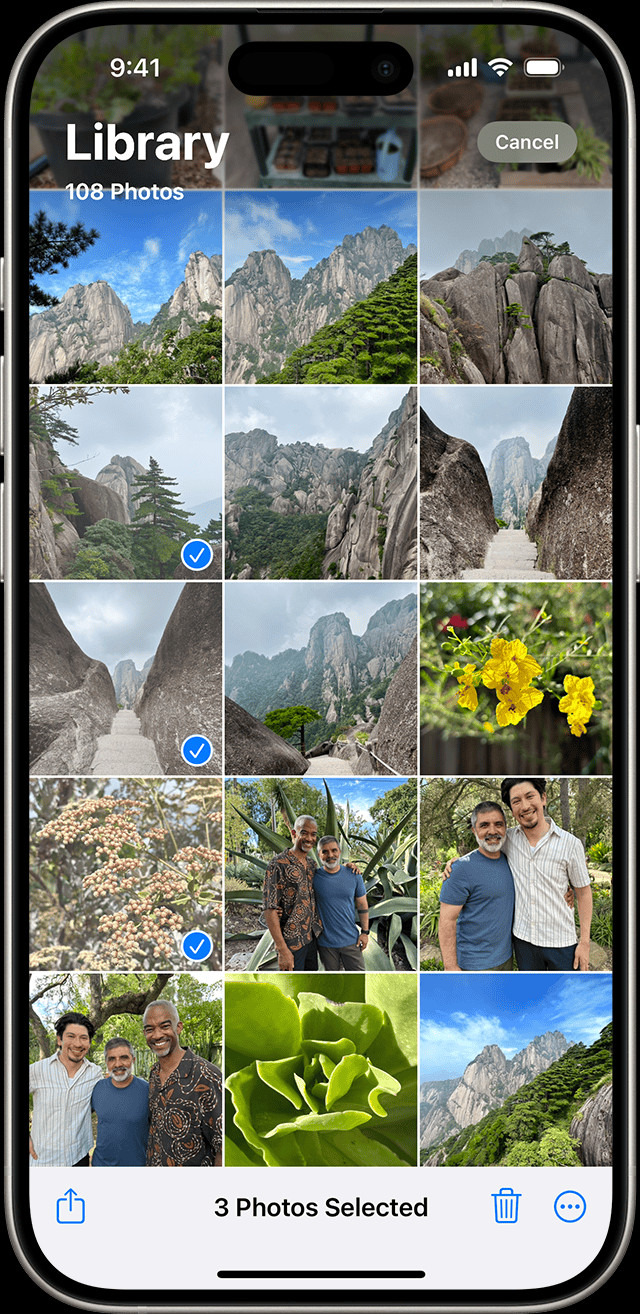 iPhone showing multiple photos selected in the Photos app
4. Optimizing Photos for Transfer: How to Preserve Quality and Save Space?
How can you balance image quality with storage efficiency when transferring your photos? Learn about different formats and compression techniques.
Optimizing photos for transfer is a crucial step in ensuring that you preserve the quality of your precious memories while also managing storage space efficiently. Here’s a detailed guide on how to achieve this balance:
4.1 Understanding Image Formats
The image format you choose plays a significant role in both the quality and the file size of your photos. Here are some common formats:
- JPEG (or JPG): This is the most widely used format for photos. It uses lossy compression, which means that some image data is discarded during compression to reduce file size. JPEGs are great for everyday photos and online sharing, but they are not ideal for photos that you plan to edit extensively, as each save can further degrade the quality.
- HEIC (High Efficiency Image File Format): This is Apple’s preferred format for photos on iPhones and iPads. It offers better compression than JPEG, meaning that it can store photos at a smaller file size with similar or better quality. However, HEIC is not universally supported, so you may need to convert HEIC files to JPEG for compatibility with older devices or software.
- PNG (Portable Network Graphics): This format uses lossless compression, which means that no image data is lost during compression. PNGs are great for images with text, graphics, or sharp lines, but they tend to have larger file sizes than JPEGs.
- TIFF (Tagged Image File Format): This is a high-quality, lossless format that is often used for professional photography and archiving. TIFF files are very large, but they preserve all the original image data.
4.2 Choosing the Right Format for Transfer
- For Archiving: If you want to preserve the highest possible quality for your photos, consider transferring them in their original format (HEIC if that’s what your iPhone uses, or JPEG if you’ve set it to “Most Compatible”). You can always convert them to a different format later if needed. If space is not a concern, TIFF is also an excellent option.
- For Sharing: If you plan to share your photos online or with others who may not have compatible devices or software, JPEG is usually the best choice. It’s widely supported and offers a good balance of quality and file size.
- For Editing: If you plan to edit your photos extensively, consider using a lossless format like PNG or TIFF to avoid quality degradation during editing.
4.3 Converting Image Formats
If you need to convert your photos to a different format, there are many tools available:
- On macOS: The Preview app can convert images to JPEG, PNG, TIFF, and other formats. Simply open the image in Preview, go to File > Export, and choose the desired format.
- On Windows: The Photos app can convert images to JPEG, PNG, TIFF, and other formats. Open the image in Photos, click the “Edit & Create” button, select “Edit,” then click “Save a copy” and choose the desired format.
- Online Converters: There are many online image converters that can convert images between different formats. Be cautious when using online converters, as they may have privacy or security risks.
- Third-Party Software: There are also many third-party image editing and conversion programs available, such as Adobe Photoshop, GIMP, and IrfanView, which offer more advanced features and options.
4.4 Compressing Photos
Compression reduces the file size of your photos, making them easier to transfer and store. There are two main types of compression:
- Lossy Compression: This type of compression discards some image data to reduce file size. JPEG is the most common example of a lossy format. The amount of compression can be adjusted, but higher compression levels result in lower image quality.
- Lossless Compression: This type of compression reduces file size without discarding any image data. PNG and TIFF are examples of lossless formats. Lossless compression typically results in larger file sizes than lossy compression.
4.5 Adjusting Compression Settings
When saving photos in a lossy format like JPEG, you can usually adjust the compression settings to control the balance between quality and file size. Most image editing programs offer a “quality” slider or similar control. Higher quality settings result in larger file sizes, while lower quality settings result in smaller file sizes but more noticeable image degradation. Experiment with different settings to find the best compromise for your needs.
4.6 Resizing Photos
Resizing photos can also significantly reduce their file size. If you don’t need to print your photos at a large size, you can resize them to a smaller resolution before transferring them. Most image editing programs offer resizing tools.
4.7 Using iCloud Photos “Optimize iPhone Storage”
If you use iCloud Photos, you have the option to “Optimize iPhone Storage.” This setting stores smaller, optimized versions of your photos on your iPhone, while the full-resolution versions are stored in iCloud. This can save a lot of space on your iPhone, but it also means that you won’t have the full-resolution versions of your photos available offline. Before transferring your photos, you may want to download the full-resolution versions to your iPhone. To do this, go to Settings > Photos and select “Download and Keep Originals.”
4.8 Batch Processing
If you have a large number of photos to optimize, consider using batch processing tools. These tools allow you to apply the same changes (such as format conversion, compression, and resizing) to multiple photos at once, saving you a lot of time and effort. Many image editing programs offer batch processing capabilities.
By carefully considering these factors and using the appropriate tools and techniques, you can optimize your photos for transfer, ensuring that you preserve the quality of your memories while also managing storage space efficiently.
5. Troubleshooting Common Transfer Issues: What to Do When Things Go Wrong?
What are the common pitfalls during photo transfers, and how can you resolve them? Get practical solutions to technical problems.
Even with careful preparation, things can sometimes go wrong during photo transfers. Here’s a troubleshooting guide to help you resolve common issues:
5.1 iPhone Not Recognized by Computer
- Problem: Your computer doesn’t detect your iPhone when you connect it via USB.
- Solutions:
- Check the USB cable: Ensure that the USB cable is properly connected to both your iPhone and your computer. Try using a different USB cable to rule out a faulty cable.
- Try a different USB port: Some USB ports may not provide enough power or may have compatibility issues. Try connecting your iPhone to a different USB port on your computer.
- Trust This Computer: When you connect your iPhone to your computer for the first time, you should see a prompt on your iPhone asking if you trust the computer. Make sure to tap “Trust.” If you accidentally tapped “Don’t Trust,” disconnect and reconnect your iPhone, and the prompt should reappear.
- Update iTunes (Windows): On Windows, iTunes is required for your computer to recognize your iPhone. Make sure you have the latest version of iTunes installed. You can download it from the Apple website.
- Restart your iPhone and computer: Sometimes, a simple restart can resolve connection issues.
- Check Apple Mobile Device USB Driver (Windows):
- Open Device Manager (search for “Device Manager” in the Windows Start menu).
- Expand “Universal Serial Bus controllers.”
- Look for “Apple Mobile Device USB Driver.” If you see a yellow exclamation mark next to it, there’s a problem with the driver.
- Right-click on the driver and select “Update driver.”
- Choose “Search automatically for drivers.”
- If that doesn’t work, try uninstalling the driver (right-click and select “Uninstall device”), then disconnect and reconnect your iPhone. Windows should automatically reinstall the driver.
- Check Finder (macOS): On macOS Catalina and later, Finder handles device connections instead of iTunes. Make sure your iPhone is showing up in the Finder sidebar. If not, check Finder preferences to ensure that “CDs, DVDs, and iOS Devices” is checked under “General.”
- Reset Location & Privacy: On your iPhone, go to Settings > General > Transfer or Reset iPhone > Reset > Reset Location & Privacy. This will reset your trust settings for all computers. When you reconnect your iPhone, you’ll be prompted to trust the computer again.
5.2 Slow Transfer Speeds
- Problem: The photo transfer process is taking a very long time.
- Solutions:
- Use a USB 3.0 port: If your computer has USB 3.0 ports (usually blue), use one of those. USB 3.0 offers significantly faster transfer speeds than USB 2.0.
- Close other applications: Other applications running on your computer can consume system resources and slow down the transfer process. Close any unnecessary applications.
- Transfer in smaller batches: Transferring a very large number of photos at once can be slow. Try transferring them in smaller batches.
- Use a wired connection: A wired connection (USB cable) is generally faster and more reliable than a wireless connection (iCloud Photos, AirDrop, etc.).
- Optimize photos before transfer: Large, high-resolution photos take longer to transfer. Consider optimizing your photos (reducing file size and resolution) before transferring them.
- Check your iPhone storage: If your iPhone’s storage is nearly full, it can slow down the transfer process. Free up some space on your iPhone by deleting unnecessary files.
5.3 Photos Not Transferring Completely
- Problem: Some photos are missing or incomplete after the transfer.
- Solutions:
- Check for errors during transfer: Keep an eye on the transfer process for any error messages. If you see an error, try transferring the affected photos again.
- Ensure sufficient storage space: Make sure you have enough free space on both your iPhone and your computer to accommodate all the photos you’re transferring.
- Try a different transfer method: If one method is not working reliably, try a different method. For example, if you’re using iCloud Photos, try transferring the photos via USB cable.
- Check for corrupted files: It’s possible that some of your photos are corrupted. Try opening the photos on your iPhone to see if they display correctly. If a photo is corrupted, it may not be transferable.
- Update your iPhone and computer: Make sure both your iPhone and your computer are running the latest software versions.
- Disable “Optimize iPhone Storage”: If you’re using iCloud Photos with “Optimize iPhone Storage” enabled, the full-resolution versions of your photos may not be on your iPhone. Go to Settings > Photos and select “Download and Keep Originals” to download the full-resolution versions before transferring.
5.4 HEIC Compatibility Issues
- Problem: Your computer can’t open or display HEIC photos.
- Solutions:
- Install HEIC codec (Windows): On Windows, you need to install the HEIC codec to be able to open HEIC files. You can download it from the Microsoft Store (search for “HEIF Image Extensions”).
- Convert HEIC to JPEG: If you can’t install the HEIC codec, you can convert the HEIC files to JPEG. You can use online converters or image editing software to do this.
- Change iPhone camera settings: You can set your iPhone to capture photos in JPEG format instead of HEIC. Go to Settings > Camera > Formats and select “Most Compatible.” Note that this will result in larger file sizes.
5.5 iCloud Photos Syncing Issues
- Problem: Your photos are not syncing between your iPhone and iCloud.
- Solutions:
- Check your internet connection: iCloud Photos requires an active internet connection to sync. Make sure you’re connected to Wi-Fi or cellular data.
- Check your iCloud storage: If your iCloud storage is full, photos won’t sync. Go to Settings > [Your Name] > iCloud > Manage Storage to check your storage usage.
- Enable iCloud Photos: Make sure iCloud Photos is enabled on your iPhone. Go to Settings > Photos and turn on “iCloud Photos.”
- Sign in to iCloud: Make sure you’re signed in to iCloud with the same Apple ID on all your devices.
- Restart your iPhone: Sometimes, a simple restart can resolve syncing issues.
- Reset Network Settings: On your iPhone, go to Settings > General > Transfer or Reset iPhone > Reset > Reset Network Settings. This will reset your Wi-Fi passwords and other network settings, which may help resolve syncing issues. Note that you’ll need to re-enter your Wi-Fi passwords after doing this.
By following these troubleshooting steps, you should be able to resolve most common photo transfer issues and get your precious memories safely off your iPhone. If you’re still having trouble, consider seeking help from Apple Support or a qualified technical professional.
6. Retrieving Photos from a Broken iPhone: Is It Possible?
What options do you have if your iPhone is damaged and you need to recover your photos? Explore data recovery methods.
Retrieving photos from a broken iPhone can be a challenging but not always impossible task. The feasibility of recovery depends on the extent of the damage and whether you have backups available. Here’s a comprehensive overview of the options:
6.1 Assessing the Damage
The first step is to assess the extent of the damage to your iPhone. Consider these factors:
- Is the screen broken but the phone still turns on? If the screen is the only issue, the underlying hardware may still be functional, making data recovery easier.
- Does the phone turn on at all? If the phone is completely unresponsive, the damage may be more severe, potentially affecting the logic board or storage components.
- Is there water damage? Water damage can cause corrosion and short circuits, making data recovery more difficult.
- Has the phone been physically damaged (e.g., bent, crushed)? Physical damage can compromise the integrity of the storage chips, making data recovery complex.
6.2 Recovery Options
Based on the assessment of the damage, here are the available recovery options:
6.2.1 If the iPhone Turns On and the Screen Works (or Can Be Temporarily Repaired)
- Connect to a Computer: If the iPhone turns on and the screen is functional (or if you can temporarily repair the screen to make it functional), the simplest option is to connect the iPhone to a computer using a USB cable and transfer the photos as described in Section 3.
- Use iCloud Photos: If you have iCloud Photos enabled, your photos should already be synced to iCloud. You can access them on any device by signing in with your Apple ID.
- Use Third-Party Cloud Services: If you used a third-party cloud service like Google Photos or Dropbox to back up your photos, you can access them through the respective app or website.
6.2.2 If the iPhone Turns On But the Screen Doesn’t Work
- Connect to a Computer and Trust the Connection (If Possible): If the iPhone turns on but the screen doesn’t work, you may still be able to connect it to a computer and transfer the photos. However, you’ll need to have previously “trusted” the computer. If you haven’t trusted the computer, you won’t be able to access the photos without a functional screen.
- Use a USB Adapter and External Display: If the iPhone supports it, you may be able to use a USB adapter (like a Lightning to HDMI adapter) to connect it to an external display. This will allow you to see the screen and interact with the iPhone.
- Professional Screen Repair: Consider getting the screen professionally repaired. This may be the most cost-effective option if the underlying hardware is still functional.
6.2.3 If the iPhone Doesn’t Turn On
- Check for Backup: The first step is to check if you have a recent backup of your iPhone. You can check for iCloud backups by signing in to iCloud.com or by going to Settings > [Your Name] > iCloud > iCloud Backup on another Apple device. You can also check for computer backups in Finder (macOS Catalina and later) or iTunes (older macOS or Windows).
- Restore from Backup: If you have a backup, you can restore your photos to a new iPhone or iPad.
- Professional Data Recovery Services: If you don’t have a backup and the iPhone doesn’t turn on, your best bet is to seek help from a professional data recovery service. These services have specialized equipment and expertise to recover data from damaged devices. However, data recovery can be expensive and there’s no guarantee of success.
6.3 Data Recovery Services
When choosing a data recovery service, consider these factors:
- Reputation and Experience: Look for a service with a good reputation and a proven track record of successful data recovery.
- Expertise: Ensure that the service has experience with iPhone data recovery and understands the intricacies of iOS devices.
- Cleanroom Environment: Data recovery should be performed in a cleanroom environment to minimize the risk of further damage from dust and contaminants.
- Cost: Data recovery can be expensive. Get a quote from the service before proceeding.
- No Data, No Fee Policy: Look for a service that offers a “no data, no fee” policy, meaning that you only pay if they are able to recover your data.
- Privacy and Security: Ensure that the service has strict privacy and security protocols to protect your personal data.
6.4 Preventing Data Loss in the Future
To prevent data loss in the future, consider these tips:
- Enable iCloud Photos: iCloud Photos automatically backs up your photos to iCloud, ensuring that they are safe even if your iPhone is lost, stolen, or damaged.
- Use Third-Party Cloud Services: Consider using a third-party cloud service like Google Photos or Dropbox to back up your photos.
- Back Up Regularly: Back up your iPhone regularly to iCloud or your computer.
- Handle Your iPhone with Care: Protect your iPhone from physical damage and water damage.
- Get Insurance: Consider getting insurance for your iPhone to cover the cost of repairs or replacement in case of damage or loss.
While retrieving photos from a broken iPhone can be challenging, it’s often possible, especially if you have backups or if the damage is not too severe. By carefully assessing the damage and choosing the right recovery option, you can maximize your chances of getting your precious memories back.
7. Managing iCloud Storage: How to Free Up Space for More Photos?
Are you running out of iCloud storage? Learn how to manage your storage and make room for new photos.
Managing iCloud storage is essential for ensuring that your photos, videos, and other important data are safely backed up and accessible across your Apple devices. When your iCloud storage is full, you won’t be able to back up new photos and videos, and you may experience syncing issues. Here’s a comprehensive guide on how to manage your iCloud storage and free up space for more photos:
7.1 Understanding iCloud Storage
Every Apple ID comes with 5 GB of free iCloud storage. This storage is shared across all your iCloud services, including:
- iCloud Photos: Stores your photos and videos.
- iCloud Drive: Stores your documents, files, and folders.
- iCloud Backup: Backs up your iPhone, iPad, and iPod touch data.
- iCloud Mail: Stores your email messages and attachments.
- iCloud Notes: Stores your notes.
- iCloud Calendar: Stores your calendar events.
- iCloud Contacts: Stores your contacts.
- iCloud Keychain: Stores your passwords and credit card information.
- iCloud Messages: Stores your iMessage and SMS messages.
If you need more than 5 GB of storage, you can upgrade to iCloud+, which offers paid plans with more storage and additional features.
7.2 Checking Your iCloud Storage Usage
To check your iCloud storage usage on your iPhone or iPad, follow these steps:
- Open the Settings app.
- Tap your name at the top of the screen.
- Tap “iCloud.”
- You’ll see a bar graph showing how much storage you’re using and what’s taking up the most space.
- Tap “Manage Storage” to see a detailed breakdown of your storage usage.
On your Mac, follow these steps:
- Click the Apple menu in the top-left corner of the screen.
- Choose “System Preferences.”
- Click “Apple ID.”