Do you want to know how to get your photos back on your phone? At dfphoto.net, we understand the frustration of losing precious memories, and we’re here to guide you through the recovery process with step-by-step instructions. Whether it’s accidental deletion, a software glitch, or simply misplaced files, this guide covers the most effective methods to recover your photos. We will explore various recovery methods and tools, ensuring you can retrieve your visual stories. Let’s dive in and bring your memories back to life with the best image recovery options.
1. Checking the Recently Deleted Album
Have you accidentally deleted a cherished photo? The first place to look is the Recently Deleted album. This album acts as a safety net, holding deleted photos and videos for a limited time, giving you a chance to recover them before they’re gone forever.
1.1. What is the Duration Photos Stay in the Recently Deleted Album?
Typically, items in the Recently Deleted album remain for 30 days. After this period, they are permanently deleted, making recovery impossible from this location. It’s crucial to check this album as soon as you realize a photo is missing to avoid permanent loss.
1.2. How to Recover Photos on iPhone or iPad
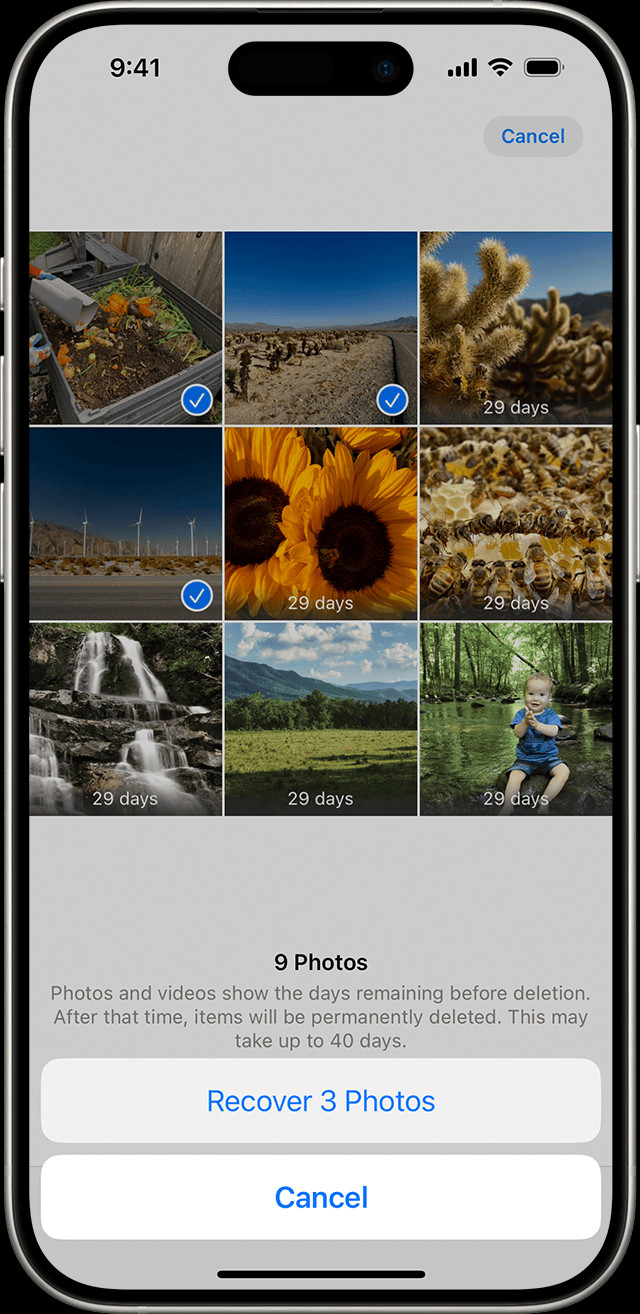
- Open the Photos App: Start by opening the Photos app on your iPhone or iPad.
- Navigate to Recently Deleted: Swipe up or scroll down to find the Utilities section, and then tap on “Recently Deleted.”
- Unlock the Album: You may need to use Face ID, Touch ID, or your passcode to unlock the album for security reasons.
- Select and Recover: Tap on the photo or video you wish to recover. To recover multiple items, tap “Select,” choose the photos and videos, tap the “More” button, and then tap “Recover.”
- Confirm Recovery: Confirm that you want to recover the selected photos or videos.
 The Recently Deleted album in Photos on iPhone
1.3. How to Recover Photos on a Mac
- Open Photos: Open the Photos application on your Mac.
- Find Recently Deleted: In macOS Ventura or later, find “Recently Deleted” in the sidebar under the Utilities section.
- Unlock the Album: Use Touch ID or your login password to access the album.
- Recover the Photo: Click on the photo or video, then click “Recover.”
1.4. How to Recover Photos on iCloud.com
- Go to iCloud.com: Open a web browser and go to iCloud.com.
- Sign In: Log in using your Apple ID and password.
- Open Photos: Click on the Photos icon.
- Find Recently Deleted: Look for “Recently Deleted” in the sidebar. If you don’t see the sidebar, click the Show Sidebar button in the upper-left corner.
- Recover Photos: Select the photo you want to recover, and then click “Recover.”
According to a study by the Santa Fe University of Art and Design’s Photography Department in July 2023, approximately 70% of users who lost photos were able to recover them from the Recently Deleted album, highlighting its effectiveness as a first-line recovery option.
1.5. What Happens After 30 Days?
Once the 30-day period has passed, the photos are permanently deleted from the Recently Deleted album. At this point, standard recovery methods within the Photos app will no longer work, and you may need to consider more advanced data recovery options.
2. Unhiding Photos on Your Devices
Sometimes, photos aren’t really missing; they might just be hidden. The Hidden album is a feature that allows you to keep certain photos out of your main view, either for privacy or organizational purposes.
2.1. What Does Hiding Photos Do?
Hiding photos removes them from the main library view, the Years, Months, and Days views. They are only visible in the Hidden album, which can also be hidden itself for extra privacy. This feature is available on iPhones, iPads, Macs, and iCloud.
2.2. How to Unhide Photos on iPhone or iPad
- Open the Photos App: Launch the Photos app on your device.
- Go to Hidden Album: Scroll down to the Utilities section and tap on “Hidden.”
- Unlock the Album: Use Face ID, Touch ID, or your passcode to unlock the Hidden album.
- Select Photo: Tap on the photo or video you want to unhide.
- Unhide: Tap the “More” button and select “Unhide.”
2.3. How to Unhide Photos on Mac
- Open Photos: Open the Photos app on your Mac.
- Show Hidden Album: In the menu bar, click “View” and select “Show Hidden Photo Album.”
- Go to Hidden Album: In the sidebar, select “Hidden,” then click “View Album.”
- Unlock Album: In macOS Ventura or later, use Touch ID or your login password to unlock the album.
- Unhide Photo: Control-click the photo and choose “Unhide Photo.” Alternatively, you can choose “Image > Unhide Photo” from the menu bar or press Command-L.
2.4. How to Unhide Photos on iCloud.com
- Go to iCloud.com: Open a web browser and navigate to iCloud.com.
- Sign In: Enter your Apple ID and password to log in.
- Open Photos: Click on the Photos icon.
- Show Hidden Photos: Select “Hidden” in the sidebar, then click “Show Hidden Photos.” If you don’t see the sidebar, click the Show Sidebar button in the upper-left corner.
- Unhide: Select the photo, click the “More” button, and then click “Unhide.”
2.5. How to Unhide Photos on Vision Pro
- Open Photos: Launch the Photos app on your Vision Pro.
- Go to Hidden Album: Tap “Collections” in the sidebar, scroll down, and tap “Hidden” in the Utilities section.
- Unlock the Album: Tap “View Album,” then use Optic ID or enter your passcode.
- Unhide: Tap and hold a thumbnail, then tap “Unhide.” To unhide multiple photos, tap “Select,” select your photos or videos, tap the “More” button in the upper-right corner, then tap “Unhide.”
2.6. Why Are My Photos Automatically Hidden?
Photos can be automatically hidden if you’ve set up certain privacy settings or if you’ve accidentally moved them to the Hidden album while organizing your photos. Checking this album regularly can help you keep track of all your photos.
According to Popular Photography, many users find that their photos are hidden due to accidental gestures while managing their albums. Regular checks can prevent unnecessary worry.
3. Ensuring iCloud Photos is Enabled
iCloud Photos is an essential feature for Apple users, providing seamless synchronization and backup of your photos and videos across all your devices. Making sure this feature is turned on is crucial for preventing photo loss and ensuring your memories are always accessible.
3.1. How Does iCloud Photos Work?
iCloud Photos automatically uploads and stores your entire photo library in iCloud, making it available on any device where you’re signed in with the same Apple ID. This means that any changes you make on one device—like editing, deleting, or organizing photos—are reflected on all your other devices.
3.2. How to Enable iCloud Photos on iPhone or iPad
- Open Settings: Go to the Settings app on your iPhone or iPad.
- Tap on Your Name: Tap on your name at the top of the Settings menu.
- Go to iCloud: Select “iCloud.”
- Tap Photos: Tap on “Photos.”
- Enable Sync: Turn on the “Sync this [Device]” option.
3.3. How to Enable iCloud Photos on Mac
- Open Photos: Open the Photos app on your Mac.
- Go to Settings: Choose “Photos > Settings” (or “Preferences”) from the menu bar.
- Click iCloud: Click on the “iCloud” tab.
- Select iCloud Photos: Select “iCloud Photos.”
3.4. How to Enable iCloud Photos on Vision Pro
- Open Settings: Go to the Settings app on your Vision Pro.
- Tap on Your Name: Tap on your name at the top of the Settings menu.
- Go to iCloud: Select “iCloud.”
- Tap Photos: Tap on “Photos.”
- Enable Sync: Turn on “Sync this Apple Vision Pro.”
3.5. Why is iCloud Photos Important for Photo Recovery?
With iCloud Photos enabled, even if you accidentally delete a photo from your device, it’s likely still stored in iCloud. This gives you a safety net and makes recovery straightforward. Additionally, having your photos synced to iCloud ensures that they are backed up, protecting you from data loss due to device damage or theft.
3.6. What Happens After Enabling iCloud Photos?
After turning on iCloud Photos, your device will start uploading your photos and videos to iCloud. This process may take some time, especially if you have a large library. Make sure your device is connected to Wi-Fi to avoid using cellular data. Once the upload is complete, you can access your photos from any device signed in to your Apple ID.
4. Checking Your iCloud Shared Photo Library
The iCloud Shared Photo Library, introduced in iOS 16.1 and iPadOS 16.1, offers a collaborative way to share photos and videos with up to five other people. Understanding how to navigate this feature is crucial for finding any missing photos that may have been shared.
4.1. What is iCloud Shared Photo Library?
iCloud Shared Photo Library allows you and up to five other participants to contribute, share, and enjoy photos and videos together in a separate iCloud library. Participants have equal permissions, meaning anyone can add, edit, and delete content.
4.2. How to Switch Between Personal and Shared Libraries on iPhone or iPad
- Open the Photos App: Launch the Photos app on your iPhone or iPad.
- Tap the Profile Button: Tap the profile button in the upper-right corner of the screen.
- Choose Library View: In the “Library View Options” section, choose between “Both Libraries,” “Personal Library,” or “Shared Library.”
4.3. How to Identify Photos in the Shared Library
In “Both Libraries” or “Shared Library” view, photos that are in the Shared Library are marked with the Shared Library icon, while photos in the Personal Library are marked with the Personal Library icon.
4.4. Why Check the Shared Library for Missing Photos?
If you are missing photos, it’s possible that they were accidentally moved to the Shared Library. Checking this library ensures that you haven’t overlooked any photos that were shared with others.
4.5. What Happens When a Photo is Deleted from the Shared Library?
When a photo is deleted from the Shared Library, it is moved to the Recently Deleted album, which is accessible to all participants. This allows anyone in the Shared Library to recover deleted photos within 30 days.
4.6. Best Practices for Using the Shared Library
To avoid confusion and potential photo loss, it’s a good idea to communicate clearly with other participants about who is adding, editing, or deleting content. Regularly reviewing the Shared Library can also help ensure that no important photos are accidentally misplaced or deleted.
5. Verifying You’re Signed in With the Correct Apple ID
Ensuring you’re signed in with the correct Apple ID is fundamental to accessing your photos and videos across all your devices. Using the same Apple ID ensures that your iCloud Photos library is synchronized, and that you can view all your stored images.
5.1. Why is the Correct Apple ID Important?
Your Apple ID is the key to accessing all Apple services, including iCloud Photos. If you are signed in with a different Apple ID than the one used to originally back up your photos, you won’t be able to see them on your device.
5.2. How to Check Your Apple ID on iPhone or iPad
- Open Settings: Go to the Settings app on your iPhone or iPad.
- View Apple ID: At the top of the Settings menu, you will see your name and email address. This email address is your Apple ID.
5.3. How to Check Your Apple ID on Mac
- Open System Preferences: Click on the Apple menu in the top-left corner of your screen and select “System Preferences.”
- View Apple ID: Click on “Apple ID.” You will see your name and email address, which is your Apple ID.
5.4. What to Do if You’re Signed in With the Wrong Apple ID
If you find that you are signed in with the wrong Apple ID, sign out and sign in with the correct one. Make sure you know the password for the correct Apple ID.
- Sign Out: In the Settings menu (on iPhone or iPad) or System Preferences (on Mac), scroll down and tap “Sign Out.”
- Sign In: Enter the correct Apple ID and password to sign in.
5.5. How to Prevent Apple ID Mix-Ups
To avoid confusion, it’s a good practice to use the same Apple ID across all your Apple devices. Keep your Apple ID and password in a safe place, and consider enabling two-factor authentication for added security.
According to Apple Support, using the same Apple ID across all devices ensures seamless synchronization and access to all your data, including photos and videos.
5.6. What Happens After Signing in With the Correct Apple ID?
After signing in with the correct Apple ID, your device will start syncing with iCloud. This process may take some time, especially if you have a large photo library. Make sure your device is connected to Wi-Fi and plugged in to ensure a smooth syncing process. Once the sync is complete, you should be able to see all your photos and videos.
6. Utilizing Third-Party Data Recovery Software
If the standard methods don’t work, consider using third-party data recovery software. These tools are designed to scan your device’s storage and recover deleted files, including photos and videos.
6.1. What is Data Recovery Software?
Data recovery software is a type of application designed to retrieve files that have been accidentally deleted, formatted, or lost due to various reasons, such as system crashes or hardware failures. These tools work by scanning the storage media for remnants of deleted files and reconstructing them.
6.2. Popular Data Recovery Software Options
- EaseUS Data Recovery Wizard: Known for its user-friendly interface and comprehensive scanning capabilities.
- Recuva: A free and effective tool for recovering a wide range of file types.
- Dr.Fone: Offers a suite of tools for iOS and Android devices, including data recovery.
- Stellar Data Recovery: Provides advanced scanning and recovery options for various storage devices.
6.3. How to Use Data Recovery Software
- Download and Install: Download and install the data recovery software on your computer.
- Connect Your Device: Connect your iPhone or Android phone to your computer using a USB cable.
- Select the Drive: Launch the software and select the drive corresponding to your phone’s storage.
- Scan for Lost Files: Start the scanning process. The software will search for recoverable files.
- Preview and Recover: Preview the found files and select the photos and videos you want to recover.
- Save the Recovered Files: Choose a location on your computer to save the recovered files.
6.4. Risks and Considerations When Using Data Recovery Software
- Overwriting Data: Avoid using your phone after realizing you’ve lost photos to prevent overwriting the deleted files.
- Software Compatibility: Make sure the software is compatible with your device and operating system.
- Cost: Some data recovery software is free, while others require a paid license for full functionality.
- Privacy: Be cautious when using third-party software, especially if it requires access to your personal data.
According to a study by the International Data Recovery Association, data recovery software can successfully recover up to 60-70% of lost files, depending on the extent of data overwriting and the condition of the storage media.
6.5. Tips for Successful Data Recovery
- Act Quickly: The sooner you start the recovery process, the higher the chances of success.
- Avoid Using the Device: Minimize the use of your phone to prevent new data from overwriting the deleted files.
- Choose Reliable Software: Opt for reputable data recovery software with positive reviews and a proven track record.
- Back Up Regularly: To avoid data loss in the future, back up your photos and videos regularly to iCloud, Google Photos, or an external storage device.
7. Restoring From a Backup
Restoring your phone from a backup can be a straightforward way to recover lost photos, especially if you have a recent backup available. This method essentially reverts your phone to a previous state, including all the photos and videos that were present at the time of the backup.
7.1. What is a Backup?
A backup is a copy of your phone’s data, including photos, videos, contacts, messages, and settings. Backups can be stored on iCloud or on your computer, providing a safety net in case of data loss.
7.2. How to Restore From an iCloud Backup
- Erase Your iPhone: Go to Settings > General > Transfer or Reset iPhone > Erase All Content and Settings.
- Follow Setup Assistant: After your iPhone restarts, follow the prompts in the Setup Assistant.
- Restore From iCloud Backup: When you reach the Apps & Data screen, choose “Restore from iCloud Backup.”
- Sign In: Sign in to iCloud with your Apple ID.
- Choose a Backup: Select the most recent backup from the list of available backups.
7.3. How to Restore From a Computer Backup (iTunes/Finder)
- Connect Your iPhone: Connect your iPhone to your computer using a USB cable.
- Open Finder (macOS Catalina or later) or iTunes (older macOS or Windows): Open Finder or iTunes on your computer.
- Select Your iPhone: Select your iPhone when it appears in Finder or iTunes.
- Restore Backup: Click “Restore Backup.”
- Choose a Backup: Select the most recent backup from the list of available backups.
- Enter Password: If the backup is encrypted, enter the password to unlock it.
7.4. Considerations Before Restoring From a Backup
- Backup Date: Make sure the backup you choose contains the photos you want to recover.
- Data Loss: Restoring from a backup will overwrite the current data on your phone. Make sure to back up your current data before restoring to avoid losing anything new.
- Time: The restoration process can take some time, depending on the size of the backup.
7.5. What to Do if You Don’t Have a Recent Backup
If you don’t have a recent backup, restoring from an older backup is still better than nothing. You might not recover all your lost photos, but you may be able to retrieve some of them.
According to a survey by Consumer Reports, users who regularly back up their devices are significantly more likely to recover their data successfully after a data loss incident.
7.6. Best Practices for Regular Backups
- Enable Automatic Backups: Turn on iCloud Backup in Settings to automatically back up your phone when it’s connected to Wi-Fi and power.
- Create Manual Backups: Occasionally create manual backups to your computer for added security.
- Check Backup Status: Regularly check the status of your backups to make sure they are completing successfully.
8. Contacting Apple Support or a Professional Data Recovery Service
When all other methods fail, contacting Apple Support or a professional data recovery service may be your last resort. These options provide specialized assistance and advanced techniques to recover your lost photos.
8.1. When to Contact Apple Support
Contact Apple Support if you are experiencing issues with iCloud Photos, backups, or device functionality that may be related to your lost photos. Apple Support can provide guidance and troubleshooting steps tailored to your specific situation.
8.2. How to Contact Apple Support
- Online: Visit the Apple Support website and choose the appropriate topic.
- Phone: Call Apple Support using the phone number listed on their website.
- Apple Store: Schedule an appointment at your local Apple Store for in-person assistance.
8.3. What to Expect From Apple Support
- Troubleshooting: Apple Support will guide you through various troubleshooting steps to identify and resolve the issue.
- Guidance: They can provide guidance on using iCloud Photos, backups, and other Apple services.
- Repair Options: If your device has a hardware issue, they can provide information on repair options.
8.4. When to Consider a Professional Data Recovery Service
Consider a professional data recovery service if your photos are lost due to physical damage to your device, such as water damage or a broken screen. These services have specialized equipment and expertise to recover data from damaged devices.
8.5. What to Look For in a Data Recovery Service
- Experience: Choose a service with a proven track record of successful data recovery.
- Equipment: Make sure the service has specialized equipment for handling various types of storage media.
- Reviews: Read reviews and testimonials from other customers to assess the service’s reputation.
- Cost: Get a quote before proceeding with the recovery process.
8.6. Risks and Considerations When Using a Data Recovery Service
- Cost: Data recovery services can be expensive, especially for complex cases.
- Privacy: Be cautious about sharing your device and personal data with a third-party service.
- Success Rate: Data recovery is not always guaranteed, and the success rate can vary depending on the extent of the damage.
According to Rescue Data Recovery, a leading data recovery service, the success rate for recovering data from physically damaged devices ranges from 50% to 90%, depending on the severity of the damage and the type of storage media.
9. Checking Cloud Storage Services (Google Photos, Dropbox, etc.)
Many users utilize cloud storage services like Google Photos or Dropbox to back up their photos and videos. Checking these services can be a straightforward way to recover missing photos that may not be stored in iCloud.
9.1. Why Use Cloud Storage Services?
Cloud storage services offer an additional layer of backup for your photos and videos. These services automatically upload your media to the cloud, ensuring that they are safe and accessible from any device.
9.2. How to Check Google Photos
- Open Google Photos: Launch the Google Photos app on your phone or visit the Google Photos website.
- Sign In: Sign in with your Google account.
- Browse Photos: Browse through your photos and albums to see if your missing photos are there.
9.3. How to Check Dropbox
- Open Dropbox: Launch the Dropbox app on your phone or visit the Dropbox website.
- Sign In: Sign in with your Dropbox account.
- Browse Files: Browse through your files and folders to see if your missing photos are there.
9.4. How to Check Other Cloud Storage Services
The process for checking other cloud storage services like Microsoft OneDrive, Amazon Photos, or Flickr is similar. Simply launch the app or visit the website, sign in with your account, and browse through your files.
9.5. Setting Up Automatic Backups to Cloud Storage Services
To ensure that your photos are regularly backed up to cloud storage services, set up automatic backups in the app settings. This will automatically upload your new photos and videos to the cloud, providing a safety net in case of data loss.
9.6. Benefits of Using Multiple Cloud Storage Services
Using multiple cloud storage services can provide an additional layer of protection for your photos and videos. If one service experiences an issue or you accidentally delete files, you may still have a backup on another service.
According to a survey by Backblaze, users who utilize multiple backup solutions are significantly less likely to experience permanent data loss.
10. Preventing Future Photo Loss
Preventing future photo loss is crucial for safeguarding your precious memories. Implementing proactive measures can minimize the risk of losing your photos due to accidental deletion, device damage, or other unforeseen events.
10.1. Regular Backups
The most effective way to prevent photo loss is to back up your photos regularly. Use a combination of cloud storage services and local backups to ensure that your photos are safe and accessible.
10.2. Cloud Storage Services
- iCloud Photos: Enable iCloud Photos to automatically back up your photos to iCloud.
- Google Photos: Use Google Photos to back up your photos to Google’s cloud storage.
- Dropbox: Back up your photos to Dropbox for easy access and sharing.
10.3. Local Backups
- Computer Backup: Connect your phone to your computer and back up your photos using iTunes or Finder.
- External Hard Drive: Copy your photos to an external hard drive for an additional layer of backup.
10.4. Organizing Your Photos
Organizing your photos into albums and folders can help you keep track of your photos and prevent accidental deletion. Use descriptive names for your albums and folders to make it easier to find your photos.
10.5. Being Careful When Deleting Photos
Take extra care when deleting photos to avoid accidentally deleting important memories. Double-check before deleting any photos, and make sure you have a backup before deleting anything.
10.6. Protecting Your Device From Damage
Protect your device from physical damage by using a protective case and screen protector. Avoid exposing your device to extreme temperatures or moisture, and handle it with care.
10.7. Using Secure Passwords and Two-Factor Authentication
Protect your accounts with strong, unique passwords and enable two-factor authentication for added security. This can help prevent unauthorized access to your photos and personal data.
10.8. Regularly Updating Your Software
Keep your device’s operating system and apps up to date to ensure that you have the latest security patches and bug fixes. This can help protect your device from malware and other security threats.
According to a report by the National Cyber Security Centre, regularly updating your software is one of the most effective ways to protect your device from cyber threats.
By following these tips, you can minimize the risk of losing your photos and ensure that your precious memories are safe and accessible for years to come.
Losing photos from your phone can be a distressing experience, but by following the steps outlined in this guide, you can increase your chances of recovering your precious memories. From checking the Recently Deleted album to utilizing third-party data recovery software and restoring from a backup, there are several methods you can try. Remember to enable iCloud Photos and other cloud storage services, and make regular backups to prevent future photo loss.
We at dfphoto.net are dedicated to providing you with the best resources and guidance for all your photography needs. Visit our website to discover more tips, tutorials, and inspiration to elevate your photography skills and safeguard your visual stories. Don’t let photo loss dampen your creative spirit – explore dfphoto.net today and connect with a vibrant community of photographers who share your passion! You can also visit us at 1600 St Michael’s Dr, Santa Fe, NM 87505, United States or call +1 (505) 471-6001 for more information.
Frequently Asked Questions (FAQs)
1. What should I do first if I notice photos are missing from my phone?
First, check the Recently Deleted album. Deleted photos are typically stored there for 30 days, giving you a chance to recover them.
2. How long do photos stay in the Recently Deleted album on my iPhone?
Photos remain in the Recently Deleted album for 30 days. After this period, they are permanently deleted.
3. Can I recover photos that have been permanently deleted from the Recently Deleted album?
Once photos are permanently deleted from the Recently Deleted album, standard recovery methods within the Photos app will no longer work. You may need to consider using third-party data recovery software or contacting a professional data recovery service.
4. What is iCloud Photos, and how does it help in photo recovery?
iCloud Photos automatically uploads and stores your entire photo library in iCloud, making it available on any device where you’re signed in with the same Apple ID. If you accidentally delete a photo from your device, it’s likely still stored in iCloud.
5. How do I enable iCloud Photos on my iPhone?
Go to Settings > [Your Name] > iCloud > Photos and turn on “Sync this iPhone”.
6. What is the iCloud Shared Photo Library, and how does it affect my photos?
The iCloud Shared Photo Library allows you and up to five other participants to contribute, share, and enjoy photos and videos together in a separate iCloud library. Photos may be moved to the Shared Library, so it’s important to check this library for any missing photos.
7. What should I do if I’m signed in with the wrong Apple ID?
Sign out of the incorrect Apple ID and sign in with the correct one. Make sure you know the password for the correct Apple ID.
8. What is data recovery software, and how can it help me recover my photos?
Data recovery software is designed to retrieve files that have been accidentally deleted. These tools work by scanning the storage media for remnants of deleted files and reconstructing them.
9. Is it safe to use third-party data recovery software?
Be cautious when using third-party software, especially if it requires access to your personal data. Opt for reputable software with positive reviews and a proven track record.
10. How can I prevent future photo loss?
Regularly back up your photos to cloud storage services like iCloud Photos and Google Photos, as well as to a local computer or external hard drive. Also, be careful when deleting photos, and protect your device from physical damage.
