Here’s a comprehensive guide on how to get your photos back. Losing precious memories captured in photos can be disheartening, but dfphoto.net is here to help you recover them using various methods, from checking your recently deleted album to utilizing iCloud features. We’ll explore solutions for both accidental deletions and hidden photos, ensuring you can retrieve your visual treasures. dfphoto.net wants you to explore data recovery, cloud storage, and photo management.
1. Understanding the Search Intent Behind Photo Recovery
Before diving into specific solutions, let’s understand what users are really looking for when they search for “How To Get My Photos Back.” The search intent typically falls into these categories:
- Accidental Deletion: Users who have mistakenly deleted photos and want to recover them.
- Missing Photos: Users who can’t find photos they believe should be on their device or in their cloud storage.
- Device Issues: Users who have experienced device malfunctions or data loss and need to retrieve their photos.
- Cloud Storage Problems: Users encountering issues with syncing or accessing photos stored in cloud services.
- Hidden or Lost Albums: Users who suspect their photos are hidden or misplaced within their device or cloud account.
2. The First Line of Defense: Checking the Recently Deleted Album
How can I recover photos from the Recently Deleted album?
You can recover photos from the Recently Deleted album by navigating to the “Recently Deleted” section in your Photos app and restoring the desired images within 30 days of deletion. The Recently Deleted album is a temporary holding place for deleted photos and videos. It acts as a safety net, giving you a chance to recover files you didn’t mean to erase. This feature is available on iPhones, iPads, Macs, iCloud.com, and Apple Vision Pro. Anything in your Recently Deleted album stays there for 30 days. After 30 days, it’s permanently deleted and you can’t get it back.
2.1. Recovering Photos on iPhone or iPad
- Open the Photos app: Locate and tap the Photos app icon on your home screen.
- Navigate to Recently Deleted: Swipe up from the bottom of the screen and tap “Recently Deleted” in the Utilities section.
- Unlock the Album: Tap “View Album” and use Face ID, Touch ID, or your passcode to unlock the album.
- Select and Recover:
- Single Photo: Tap the photo or video you want to recover, then tap “Recover.”
- Multiple Photos: Tap “Select,” choose the photos or videos you want to restore, tap the “More” button (…), and then tap “Recover.”
- Confirm Recovery: Confirm that you want to recover the selected photos or videos.
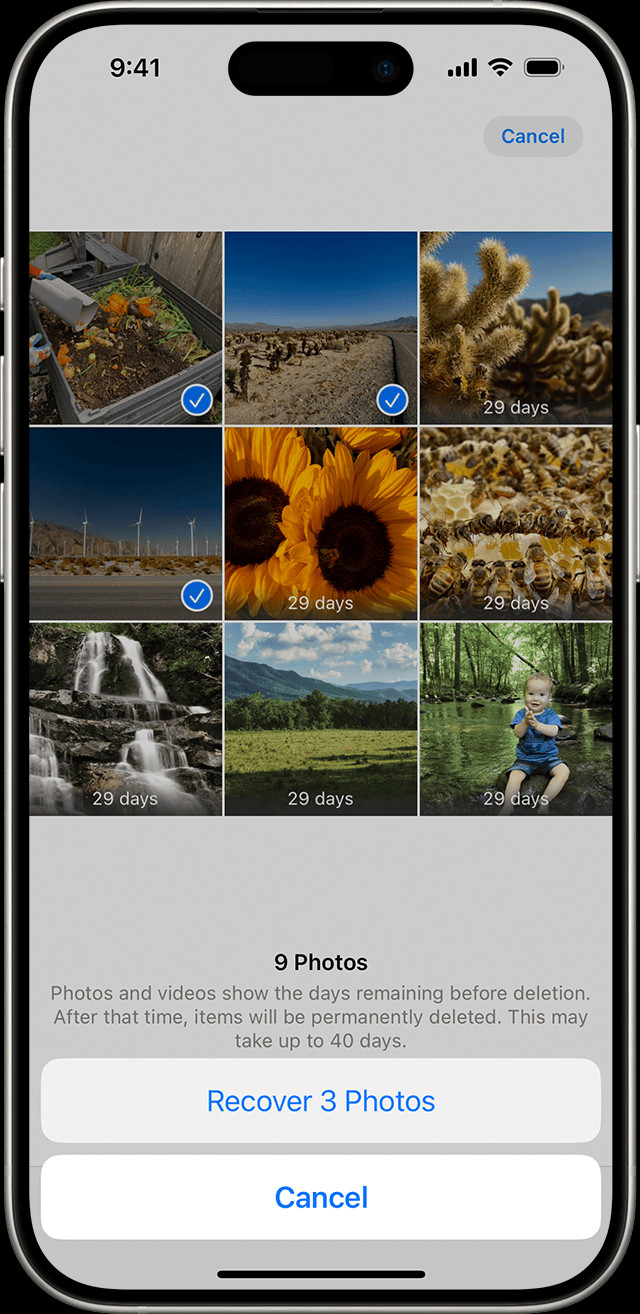 The Recently Deleted album in Photos on iPhone
2.2. Recovering Photos on Mac
- Open Photos: Launch the Photos app on your Mac.
- Find Recently Deleted: In macOS Ventura or later, select “Recently Deleted” in the Utilities section of the sidebar.
- Unlock the Album: Use Touch ID or your login password to unlock the Recently Deleted album.
- Select and Recover: Click the photo or video you want to recover, then click “Recover.”
2.3. Recovering Photos on iCloud.com
- Go to iCloud.com: Open a web browser and go to iCloud.com.
- Sign In: Log in to your Apple Account using your Apple ID and password.
- Open Photos: Tap or click on the “Photos” icon.
- Access Recently Deleted: Select “Recently Deleted” in the sidebar. If you don’t see the sidebar, tap or click the Show Sidebar button in the upper-left corner.
- Select and Recover: Select the photo you want to recover, then tap or click “Recover.”
2.4. Recovering Photos on Apple Vision Pro
- Open Photos: Launch the Photos app.
- Go to Collections: Tap “Collections” in the sidebar.
- Find Recently Deleted: Scroll down and tap “Recently Deleted” in the Utilities section.
- Unlock the Album: Tap “View Album,” then use Optic ID or your passcode to unlock the album.
- Select and Recover:
- Single Photo: Tap and hold a photo or video, then tap “Recover.”
- Multiple Photos: Tap “Select,” choose the photos or videos you want to restore, tap the “More” button in the upper-right corner, then tap “Recover.”
- Confirm Recovery: Tap “Recover” to confirm.
3. Revealing Hidden Photos: The Hidden Album
How do I unhide photos that seem to be missing?
You can unhide photos that seem to be missing by accessing the “Hidden” album in your Photos app and selecting the “Unhide” option for the desired images. If you’ve hidden photos and videos, they’ll only appear in your Hidden album, which can make them seem lost. This feature allows you to keep certain photos private while still having them stored on your device or in iCloud.
3.1. Unhiding Photos on iPhone or iPad
- Open Photos: Launch the Photos app.
- Navigate to Hidden: Swipe up and tap “Hidden” in the Utilities section.
- Unlock the Album: Tap “View Album” and use Face ID, Touch ID, or your passcode to unlock the album.
- Select and Unhide:
- Tap the photo or video you want to unhide.
- Tap the “More” button (…).
- Tap “Unhide.”
3.2. Unhiding Photos on Mac
- Open Photos: Launch the Photos app.
- Show Hidden Album: In the menu bar, click “View,” then select “Show Hidden Photo Album.”
- Access Hidden Album: In the sidebar, select “Hidden,” then click “View Album.”
- Unlock the Album: In macOS Ventura or later, use Touch ID or your login password to unlock the Hidden album.
- Select and Unhide:
- Select the photo or video you want to unhide.
- Control-click the photo, then choose “Unhide Photo.” You can also choose “Image > Unhide Photo” from the menu bar, or press Command-L.
3.3. Unhiding Photos on iCloud.com
- Go to iCloud.com: Open a web browser and navigate to iCloud.com.
- Sign In: Log in to your Apple Account.
- Open Photos: Tap or click “Photos.”
- Access Hidden Album: Select “Hidden” in the sidebar, then tap or click “Show Hidden Photos.” If you don’t see the sidebar, tap or click the Show Sidebar button in the upper-left corner.
- Select and Unhide: Select a photo, tap or click the “More” button, then tap or click “Unhide.”
3.4. Unhiding Photos on Vision Pro
- Open Photos: Open the Photos app, then tap Collections in the sidebar.
- Go to Collections: Scroll down and tap “Hidden” in the Utilities section.
- Access Hidden Album: Tap “View Album,” then use Optic ID or enter your passcode to unlock the album.
- Select and Unhide:
- Tap and hold a thumbnail, then tap “Unhide.”
- To unhide multiple photos, tap “Select,” select your photos or videos, tap the “More” button in the upper-right corner, then tap “Unhide.”
4. The Power of iCloud Photos: Syncing and Storage
How do I ensure my photos are safely stored and accessible across all devices using iCloud?
You can ensure your photos are safely stored and accessible across all devices by turning on iCloud Photos and syncing your devices to the same Apple Account. iCloud Photos securely stores all your photos and videos in iCloud, allowing you to access them on any device where you’re logged in with the same Apple ID. This is a crucial step to prevent data loss and keep your photo library consistent across your ecosystem of devices.
4.1. Enabling iCloud Photos on iPhone or iPad
- Open Settings: Go to Settings > [your name], then tap “iCloud.”
- Access Photos Settings: Tap “Photos.”
- Turn on iCloud Photos: Turn on “Sync this [Device].”
4.2. Enabling iCloud Photos on Mac
- Open Photos: Launch the Photos app.
- Access Preferences: Choose “Photos > Settings” (or “Preferences”) from the menu bar.
- Go to iCloud Tab: Click the “iCloud” tab.
- Select iCloud Photos: Select “iCloud Photos.”
After turning on iCloud Photos, connect to Wi-Fi and wait a few minutes for your photos to sync.
4.3. Enabling iCloud Photos on Vision Pro
- Open Settings: Go to Settings > [your name], then tap “iCloud.”
- Access Photos Settings: Tap “Photos.”
- Turn on iCloud Photos: Turn on “Sync this Apple Vision Pro.”
5. Exploring the iCloud Shared Photo Library
What is the iCloud Shared Photo Library and how can it help me find missing photos?
The iCloud Shared Photo Library is a feature that allows you to share photos and videos with up to five other people, and it can help you find missing photos by ensuring they’re visible in both your personal library and the shared library. In iOS 16.1, iPadOS 16.1, and later, you can create or join an iCloud Shared Photo Library with up to five contacts. This feature allows you to collaborate on a shared collection of photos and videos, making it easier to organize and share memories with family and friends.
5.1. Switching Between Libraries on iPhone or iPad
- Open Photos: Launch the Photos app.
- Tap Profile Button: Tap the profile button in the upper-right corner.
- Choose Library View: Select “Both Libraries,” “Personal Library,” or “Shared Library” in the Library View Options section.
In “Both Libraries” or “Shared Library” view, photos in the Shared Library are marked with the Shared Library icon. Photos in the Personal Library are marked with the Personal Library icon.
6. The Importance of Using the Same Apple Account
Why is it crucial to use the same Apple Account across all my devices?
It is crucial to use the same Apple Account across all your devices because this ensures that your photos and videos stay up to date and accessible on every device. Using the same Apple Account ensures seamless syncing and access to your iCloud Photos library across all your devices. This means that any changes you make on one device, such as adding, deleting, or editing photos, will automatically be reflected on all your other devices.
You can check which Apple Account your device is using in Settings. You’ll see your name and email address. Your email address is your Apple Account.
7. Advanced Data Recovery Techniques
If the above methods don’t work, it might be time to explore more advanced data recovery techniques. These methods are particularly useful if you’ve experienced device damage or data corruption.
7.1. Using Data Recovery Software
What type of data recovery software can I use to retrieve deleted photos?
You can use data recovery software like EaseUS Data Recovery Wizard, Stellar Data Recovery, or Disk Drill to retrieve deleted photos. These tools scan your device’s storage for recoverable files and can be effective in retrieving photos that have been permanently deleted but not yet overwritten.
- Choose Software: Select a reputable data recovery software.
- Install and Run: Install the software on your computer and run it.
- Select Drive: Choose the drive or device where the photos were lost.
- Scan for Lost Files: Start the scanning process.
- Preview and Recover: Preview the found photos and select the ones you want to recover.
- Save Recovered Files: Save the recovered files to a safe location, preferably on an external drive.
7.2. Consulting Professional Data Recovery Services
When should I consider using a professional data recovery service?
You should consider using a professional data recovery service when your device has suffered severe physical damage or when data recovery software fails to retrieve your photos. These services have specialized equipment and expertise to recover data from damaged storage devices.
- Research Services: Find a reputable data recovery service.
- Contact and Evaluate: Contact the service and describe your situation. Get an estimate for the recovery process.
- Send Device: If you’re comfortable with the estimate, send your device to the service.
- Recovery Process: The service will attempt to recover your data.
- Review and Retrieve: Review the recovered data and retrieve your photos.
7.3. Restoring From Backups
How can restoring from a backup help me recover my lost photos?
Restoring from a backup can help you recover your lost photos by reverting your device to a previous state where the photos were still present, provided you have a recent backup. Backups are a critical part of data protection. If you’ve been regularly backing up your device to iCloud or a computer, you can restore your photos from a recent backup.
7.3.1. Restoring from iCloud Backup
- Erase Device: Go to Settings > General > Transfer or Reset [Device] > Erase All Content and Settings.
- Restore from iCloud: Follow the on-screen instructions until you reach the Apps & Data screen, then tap “Restore from iCloud Backup.”
- Sign In: Sign in to iCloud with your Apple ID.
- Choose Backup: Choose the most recent backup that contains your photos.
7.3.2. Restoring from iTunes/Finder Backup
- Connect Device: Connect your iPhone or iPad to your computer.
- Open Finder/iTunes: Open Finder (macOS Catalina or later) or iTunes (older macOS versions).
- Select Device: Select your device when it appears.
- Restore Backup: Click “Restore Backup” and choose the most recent backup that contains your photos.
8. Preventing Future Photo Loss
What steps can I take to prevent losing my photos in the future?
To prevent losing your photos in the future, you should enable iCloud Photos, regularly back up your devices, be cautious when deleting photos, and consider using multiple storage solutions for redundancy.
8.1. Regular Backups
Why are regular backups essential for preventing data loss?
Regular backups are essential for preventing data loss because they provide a safety net, allowing you to restore your photos and other important data in case of device failure, accidental deletion, or other unforeseen events.
- iCloud Backup: Enable iCloud Backup in Settings > [Your Name] > iCloud > iCloud Backup.
- Computer Backup: Regularly back up your device to your computer using iTunes or Finder.
8.2. Utilizing Multiple Storage Solutions
What are the benefits of using multiple storage solutions for my photos?
The benefits of using multiple storage solutions for your photos include redundancy, increased security, and easier access from different devices. By storing your photos in multiple locations, you reduce the risk of losing them due to a single point of failure.
- Cloud Services: Use services like Google Photos, Dropbox, or Amazon Photos in addition to iCloud.
- External Hard Drives: Keep a physical backup of your photos on an external hard drive.
8.3. Being Cautious When Deleting
How can being more cautious when deleting photos prevent accidental loss?
Being more cautious when deleting photos can prevent accidental loss by giving you time to double-check and confirm that you really want to delete the selected images before they’re gone.
- Review Before Deleting: Always review photos before deleting them to ensure you’re not deleting anything important.
- Use Recently Deleted: Remember that deleted photos go to the Recently Deleted album, giving you a chance to recover them.
9. Understanding Photo Storage Options: A Comparison
To better manage your photo storage, it’s helpful to understand the different options available and their pros and cons.
| Storage Option | Description | Pros | Cons |
|---|---|---|---|
| iCloud Photos | Apple’s cloud storage solution integrated with iOS, macOS, and Vision Pro. | Seamless integration with Apple devices, automatic syncing, easy access across devices. | Limited free storage (5GB), can be expensive to upgrade storage, privacy concerns. |
| Google Photos | Google’s cloud storage solution with unlimited storage for compressed photos. | Unlimited storage for compressed photos, AI-powered organization, cross-platform compatibility. | Compresses photos, privacy concerns, requires a Google account. |
| Dropbox | Cloud storage service that offers file syncing and sharing. | Versatile file storage, easy sharing, cross-platform compatibility. | Limited free storage, can be expensive for large storage needs, not specifically designed for photos. |
| Amazon Photos | Cloud storage service for Amazon Prime members. | Unlimited storage for photos for Prime members, integration with Amazon devices, facial recognition. | Requires Amazon Prime membership, limited video storage, not as feature-rich as other photo-specific services. |
| External Hard Drives | Physical storage devices that connect to your computer. | Large storage capacity, one-time cost, control over your data. | Requires manual backups, risk of physical damage or loss, not accessible remotely. |
| NAS (Network Storage) | Storage devices connected to your home network. | Large storage capacity, accessible from multiple devices on your network, can be configured for automatic backups. | Higher initial cost, requires technical setup, risk of hardware failure. |
10. DFphoto.net: Your Resource for Photo Recovery and Photography Tips
How can dfphoto.net help me with photo recovery and improving my photography skills?
dfphoto.net can help you with photo recovery and improving your photography skills by providing comprehensive guides, tutorials, and a supportive community for photographers of all levels. At dfphoto.net, we’re dedicated to helping you not only recover your lost photos but also enhance your photography skills. We offer a wealth of resources, including detailed tutorials, inspirational galleries, and a vibrant community where you can connect with fellow photographers.
10.1. A Treasure Trove of Learning Resources
Our website is filled with articles and guides covering various aspects of photography, from basic techniques to advanced editing methods.
- Shooting Techniques: Learn about exposure, aperture, shutter speed, composition, and more.
- Editing Tutorials: Master popular software like Adobe Photoshop and Lightroom with our step-by-step guides.
- Equipment Reviews: Get the latest information on cameras, lenses, and accessories.
10.2. Inspiration at Your Fingertips
Browse our curated galleries featuring stunning photographs from talented photographers around the globe. Get inspired and discover new ideas for your own projects.
10.3. Join the DFphoto.net Community
Connect with other photography enthusiasts, share your work, ask questions, and get feedback. Our community is a supportive and welcoming space for photographers of all levels.
11. Staying Updated with the Latest Trends and Technology
How can I stay informed about the latest photography equipment, software, and trends?
Staying informed about the latest photography equipment, software, and trends can be achieved by following reputable photography blogs, subscribing to industry newsletters, attending photography events, and engaging with online communities. The world of photography is constantly evolving, with new equipment, software, and techniques emerging all the time. Staying up-to-date is essential for photographers who want to push their creative boundaries and deliver the best possible results.
11.1. Top Photography Resources
Here are some of the best resources for staying informed:
- Popular Photography: A leading photography magazine with articles, reviews, and tutorials.
- Digital Photography Review (DPReview): A comprehensive website with in-depth camera and lens reviews.
- Petapixel: A popular photography blog with news, tutorials, and inspiration.
- Fstoppers: A community-driven website with articles, videos, and forums.
11.2. Photography Events and Workshops
Attending photography events and workshops is a great way to learn new skills, network with other photographers, and see the latest equipment in action.
- Santa Fe Workshops: Offers a variety of photography workshops in Santa Fe, New Mexico.
- PhotoPlus Expo: A large photography trade show in New York City.
- Local Photography Clubs: Join a local photography club to connect with other photographers in your area.
11.3. Social Media and Online Communities
Follow photographers and photography-related accounts on social media to stay up-to-date on the latest trends and techniques.
- Instagram: A visual platform where you can discover and share inspiring photography.
- Facebook Groups: Join photography-related Facebook groups to connect with other photographers and ask questions.
- Online Forums: Participate in online photography forums to discuss techniques, equipment, and trends.
12. Understanding Copyright and Image Usage
What are the key considerations for copyright and image usage in photography?
The key considerations for copyright and image usage in photography include understanding ownership, obtaining proper licenses and permissions, and respecting the rights of creators. Copyright law protects photographers’ original works, giving them exclusive rights to control how their images are used. Understanding these rights and responsibilities is crucial for both photographers and those who use their images.
12.1. Copyright Ownership
Who owns the copyright to a photograph?
The photographer generally owns the copyright to a photograph from the moment it is created, unless there is a written agreement transferring ownership to another party.
12.2. Licensing and Permissions
What is a photo license and how do I obtain one?
A photo license is a legal agreement that grants someone permission to use a copyrighted photograph in specific ways. You can obtain a photo license by contacting the photographer or a stock photo agency that represents the photographer.
12.3. Fair Use
What is fair use and how does it apply to photography?
Fair use is a legal doctrine that allows limited use of copyrighted material without permission for purposes such as criticism, commentary, news reporting, teaching, scholarship, and research. The application of fair use to photography depends on the specific circumstances and is often determined on a case-by-case basis.
13. The Importance of E-E-A-T in Photography Content
Why is E-E-A-T important for photography-related websites and content?
E-E-A-T (Experience, Expertise, Authoritativeness, and Trustworthiness) is important for photography-related websites and content because it helps ensure that the information provided is accurate, reliable, and comes from credible sources, which is crucial for users seeking advice on equipment, techniques, and photo management.
13.1. Demonstrating Experience
How can a photography website demonstrate experience?
A photography website can demonstrate experience by showcasing the photographer’s or author’s own work, providing case studies, and sharing personal anecdotes related to photography projects.
13.2. Establishing Expertise
How can a photography website establish expertise?
A photography website can establish expertise by providing detailed explanations of technical concepts, offering professional tips and advice, and citing reputable sources and research.
13.3. Building Authoritativeness
How can a photography website build authoritativeness?
A photography website can build authoritativeness by earning backlinks from other reputable websites, receiving positive reviews and testimonials, and being recognized by industry experts.
13.4. Ensuring Trustworthiness
How can a photography website ensure trustworthiness?
A photography website can ensure trustworthiness by providing accurate and up-to-date information, being transparent about its sources and affiliations, and having a clear privacy policy and terms of service.
14. Top Photography Locations in the USA
What are some of the best photography locations in the USA?
Some of the best photography locations in the USA include national parks like Yellowstone and Yosemite, iconic cityscapes like New York City and San Francisco, and unique landscapes like the Grand Canyon and Death Valley. The USA offers a diverse range of stunning locations for photographers of all interests.
14.1. Natural Landscapes
- Yellowstone National Park: Known for its geysers, hot springs, and diverse wildlife.
- Yosemite National Park: Famous for its granite cliffs, waterfalls, and giant sequoia trees.
- Grand Canyon National Park: An iconic canyon with stunning views and hiking trails.
- Death Valley National Park: A desert landscape with unique geological formations.
14.2. Urban Landscapes
- New York City: Offers iconic landmarks, vibrant street scenes, and diverse neighborhoods.
- San Francisco: Known for its Golden Gate Bridge, colorful Victorian houses, and hilly streets.
- New Orleans: Features historic architecture, lively music scenes, and unique cultural experiences.
- Chicago: Offers stunning skyscrapers, beautiful parks, and a vibrant arts scene.
14.3. Unique and Unusual Locations
- Antelope Canyon, Arizona: A slot canyon with stunning light and color.
- White Sands National Park, New Mexico: A landscape of white gypsum sand dunes.
- Great Sand Dunes National Park, Colorado: Features towering sand dunes set against the backdrop of the Rocky Mountains.
- Acadia National Park, Maine: Offers rugged coastline, rocky beaches, and scenic forests.
15. FAQ: How To Get My Photos Back
1. Where do deleted photos go?
Deleted photos typically go to the “Recently Deleted” album in your Photos app, where they remain for 30 days before being permanently deleted.
2. How long do photos stay in Recently Deleted?
Photos stay in the “Recently Deleted” album for 30 days. After this period, they are permanently deleted.
3. Can I recover permanently deleted photos from my iPhone?
Recovering permanently deleted photos from your iPhone without a backup is difficult, but data recovery software or professional services might help.
4. How do I unhide photos on my iPhone?
To unhide photos, go to the “Hidden” album in the Utilities section of the Photos app, unlock the album, and select the photos to unhide.
5. How do I turn on iCloud Photos?
To turn on iCloud Photos, go to Settings > [Your Name] > iCloud > Photos and toggle “iCloud Photos” on.
6. What is the iCloud Shared Photo Library?
The iCloud Shared Photo Library allows you to share photos and videos with up to five other people, creating a collaborative photo collection.
7. How do I switch between personal and shared libraries on my iPhone?
To switch libraries, open the Photos app, tap the profile button in the upper-right corner, and choose your desired library view.
8. Why is it important to use the same Apple ID on all devices?
Using the same Apple ID ensures that your photos and videos sync across all your devices, keeping your photo library consistent.
9. What should I do if my photos are not syncing to iCloud?
Check your internet connection, ensure you have enough iCloud storage, and verify that iCloud Photos is turned on in your settings.
10. What are some alternative cloud storage options for photos?
Alternative cloud storage options include Google Photos, Dropbox, Amazon Photos, and OneDrive.
16. Conclusion: Your Photos, Safe and Sound
Losing photos can be a stressful experience, but with the right knowledge and tools, you can often recover your precious memories. Remember to check your Recently Deleted album, unhide any hidden photos, enable iCloud Photos for seamless syncing, and regularly back up your devices. And be sure to visit dfphoto.net for more photography tips, tutorials, and inspiration. Address: 1600 St Michael’s Dr, Santa Fe, NM 87505, United States. Phone: +1 (505) 471-6001. Website: dfphoto.net. Don’t wait—explore dfphoto.net today, dive into our how-to guides, admire our stunning photo collections, and join our vibrant community to transform your photographic journey.