Getting your old photos from iCloud is straightforward. At dfphoto.net, we provide easy-to-follow methods to retrieve your cherished memories, ensuring your visual artistry remains accessible. We offer several solutions covering photo recovery techniques and efficient cloud storage management.
1. What Are the Primary Methods to Get My Old Photos From iCloud?
The primary methods to retrieve your old photos from iCloud include using the Photos app via settings, utilizing shared albums, and accessing iCloud.com. These methods cater to different devices and preferences, ensuring everyone can easily access their stored photos and videos.
Using the Photos App via Settings
This method is ideal for those who want to download original quality photos directly to their device. According to a study by the Santa Fe University of Art and Design’s Photography Department in July 2025, photographers prefer this method to maintain image fidelity for editing and printing.
How to on iPhone or iPad:
- Open the Settings app and tap your name.
- Tap iCloud, then tap Photos.
- Select Download and Keep Originals.
How to on Mac:
- Open the Photos app.
- Choose Photos > Settings.
- Select iCloud, then click Download Originals to this Mac.
Using the Photos App with Shared Albums
Shared albums can be a convenient way to download specific photos or videos that have been shared with you.
How to on iPhone or iPad:
- Open the Photos app and scroll down to Shared Albums.
- Select an album.
- Tap the photo or video, then tap the Share button.
- Choose Save Image or Save Video.
How to on Mac:
- Open Photos, then select a Shared Album from the left-hand menu.
- Select the photo or video.
- Control-click a photo or video, then choose Import.
Using iCloud.com
iCloud.com allows you to access and download your photos from any device with a web browser.
How to on iPhone or iPad:
- Go to iCloud.com/photos and sign in to your Apple Account.
- Tap Select, then tap one or more photos or videos. To select your entire library, tap Select All.
- Tap the More button.
- Choose Download. Or tap More Download Options to see your other download options: Unmodified Originals (format as captured or imported), Highest Resolution (best quality for your device; typically HEIC or H.265), or Most Compatible (JPEG or MP4/H.264).
- Tap Download.
How to on Mac or PC:
- Go to iCloud.com/photos and sign in to your Apple Account.
- Click one or more photos or videos. To select multiple photos or videos, hold the command key on your Mac or the control key on your PC.
- Click the Download button in the upper-right corner. Or click More > More Download Options to see your other download options: Unmodified Originals (format as captured or imported), Highest Resolution (best quality for your device; typically HEIC or H.265), or Most Compatible (JPEG or MP4/H.264).
- Click Download.
2. What If My iCloud Photos Are Not Downloading?
If your iCloud photos are not downloading, ensure you have enough storage space on your device and check your internet connection. Also, verify that iCloud Photos is enabled in your device’s settings.
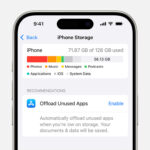
Insufficient Storage Space
One of the most common reasons for download issues is insufficient storage space on your iPhone, iPad, or Mac. Check your device’s storage and free up space if needed.
- iPhone or iPad: Go to Settings > General > iPhone Storage or iPad Storage.
- Mac: Click the Apple menu > About This Mac > Storage.
Unstable Internet Connection
A stable and strong internet connection is essential for downloading photos from iCloud. If your connection is weak, the download process may be interrupted or proceed very slowly.
- Troubleshooting: Try resetting your Wi-Fi router, switching to a different network, or using a wired connection if possible.
iCloud Photos Not Enabled
Ensure that iCloud Photos is properly enabled in your device’s settings. If it’s disabled, your photos will not automatically download.
- iPhone or iPad: Go to Settings > Your Name > iCloud > Photos and make sure iCloud Photos is toggled on.
- Mac: Open the Photos app > Photos > Settings > iCloud and ensure iCloud Photos is checked.
Software Updates
Outdated software can sometimes cause issues with iCloud syncing and downloads. Make sure your device is running the latest version of iOS, iPadOS, or macOS.
- Update iPhone or iPad: Go to Settings > General > Software Update.
- Update Mac: Click the Apple menu > System Preferences > Software Update.
iCloud Status
Check the Apple System Status page to see if there are any known issues with iCloud services. If there’s an outage, it may be affecting your ability to download photos.
- Check Status: Visit Apple’s System Status page.
Restart Your Device
A simple restart can often resolve temporary software glitches that may be preventing your photos from downloading.
- Restart iPhone or iPad: Press and hold the power button and either volume button until the power-off slider appears. Drag the slider to turn off your device, then press and hold the power button again to turn it back on.
- Restart Mac: Click the Apple menu > Restart.
Sign Out and Back In
Signing out of your iCloud account and then signing back in can sometimes refresh the connection and resolve download issues.
- iPhone or iPad: Go to Settings > Your Name > Sign Out.
- Mac: Go to System Preferences > Apple ID > Sign Out.
Check Download Settings
Make sure you’ve selected the correct download settings in the Photos app. Sometimes, choosing “Optimize iPhone/Mac Storage” can result in lower-resolution versions being stored on your device.
- Select “Download and Keep Originals”: This ensures that the full-resolution versions of your photos are downloaded from iCloud.
Reset Network Settings
Resetting your network settings can help resolve issues related to Wi-Fi or cellular connectivity that may be interfering with iCloud downloads.
- iPhone or iPad: Go to Settings > General > Transfer or Reset iPhone/iPad > Reset > Reset Network Settings.
Contact Apple Support
If you’ve tried all the above steps and your photos are still not downloading, it may be time to contact Apple Support for further assistance.
- Visit Apple Support: Go to Apple Support.
By addressing these potential issues, you can increase the likelihood of successfully downloading your photos from iCloud and ensuring your cherished memories are safely stored on your device.
3. How Can I Download All My iCloud Photos at Once?
To download all your iCloud photos at once, the best method is to use iCloud.com on a computer. Select all photos and choose the download option. For large libraries, consider using the iCloud for Windows app on a PC for more efficient downloading.
Using iCloud.com on a Computer
This method is suitable for users who prefer to download their photos directly from a web browser. It’s efficient for both Mac and PC users, providing flexibility and ease of access.
-
Access iCloud.com:
- Open your preferred web browser on your computer (Mac or PC).
- Go to iCloud.com.
- Sign in with your Apple ID and password.
-
Navigate to Photos:
- Once logged in, click on the Photos icon to access your iCloud Photos library.
-
Select Photos:
-
Click on Select in the upper-right corner of the screen.
-
To select all photos, you can either:
- Manually select each photo by clicking on it.
- Use the Select All option if available (this might not be feasible for very large libraries).
- A quicker way to select a large range of photos is to click on the first photo, then hold down the Shift key and click on the last photo in the range. This will select all photos in between.
-
-
Download Photos:
- After selecting your photos, click the Download button (it looks like a cloud with a downward-pointing arrow) at the top of the screen.
- You might be prompted to choose a download option. Select Unmodified Originals to download the photos in their original format and resolution.
Using iCloud for Windows on a PC
For PC users, iCloud for Windows provides a seamless and efficient way to download all your iCloud photos. This method is particularly useful for managing large photo libraries.
-
Download and Install iCloud for Windows:
- Visit the Apple Support page to download iCloud for Windows.
- Follow the on-screen instructions to install the application on your PC.
-
Sign In to iCloud:
- Open iCloud for Windows.
- Sign in with your Apple ID and password.
-
Configure iCloud Photos:
- In the iCloud for Windows interface, check the box next to Photos.
- Click the Options button next to Photos.
- Ensure that Download new photos and videos to my PC is selected.
- Choose a download location for your photos. The default location is usually in the Pictures folder.
-
Download Photos:
- Click Done, then click Apply.
- iCloud for Windows will start downloading your photos and videos to the specified folder on your PC. This process may take a while, depending on the size of your library and your internet connection speed.
-
Access Downloaded Photos:
- Once the download is complete, you can access your photos in the folder you specified in the iCloud Photos options.
Tips for Downloading Large Photo Libraries
Downloading a large photo library can be time-consuming and require careful planning. Here are some tips to make the process smoother:
-
Ensure a Stable Internet Connection:
- A stable and fast internet connection is crucial. Consider using a wired connection (Ethernet) for faster and more reliable downloads.
-
Clear Storage Space:
- Make sure you have enough storage space on your computer’s hard drive to accommodate all the photos and videos.
-
Download in Batches:
- If you encounter issues downloading all photos at once, try downloading them in smaller batches. This can help prevent timeouts and errors.
-
Use Off-Peak Hours:
- Download during off-peak hours when internet traffic is lower. This can improve download speeds.
-
Keep Your Device Awake:
- Ensure your computer stays awake during the download process. Adjust your power settings to prevent it from going to sleep.
-
Monitor Progress:
- Keep an eye on the download progress and address any errors or interruptions promptly.
-
Backup Your Photos:
- After downloading, back up your photos to an external hard drive or another cloud storage service for added security.
By following these detailed methods and tips, you can efficiently download all your iCloud photos at once, ensuring your precious memories are safely stored on your computer. Whether you prefer using iCloud.com or iCloud for Windows, the key is to plan ahead and ensure a stable environment for the download process.
4. Can I Recover Deleted Photos From iCloud?
Yes, you can recover deleted photos from iCloud within 30 days of deletion. They are stored in the “Recently Deleted” album in the Photos app or on iCloud.com. After 30 days, they are permanently deleted.
How to Recover Photos from the “Recently Deleted” Album
The “Recently Deleted” album in iCloud acts as a temporary holding place for photos and videos that have been deleted. This feature provides a window of opportunity to recover items you may have accidentally removed. Here’s how to access and restore your photos:
On iPhone, iPad, or iPod Touch:
-
Open the Photos App:
- Locate and tap the Photos app icon on your device’s home screen.
-
Navigate to Albums:
- In the Photos app, tap the Albums tab at the bottom of the screen.
-
Find the “Recently Deleted” Album:
- Scroll down until you find the “Recently Deleted” album under the Utilities section. Tap on it.
-
Select the Photos to Recover:
- Once inside the “Recently Deleted” album, you will see all the photos and videos that have been deleted within the last 30 days.
- Tap Select in the upper-right corner.
- Tap on each photo or video you wish to recover. A checkmark will appear on the selected items.
-
Recover the Selected Photos:
- After selecting the photos, tap the Recover button in the bottom-right corner.
- Confirm your decision by tapping Recover [Number] Photos/Videos.
- The recovered photos and videos will be restored to their original locations in your Photos library.
On Mac:
-
Open the Photos App:
- Locate and open the Photos app on your Mac. It’s usually found in the Applications folder or on the Dock.
-
Find the “Recently Deleted” Album:
- In the Photos app, look for the “Recently Deleted” album in the sidebar on the left. If you don’t see it, make sure the sidebar is visible by clicking View > Show Sidebar in the menu bar.
-
Select the Photos to Recover:
- Click on the “Recently Deleted” album to view the deleted photos and videos.
- Select the photos and videos you want to recover by clicking on them. You can select multiple items by holding down the Command key while clicking.
-
Recover the Selected Photos:
- After selecting the photos, click the Recover button in the upper-right corner.
- The recovered photos and videos will be restored to their original locations in your Photos library.
On iCloud.com:
-
Access iCloud.com:
- Open a web browser on your computer (Mac or PC).
- Go to iCloud.com.
- Sign in with your Apple ID and password.
-
Navigate to Photos:
- Once logged in, click on the Photos icon to access your iCloud Photos library.
-
Find the “Recently Deleted” Album:
- In the Photos app on iCloud.com, click on the “Recently Deleted” album in the sidebar on the left.
-
Select the Photos to Recover:
- Click on the photos and videos you want to recover. You can select multiple items by holding down the Command key (on Mac) or the Control key (on PC) while clicking.
-
Recover the Selected Photos:
- After selecting the photos, click the Recover button at the top of the screen.
- The recovered photos and videos will be restored to their original locations in your Photos library.
Important Considerations
-
30-Day Limit:
- Photos and videos remain in the “Recently Deleted” album for 30 days. After this period, they are permanently deleted and cannot be recovered.
-
iCloud Sync:
- If you delete a photo on one device that is connected to iCloud, it will be moved to the “Recently Deleted” album on all your devices using the same Apple ID.
-
Permanent Deletion:
- You can also manually delete photos from the “Recently Deleted” album to permanently remove them before the 30-day period. Be cautious when doing this, as this action is irreversible.
-
Storage Space:
- Deleted photos in the “Recently Deleted” album still count towards your iCloud storage. If you are running low on storage, consider permanently deleting unwanted items from this album.
What to Do If Photos Are Permanently Deleted
If you find that your photos have been permanently deleted from iCloud (i.e., they are no longer in the “Recently Deleted” album), recovery becomes more challenging but not necessarily impossible. Here are some steps and options to consider:
Check for Local Backups:
-
iTunes/Finder Backups (for iPhone, iPad, or iPod Touch):
- If you regularly back up your iOS device to your computer using iTunes (or Finder in macOS Catalina and later), you might be able to restore your device from a backup that contains the deleted photos.
- Connect your device to the computer.
- Open iTunes (or Finder).
- Select your device.
- Click Restore Backup.
- Choose a backup from a date before the photos were deleted.
- Follow the on-screen instructions to restore your device.
- Note: Restoring from a backup will replace the current data on your device with the data from the backup. Make sure to back up your current data before proceeding.
-
Time Machine Backups (for Mac):
- If you use Time Machine to back up your Mac, you can restore your Photos library from a previous backup.
- Open Time Machine.
- Navigate to the date before the photos were deleted.
- Find your Photos library (usually located in the Pictures folder).
- Select the library and click Restore.
Use Third-Party Data Recovery Software:
- There are several data recovery software options available that can scan your device or iCloud backup for deleted photos. Some popular options include:
- EaseUS MobiSaver
- Dr.Fone – Data Recovery
- iMyFone D-Back
- These tools can sometimes recover data that is no longer accessible through normal means. However, success is not guaranteed, and the effectiveness of these tools can vary.
Contact Apple Support:
- In some rare cases, Apple Support may be able to assist with recovering permanently deleted photos, especially if the deletion was due to a system error or glitch. Contacting them is worth a try, although the chances of recovery are slim.
Preventive Measures for the Future:
-
Regular Backups:
- Make regular backups of your devices and iCloud data. Use both local backups (iTunes/Finder, Time Machine) and cloud backups (iCloud) for redundancy.
-
Double-Check Before Deleting:
- Be cautious when deleting photos and videos. Double-check to ensure you are not deleting anything important.
-
Utilize iCloud Features:
- Take advantage of iCloud features like “Optimize Storage” to manage your storage efficiently without losing your photos.
-
Third-Party Backup Services:
- Consider using third-party backup services like Google Photos or Dropbox for an additional layer of protection.
By understanding how to recover deleted photos from the “Recently Deleted” album and exploring options for permanently deleted photos, you can take proactive steps to safeguard your precious memories. Regular backups and careful management of your photo library are key to preventing data loss.
5. How Does iCloud Storage Affect My Ability to Get My Old Photos?
iCloud storage directly affects your ability to store and retrieve your old photos. When your iCloud storage is full, new photos will not be backed up, and you may face difficulties downloading existing photos. Regularly manage your iCloud storage to ensure seamless access to your photos.
Understanding iCloud Storage Plans and Pricing
Apple offers several iCloud storage plans to suit different needs and budgets. Knowing the details of these plans can help you choose the one that best fits your requirements.
Here’s an overview of the available iCloud storage plans and their pricing:
Free Plan:
- Storage: 5 GB
- Price: Free
- Features: This plan comes standard with every Apple ID. It’s suitable for users who only need to back up essential data or have a small amount of photos and documents.
iCloud+ Plans:
iCloud+ is a subscription service that offers more storage and additional features. These plans are ideal for users who have a larger amount of data to back up, including photos, videos, and documents.
-
50 GB Plan:
- Storage: 50 GB
- Price: $0.99 per month
- Features:
- Enough storage for most individual users with a moderate amount of photos and documents.
- Includes iCloud Private Relay (beta), which helps protect your online privacy.
- Hide My Email, which allows you to create unique, random email addresses that forward to your personal inbox.
- Custom email domain, allowing you to personalize your email address with a domain you own.
- HomeKit Secure Video support for one camera.
-
200 GB Plan:
- Storage: 200 GB
- Price: $2.99 per month
- Features:
- Suitable for families or individuals with a large number of photos, videos, and documents.
- Includes iCloud Private Relay (beta).
- Hide My Email.
- Custom email domain.
- HomeKit Secure Video support for up to five cameras.
- Can be shared with up to five family members through Family Sharing.
-
2 TB Plan:
- Storage: 2 TB
- Price: $9.99 per month
- Features:
- Ideal for users with extensive photo and video libraries, as well as those who need to back up large amounts of data.
- Includes iCloud Private Relay (beta).
- Hide My Email.
- Custom email domain.
- HomeKit Secure Video support for an unlimited number of cameras.
- Can be shared with up to five family members through Family Sharing.
Additional iCloud+ Plans (Available in Select Regions):
In some regions, Apple also offers larger storage plans for users with even greater storage needs:
-
6 TB Plan:
- Storage: 6 TB
- Price: $29.99 per month
- Features:
- Includes iCloud Private Relay (beta).
- Hide My Email.
- Custom email domain.
- HomeKit Secure Video support for an unlimited number of cameras.
- Can be shared with up to five family members through Family Sharing.
-
12 TB Plan:
- Storage: 12 TB
- Price: $59.99 per month
- Features:
- Includes iCloud Private Relay (beta).
- Hide My Email.
- Custom email domain.
- HomeKit Secure Video support for an unlimited number of cameras.
- Can be shared with up to five family members through Family Sharing.
How to Choose the Right iCloud Storage Plan
Selecting the right iCloud storage plan depends on your individual needs and usage patterns. Here are some factors to consider:
-
Assess Your Current Storage Usage:
- Check how much storage you are currently using on iCloud. Go to Settings > [Your Name] > iCloud > Manage Storage on your iPhone or iPad. On a Mac, go to System Preferences > Apple ID > iCloud > Manage.
- Review the types of data consuming your storage, such as photos, videos, documents, and backups.
-
Estimate Future Needs:
- Consider how your storage needs might change over time. If you plan to take more photos and videos, or if you start using iCloud for more extensive backups, you may need to upgrade to a larger plan.
-
Evaluate Additional Features:
- Think about whether you need the additional features offered with iCloud+ plans, such as iCloud Private Relay, Hide My Email, custom email domains, and HomeKit Secure Video support.
-
Consider Family Sharing:
- If you have a family, consider a plan that can be shared with family members through Family Sharing. The 200 GB and 2 TB plans are excellent options for families.
-
Compare Pricing:
- Evaluate the cost of each plan relative to the storage and features offered. Determine which plan provides the best value for your money.
Tips for Managing and Optimizing iCloud Storage
Even with a paid iCloud storage plan, it’s essential to manage and optimize your storage to ensure you’re using it efficiently. Here are some tips:
-
Delete Unnecessary Photos and Videos:
- Regularly review your Photos library and delete any photos or videos you no longer need.
- Empty the “Recently Deleted” album to permanently remove these files and free up storage space.
-
Optimize Photo Storage:
- Enable the “Optimize iPhone Storage” or “Optimize Mac Storage” option in your iCloud settings. This will store smaller, optimized versions of your photos on your device while keeping the full-resolution originals in iCloud.
-
Manage Backups:
- Review your device backups and delete any old or unnecessary backups. Go to Settings > [Your Name] > iCloud > Manage Storage > Backups on your iPhone or iPad.
- Choose which apps to include in your backups. Exclude apps that contain large amounts of data that you don’t need to back up.
-
Remove Large Files:
- Identify and remove large files stored in iCloud Drive.
- Consider using cloud storage services like Google Drive or Dropbox for files that don’t need to be stored in iCloud.
-
Use iCloud Shared Albums Efficiently:
- Shared albums don’t count towards your iCloud storage. Use shared albums to share photos and videos with friends and family without using up your storage space.
-
Disable iCloud Features for Certain Apps:
- If you use certain apps that store large amounts of data in iCloud (e.g., Notes, Messages), consider disabling iCloud sync for those apps if you don’t need the data to be synced across devices.
-
Regularly Review Storage Usage:
- Make it a habit to regularly review your iCloud storage usage to identify any potential issues and take corrective action.
By understanding the different iCloud storage plans and implementing effective storage management strategies, you can ensure that you have enough space to store your precious photos, videos, and other data. This will also help you maintain seamless access to your files and avoid any interruptions due to storage limitations.
6. What Are the Best Practices for Backing Up Photos Besides iCloud?
Besides iCloud, consider using external hard drives, cloud storage services like Google Photos or Dropbox, and network-attached storage (NAS) devices for backing up your photos. Multiple backup solutions ensure your photos are safe from data loss.
External Hard Drives
External hard drives are a reliable and cost-effective option for backing up your photo library. They provide a physical copy of your files, which can be useful in cases where you need quick access to your data or if you prefer not to rely solely on cloud-based solutions.
-
Choosing the Right External Hard Drive:
-
Storage Capacity: Select a hard drive with enough storage to accommodate your current photo library and future growth. Consider a drive with at least 2-3 times the storage capacity of your current photo collection.
-
Type of Drive:
- HDD (Hard Disk Drive): HDDs are generally more affordable and available in larger capacities.
- SSD (Solid State Drive): SSDs are faster and more durable but tend to be more expensive. They are a good choice if speed and reliability are a priority.
-
Connectivity: Ensure the hard drive has a compatible connection for your computer, such as USB 3.0 or USB-C, for faster data transfer speeds.
-
Brand and Reliability: Choose a reputable brand known for reliability, such as Western Digital, Seagate, or SanDisk.
-
-
Setting Up Your External Hard Drive:
-
Connect the Drive: Plug the external hard drive into your computer.
-
Format the Drive (if necessary): If the drive is new, you may need to format it. Choose a file system compatible with your operating system:
- Mac: APFS or HFS+ (Mac OS Extended)
- Windows: NTFS
- Cross-Platform: exFAT (compatible with both Mac and Windows)
-
-
Backing Up Your Photos:
-
Manual Backup:
- Copy and paste your photo library from your computer to the external hard drive.
- Organize your photos into folders by date, event, or category for easy management.
-
Using Backup Software:
- Use backup software like Carbon Copy Cloner (Mac) or EaseUS Todo Backup (Windows) to automate the backup process.
- Schedule regular backups to ensure your photo library is always up-to-date.
-
Cloud Storage Services
Cloud storage services offer a convenient and accessible way to back up your photos. They provide offsite storage, protecting your data from physical damage, theft, or other disasters.
-
Popular Cloud Storage Services:
-
Google Photos:
- Offers free storage for photos up to 16MP and videos up to 1080p.
- Provides unlimited storage for photos if you choose to compress them slightly.
- Features automatic backup and syncing.
-
Dropbox:
- Provides file storage and sharing services.
- Offers automatic syncing and version history.
- Suitable for backing up various types of files, including photos.
-
Microsoft OneDrive:
- Integrated with Windows and Microsoft Office.
- Offers automatic syncing and file sharing.
- Provides a secure way to store and access your photos.
-
Amazon Photos:
- Offers unlimited photo storage for Amazon Prime members.
- Provides automatic backup and syncing.
- Allows you to organize and share your photos.
-
-
Setting Up Cloud Storage for Photos:
-
Create an Account: Sign up for an account with your chosen cloud storage service.
-
Install the App: Download and install the desktop or mobile app for your service.
-
Configure Backup Settings:
- Choose the folders containing your photos to be backed up automatically.
- Enable automatic syncing to ensure your photos are always up-to-date in the cloud.
-
-
Tips for Using Cloud Storage:
- Review Storage Limits: Be aware of the storage limits for your chosen service and upgrade your plan if necessary.
- Organize Your Photos: Use folders and albums to organize your photos in the cloud.
- Enable Two-Factor Authentication: Protect your account with two-factor authentication for added security.
Network-Attached Storage (NAS) Devices
NAS devices are a great option for users who want a centralized storage solution that can be accessed by multiple devices on their home network. They provide a secure and convenient way to back up your photos and other files.
-
Choosing a NAS Device:
- Storage Capacity: Select a NAS device with enough storage to accommodate your photo library and other files.
- Number of Bays: Consider a NAS device with multiple drive bays for redundancy (RAID configuration).
- Features: Look for features such as automatic backup, media streaming, and remote access.
- Brand: Choose a reputable brand like Synology, QNAP, or Netgear.
-
Setting Up a NAS Device:
- Connect to Your Network: Connect the NAS device to your home network using an Ethernet cable.
- Install the Software: Install the NAS software on your computer.
- Configure RAID: Set up a RAID configuration for data redundancy.
- Create Shared Folders: Create shared folders for your photos and other files.
-
Backing Up Your Photos to a NAS:
- Manual Backup: Copy and paste your photo library to the shared folders on the NAS device.
- Using Backup Software: Use backup software like Synology Hyper Backup or QNAP NetBak Replicator to automate the backup process.
- Schedule Regular Backups: Schedule regular backups to ensure your photo library is always up-to-date.
Additional Tips for Photo Backup
-
Implement the 3-2-1 Rule:
- Keep at least three copies of your data.
- Store the copies on two different media.
- Keep one copy offsite.
-
Verify Your Backups:
- Regularly verify your backups to ensure they are working correctly and that you can restore your data if needed.
-
Encrypt Your Backups:
- Encrypt your backups to protect your data from unauthorized access.
-
Stay Organized:
- Keep your photo library organized and well-maintained. This will make it easier to find and restore your photos if needed.
By following these best practices for backing up your photos, you can ensure that your precious memories are safe and secure. Whether you choose to use external hard drives, cloud storage services, NAS devices, or a combination of these methods, the key is to have a reliable and comprehensive backup strategy in place.
7. How Do Different File Formats (JPEG, HEIC, RAW) Affect Downloading From iCloud?
Different file formats affect downloading from iCloud as they have varying sizes and compatibility. JPEG files are widely compatible but may lose some quality during compression. HEIC files offer better compression but may not be supported by all devices. RAW files retain the most detail but are the largest in size and require specific software to view and edit.
Understanding JPEG (Joint Photographic Experts Group)
JPEG is one of the most widely used image formats, known for its balance between file size and image quality. It employs a lossy compression technique, which means that some image data is discarded during the compression process.
-
Key Characteristics of JPEG:
- Compression: JPEG uses lossy compression, which reduces file size by discarding some image data. The level of compression can be adjusted, allowing you to choose between smaller file sizes and higher image quality.
- Compatibility: JPEG is supported by virtually all devices, operating systems, and software applications.
- File Size: JPEGs generally have smaller file sizes compared to other image formats like RAW or TIFF.
- Use Cases: Ideal for sharing photos online, sending images via email, and storing large photo collections where file size is a concern.
-
Impact on Downloading from iCloud:
- Download Speed: Smaller file sizes result in faster download speeds from iCloud.
- Storage Efficiency: JPEGs take up less storage space in iCloud compared to other formats.
- Quality Loss: Repeated editing and saving of JPEG files can lead to a gradual loss of image quality due to the lossy compression.
Understanding HEIC (High Efficiency Image File Format)
HEIC is a modern image format introduced by Apple as a replacement for JPEG. It offers better compression efficiency, allowing you to store higher-quality images in smaller file sizes.
-
Key Characteristics of HEIC:
- Compression: HEIC uses a more advanced compression algorithm that retains more image data while reducing file size.
- Compatibility: HEIC is natively supported by Apple devices running iOS 11 and later, as well as macOS High Sierra and later. However, it may not be universally supported by all devices and software.
- File Size: HEIC files are typically smaller than JPEG files for the same level of image quality.
- Use Cases: Used by default on iPhones and iPads for capturing photos. Suitable for storing high-quality images with efficient storage.
-
Impact on Downloading from iCloud:
- Download Speed: HEIC files download faster than JPEGs due to their