Losing precious photos from your iPhone can be distressing. But don’t panic! This guide from dfphoto.net provides comprehensive solutions for photo recovery, covering everything from recently deleted albums to iCloud settings, ensuring your cherished memories are not lost forever. With the right steps, recovering your images is often possible.
1. Understand the Common Causes of Missing Photos on Your iPhone
Before diving into recovery methods, it’s helpful to know why your photos might disappear in the first place. Here are some common causes:
- Accidental Deletion: This is the most frequent reason. Photos can be unintentionally deleted and end up in the Recently Deleted album.
- iCloud Sync Issues: If iCloud Photos is not correctly set up, photos may not sync across your devices, leading to the impression that they are missing.
- Hidden Album: The Hidden album feature can conceal photos, making them seem lost if you forget they are there.
- Software Glitches: Occasionally, software bugs or updates can cause photos to disappear.
- Shared Library Confusion: If you’re using iCloud Shared Photo Library, photos might be in a different view than you expect.
2. Check Your Recently Deleted Album to Retrieve Lost Photos
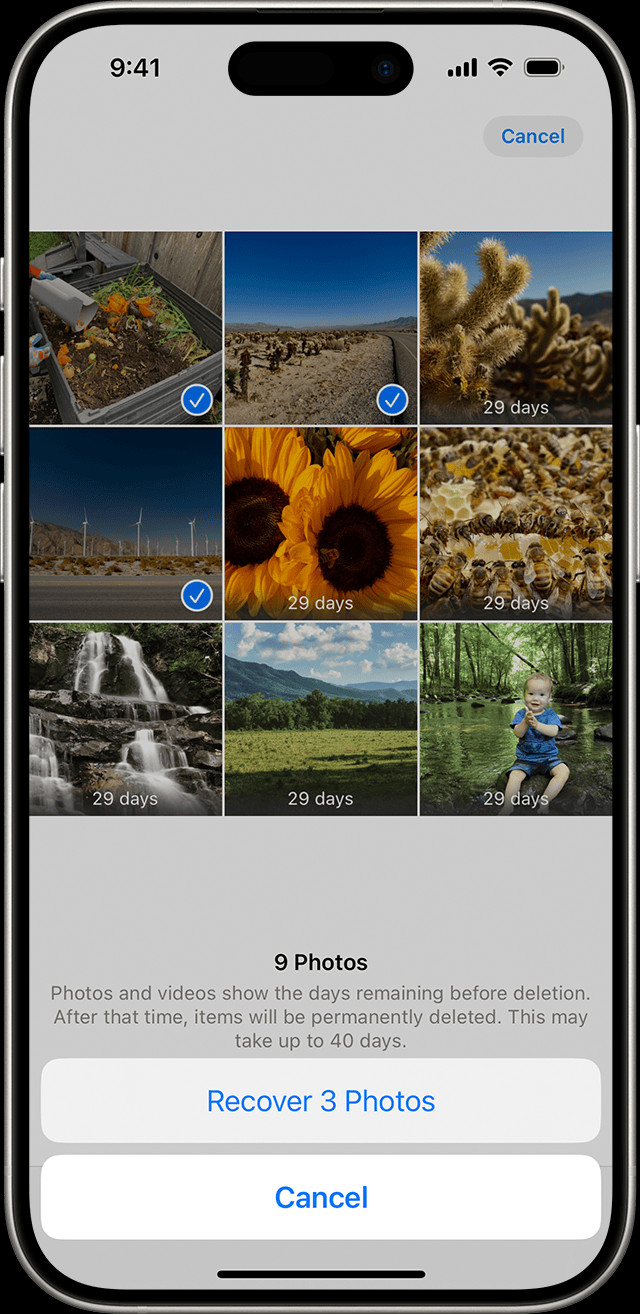
The Recently Deleted album is the first place to check when you can’t find a photo or video. When you delete something, it stays in this album for 30 days, giving you a window to recover it.
2.1. How to Recover Photos from Recently Deleted on iPhone or iPad
- Open the Photos App: Launch the Photos app on your iPhone or iPad.
- Navigate to Recently Deleted: Swipe up to find the Utilities section and tap on “Recently Deleted.”
- Unlock the Album: Use Face ID, Touch ID, or your passcode to unlock the Recently Deleted album.
- Select and Recover:
- To Recover a Single Photo or Video: Tap the photo or video and then tap “Recover.”
- To Recover Multiple Photos or Videos: Tap “Select,” choose the photos or videos you want to recover, tap the “More” button (…), and then tap “Recover.”
- Confirm Recovery: Confirm that you want to recover the selected photos or videos.
 Recover Photos from Recently Deleted on iPhone
2.2. How to Recover Photos from Recently Deleted on Mac
- Open Photos App: Launch the Photos app on your Mac.
- Navigate to Recently Deleted: In macOS Ventura or later, select “Recently Deleted” in the Utilities section of the sidebar.
- Unlock the Album: Use Touch ID or your login password to unlock the Recently Deleted album.
- Select and Recover: Click the photo or video you want to recover and then click “Recover.”
2.3. How to Recover Photos from Recently Deleted on iCloud.com
- Go to iCloud.com: Open a web browser and go to iCloud.com.
- Sign In: Sign in with your Apple Account.
- Open Photos: Tap or click “Photos.”
- Navigate to Recently Deleted: Select “Recently Deleted” in the sidebar. If you don’t see the sidebar, tap or click the Show Sidebar button in the upper-left corner.
- Select and Recover: Select a photo and then tap or click “Recover.”
2.4. How to Recover Photos from Recently Deleted on Apple Vision Pro
- Open Photos: Open the Photos app on your Apple Vision Pro.
- Navigate to Collections: Tap “Collections” in the sidebar.
- Scroll to Recently Deleted: Scroll down and tap “Recently Deleted” in the Utilities section.
- Unlock the Album: Tap “View Album” and use Optic ID or your passcode to unlock the album.
- Select and Recover:
- To Recover a Single Photo or Video: Tap and hold a photo or video, then tap “Recover.”
- To Recover Multiple Photos or Videos: Tap “Select,” choose your photos or videos, tap the “More” button in the upper-right corner, and then tap “Recover.”
- Confirm Recovery: Tap “Recover” to confirm.
3. Unhide Your Photos if They Seem Missing
Photos can sometimes appear missing because they are hidden. The Hidden album is a feature that allows you to conceal photos and videos from the main view.
3.1. How to Unhide Photos on iPhone or iPad
- Open the Photos App: Launch the Photos app on your iPhone or iPad.
- Navigate to Hidden: Swipe up to find the Utilities section and tap “Hidden.”
- Unlock the Album: Use Face ID, Touch ID, or your passcode to unlock the Hidden album.
- Select the Photo or Video: Tap the photo or video you want to unhide.
- Unhide: Tap the “More” button (…), and then tap “Unhide.”
3.2. How to Unhide Photos on Mac
- Open Photos App: Launch the Photos app on your Mac.
- Show Hidden Album (If Necessary): In the menu bar, click “View,” then select “Show Hidden Photo Album.”
- Navigate to Hidden: In the sidebar, select “Hidden,” then click “View Album.”
- Unlock the Album: In macOS Ventura or later, use Touch ID or your login password to unlock the Hidden album.
- Select and Unhide:
- Control-Click: Control-click the photo and choose “Unhide Photo.”
- Menu Bar: You can also choose “Image > Unhide Photo” from the menu bar, or press Command-L.
3.3. How to Unhide Photos on iCloud.com
- Go to iCloud.com: Open a web browser and go to iCloud.com.
- Sign In: Sign in with your Apple Account.
- Open Photos: Tap or click “Photos.”
- Navigate to Hidden: Select “Hidden” in the sidebar, then tap or click “Show Hidden Photos.” If you don’t see the sidebar, tap or click the Show Sidebar button in the upper-left corner.
- Select and Unhide: Select a photo, tap or click the “More” button (…), then tap or click “Unhide.”
3.4. How to Unhide Photos on Vision Pro
- Open Photos: Open the Photos app.
- Navigate to Collections: Tap Collections in the sidebar.
- Scroll to Hidden: Scroll down and tap Hidden in the Utilities section.
- Unlock the Album: Tap View Album, then use Optic ID or enter your passcode to unlock the Hidden album.
- Unhide Photos:
- Single Photo: Tap and hold a thumbnail, then tap Unhide.
- Multiple Photos: Tap Select, select your photos or videos, tap the More button in the upper-right corner, then tap Unhide.
4. Ensure iCloud Photos is Enabled for Seamless Syncing
iCloud Photos is crucial for syncing your photos across all your Apple devices. If it’s not turned on, your photos may not be backed up or accessible on other devices.
4.1. How to Turn on iCloud Photos on iPhone or iPad
- Open Settings: Go to “Settings” on your iPhone or iPad.
- Tap Your Name: Tap on your name at the top.
- Go to iCloud: Tap “iCloud.”
- Tap Photos: Tap “Photos.”
- Enable Sync: Turn on “Sync this [Device].”
4.2. How to Turn on iCloud Photos on Mac
- Open Photos App: Launch the Photos app on your Mac.
- Go to Settings/Preferences: Choose “Photos > Settings” (or “Photos > Preferences”) from the menu bar.
- Click iCloud Tab: Click the “iCloud” tab.
- Select iCloud Photos: Select “iCloud Photos.”
After turning on iCloud Photos, connect to Wi-Fi and allow some time for your photos to sync.
4.3. How to Turn on iCloud Photos on Vision Pro
- Open Settings: Go to “Settings” on your Vision Pro.
- Tap Your Name: Tap on your name at the top.
- Go to iCloud: Tap “iCloud.”
- Tap Photos: Tap “Photos.”
- Enable Sync: Turn on “Sync this Apple Vision Pro.”
5. Check Your iCloud Shared Photo Library to Find Shared Images
If you are using iOS 16.1, iPadOS 16.1, or later, you might have an iCloud Shared Photo Library with up to five other people. Photos might appear to be missing if they are only visible in certain library views.
5.1. How to Switch Between Personal and Shared Libraries on iPhone or iPad
- Open the Photos App: Launch the Photos app.
- Tap the Profile Button: Tap the profile button in the upper-right corner.
- Choose Library View: Select “Both Libraries,” “Personal Library,” or “Shared Library” in the Library View Options section.
Photos in the Shared Library are marked with the Shared Library icon, while those in the Personal Library are marked with the Personal Library icon.
6. Verify You Are Signed In With the Correct Apple Account
To keep your photos and videos synchronized across all your devices, ensure you’re signed in to iCloud with the same Apple Account on every device.
6.1. How to Check Your Apple Account in Settings
- Open Settings: Go to “Settings” on your device.
- View Your Account: At the top, you’ll see your name and email address. This is the Apple Account you’re currently using.
7. Utilize Third-Party Data Recovery Software
If you’ve exhausted all the built-in methods, third-party data recovery software might be able to retrieve photos that have been permanently deleted. These tools scan your device’s storage for recoverable files.
7.1. Popular Data Recovery Software Options
- Dr.Fone – Data Recovery (iOS): A comprehensive tool for recovering various types of data from iPhones and iPads.
- EaseUS MobiSaver: Another reliable option for iOS data recovery.
- iMyFone D-Back: Known for its ability to recover data from iCloud and iTunes backups, as well as directly from the device.
7.2. Steps for Using Data Recovery Software
- Download and Install: Download and install the data recovery software on your computer.
- Connect Your iPhone: Connect your iPhone to your computer using a USB cable.
- Trust the Computer: On your iPhone, tap “Trust” when prompted to trust the computer.
- Scan for Lost Data: Launch the software and follow the instructions to scan your device for lost photos.
- Preview and Recover: Preview the recoverable photos and select the ones you want to recover. Save them to your computer or back to your iPhone.
8. Restore From a Backup to Recover Missing Photos
If you have a recent backup of your iPhone, you can restore it to recover missing photos. Backups can be stored in iCloud or on your computer.
8.1. Restore From an iCloud Backup
- Erase Your iPhone: Go to “Settings > General > Transfer or Reset iPhone > Erase All Content and Settings.”
- Follow Setup Assistant: Follow the on-screen instructions until you reach the Apps & Data screen.
- Restore From iCloud Backup: Choose “Restore from iCloud Backup” and sign in with your Apple ID.
- Select a Backup: Select the most relevant backup from the list.
- Wait for Restore: Wait for the restore process to complete. Ensure your device remains connected to Wi-Fi during the process.
8.2. Restore From a Computer Backup
- Connect Your iPhone: Connect your iPhone to your computer using a USB cable.
- Open Finder (macOS Catalina or later) or iTunes (Windows or earlier macOS): Open Finder or iTunes on your computer.
- Select Your iPhone: Select your iPhone when it appears in Finder or iTunes.
- Restore Backup: Click “Restore Backup.”
- Select a Backup: Choose the most relevant backup from the list and enter your password if prompted.
- Wait for Restore: Wait for the restore process to complete. Keep your device connected until it restarts.
9. Tips to Prevent Future Photo Loss
Prevention is better than cure. Here are some tips to ensure you don’t lose your photos in the future:
- Enable iCloud Photos: Keep iCloud Photos turned on to automatically back up and sync your photos across devices.
- Regular Backups: Regularly back up your iPhone to iCloud or your computer.
- Be Careful When Deleting: Double-check before deleting photos, especially when cleaning up your gallery.
- Use a Reliable Photo Management App: Consider using a photo management app like Google Photos, which offers additional backup and organization features.
- Keep Software Updated: Keep your iPhone’s software up to date to avoid software glitches that could cause data loss.
- Understand Shared Library Settings: If using iCloud Shared Photo Library, be aware of which library view you are in.
10. Additional Resources and Support
If you’re still having trouble recovering your photos, here are some additional resources:
- Apple Support: Contact Apple Support for personalized assistance.
- Online Forums: Visit Apple Support Communities or other online forums for advice from other users.
- Professional Data Recovery Services: Consider using a professional data recovery service if the photos are extremely important and you’ve exhausted all other options.
11. Understanding the Role of Metadata in Photo Recovery
Metadata, or data about data, plays a crucial role in photo recovery. When you take a photo, your iPhone saves information like the date, time, location, and camera settings. This metadata can be invaluable when trying to recover lost photos.
11.1. How Metadata Aids Recovery
- Sorting and Filtering: Metadata helps data recovery software sort and filter files, making it easier to locate and recover specific photos.
- Identifying Files: Even if a photo’s filename is corrupted, metadata can help identify the image based on its creation date or location.
- Maintaining Organization: When recovering photos, metadata ensures they are organized correctly, preserving the original order and grouping.
11.2. Tools for Viewing and Editing Metadata
- Photos App: The built-in Photos app allows you to view basic metadata like date, time, and location.
- Third-Party Apps: Apps like Exif Viewer and Metapho provide more detailed metadata information and editing capabilities.
- macOS Finder: On a Mac, you can view metadata by right-clicking a file, selecting “Get Info,” and looking at the “More Info” section.
12. The Impact of iOS Updates on Photo Storage and Recovery
iOS updates can sometimes affect photo storage and recovery. While Apple typically ensures updates are seamless, issues can occasionally arise.
12.1. Potential Issues After an iOS Update
- Syncing Problems: Updates might disrupt iCloud Photos syncing, leading to photos not appearing on all devices.
- Compatibility Issues: Some older photos might not be fully compatible with the new iOS version, causing them to display incorrectly or appear missing.
- Storage Changes: Updates can sometimes alter storage management, potentially affecting where photos are stored or how they are accessed.
12.2. How to Mitigate Update-Related Issues
- Backup Before Updating: Always back up your iPhone before installing an iOS update.
- Check iCloud Settings: After updating, verify that iCloud Photos is still enabled and functioning correctly.
- Restart Your Device: If you experience any issues, try restarting your iPhone.
- Contact Apple Support: If problems persist, contact Apple Support for assistance.
13. Advanced Techniques for Deep Scan Recovery
For photos that are deeply buried or severely corrupted, advanced recovery techniques may be necessary. These techniques involve deeper scans of your device’s storage.
13.1. Using Disk Drill for Deep Scans
Disk Drill is a powerful data recovery tool that offers deep scan capabilities. It can locate and recover files that other software might miss.
- Download and Install: Download and install Disk Drill on your computer.
- Connect Your iPhone: Connect your iPhone to your computer using a USB cable.
- Start a Deep Scan: Launch Disk Drill and select your iPhone. Choose the “Deep Scan” option.
- Wait for Scan: Allow Disk Drill to thoroughly scan your device. This process can take several hours.
- Preview and Recover: Preview the recoverable photos and select the ones you want to recover.
13.2. Forensic Data Recovery Services
If DIY methods fail, consider professional forensic data recovery services. These services use specialized equipment and techniques to recover data from damaged or inaccessible devices.
- DriveSavers: A well-known data recovery service with a high success rate.
- Ontrack: Offers advanced data recovery solutions for various devices.
- Secure Data Recovery: Provides secure and confidential data recovery services.
14. The Importance of Regular Data Integrity Checks
Regularly checking the integrity of your data can help prevent photo loss and ensure your backups are reliable.
14.1. How to Perform Data Integrity Checks
- Verify Backups: Periodically restore a small portion of your backup to ensure it’s working correctly.
- Check File Health: Use tools like checksum utilities to verify that your photo files are not corrupted.
- Monitor Storage Health: Keep an eye on the health of your iPhone’s storage to detect any potential issues early on.
14.2. Tools for Data Integrity Checks
- md5sum (macOS/Linux): A command-line tool for generating checksums of files.
- TeraCopy (Windows): A file transfer tool that verifies the integrity of copied files.
- DriveDx (macOS): A utility for monitoring the health of hard drives and SSDs.
15. Exploring Alternative Cloud Storage Solutions
While iCloud Photos is a convenient option for Apple users, exploring alternative cloud storage solutions can provide additional backup and redundancy.
15.1. Popular Cloud Storage Alternatives
- Google Photos: Offers unlimited storage for compressed photos and videos, as well as robust organization and sharing features.
- Dropbox: A versatile cloud storage service that supports various file types and offers easy sharing and collaboration.
- Amazon Photos: Provides unlimited storage for photos for Amazon Prime members, as well as integration with Amazon devices and services.
15.2. Benefits of Using Multiple Cloud Services
- Redundancy: If one service experiences issues, you have a backup on another.
- Flexibility: Different services offer different features and pricing plans, allowing you to choose the best options for your needs.
- Organization: Using multiple services can help you organize your photos in different ways, such as by date, event, or project.
16. Leveraging AI-Powered Photo Recovery Tools
Artificial intelligence (AI) is increasingly being used in photo recovery to improve the accuracy and efficiency of the process.
16.1. How AI Aids Photo Recovery
- Intelligent Scanning: AI algorithms can analyze storage media to identify recoverable files more accurately than traditional methods.
- File Reconstruction: AI can reconstruct fragmented or corrupted files, increasing the chances of successful recovery.
- Duplicate Detection: AI can identify and remove duplicate photos, saving storage space and simplifying organization.
16.2. AI-Powered Recovery Tools
- Remo Recover: Uses AI to scan and recover photos from various storage devices.
- Stellar Data Recovery: Employs AI algorithms to improve the accuracy and speed of data recovery.
- Tenorshare UltData: Features AI-powered scanning and recovery capabilities for iOS devices.
17. The Ethical Considerations of Photo Recovery
When recovering photos, it’s important to consider ethical implications, particularly when dealing with data that may not belong to you.
17.1. Respecting Privacy
- Obtain Consent: If you’re recovering photos from a device that isn’t yours, obtain consent from the owner.
- Handle Data Responsibly: Avoid sharing or distributing recovered photos without permission.
- Comply With Laws: Be aware of and comply with data privacy laws and regulations in your jurisdiction.
17.2. Avoiding Illegal Activities
- Do Not Recover Stolen Data: Avoid recovering data from devices that you know are stolen or obtained illegally.
- Respect Intellectual Property: Do not recover and distribute copyrighted photos without permission from the copyright holder.
18. Staying Informed About the Latest Photo Recovery Technologies
The field of photo recovery is constantly evolving. Staying informed about the latest technologies and techniques can help you maximize your chances of successful recovery.
18.1. Resources for Staying Informed
- Tech Blogs: Follow tech blogs and websites that cover data recovery and digital forensics.
- Industry Conferences: Attend industry conferences and workshops to learn from experts and network with peers.
- Online Forums: Participate in online forums and communities to share knowledge and learn from others.
18.2. Key Trends to Watch
- AI-Powered Recovery: Keep an eye on advancements in AI and machine learning for data recovery.
- Cloud-Based Recovery: Explore cloud-based data recovery solutions for added convenience and accessibility.
- Security Enhancements: Stay informed about security enhancements and best practices for protecting your data during recovery.
Losing photos from your iPhone can be a challenging experience, but with the right knowledge and tools, recovery is often possible. This comprehensive guide has covered various methods, from checking the Recently Deleted album to utilizing advanced data recovery software and AI-powered tools. Remember to follow preventive measures, such as enabling iCloud Photos and performing regular backups, to minimize the risk of future photo loss.
For more in-depth tutorials, tips, and inspiration on photography, visit dfphoto.net. Join our community of photography enthusiasts and elevate your skills today.
Want to explore more photography techniques or need help choosing the right equipment? Contact us at Address: 1600 St Michael’s Dr, Santa Fe, NM 87505, United States or call us at Phone: +1 (505) 471-6001. You can also visit our website dfphoto.net for more information.
FAQ: How to Get Lost Photos Back on iPhone
1. Where do deleted photos go on an iPhone?
Deleted photos go to the Recently Deleted album in the Photos app, where they stay for 30 days before being permanently deleted.
2. How can I recover permanently deleted photos from my iPhone?
You can try using third-party data recovery software or restoring your iPhone from a backup if you have one.
3. How do I find hidden photos on my iPhone?
Open the Photos app, go to the Albums tab, scroll down to Utilities, and tap Hidden. You may need to authenticate with Face ID, Touch ID, or your passcode.
4. Why are my photos not syncing to iCloud?
Check that iCloud Photos is enabled in Settings > [Your Name] > iCloud > Photos, and ensure you have enough iCloud storage. Also, verify that you are connected to Wi-Fi.
5. How do I switch between Personal Library and Shared Library on my iPhone?
In the Photos app, tap the profile button in the upper-right corner and choose your preferred library view option.
6. Can iOS updates cause photo loss?
While rare, iOS updates can sometimes cause syncing issues or compatibility problems. Always back up your iPhone before updating.
7. What is metadata, and how does it help in photo recovery?
Metadata is data about data, including the date, time, and location of a photo. It helps in sorting, filtering, and identifying files during recovery.
8. Are there any ethical considerations when recovering photos from someone else’s device?
Yes, always obtain consent from the device owner and handle recovered data responsibly, respecting privacy and data protection laws.
9. What are some alternative cloud storage solutions to iCloud Photos?
Popular alternatives include Google Photos, Dropbox, and Amazon Photos.
10. How can AI-powered tools help in photo recovery?
AI can enhance scanning accuracy, reconstruct fragmented files, and detect duplicates, improving the efficiency of the recovery process.