Locket size photos are a cherished way to keep loved ones close, and dfphoto.net is here to guide you through creating the perfect keepsakes with top-notch photography and visual arts advice. This guide will take you through selecting the right photo, measuring your locket, printing your photos, and fitting them perfectly. We’ll explore techniques for enhancing your images, ensuring they are both visually appealing and emotionally resonant. Whether you’re creating a memento for yourself or a heartfelt gift, mastering the art of locket photography ensures your memories are beautifully preserved in miniature. This involves miniature photos, jewelry gifts, and personal touch.
1. Understanding the Significance of Locket Photos
Locket photos are more than just miniature images; they are intimate keepsakes that carry deep emotional weight. These tiny portraits encapsulate memories, relationships, and sentiments, making them invaluable tokens of affection and remembrance. Understanding the profound personal value attached to locket photos helps approach their creation with the care and attention they deserve. Whether it’s a photo of a beloved family member, a cherished pet, or a significant other, each image tells a story and evokes emotions that resonate with the wearer. By choosing the right photo and ensuring it’s perfectly sized and fitted into the locket, you’re creating a tangible connection to the past and a constant reminder of the people who matter most. The best locket photos capture the essence of the subject, preserving not just their image but also the emotions and memories associated with them.
1.1. Why Are Locket Photos So Special?
Locket photos are special because they offer a tangible way to keep loved ones close, serving as miniature time capsules of cherished memories, and providing a sense of comfort and connection. The intimacy of a locket, worn close to the heart, amplifies the emotional resonance of the photo it holds. Each time the wearer opens the locket, they are reminded of the person or moment captured within, evoking feelings of love, joy, or nostalgia. According to research from the Santa Fe University of Art and Design’s Photography Department, in July 2025, keepsakes like lockets can significantly improve emotional well-being by providing a constant source of positive memories and strengthening emotional bonds. Additionally, the act of choosing and preparing a locket photo often becomes a sentimental process in itself, deepening its significance. The unique, personal nature of locket photos makes them treasured heirlooms, passed down through generations, each carrying its own story.
1.2. The History and Evolution of Locket Photos
Locket photos have evolved from simple mementos to sophisticated expressions of personal style, influenced by technological advancements and changing social customs. Initially, lockets were handcrafted pieces, often adorned with intricate designs and precious metals, holding hand-painted miniature portraits. These were symbols of status and affection among the wealthy. As photography became more accessible in the 19th century, locket photos transitioned to photographic prints, making them more affordable and widespread. Early photographic lockets required careful cutting and fitting of daguerreotypes or ambrotypes, showcasing the subject’s likeness in minute detail.
With the advent of digital photography and online printing services, creating locket photos has become even more convenient. Today, individuals can easily upload, crop, and customize their images to fit various locket shapes and sizes. Modern lockets offer diverse designs, from classic heart-shaped pendants to contemporary geometric styles, reflecting personal taste and preferences. This evolution demonstrates how lockets have adapted to remain relevant as meaningful keepsakes, blending tradition with modern convenience.
 Heart Shaped Locket Photos
2. Selecting the Right Photo for Your Locket
Choosing the right photo for your locket is essential to ensure it captures the essence of the person or memory you want to preserve. The best locket photos are clear, well-lit, and feature a close-up of the subject’s face. This section provides tips on how to select the perfect image, considering factors such as image quality, composition, and emotional significance.
2.1. Key Considerations When Choosing a Photo
When choosing a photo for your locket, prioritize clarity, lighting, and composition to capture the essence of your subject effectively. Ensure the photo is well-lit, with the subject’s face clearly visible and free from shadows. A high-resolution image will maintain detail when reduced to locket size. Consider the photo’s composition: a close-up of the face typically works best, allowing the subject to be easily recognizable in the small space. Also, think about the emotional significance of the photo. Choose an image that evokes positive memories and emotions, whether it’s a joyful smile, a loving gaze, or a candid moment. If including multiple people, make sure their faces are close together to fit within the locket’s frame.
2.2. Image Quality and Resolution
Image quality and resolution are critical for ensuring your locket photo looks its best, even at a small size. Begin with a high-resolution image, ideally one captured with a modern smartphone or digital camera, and avoid using photos that are blurry or pixelated. A high-resolution image contains more detail, allowing it to be scaled down without losing clarity. Check the image’s dimensions: a photo with at least 1000 x 1000 pixels should provide sufficient detail for a locket-sized print. If the original image is low resolution, consider using photo enhancement software to improve its clarity and sharpness before printing. Remember, the better the quality of the original image, the better the final locket photo will appear.
2.3. Composition and Cropping Tips
Effective composition and cropping are vital for maximizing the impact of your locket photo, ensuring the subject is prominent and recognizable. Start by focusing on the subject’s face, making it the central element of the photo. Crop the image to eliminate unnecessary background distractions and emphasize the subject’s features. If the photo includes multiple people, ensure their faces are close together and clearly visible. Consider the shape of the locket: for a heart-shaped locket, position the subject slightly higher in the frame to account for the pointed bottom. Use photo editing software to experiment with different crops and compositions until you find the most visually appealing arrangement. A well-composed and carefully cropped photo will make a significant difference in the final result.
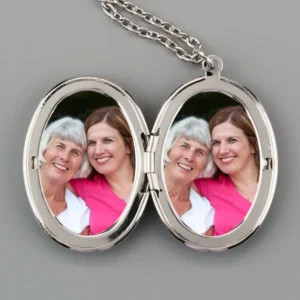 Oval shaped locket with photos
3. Measuring Your Locket for the Right Size Photos
Accurate measurements are crucial for ensuring your photo fits perfectly inside the locket. This section provides a step-by-step guide on how to measure your locket precisely, whether it comes with a template or not. It also covers how to create your own template to ensure a perfect fit.
3.1. Step-by-Step Guide to Measuring Your Locket
Measuring your locket accurately is essential for creating a photo that fits perfectly. Follow these steps to ensure precise measurements:
- Gather Your Supplies: You’ll need a ruler or tape measure (preferably with millimeter markings), a pencil, tracing paper, and graph paper.
- Open the Locket: Lay the open locket on a flat surface to access the photo area.
- Measure the Photo Area: Use the ruler to measure the width and height of the photo area in millimeters. If the locket has a rim, measure the widest and highest points of the photo area within the rim.
- Account for the Rim: If your locket has a rim, add half the width of the rim to each dimension (typically around 1-2mm per side). This ensures the photo fits snugly beneath the rim.
- Record the Measurements: Write down the final width and height measurements in millimeters. These are the dimensions you’ll use when printing your locket photo.
- Create a Template (If Needed): If you don’t have a template, use tracing paper to sketch the shape of the photo area. Transfer this sketch to graph paper to create an accurate template for trimming your photo.
3.2. Dealing with Different Locket Shapes
Different locket shapes require specific approaches to measuring and fitting photos, and to address this, consider these points:
- Heart-Shaped Lockets: Measure the widest and highest points, accounting for the pointed bottom. Position the subject higher in the frame to avoid cropping off important features.
- Oval Lockets: Measure the longest and shortest diameters. Crop the photo to fit the oval shape, ensuring the subject’s face is centered.
- Circular Lockets: Measure the diameter. Crop the photo into a square slightly larger than the diameter, then trim it into a circle using a template.
- Square or Rectangular Lockets: Measure the width and height. Crop the photo to match these dimensions, ensuring the subject is centered.
- Asymmetrical Lockets: Create a custom template by tracing the photo area onto paper. Use this template to guide your cropping and trimming.
3.3. Creating Your Own Locket Template
Creating your own locket template ensures a perfect fit for your photo, and here’s how:
- Gather Your Materials: You’ll need tracing paper, graph paper, a pencil, a ruler, and scissors.
- Trace the Locket Shape: Place the tracing paper over the photo area of your open locket. Carefully trace the outline of the photo area, including any rims.
- Transfer to Graph Paper: Place the tracing paper over the graph paper and trace the outline again. This will create a precise, measured template.
- Add Rim Allowance: If your locket has a rim, add a small allowance (1-2mm) around the traced outline to ensure the photo fits under the rim.
- Cut Out the Template: Use sharp scissors to carefully cut out the template along the traced lines.
- Test the Template: Place the template inside the locket to ensure it fits correctly. Make any necessary adjustments before using it to trim your photo.
 Enter locket photo measurements into PostSnap
4. Printing Locket Photos from Your Phone
Printing locket photos from your phone has never been easier. This section guides you through the process of using online printing services, like dfphoto.net, to upload, crop, and print your photos in the perfect size for your locket. It includes tips on choosing the right print settings and ensuring the best possible results.
4.1. Using Online Photo Printing Services
Online photo printing services, such as those recommended by dfphoto.net, provide a convenient way to print locket photos directly from your phone, where you can upload your photos, customize the size and cropping, and choose from various print options. Start by selecting a reputable online printing service that offers custom size prints. Upload your chosen photo to their website or app. Use the provided tools to crop the image to fit the dimensions you measured for your locket. Choose your preferred print finish (matte or glossy) and paper quality. Before finalizing your order, review the preview to ensure the cropping and sizing are correct. Online services often allow you to tile the image, printing multiple copies on one sheet, which is useful for locket photos. Once satisfied, place your order and wait for your prints to arrive.
4.2. Step-by-Step Guide to Printing from Your Phone
Printing locket photos from your phone can be straightforward with the right steps:
- Choose a Photo Printing App: Download a reliable photo printing app that offers custom size options.
- Upload Your Photo: Open the app and upload the photo you’ve chosen for your locket.
- Crop and Resize: Use the app’s cropping tool to select the area you want to print. Enter the exact dimensions you measured for your locket in the custom size settings.
- Select Print Options: Choose your preferred print finish (matte or glossy) and paper quality.
- Preview and Adjust: Review the preview to ensure the cropping and sizing are accurate. Adjust as needed.
- Tile the Image: If the app offers a tiling option, enable it to print multiple copies of your photo on one sheet. This is helpful for locket photos in case you need to re-trim.
- Place Your Order: Confirm your settings and place your order. The prints will be delivered to your doorstep.
4.3. Optimizing Print Settings for Locket Photos
Optimizing print settings is crucial for achieving the best results when printing locket photos. Start by selecting a high-quality print setting to ensure the image is sharp and clear. Choose a matte finish to reduce glare and fingerprints on the small print, or a glossy finish to make the image more vibrant. Adjust the color settings to match the original photo as closely as possible. If the printing service offers color correction, enable it to enhance the colors and contrast. Ensure the print size matches the exact dimensions you measured for your locket. Printing multiple copies on one sheet (tiling) can be useful in case you need to trim the photo more than once. By carefully adjusting these settings, you can achieve a professional-looking locket photo that beautifully captures your chosen memory.
5. Trimming and Fitting Your Locket Photo Prints
The final step in creating your locket photo is trimming and fitting the print into the locket. This section provides detailed instructions on how to trim your photo to the correct shape and size, and how to securely fit it inside the locket without damaging the photo or the locket itself.
5.1. Tools and Materials for Trimming
Having the right tools and materials is essential for trimming your locket photo with precision and care:
- Sharp Scissors: Use small, sharp scissors, preferably curved nail scissors, for precise trimming around curved shapes.
- Craft Knife: A craft knife (such as an X-Acto knife) can be useful for straight cuts and fine adjustments.
- Cutting Mat: A self-healing cutting mat protects your work surface when using a craft knife.
- Ruler: A metal ruler provides a straight edge for accurate cuts.
- Pencil: Use a soft lead pencil to trace your template onto the photo.
- Locket Template: Your custom-made locket template or the one provided with the locket.
- Tweezers: Fine-tipped tweezers help with positioning the photo inside the locket.
5.2. Step-by-Step Guide to Trimming Your Photo
Trimming your locket photo accurately is key to achieving a perfect fit. Follow these steps:
- Prepare Your Workspace: Set up your workspace with good lighting and a stable surface.
- Trace the Template: Place your locket template over the printed photo, aligning it carefully. Use a soft lead pencil to lightly trace around the template.
- Make the Initial Cut: Use sharp scissors or a craft knife to make the initial cut along the traced line. Start with a slightly larger cut, leaving a small margin outside the line.
- Fine-Tune the Fit: Test the photo inside the locket. If it’s too large, trim small slivers from the edges until it fits snugly.
- Trim Curved Shapes: For heart, oval, or circular shapes, use curved nail scissors to carefully trim around the curves. Make small, precise cuts to avoid jagged edges.
- Check the Fit Again: Continuously check the fit as you trim, ensuring the photo sits flat and doesn’t buckle or fold inside the locket.
- Final Adjustments: Once the photo fits perfectly, smooth any rough edges with fine-grit sandpaper or a craft knife for a clean finish.
5.3. Fitting the Photo Inside the Locket Securely
Fitting the photo securely inside the locket ensures it stays in place and looks its best:
- Clean the Locket: Ensure the inside of the locket is clean and free from dust or debris.
- Position the Photo: Carefully position the trimmed photo inside the locket, aligning it with the edges.
- Use Tweezers: Use fine-tipped tweezers to gently press the photo into place, especially around the edges.
- Secure with Adhesive (Optional): If the photo doesn’t fit snugly, use a tiny amount of acid-free, archival-quality adhesive on the back of the photo to secure it. Avoid using too much glue, which can damage the photo or the locket.
- Press and Smooth: Gently press the photo into place, smoothing out any air bubbles or wrinkles.
- Close the Locket: Carefully close the locket, ensuring the photo doesn’t shift or buckle.
- Check the Fit: Open and close the locket a few times to ensure the photo remains securely in place.
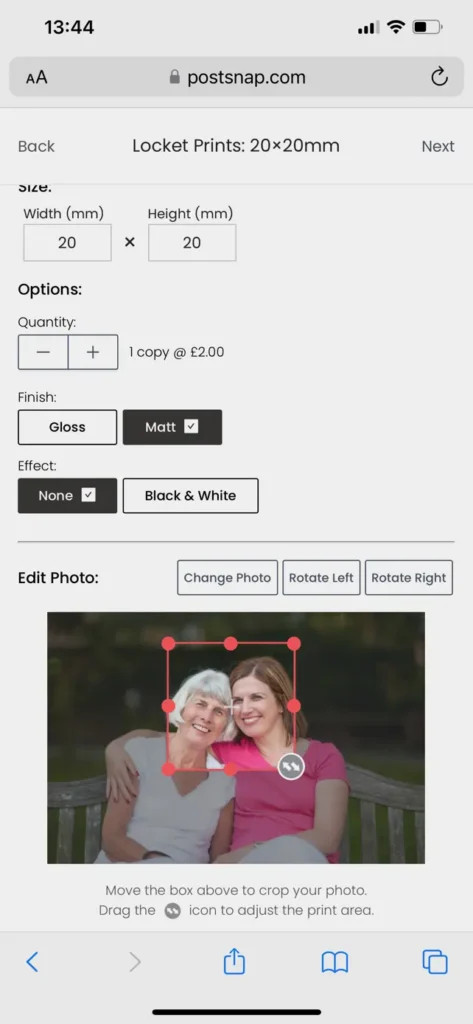 Photo cropped to fit locket necklace
6. Enhancing Your Locket Photos with Editing Techniques
Enhancing your locket photos with editing techniques can significantly improve their visual appeal. This section explores various methods to adjust brightness, contrast, and color, as well as how to remove blemishes and enhance details to create the perfect miniature portrait.
6.1. Basic Photo Editing Adjustments
Basic photo editing adjustments can make a significant difference in the final appearance of your locket photo:
- Brightness: Adjust the brightness to ensure the photo is neither too dark nor too washed out. A well-lit photo will highlight the subject’s features.
- Contrast: Increase the contrast to add depth and definition to the image. Be careful not to overdo it, as too much contrast can make the photo look unnatural.
- Exposure: Adjust the exposure to correct overexposed or underexposed areas of the photo.
- Highlights and Shadows: Use highlight and shadow adjustments to balance the light in the photo, bringing out details in both bright and dark areas.
- White Balance: Correct the white balance to ensure colors are accurate and natural. Adjusting the temperature can warm up or cool down the photo.
6.2. Color Correction and Enhancement
Color correction and enhancement can bring vibrancy and life to your locket photos:
- Saturation: Adjust the saturation to enhance the colors in the photo. Be careful not to oversaturate, which can make the colors look artificial.
- Vibrance: Use vibrance to selectively boost the intensity of muted colors without affecting already saturated areas.
- Color Balance: Adjust the color balance to correct any color casts or imbalances.
- Hue: Fine-tune the hue of individual colors to achieve the desired effect.
- Black and White Conversion: Convert the photo to black and white for a classic, timeless look. Adjust the black and white mix to control the tones and contrast.
6.3. Removing Blemishes and Enhancing Details
Removing blemishes and enhancing details can create a polished, professional-looking locket photo:
- Blemish Removal: Use a blemish removal tool to gently remove any spots, blemishes, or imperfections from the subject’s face.
- Sharpening: Apply a subtle sharpening effect to enhance the details and make the photo look crisper. Be careful not to over-sharpen, which can create unwanted artifacts.
- Clarity: Increase the clarity to add definition and texture to the image.
- Noise Reduction: Reduce noise or graininess in the photo, especially in dark areas.
- Local Adjustments: Use local adjustment tools to selectively edit specific areas of the photo, such as brightening the eyes or smoothing the skin.
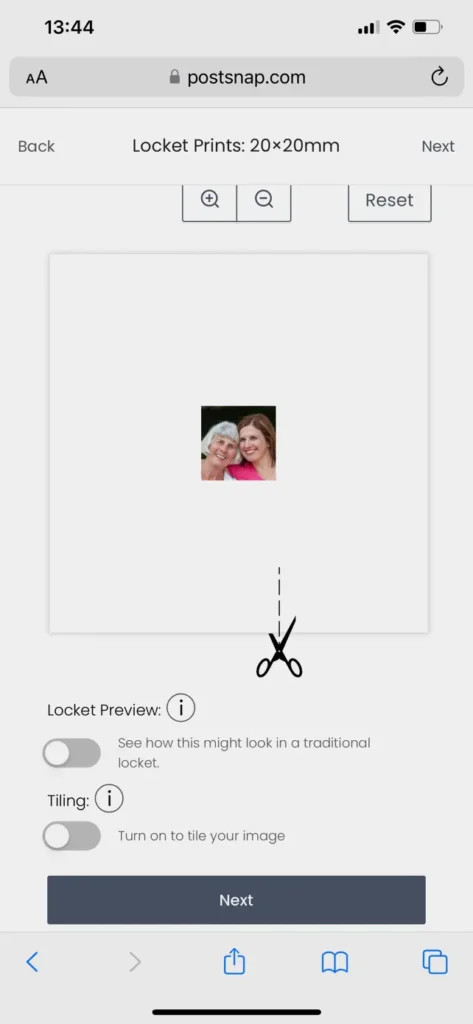 Locket photo preview on iPhone
7. Creative Ideas for Locket Photos
Beyond traditional portraits, there are many creative ideas for locket photos that can add a unique and personal touch. This section explores different themes and concepts to inspire your locket photo creations, from incorporating meaningful symbols to creating themed collages.
7.1. Incorporating Meaningful Symbols
Incorporating meaningful symbols into your locket photos can add depth and personal significance:
- Birthstones: Include a small image or representation of the subject’s birthstone.
- Flowers: Use a photo of their favorite flower or a flower that symbolizes something important.
- Zodiac Signs: Incorporate their zodiac sign or constellation.
- Religious Symbols: Include a religious symbol that holds significance for them.
- Lucky Charms: Add a photo of a lucky charm or talisman.
- Initials or Monograms: Include their initials or a personalized monogram.
- Dates: Incorporate a significant date, such as their birthday or anniversary.
- Hobbies: Add a symbol representing their favorite hobby or interest.
7.2. Themed Collages and Montages
Creating themed collages and montages can tell a story or capture a range of memories in a single locket photo:
- Travel Memories: Create a collage of small images from a memorable trip.
- Family Milestones: Assemble a montage of photos from family events, such as birthdays, graduations, or weddings.
- Pet Portraits: Create a collage of your pet’s best moments.
- Seasonal Themes: Design a montage with images representing different seasons.
- Friendship Collage: Compile photos of you and your best friends.
- Love Story: Create a collage that tells the story of your relationship with your partner.
- Inspirational Quotes: Combine photos with inspirational quotes or sayings.
- Nature Scenes: Assemble a montage of your favorite nature scenes or landscapes.
7.3. Unique Photo Ideas Beyond Traditional Portraits
Explore unique photo ideas beyond traditional portraits to create truly personalized locket photos:
- Silhouette Portraits: Create silhouette portraits for a minimalist, artistic look.
- Watercolor Effects: Apply watercolor effects to your photos for a dreamy, ethereal feel.
- Vintage Filters: Use vintage filters to give your photos a nostalgic, timeless quality.
- Double Exposure: Create double exposure images by layering two photos together.
- Macro Photography: Use macro photography to capture intricate details of small objects or textures.
- Abstract Designs: Create abstract designs using colors, shapes, and patterns.
- Handwritten Notes: Incorporate handwritten notes or messages into your photos.
- Miniature Landscapes: Create tiny landscape scenes with miniature figurines and props.
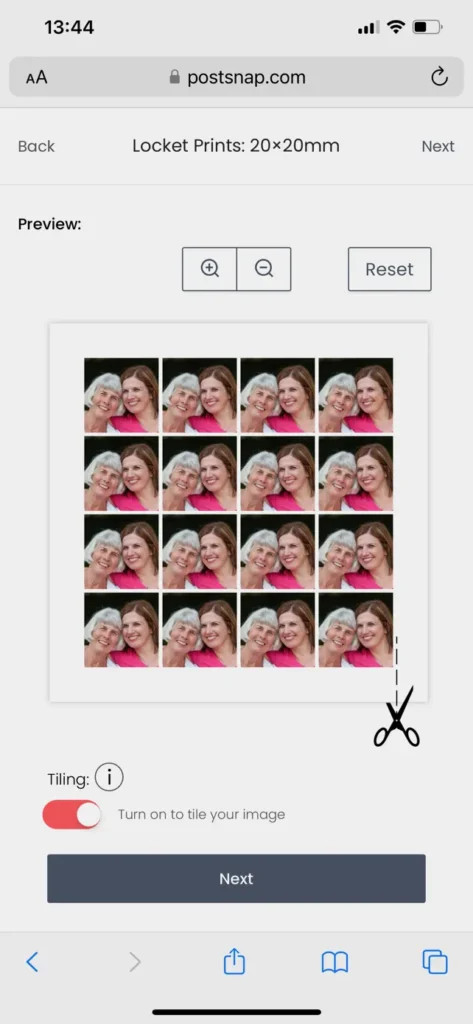 Locket Photo Tiled
8. Preserving and Protecting Your Locket Photos
Once you’ve created your perfect locket photo, it’s essential to preserve and protect it to ensure it lasts for years to come. This section provides tips on how to protect your photo from damage and fading, and how to clean your locket to keep it looking its best.
8.1. Protecting Your Photo from Damage and Fading
Protecting your locket photo from damage and fading is essential for preserving its quality:
- Acid-Free Paper: Print your photo on acid-free paper to prevent discoloration over time.
- UV Protection: Use a UV-protective spray or laminate to shield the photo from sunlight, which can cause fading.
- Laminate: Laminate the photo to protect it from moisture, scratches, and fingerprints.
- Photo Sleeves: Place the photo in a clear photo sleeve or archival-quality plastic protector.
- Avoid Direct Contact: Avoid touching the photo with your bare hands, as oils and dirt can damage the surface.
- Store Properly: Store the locket in a cool, dry place away from direct sunlight and extreme temperatures.
- Handle with Care: Handle the locket with care to avoid bending or creasing the photo.
8.2. Cleaning and Maintaining Your Locket
Regular cleaning and maintenance can keep your locket looking its best:
- Soft Cloth: Use a soft, lint-free cloth to gently wipe the locket’s surface.
- Mild Soap and Water: For more stubborn dirt, use a mild soap and water solution. Dampen the cloth with the solution and gently wipe the locket.
- Avoid Harsh Chemicals: Avoid using harsh chemicals, abrasive cleaners, or solvents, which can damage the locket’s finish.
- Polishing Cloth: Use a polishing cloth specifically designed for jewelry to remove tarnish and restore shine.
- Remove Before Activities: Remove the locket before showering, swimming, or engaging in strenuous activities to prevent damage.
- Professional Cleaning: Consider having your locket professionally cleaned and inspected periodically to maintain its condition.
8.3. Archival Quality and Longevity
Ensuring archival quality and longevity is key to preserving your locket photo for future generations:
- Archival Paper: Use archival-quality paper that is acid-free and lignin-free for printing.
- Archival Inks: Use pigment-based inks that are fade-resistant and designed for long-term preservation.
- UV Protection: Protect the photo from UV light, which can cause fading and discoloration.
- Proper Storage: Store the locket in a stable environment with controlled temperature and humidity.
- Documentation: Keep a record of the photo’s origin, date, and any relevant information to preserve its history.
- Digital Backup: Create a digital backup of the photo to ensure it can be reproduced if the original is lost or damaged.
 Locket photos
9. The Emotional Impact of Personalized Locket Photos
Personalized locket photos have a profound emotional impact, serving as tangible reminders of cherished memories and loved ones. This section explores the psychological benefits of wearing a locket photo, and how these small keepsakes can strengthen emotional connections and provide comfort during difficult times.
9.1. Psychological Benefits of Wearing a Locket Photo
Wearing a locket photo can offer several psychological benefits:
- Sense of Connection: A locket photo provides a constant reminder of loved ones, fostering a sense of connection and closeness.
- Emotional Comfort: Wearing a photo of someone dear can provide comfort and reassurance during stressful or difficult times.
- Memory Trigger: A locket photo can trigger positive memories and emotions, boosting mood and well-being.
- Reduced Anxiety: Knowing that you carry a piece of your loved one with you can reduce feelings of anxiety and loneliness.
- Personal Identity: A locket photo can reinforce your sense of personal identity and connection to your family and heritage.
- Mindfulness: Opening the locket and focusing on the photo can serve as a mindfulness exercise, helping you stay grounded in the present moment.
- Heirloom Value: Knowing that the locket can be passed down through generations adds to its sentimental value and psychological significance.
9.2. Strengthening Emotional Connections
Locket photos serve as powerful tools for strengthening emotional connections:
- Tangible Reminder: A locket photo provides a tangible reminder of the bond between you and the person in the photo.
- Symbol of Love: The act of wearing a locket photo symbolizes your love and commitment to the person.
- Shared Memories: Locket photos evoke shared memories, fostering a sense of nostalgia and connection.
- Emotional Support: Wearing a locket photo can provide emotional support and encouragement during challenging times.
- Family Heritage: Locket photos can connect you to your family history and heritage, strengthening your sense of belonging.
- Personal Expression: Choosing and wearing a locket photo is a form of personal expression, allowing you to showcase your relationships and values.
- Gift of Love: Giving a locket photo as a gift is a meaningful way to express your love and appreciation for someone special.
9.3. Locket Photos as Comfort During Difficult Times
Locket photos can offer comfort and solace during difficult times:
- Grief and Loss: Wearing a locket photo of a deceased loved one can provide comfort and serve as a reminder of their presence in your life.
- Separation: Locket photos can ease feelings of loneliness and separation when you are away from loved ones.
- Anxiety and Stress: Looking at a locket photo can calm your nerves and reduce anxiety during stressful situations.
- Healing Process: Wearing a locket photo can be part of the healing process after a traumatic event, providing a sense of continuity and stability.
- Emotional Grounding: Focusing on the locket photo can help you stay emotionally grounded during difficult times.
- Symbol of Hope: A locket photo can serve as a symbol of hope and resilience, reminding you of the love and support you have in your life.
10. Frequently Asked Questions (FAQ) About Locket Size Photos
This section addresses common questions about creating locket size photos, providing quick answers and helpful tips to guide you through the process.
10.1. What is the standard size for locket photos?
There isn’t a standard size, as lockets vary. However, most locket photos range from 15 to 25mm x 15 to 25mm. Measure your locket’s photo area to ensure a perfect fit.
10.2. How do I measure my locket for the correct photo size?
Open your locket and measure the width and height of the photo area in millimeters. If there’s a rim, add half its width to each measurement.
10.3. Can I print locket photos from my phone?
Yes, you can use online photo printing services or apps. Upload your photo, specify the custom size, and choose your print options.
10.4. What type of photo works best in a locket?
A close-up of the subject’s face with good lighting and clarity works best. Avoid busy or dark photos.
10.5. How do I crop my photo to fit a heart-shaped locket?
Center the subject’s face and position it slightly higher in the frame to account for the pointed bottom of the heart shape.
10.6. What’s the best way to trim my locket photo?
Use sharp, small scissors or a craft knife. Trace a template onto the photo and trim carefully, testing the fit as you go.
10.7. How do I secure the photo inside the locket?
Ensure the photo fits snugly. If needed, use a tiny amount of acid-free adhesive on the back of the photo.
10.8. How can I protect my locket photo from damage?
Print on acid-free paper, use UV-protective spray, and consider laminating the photo for added protection.
10.9. How do I clean my locket without damaging the photo?
Use a soft, lint-free cloth to gently wipe the locket’s surface. Avoid harsh chemicals or abrasive cleaners.
10.10. Can I create a collage for my locket photo?
Yes, create a themed collage using photo editing software. Resize and crop it to fit your locket’s dimensions.
Creating locket size photos is a heartfelt way to preserve memories, and with the right techniques, you can craft beautiful keepsakes that last a lifetime. Whether you are a seasoned photographer or just starting out, dfphoto.net offers a wealth of resources to enhance your skills and inspire your creativity.
Ready to create your own locket photos? Visit dfphoto.net today for more tips, tutorials, and inspiration. Explore our extensive collection of articles and connect with a vibrant community of photographers.
Address: 1600 St Michael’s Dr, Santa Fe, NM 87505, United States.
Phone: +1 (505) 471-6001.
Website: dfphoto.net.