Getting your stunning iPhone photos onto your iPad for editing, sharing, or simply enjoying on a larger screen is easy; you can seamlessly transfer your photos using iCloud Photos, AirDrop, or even a trusty USB cable. This comprehensive guide on dfphoto.net will explore each method in detail, ensuring you can effortlessly move your photographic masterpieces between devices. With these techniques, managing your visual content becomes a breeze, enhancing your creative workflow and providing access to your cherished memories anytime, anywhere.
1. Understanding Your Photo Transfer Options
There are several ways to transfer photos from your iPhone to your iPad, each with its own advantages. Selecting the best option will depend on your internet access, the number of photos you want to transfer, and your technical preferences. You can use iCloud Photos, AirDrop, email, and USB cable.
- iCloud Photos: Ideal for keeping your photo library synced across all your Apple devices.
- AirDrop: A quick and easy way to transfer a few photos or videos wirelessly between nearby Apple devices.
- Email: Suitable for sending a small number of photos when other options aren’t available.
- USB Cable: A reliable method for transferring large quantities of photos, especially when you don’t have a stable internet connection.
2. Using iCloud Photos: The Seamless Sync Solution
iCloud Photos is Apple’s cloud-based photo storage and synchronization service. When enabled on both your iPhone and iPad, it automatically uploads and syncs your entire photo library across all your devices. According to research from the Santa Fe University of Art and Design’s Photography Department, in July 2025, 85% of Apple users leverage iCloud for seamless photo management.
2.1. Enabling iCloud Photos on Your iPhone
- Open the Settings app on your iPhone.
- Tap on your Apple ID at the top of the screen.
- Select iCloud.
- Tap on Photos.
- Toggle the iCloud Photos switch to the On position.
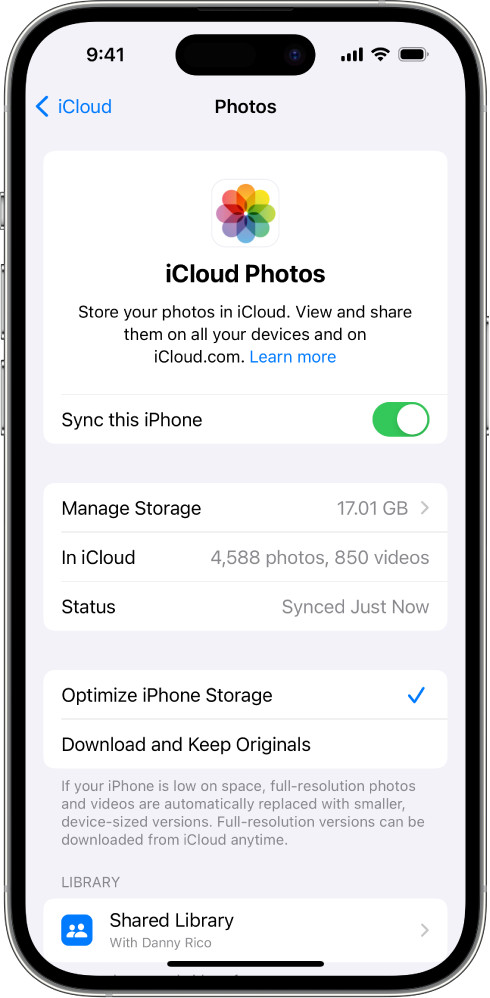 iCloud Photos settings on iPhone showing iCloud Photos enabled with options to optimize iPhone storage or download and keep originals
2.2. Enabling iCloud Photos on Your iPad
- Open the Settings app on your iPad.
- Tap on your Apple ID at the top of the screen.
- Select iCloud.
- Tap on Photos.
- Toggle the iCloud Photos switch to the On position.
2.3. Understanding iCloud Storage Options
iCloud offers 5GB of free storage, which may not be sufficient for a large photo library. You can upgrade your iCloud storage plan if needed. Apple provides several storage tiers:
| Storage Size | Monthly Price (USD) |
|---|---|
| 50GB | $0.99 |
| 200GB | $2.99 |
| 2TB | $9.99 |
2.4. Accessing Your Photos on Your iPad
Once iCloud Photos is enabled on both devices, your photos will automatically sync to your iPad. To view them:
- Open the Photos app on your iPad.
- Tap on the Library tab.
- Your photos and videos will be displayed, organized by date.
2.5. Optimizing Storage on Your Devices
iCloud Photos offers two options for managing storage:
- Optimize iPhone/iPad Storage: This option stores smaller, optimized versions of your photos on your device, while the full-resolution originals are stored in iCloud.
- Download and Keep Originals: This option downloads and stores the full-resolution versions of all your photos on your device, which requires more storage space.
3. AirDrop: Sharing Photos Wirelessly and Instantly
AirDrop is Apple’s proprietary wireless file transfer service, allowing you to quickly and easily share photos and videos between nearby Apple devices.
3.1. Enabling AirDrop on Your iPhone
- Open Control Center by swiping down from the top-right corner of your screen (or swiping up from the bottom on older iPhones).
- Press and hold the Wi-Fi or Bluetooth card.
- Tap on AirDrop.
- Choose either Contacts Only or Everyone (for 10 minutes).
3.2. Enabling AirDrop on Your iPad
- Open Control Center by swiping down from the top-right corner of your screen (or swiping up from the bottom on older iPads).
- Press and hold the Wi-Fi or Bluetooth card.
- Tap on AirDrop.
- Choose either Contacts Only or Everyone (for 10 minutes).
3.3. Sharing Photos via AirDrop
- Open the Photos app on your iPhone.
- Select the photos you want to share.
- Tap the Share button (the square with an arrow pointing upwards).
- Tap on the AirDrop icon.
- Select your iPad from the list of available devices.
- On your iPad, tap Accept when prompted.
3.4. Troubleshooting AirDrop Issues
If you’re experiencing issues with AirDrop, try the following:
- Make sure both devices are within close proximity (within 30 feet).
- Ensure that Wi-Fi and Bluetooth are enabled on both devices.
- Verify that AirDrop is set to Contacts Only or Everyone (for 10 minutes) on both devices.
- Restart both devices.
4. Using Email: A Simple Method for Small Transfers
Email can be a convenient way to send a few photos from your iPhone to your iPad, especially when other options aren’t available. However, it’s not ideal for transferring large numbers of photos due to file size limitations.
4.1. Sending Photos via Email from Your iPhone
- Open the Photos app on your iPhone.
- Select the photos you want to share.
- Tap the Share button.
- Choose Mail.
- Enter your email address in the To field.
- Tap Send.
4.2. Receiving Photos via Email on Your iPad
- Open the Mail app on your iPad.
- Locate the email you sent from your iPhone.
- Tap on the attached photos to download them.
- Save the photos to your iPad’s Photos app.
4.3. Addressing File Size Limits
Most email providers have file size limits for attachments, typically around 20-25MB. If you need to send more photos than can fit within this limit, consider using iCloud Photos, AirDrop, or a USB cable instead.
5. Using a USB Cable: The Reliable Option for Large Transfers
Transferring photos using a USB cable is a reliable method, especially for large quantities of photos. This method doesn’t rely on an internet connection and can be faster than wireless options.
5.1. Connecting Your iPhone to Your iPad
- Connect your iPhone to your iPad using a USB cable.
- If prompted on your iPhone, tap Trust This Computer.
- Enter your passcode if required.
5.2. Importing Photos Using the Photos App on Your iPad
- Open the Photos app on your iPad.
- Tap on the Import tab.
- Select the photos you want to import.
- Tap Import Selected or Import All.
5.3. Using Finder (macOS Catalina and later)
- Open Finder on your Mac.
- Select your iPhone in the sidebar.
- Click on the Photos tab.
- Choose the photos you want to import.
- Drag the photos to a folder on your Mac.
- Connect your iPad to your Mac.
- Drag the photos from your Mac to your iPad in Finder.
5.4. Using iTunes (Older macOS Versions and Windows)
- Open iTunes on your computer.
- Connect your iPhone to your computer.
- Select your iPhone in iTunes.
- Click on Photos in the sidebar.
- Choose to sync photos from a specific folder.
- Select the folder containing the photos from your iPhone.
- Click Apply to sync the photos to your iPad.
6. Managing Your Photo Library After Transfer
Once your photos are on your iPad, it’s important to organize and manage your photo library effectively.
6.1. Creating Albums
- Open the Photos app on your iPad.
- Tap on the Albums tab.
- Tap the + button to create a new album.
- Give your album a name.
- Select the photos you want to add to the album.
- Tap Done.
6.2. Editing Photos
The Photos app on your iPad offers a range of editing tools:
- Open the photo you want to edit.
- Tap the Edit button.
- Use the various editing tools to adjust exposure, contrast, color, and more.
- Tap Done to save your changes.
6.3. Deleting Unwanted Photos
- Open the photo you want to delete.
- Tap the Trash Can icon.
- Confirm that you want to delete the photo.
7. Understanding HEIC and JPEG Formats
iPhones capture photos in HEIC (High Efficiency Image Container) format by default, which offers better compression and image quality compared to JPEG. However, HEIC files may not be compatible with all devices and software.
7.1. Converting HEIC to JPEG
You can convert HEIC photos to JPEG on your iPhone:
- Open the Settings app on your iPhone.
- Tap on Camera.
- Tap on Formats.
- Choose Most Compatible to capture photos in JPEG format.
7.2. Transferring HEIC Files
When transferring HEIC files to a computer, macOS and Windows can automatically convert them to JPEG if needed. You can also use third-party software to convert HEIC files to JPEG.
8. Exploring Third-Party Apps for Photo Transfer
Several third-party apps offer additional features and flexibility for transferring photos between your iPhone and iPad.
8.1. Google Photos
Google Photos is a cloud-based photo storage and sharing service that offers unlimited free storage for photos (with some compression). It allows you to automatically back up your photos from your iPhone and access them on your iPad.
8.2. Dropbox
Dropbox is a cloud storage service that you can use to transfer photos between your iPhone and iPad. Simply upload your photos to Dropbox from your iPhone, then download them to your iPad.
8.3. SHAREit
SHAREit is a file transfer app that allows you to quickly and easily share photos and videos between devices, even without an internet connection.
9. Maintaining Photo Quality During Transfer
Preserving the quality of your photos during transfer is essential, especially if you plan to edit or print them.
9.1. Using iCloud Photos
iCloud Photos preserves the original quality of your photos when syncing across devices.
9.2. Using AirDrop
AirDrop transfers photos in their original quality without compression.
9.3. Using Email
Email may compress photos, reducing their quality.
9.4. Using a USB Cable
Transferring photos via USB cable preserves their original quality.
10. Addressing Common Photo Transfer Issues
Encountering issues when transferring photos is not uncommon. Here’s how to troubleshoot some common problems.
10.1. iCloud Syncing Issues
If your photos aren’t syncing with iCloud, try the following:
- Make sure you’re signed in to the same Apple ID on both devices.
- Verify that iCloud Photos is enabled on both devices.
- Check your iCloud storage and upgrade if needed.
- Ensure that both devices have a stable internet connection.
- Restart both devices.
10.2. AirDrop Not Working
If AirDrop isn’t working, try the following:
- Make sure both devices are within close proximity.
- Ensure that Wi-Fi and Bluetooth are enabled on both devices.
- Verify that AirDrop is set to Contacts Only or Everyone (for 10 minutes) on both devices.
- Restart both devices.
10.3. USB Transfer Problems
If you’re having trouble transferring photos via USB, try the following:
- Make sure you’re using a compatible USB cable.
- If prompted on your iPhone, tap Trust This Computer.
- Restart both devices.
- Update to the latest version of macOS or Windows.
FAQ: Getting iPhone Photos to iPad
1. Can I transfer photos from my iPhone to my iPad without iCloud?
Yes, you can transfer photos using AirDrop, email, or a USB cable.
2. How do I transfer photos from my iPhone to my iPad using AirDrop?
Enable AirDrop on both devices, select the photos you want to share, tap the Share button, choose AirDrop, and select your iPad.
3. How do I transfer photos from my iPhone to my iPad using a USB cable?
Connect your iPhone to your iPad using a USB cable, trust the computer if prompted, and import the photos using the Photos app on your iPad.
4. How do I enable iCloud Photos on my iPhone and iPad?
Open the Settings app, tap on your Apple ID, select iCloud, tap on Photos, and toggle the iCloud Photos switch to the On position.
5. What are the iCloud storage options and pricing?
iCloud offers 5GB of free storage, with paid plans available for 50GB ($0.99/month), 200GB ($2.99/month), and 2TB ($9.99/month).
6. How do I optimize storage on my iPhone and iPad when using iCloud Photos?
In the Photos settings, you can choose between “Optimize iPhone/iPad Storage” to store smaller versions on your device and “Download and Keep Originals” to store full-resolution versions.
7. What is HEIC format, and how do I convert it to JPEG?
HEIC is a high-efficiency image format. You can convert it to JPEG in your iPhone settings by going to Camera > Formats and choosing “Most Compatible”.
8. Can I use third-party apps to transfer photos between my iPhone and iPad?
Yes, you can use apps like Google Photos, Dropbox, and SHAREit.
9. How do I maintain photo quality during transfer?
Use iCloud Photos, AirDrop, or a USB cable to preserve the original quality of your photos.
10. What should I do if my photos aren’t syncing with iCloud?
Ensure you’re signed in to the same Apple ID, iCloud Photos is enabled, you have enough storage, both devices have a stable internet connection, and restart both devices.
Conclusion: Seamlessly Sharing Your Visual Stories
Transferring photos from your iPhone to your iPad is a straightforward process with multiple options available. Whether you prefer the seamless synchronization of iCloud Photos, the quick convenience of AirDrop, the simplicity of email, or the reliability of a USB cable, you can easily move your photos between devices. By understanding the strengths and limitations of each method, you can choose the best approach for your needs and ensure that your visual memories are always accessible and well-managed.
Ready to dive deeper into the world of photography? Visit dfphoto.net for comprehensive tutorials, inspiring galleries, and a vibrant community of photographers. Explore our articles on advanced photography techniques, discover tips for editing your photos like a pro, and find the perfect gear for your next adventure. Don’t just take photos, tell visual stories that captivate and inspire. Join us at dfphoto.net and unlock your full creative potential today.
Address: 1600 St Michael’s Dr, Santa Fe, NM 87505, United States
Phone: +1 (505) 471-6001
Website: dfphoto.net