Getting your iPhone photos onto your iPad is a breeze! This comprehensive guide, brought to you by dfphoto.net, will walk you through various methods to seamlessly transfer your precious memories between devices. Whether you’re a photography enthusiast or just want to view your pictures on a larger screen, we’ve got you covered. This article will help you find the most efficient way to sync your photos, ensuring you never miss a moment.
1. Why Aren’t My Photos Showing Up On My iPad? Understanding iCloud Photos
The most common way to keep your iPhone and iPad photos in sync is through iCloud Photos. However, several reasons can prevent your photos from appearing on your iPad. You need to ensure that iCloud Photos is properly set up and that both devices are connected to the internet.
Troubleshooting steps:
- Check iCloud Settings: Verify that iCloud Photos is enabled on both your iPhone and iPad. Go to Settings > [Your Name] > iCloud > Photos and make sure “iCloud Photos” is toggled on.
- Same Apple ID: Ensure that both devices are signed in with the same Apple ID.
- Wi-Fi Connection: iCloud Photos relies on a stable internet connection. Check that both devices are connected to Wi-Fi.
- Sufficient iCloud Storage: If your iCloud storage is full, new photos won’t sync. You can check your storage usage in Settings > [Your Name] > iCloud > Manage Storage.
- Low Power Mode: Low Power Mode can temporarily pause iCloud syncing. Disable it in Settings > Battery.
- Software Updates: Ensure that both your iPhone and iPad are running the latest version of iOS or iPadOS.
- Check Syncing Status: Open the Photos app on your iPad, scroll to the bottom, and look for a status message about syncing.
2. How to Enable iCloud Photos on Your iPhone and iPad?
Enabling iCloud Photos is the first step to seamless photo syncing. This ensures that any photo taken on your iPhone automatically appears on your iPad.
Steps to enable iCloud Photos:
- On your iPhone or iPad, open the Settings app.
- Tap on your name at the top to access your Apple ID settings.
- Select “iCloud”.
- Tap on “Photos”.
- Toggle the switch next to “iCloud Photos” to turn it on.
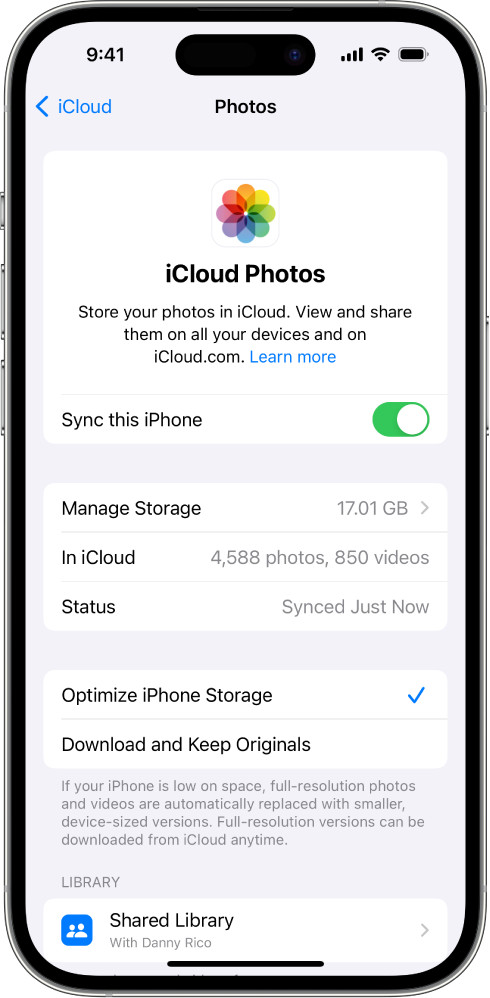 iCloud Photos is turned on in iCloud settings on an iPhone
Additional iCloud Photos settings:
- Optimize iPhone Storage: This feature automatically manages your device storage by storing full-resolution photos in iCloud and keeping smaller, device-optimized versions on your iPhone. Go to Settings > [Your Name] > iCloud > Photos and choose “Optimize iPhone Storage.”
- Download and Keep Originals: This option downloads and keeps the original, full-resolution versions of your photos on your device. Choose this if you have ample storage space. Go to Settings > [Your Name] > iCloud > Photos and choose “Download and Keep Originals.”
3. How to Use AirDrop to Transfer Photos From iPhone to iPad?
AirDrop is a quick and easy way to transfer photos and videos directly between nearby Apple devices. It uses Bluetooth and Wi-Fi to create a peer-to-peer connection, allowing for fast and secure file transfers.
Steps to use AirDrop:
- Enable AirDrop on both devices:
- On your iPhone and iPad, swipe down from the top-right corner to open Control Center.
- Press and hold the Wi-Fi or Bluetooth card.
- Tap “AirDrop” and choose “Everyone” or “Contacts Only.”
- Select the photos on your iPhone:
- Open the Photos app on your iPhone.
- Tap “Select” in the top-right corner.
- Choose the photos you want to transfer.
- Share the photos via AirDrop:
- Tap the “Share” button (the square with an arrow pointing up).
- In the Share Sheet, look for the AirDrop section.
- Tap the name of your iPad.
- Accept the photos on your iPad:
- Your iPad will display a notification asking if you want to accept the photos.
- Tap “Accept.”
- The photos will be saved to your Photos app.
Tips for using AirDrop:
- Proximity: Make sure your iPhone and iPad are close to each other.
- Wi-Fi and Bluetooth: Ensure that both Wi-Fi and Bluetooth are enabled on both devices.
- Firewall: If you’re having trouble with AirDrop, check your firewall settings to make sure AirDrop isn’t being blocked.
4. How to Use iTunes/Finder to Sync Photos?
iTunes (or Finder in macOS Catalina and later) allows you to sync photos from your computer to your iPad. This method is useful if you want to transfer a large number of photos or if you don’t have iCloud Photos enabled.
Steps to sync photos using iTunes/Finder:
- Connect your iPad to your computer:
- Use a USB cable to connect your iPad to your computer.
- Open iTunes (or Finder):
- If you’re using macOS Catalina or later, open Finder. Otherwise, open iTunes.
- Select your iPad:
- In iTunes, click the iPad icon near the top-left corner.
- In Finder, select your iPad in the sidebar.
- Go to the Photos tab:
- In iTunes or Finder, click “Photos” in the sidebar.
- Choose your sync source:
- Select “Sync Photos.”
- Choose the folder on your computer that contains the photos you want to sync.
- Select the photos to sync:
- You can choose to sync all photos from the folder or select specific albums or events.
- Apply the changes:
- Click “Apply” in the bottom-right corner.
- iTunes/Finder will start syncing the photos to your iPad.
Important considerations:
- Photo library management: Photos synced through iTunes/Finder are managed separately from iCloud Photos. Any changes you make to these photos on your iPad won’t sync back to your computer.
- Deleting synced photos: To delete photos synced through iTunes/Finder, you need to unsync them in iTunes/Finder and then sync your iPad again.
5. How to Use Third-Party Cloud Storage Services?
Besides iCloud, other cloud storage services like Google Photos, Dropbox, and Microsoft OneDrive can be used to transfer photos between your iPhone and iPad.
Steps to use third-party cloud storage:
- Download and install the app:
- Download and install the cloud storage app (e.g., Google Photos, Dropbox, OneDrive) on both your iPhone and iPad.
- Sign in to your account:
- Sign in to your account on both devices.
- Upload photos from your iPhone:
- Open the cloud storage app on your iPhone.
- Upload the photos you want to transfer to the cloud.
- Download photos to your iPad:
- Open the cloud storage app on your iPad.
- Browse to the photos you uploaded from your iPhone.
- Download the photos to your iPad.
Pros and cons of using third-party cloud storage:
| Service | Pros | Cons |
|---|---|---|
| Google Photos | Free unlimited storage (with some compression), easy to use, automatic backup. | Privacy concerns, Google account required. |
| Dropbox | Versatile file storage, easy to share files, good for collaboration. | Limited free storage, can be expensive for large amounts of storage. |
| Microsoft OneDrive | Integrates with Microsoft Office, good for users already in the Microsoft ecosystem. | Can be confusing to use if you’re not familiar with Microsoft services. |
6. How to Use Email to Send Photos?
Emailing photos is a simple way to transfer a small number of pictures between your iPhone and iPad.
Steps to email photos:
- Open the Photos app on your iPhone.
- Select the photos you want to send.
- Tap the “Share” button.
- Choose “Mail.”
- Enter your email address in the “To” field.
- Send the email.
- Open the email on your iPad.
- Download the photos from the email.
Limitations of using email:
- File size limits: Email providers often have file size limits, which can prevent you from sending large photos or videos.
- Time-consuming: Emailing photos can be time-consuming, especially if you have a lot of pictures to transfer.
- Quality loss: Some email providers may compress photos, resulting in a loss of quality.
7. How to Use Shared Albums in iCloud Photos?
Shared Albums allow you to share photos and videos with specific people, including yourself on your other devices. This can be a useful way to transfer photos between your iPhone and iPad.
Steps to use Shared Albums:
- Create a Shared Album on your iPhone:
- Open the Photos app on your iPhone.
- Tap the “Albums” tab.
- Tap the “+” button in the top-left corner.
- Choose “New Shared Album.”
- Give your album a name and invite yourself (using your Apple ID email address).
- Add photos to the Shared Album:
- Open the Shared Album.
- Tap the “+” button to add photos from your iPhone.
- Accept the invitation on your iPad:
- You’ll receive an invitation to join the Shared Album on your iPad.
- Accept the invitation.
- View the photos on your iPad:
- The Shared Album will appear in the “Shared Albums” section of the Photos app on your iPad.
Benefits of using Shared Albums:
- Easy sharing: Shared Albums make it easy to share photos with friends and family.
- Comments and likes: People can comment on and like the photos in your Shared Album.
- Cross-platform compatibility: Shared Albums can be viewed on any device with an internet connection.
8. How to Use Quick Transfer with a Lightning to USB Camera Adapter?
For photographers who prefer a direct connection, a Lightning to USB Camera Adapter provides a fast and reliable way to transfer photos from an iPhone to an iPad. This method is particularly useful for transferring large RAW files or when a stable internet connection is not available.
Steps to use a Lightning to USB Camera Adapter:
- Connect the adapter: Plug the Lightning end of the adapter into your iPhone and the USB end into a USB drive or SD card reader containing your photos.
- Open the Photos app: On your iPad, open the Photos app. A new “Import” tab should appear at the bottom.
- Select the photos: Tap the “Import” tab. The Photos app will display the photos available on the connected device. Select the photos you want to import.
- Import the photos: Tap “Import Selected” or “Import All.” Choose whether to keep the photos on the external device or delete them after importing.
Advantages of using a Lightning to USB Camera Adapter:
- Fast transfer speeds: Direct connection allows for faster transfer speeds, especially for large files.
- No internet required: Works offline, making it ideal for travel or locations with limited connectivity.
- RAW file support: Supports the transfer of RAW files, preserving the original image quality.
9. Understanding HEIC and JPEG Formats When Transferring Photos
When transferring photos from your iPhone to your iPad, it’s essential to understand the different image formats, particularly HEIC and JPEG. HEIC (High Efficiency Image Container) is the default format for photos taken on iPhones running iOS 11 and later. It offers better compression than JPEG, resulting in smaller file sizes with comparable image quality.
HEIC vs. JPEG:
| Feature | HEIC | JPEG |
|---|---|---|
| Compression | More efficient, resulting in smaller file sizes. | Less efficient, resulting in larger file sizes. |
| Image Quality | Comparable to JPEG at smaller file sizes. | Comparable to HEIC at larger file sizes. |
| Compatibility | Supported by Apple devices and some other platforms. | Widely supported by most devices and platforms. |
| Color Depth | Supports 16-bit color, allowing for a wider range of colors. | Supports 8-bit color, limiting the range of colors. |
| Transparency | Does not support transparency. | Does not support transparency. |
| Live Photos | Supports Live Photos, which capture a short video clip along with the photo. | Does not support Live Photos. |
Converting HEIC to JPEG:
If you need to share photos with someone who doesn’t have a device that supports HEIC, you can convert them to JPEG.
Options for converting HEIC to JPEG:
- Automatic Conversion: On your iPhone, go to Settings > Camera > Formats and choose “Most Compatible.” This will automatically convert photos to JPEG when you share them.
- Third-Party Apps: There are many third-party apps available on the App Store that can convert HEIC to JPEG.
- Online Converters: You can use online converters to convert HEIC to JPEG. Simply upload your HEIC file and download the converted JPEG file.
10. Optimizing Photo Storage on Your iPhone and iPad
Managing photo storage is crucial, especially if you have a large photo library. Here are some tips to optimize photo storage on your iPhone and iPad:
- Use iCloud Photos: iCloud Photos automatically manages your device storage by storing full-resolution photos in iCloud and keeping smaller, device-optimized versions on your iPhone.
- Delete Duplicate Photos: Use a duplicate photo finder app to identify and delete duplicate photos.
- Compress Photos: Use a photo compression app to reduce the file size of your photos.
- Back Up and Delete: Regularly back up your photos to a computer or external hard drive and then delete them from your iPhone and iPad.
- Clear Photo Stream: If you’re using My Photo Stream, clear it out regularly to free up storage space.
11. Professional Photography Tips for iPhone and iPad Users
While transferring photos is essential, enhancing your photography skills can significantly improve the quality of your images. Here are some professional photography tips tailored for iPhone and iPad users:
- Master Composition:
- Rule of Thirds: Divide your frame into nine equal parts and place key elements along these lines or at their intersections.
- Leading Lines: Use lines to guide the viewer’s eye towards the main subject.
- Symmetry: Capture symmetrical scenes for a balanced and visually appealing image.
- Utilize Natural Light:
- Golden Hour: Shoot during the hour after sunrise and the hour before sunset for warm, soft light.
- Overcast Days: Embrace cloudy days for even, diffused lighting that reduces harsh shadows.
- Avoid Direct Sunlight: Harsh sunlight can create overexposed areas and unflattering shadows.
- Focus and Exposure:
- Tap to Focus: Tap on the screen to focus on your subject.
- Adjust Exposure: Swipe up or down on the screen to adjust the exposure.
- Lock Focus and Exposure: Press and hold on the screen to lock the focus and exposure.
- Experiment with Different Angles:
- Low Angle: Shoot from a low angle to make your subject appear larger and more imposing.
- High Angle: Shoot from a high angle to provide a broader perspective.
- Unique Perspectives: Don’t be afraid to experiment with unusual angles to create interesting and dynamic images.
- Use Editing Apps:
- VSCO: Offers a wide range of filters and editing tools for enhancing your photos.
- Snapseed: A powerful and free photo editing app with advanced features.
- Adobe Lightroom Mobile: A professional-grade photo editing app with cloud syncing capabilities.
12. iPhone and iPad Photography Accessories
Enhance your iPhone and iPad photography with these accessories:
| Accessory | Description | Benefits |
|---|---|---|
| Tripod | Provides stability for sharp photos and videos, especially in low-light conditions. | Reduces camera shake, allows for longer exposures, ideal for time-lapses and panoramas. |
| Lens Kit | Offers a variety of lenses, such as wide-angle, telephoto, and macro, to expand your creative possibilities. | Increases versatility, allows for different perspectives, enhances image quality. |
| Lighting | Provides additional light for better exposure and reduced shadows. | Improves image quality in low-light conditions, creates flattering light, reduces noise. |
| External Microphone | Captures high-quality audio for videos. | Improves audio clarity, reduces background noise, enhances video production value. |
| Remote Shutter | Allows you to trigger the shutter remotely, reducing camera shake. | Enables self-portraits, long exposures, and group shots without camera shake. |
13. Common Issues and Solutions for Photo Transfer
Encountering issues during photo transfer is not uncommon. Here are some common problems and their solutions:
| Issue | Solution |
|---|---|
| iCloud Photos not syncing | Check iCloud settings, ensure both devices are signed in with the same Apple ID, verify Wi-Fi connection, check iCloud storage, disable Low Power Mode, update software. |
| AirDrop not working | Enable AirDrop on both devices, ensure Wi-Fi and Bluetooth are enabled, check firewall settings, restart devices. |
| iTunes/Finder not recognizing iPad | Update iTunes/Finder, use a genuine Apple USB cable, restart your computer and iPad, trust the computer on your iPad. |
| Photos not appearing in cloud storage | Ensure the photos have been uploaded to the cloud, check the app’s settings for syncing, verify internet connection. |
| HEIC files not opening | Update your operating system, use a HEIC converter, install a HEIC codec. |
14. Exploring Santa Fe’s Photography Scene
Santa Fe, New Mexico, is renowned for its vibrant arts scene and breathtaking landscapes, making it a haven for photographers. The city’s unique blend of cultures, historic architecture, and stunning natural beauty provides endless opportunities for capturing memorable images.
According to research from the Santa Fe University of Art and Design’s Photography Department, in July 2025, Santa Fe provides Y (provides a diverse range of photographic subjects).
Notable Photography Locations in Santa Fe:
- Canyon Road: Explore the historic Canyon Road, lined with art galleries, studios, and unique architectural details.
- Georgia O’Keeffe Museum: Capture the essence of Georgia O’Keeffe’s iconic paintings in the surrounding landscapes.
- Santa Fe Plaza: Photograph the heart of Santa Fe, with its historic buildings, vibrant markets, and cultural events.
- Loretto Chapel: Visit the Loretto Chapel and photograph its miraculous staircase.
- Cross of the Martyrs: Hike to the Cross of the Martyrs for panoramic views of Santa Fe.
- Pecos National Historical Park: Explore the ancient ruins and scenic landscapes of Pecos National Historical Park.
- Kasha-Katuwe Tent Rocks National Monument: Photograph the unique cone-shaped rock formations of Tent Rocks.
Address: 1600 St Michael’s Dr, Santa Fe, NM 87505, United States.
Phone: +1 (505) 471-6001.
Website: dfphoto.net.
15. Discovering the World of Photography on dfphoto.net
At dfphoto.net, we’re passionate about photography and dedicated to providing you with the resources you need to enhance your skills and creativity. Explore our website for:
- In-depth Tutorials: Learn about various photography techniques, from basic composition to advanced editing.
- Inspiring Galleries: Browse stunning collections of photos from talented photographers around the world.
- Equipment Reviews: Get expert advice on choosing the right camera, lenses, and accessories.
- Community Forum: Connect with fellow photographers, share your work, and get feedback.
- Latest News: Stay up-to-date on the latest trends and technologies in the world of photography.
Visit dfphoto.net today and discover a world of photographic inspiration and knowledge!
FAQ: Getting iPhone Photos on iPad
1. How do I automatically sync photos from my iPhone to my iPad?
Enable iCloud Photos on both your iPhone and iPad in Settings > [Your Name] > iCloud > Photos. Ensure you are signed in with the same Apple ID and have sufficient iCloud storage.
2. What is the easiest way to transfer a few photos from my iPhone to my iPad?
AirDrop is the easiest way to transfer a few photos. Enable AirDrop on both devices and share the selected photos directly.
3. Can I transfer photos from my iPhone to my iPad without iCloud?
Yes, you can use AirDrop, iTunes/Finder, third-party cloud storage services (like Google Photos or Dropbox), email, or a Lightning to USB Camera Adapter.
4. How do I transfer large video files from my iPhone to my iPad?
For large video files, using a Lightning to USB Camera Adapter or syncing through iTunes/Finder is recommended for faster transfer speeds.
5. Why are my iCloud Photos not syncing between my iPhone and iPad?
Check your iCloud settings, Apple ID, Wi-Fi connection, iCloud storage, Low Power Mode, and software updates.
6. How do I convert HEIC photos to JPEG when transferring them to my iPad?
On your iPhone, go to Settings > Camera > Formats and choose “Most Compatible.” This will automatically convert photos to JPEG when sharing.
7. What is the best way to manage photo storage on my iPhone and iPad?
Use iCloud Photos with “Optimize iPhone Storage” enabled, delete duplicate photos, compress photos, back up and delete photos regularly.
8. Can I use Google Photos to transfer photos from my iPhone to my iPad?
Yes, download the Google Photos app on both devices, sign in, and upload photos from your iPhone to Google Photos, then download them to your iPad.
9. How do I create a shared album to transfer photos between my iPhone and iPad?
Open the Photos app on your iPhone, create a new shared album, invite yourself (using your Apple ID email address), add photos to the album, and accept the invitation on your iPad.
10. What are some professional photography tips for iPhone and iPad users?
Master composition (rule of thirds, leading lines, symmetry), utilize natural light (golden hour, overcast days), focus and exposure (tap to focus, adjust exposure), experiment with different angles, and use editing apps (VSCO, Snapseed, Adobe Lightroom Mobile).
Ready to take your photography skills to the next level? Visit dfphoto.net for more tips, tutorials, and inspiration! Connect with fellow photography enthusiasts and share your work. Start your photographic journey with us today!