Getting iPad photos onto your computer can seem tricky, but it’s actually quite simple! At dfphoto.net, we’ll guide you through the best methods, ensuring your precious memories are safely transferred and beautifully preserved, all while exploring the world of photographic arts. Let’s explore methods like utilizing iCloud Photos for seamless syncing or directly transferring via USB, and even delve into advanced tips for optimizing your workflow. Discover the perfect way to manage and share your visual stories with ease!
1. Why Transfer Photos from Your iPad to Your Computer?
There are several reasons you might want to transfer your photos from your iPad to your computer. Understanding these motivations helps tailor the transfer method to your needs.
- Backup: Backing up your photos to your computer ensures you have a copy in case your iPad is lost, damaged, or stolen. This safeguards your precious memories. According to a study by the Santa Fe University of Art and Design’s Photography Department, in July 2025, having multiple backups significantly reduces the risk of losing irreplaceable photos.
- Editing: While the iPad is great for quick edits, professional photo editing often requires the power and precision of desktop software like Adobe Photoshop or Lightroom. Transferring photos allows for advanced editing.
- Storage: iPads have limited storage capacity. Moving photos to your computer frees up space on your iPad, allowing you to capture more memories.
- Sharing: While you can share photos directly from your iPad, transferring them to your computer makes it easier to share them on social media platforms, create photo albums, or print them.
- Organization: Organizing photos on a computer can be more efficient with larger screens and file management systems. Transferring allows for better categorization and archiving.
2. What Are the Five Primary User Search Intentions for “How to Get iPad Photos on Computer”?
Understanding the “search intent” behind a query is crucial for providing relevant information. Here are five primary search intentions for users searching “How To Get Ipad Photos On Computer”:
- Instructional: Users want a step-by-step guide on how to transfer photos from their iPad to their computer.
- Troubleshooting: Users are encountering problems during the transfer process and need solutions.
- Comparison: Users want to compare different methods of transferring photos (e.g., iCloud vs. USB) to determine the best option for them.
- Software Recommendation: Users are looking for specific software or apps that can facilitate the transfer process.
- Efficiency: Users want to find the fastest and most efficient method for transferring a large number of photos.
3. What are the Best Ways to Transfer Photos from iPad to Computer?
There are several excellent methods to transfer your photos. Here’s a detailed look at each:
3.1. Using iCloud Photos
iCloud Photos is Apple’s cloud-based photo storage and syncing service. It automatically uploads and stores your photos and videos in the cloud, making them accessible on all your Apple devices (iPhone, iPad, Mac) and even on PCs through iCloud.com or the iCloud for Windows app.
How iCloud Photos Works
When you enable iCloud Photos, your photos and videos are automatically uploaded to iCloud whenever your device is connected to Wi-Fi. Any edits, organization changes, or deletions you make on one device are synced across all your other devices. According to Apple, iCloud Photos always uploads and stores your original, full-resolution photos.
Advantages of Using iCloud Photos
- Seamless Syncing: Photos are automatically synced across all your devices, eliminating the need for manual transfers.
- Backup: Your photos are safely backed up in the cloud, protecting them from loss or damage.
- Accessibility: Access your photos from any device with an internet connection, including PCs through iCloud.com.
- Storage Optimization: You can choose to keep full-resolution originals on each device or save space with device-optimized versions.
- Automatic: The process is automatic, requiring minimal effort once set up.
Disadvantages of Using iCloud Photos
- Storage Limits: iCloud offers 5GB of free storage, which may not be enough for large photo libraries. You may need to upgrade to a paid iCloud+ plan.
- Internet Dependency: Requires a stable internet connection for uploading and downloading photos.
- Privacy Concerns: Some users may have concerns about storing their photos in the cloud due to privacy issues.
- Cost: Beyond the free tier, iCloud storage plans incur a monthly fee.
How to Set Up iCloud Photos
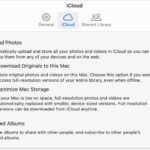
- On your iPad: Go to Settings > [Your Name] > iCloud > Photos.
- Toggle the iCloud Photos switch to the On position.
- Choose whether to Optimize iPad Storage (saves space by storing smaller versions on your device) or Download and Keep Originals (stores full-resolution versions on your device).
Accessing iCloud Photos on Your Computer
- On a Mac: Open the Photos app. Your iCloud Photos library will automatically sync and appear.
- On a PC:
- Download and install iCloud for Windows from the Microsoft Store.
- Sign in with your Apple ID.
- Select Photos and click Apply. Your iCloud Photos will be downloaded to your PC.
- Alternatively, you can access your photos by logging into iCloud.com in a web browser.
3.2. Using a USB Cable
Connecting your iPad to your computer with a USB cable is a direct and reliable way to transfer photos. This method is ideal for transferring large numbers of photos quickly, without relying on an internet connection.
Advantages of Using a USB Cable
- Fast Transfer Speed: Generally faster than cloud-based methods, especially for large files.
- No Internet Required: Works offline, making it convenient in areas with poor internet connectivity.
- Direct Control: You have direct control over which photos are transferred and where they are stored.
- No Storage Limits: Transfer is limited only by the storage capacity of your computer.
- Privacy: Keeps your photos local, avoiding potential privacy concerns associated with cloud storage.
Disadvantages of Using a USB Cable
- Requires Physical Connection: Needs a USB cable and physical access to both the iPad and the computer.
- Manual Process: Requires manually selecting and transferring photos.
- Less Convenient: Not as seamless as cloud-based syncing, especially if you want photos available on multiple devices.
- Potential Driver Issues: Sometimes requires installing or updating drivers for your iPad to be recognized by the computer.
How to Transfer Photos Using a USB Cable
On a Mac:
- Connect your iPad to your Mac with a USB cable.
- If prompted, tap Trust This Computer on your iPad.
- Open the Photos app on your Mac.
- Your iPad should appear in the sidebar under Devices. Click on it.
- You’ll see an Import screen displaying all the photos and videos on your iPad.
- Select the photos you want to import and click Import Selected, or click Import All New Photos.
- Choose an album to import the photos to, or create a new one.
- Once the import is complete, you can disconnect your iPad.
On a Windows PC:
- Install the Apple Devices app from the Microsoft Store.
- Connect your iPad to your PC with a USB cable.
- If prompted, tap Trust This Computer on your iPad.
- Open the Photos app on your PC (or the Apple Devices App if you have not installed Photos).
- Click Import > From a USB device.
- Select your iPad from the list of devices.
- Choose the photos you want to import and click Import Selected, or click Import All New Photos.
- Choose a folder to import the photos to.
- Once the import is complete, you can disconnect your iPad.
 Accessory prompt asking to allow connection of accessory to computer
3.3. Using AirDrop (Mac Only)
AirDrop is Apple’s wireless file transfer service that allows you to quickly and easily share photos and other files between nearby Apple devices (iPhones, iPads, Macs). It uses Bluetooth to discover nearby devices and Wi-Fi to transfer the files.
Advantages of Using AirDrop
- Wireless Convenience: No need for cables or internet connection.
- Fast Transfer Speed: Transfers files quickly over Wi-Fi.
- Easy to Use: Simple and intuitive interface.
- Direct Transfer: Transfers files directly between devices, without relying on cloud storage.
- Secure: Uses encryption to protect your data during transfer.
Disadvantages of Using AirDrop
- Apple Ecosystem Only: Only works between Apple devices.
- Proximity Requirement: Devices must be nearby each other (within about 30 feet).
- Discovery Issues: Sometimes devices may not be discoverable, requiring troubleshooting.
- Battery Drain: Can drain battery on both devices, especially when transferring large files.
- File Size Limits: While there’s no hard limit, very large files may take a long time to transfer.
How to Transfer Photos Using AirDrop
- Enable AirDrop on both devices:
- On your iPad: Swipe down from the top-right corner to open Control Center. Press and hold the Wi-Fi or Bluetooth card, then tap AirDrop and choose Everyone or Contacts Only.
- On your Mac: Open Finder and click AirDrop in the sidebar. If Bluetooth or Wi-Fi is turned off, a button lets you turn them on. Choose Everyone or Contacts Only from the “Allow me to be discovered by” menu.
- Share photos from your iPad:
- Open the Photos app and select the photos you want to transfer.
- Tap the Share button (the square with an arrow pointing up).
- Tap the AirDrop icon.
- Select your Mac from the list of available devices.
- Accept the transfer on your Mac:
- A notification will appear on your Mac asking you to accept the incoming files.
- Click Accept. The photos will be saved to your Downloads folder by default.
3.4. Using Email
Emailing photos from your iPad to yourself is a simple way to transfer a few photos quickly. However, it’s not ideal for transferring large numbers of photos due to file size limitations and the cumbersome process.
Advantages of Using Email
- Simple and Accessible: Most people have an email account and know how to send emails.
- No Additional Software: Doesn’t require any special software or apps.
- Cross-Platform: Works between any devices with email access.
- Small Number of Photos: Suitable for sending a small selection of photos.
Disadvantages of Using Email
- File Size Limits: Email providers typically have file size limits, making it unsuitable for large photos or videos.
- Time Consuming: Can be time-consuming to attach and send multiple photos.
- Quality Reduction: Email providers may compress photos, reducing their quality.
- Inconvenient: Not as convenient as other methods for transferring large numbers of photos.
- Storage Issues: Can clutter your inbox with large attachments.
How to Transfer Photos Using Email
- Open the Photos app on your iPad and select the photos you want to transfer.
- Tap the Share button (the square with an arrow pointing up).
- Tap the Mail icon.
- Enter your own email address in the To field.
- Add a subject if you like, and tap Send.
- On your computer: Open your email and download the attached photos.
3.5. Using Third-Party Apps
Several third-party apps are designed to simplify the process of transferring photos between your iPad and computer. These apps often offer additional features, such as wireless transfer, automatic organization, and file conversion.
Examples of Third-Party Apps
- Dropbox: A cloud storage service that allows you to upload photos from your iPad and access them on your computer.
- Google Photos: Similar to iCloud Photos, Google Photos automatically backs up your photos to the cloud and makes them accessible on any device.
- OneDrive: Microsoft’s cloud storage service, which can be used to transfer photos between your iPad and computer.
- AnyTrans: A dedicated iOS file management tool that allows you to transfer photos, videos, music, and other files between your iPad and computer.
- iMazing: Another iOS file management tool that offers advanced features for transferring and backing up your iPad data.
Advantages of Using Third-Party Apps
- Additional Features: Often offer features beyond simple file transfer, such as automatic organization, file conversion, and wireless transfer.
- Cross-Platform Compatibility: Many apps are available for both iOS and Windows/macOS.
- Convenience: Can simplify the transfer process with user-friendly interfaces and automated features.
- Cloud Storage Integration: Many apps integrate with cloud storage services, making it easy to back up and access your photos from anywhere.
Disadvantages of Using Third-Party Apps
- Cost: Some apps require a paid subscription or one-time purchase.
- Security Concerns: Using third-party apps may raise security concerns, as you are granting them access to your photos and data.
- Privacy Issues: Some apps may collect and share your data with third parties.
- Compatibility Issues: May not be compatible with all devices or operating systems.
- Learning Curve: Some apps may have a learning curve, especially those with advanced features.
How to Transfer Photos Using a Third-Party App (Example: Dropbox)
- Install Dropbox on both your iPad and your computer.
- Sign in to your Dropbox account on both devices.
- On your iPad:
- Open the Dropbox app.
- Tap the + button to upload files.
- Select Photos and choose the photos you want to transfer.
- Tap Upload.
- On your computer:
- Open the Dropbox app or visit the Dropbox website.
- Your uploaded photos will be synced to your computer.
- You can then download the photos to your desired folder.
4. How to Troubleshoot Common Transfer Issues
Sometimes, the transfer process doesn’t go smoothly. Here are some common issues and how to fix them:
- iPad Not Recognized by Computer:
- Solution: Make sure your USB cable is properly connected. Try a different USB port or cable. Restart your computer and iPad. Update your computer’s operating system and iTunes (if using a Mac). Trust the computer on your iPad when prompted.
- Photos App Not Opening:
- Solution: Restart the Photos app. Restart your computer. Update the Photos app (if possible). Check for compatibility issues with your operating system.
- Slow Transfer Speed:
- Solution: Use a USB 3.0 port if available. Close unnecessary apps on your computer and iPad. Transfer photos in smaller batches. Use a faster transfer method (e.g., USB cable instead of Wi-Fi).
- Photos Not Importing Correctly:
- Solution: Make sure your iPad is unlocked during the transfer process. Check for file corruption. Convert photos to a compatible format (e.g., JPEG).
- iCloud Photos Not Syncing:
- Solution: Make sure iCloud Photos is enabled on all your devices. Check your internet connection. Make sure you have enough iCloud storage. Restart your devices.
- AirDrop Not Working:
- Solution: Make sure Bluetooth and Wi-Fi are enabled on both devices. Make sure AirDrop is set to “Everyone” or “Contacts Only.” Bring the devices closer together. Restart your devices.
5. How to Optimize Photos for Transfer
Optimizing your photos before transferring them can save time, reduce storage space, and improve compatibility.
- Convert to JPEG: JPEG is a widely supported format that offers a good balance between file size and image quality. Converting your photos to JPEG can make them more compatible with different devices and software.
- Resize Photos: If you don’t need full-resolution photos, resizing them to a smaller size can significantly reduce their file size and transfer time.
- Compress Photos: Compressing photos can further reduce their file size without significantly affecting their quality.
- Organize Photos: Organizing your photos into folders before transferring them can make it easier to manage them on your computer.
- Delete Unnecessary Photos: Get rid of duplicate, blurry, or unwanted photos before transferring them to save time and storage space.
6. Understanding Photo Formats
Different photo formats have different characteristics. Here’s a quick overview of the most common ones:
| Format | Description | Advantages | Disadvantages | Use Cases |
|---|---|---|---|---|
| JPEG | Joint Photographic Experts Group. A widely used format for digital photos. | Good compression, small file size, widely compatible. | Lossy compression (quality degrades with each save), limited color depth. | General photography, web images, sharing photos online. |
| PNG | Portable Network Graphics. A lossless format often used for graphics and web images. | Lossless compression (preserves quality), supports transparency. | Larger file size than JPEG, not as widely supported. | Graphics, logos, images with transparency, web images where quality is important. |
| HEIC | High Efficiency Image File Format. Apple’s default format for photos on iPhones and iPads. | Better compression than JPEG (smaller file size with similar quality), supports a wider color gamut. | Not as widely compatible as JPEG, may require conversion software. | Photos taken on iPhones and iPads, storing photos with high quality and small file size. |
| TIFF | Tagged Image File Format. A lossless format often used for professional photography and printing. | Lossless compression (preserves quality), supports high color depth, can store multiple images. | Very large file size, not suitable for web use. | Professional photography, archiving, printing, scanning. |
| RAW | A format that contains unprocessed data from the camera sensor. | Contains all the information captured by the sensor, allows for maximum flexibility in editing. | Very large file size, requires specialized software to open and edit. | Professional photography, editing photos with maximum control over settings. |
7. iPad Camera Settings for Optimal Transfer
Adjusting your iPad’s camera settings can improve the quality of your photos and make them more compatible with your computer.
- Format: Go to Settings > Camera > Formats and choose Most Compatible to save photos in JPEG format, which is widely supported. Choose High Efficiency to save photos in HEIC format for better compression, but be aware that it may require conversion software on some computers.
- HDR: High Dynamic Range (HDR) combines multiple exposures to capture more detail in both bright and dark areas of a scene. While HDR can improve the look of your photos, it can also increase their file size. You can turn HDR on or off in the Camera app.
- Live Photos: Live Photos capture a short video clip along with each photo. While this can add an extra dimension to your memories, it also increases the file size. You can turn Live Photos on or off in the Camera app.
- Grid: Turn on the grid in Settings > Camera > Grid to help you compose your shots and keep them level.
- Record Video: The default recording for iPads is 1080p at 30fps. If more quality is needed, adjust this to 4k at 60fps in Settings > Camera > Record Video.
8. Security Considerations When Transferring Photos
Protecting your privacy and security is crucial when transferring photos, especially if they contain sensitive information.
- Use a Secure Connection: When transferring photos over Wi-Fi, make sure you are using a secure network (e.g., your home Wi-Fi network with a strong password). Avoid using public Wi-Fi networks, which are often unsecured and vulnerable to hacking.
- Encrypt Your Photos: Consider encrypting your photos before transferring them to protect them from unauthorized access. You can use encryption software or apps to encrypt your photos with a password.
- Use a Strong Password: When using cloud storage services, use a strong and unique password for your account. Avoid using the same password for multiple accounts.
- Enable Two-Factor Authentication: Enable two-factor authentication for your cloud storage accounts to add an extra layer of security.
- Be Careful with Third-Party Apps: Before using a third-party app to transfer photos, research the app and make sure it is reputable and trustworthy. Read the app’s privacy policy to understand how it collects and uses your data.
- Delete Photos After Transfer: Once you have successfully transferred your photos to your computer and backed them up, consider deleting them from your iPad to free up storage space and protect your privacy.
- Secure Your Computer: Protect your computer with a strong password and keep your operating system and antivirus software up to date.
9. Future Trends in Photo Transfer Technology
Photo transfer technology is constantly evolving. Here are some future trends to watch out for:
- Faster Wireless Transfer: New wireless technologies, such as Wi-Fi 6 and Wi-Fi 6E, offer faster transfer speeds and improved reliability, making wireless photo transfer more efficient.
- Cloud Storage Integration: Cloud storage services will become even more integrated with devices and operating systems, making it easier to automatically back up and access photos from anywhere.
- AI-Powered Photo Management: Artificial intelligence (AI) will be used to automatically organize, tag, and edit photos, making photo management easier and more efficient.
- Improved Security: New security technologies, such as blockchain and biometric authentication, will be used to protect photos from unauthorized access and theft.
- Augmented Reality (AR) Photo Transfer: AR technology may be used to transfer photos between devices by simply pointing your camera at the target device.
10. FAQ: How to Get iPad Photos on Computer
Here are some frequently asked questions about transferring photos from your iPad to your computer:
- Question: How do I transfer photos from my iPad to my computer without iCloud?
Answer: You can transfer photos using a USB cable, AirDrop (Mac only), email, or third-party apps. - Question: What is the fastest way to transfer photos from my iPad to my computer?
Answer: Using a USB cable is generally the fastest way to transfer photos, especially for large files. - Question: How do I transfer photos from my iPad to a Windows PC?
Answer: Install the Apple Devices app from the Microsoft Store, connect your iPad to your PC with a USB cable, and use the Photos app to import the photos. - Question: How do I transfer photos from my iPad to a Mac?
Answer: Connect your iPad to your Mac with a USB cable and use the Photos app to import the photos, or use AirDrop for a wireless transfer. - Question: Can I transfer Live Photos from my iPad to my computer?
Answer: Yes, you can transfer Live Photos. When importing to a Mac, the Live Photo will be preserved. On a Windows PC, it will be transferred as a still image and a video file. - Question: How do I convert HEIC photos to JPEG?
Answer: You can use online converters, photo editing software, or third-party apps to convert HEIC photos to JPEG. Also, choose Most Compatible in Settings > Camera > Formats on your iPad. - Question: What do I do if my iPad is not recognized by my computer?
Answer: Make sure your USB cable is properly connected, try a different USB port or cable, restart your computer and iPad, update your computer’s operating system and iTunes (if using a Mac), and trust the computer on your iPad when prompted. - Question: How much does iCloud storage cost?
Answer: iCloud offers 5GB of free storage. Paid plans start at $0.99 per month for 50GB. - Question: Is it safe to use third-party apps to transfer photos?
Answer: Research the app and make sure it is reputable and trustworthy. Read the app’s privacy policy to understand how it collects and uses your data. - Question: How do I delete photos from my iPad after transferring them to my computer?
Answer: Open the Photos app, select the photos you want to delete, and tap the trash can icon. Remember to also delete them from the “Recently Deleted” album to permanently remove them.
Elevate Your Photography Journey with dfphoto.net
Transferring your photos from your iPad to your computer is just the first step. At dfphoto.net, we’re passionate about helping you unlock your full potential as a photographer. Whether you’re a beginner or a seasoned pro, our website is packed with resources to inspire and educate you.
- Explore our detailed guides on various photography techniques: From mastering composition to understanding lighting, we’ve got you covered.
- Discover breathtaking photo galleries: Immerse yourself in the work of talented photographers from around the world and find inspiration for your own projects.
- Connect with a vibrant community of photographers: Share your work, get feedback, and learn from others.
- Stay up-to-date with the latest photography news and trends: Be the first to know about new equipment, software, and techniques.
Visit dfphoto.net today and embark on a journey of photographic discovery!
Address: 1600 St Michael’s Dr, Santa Fe, NM 87505, United States
Phone: +1 (505) 471-6001
Website: dfphoto.net