Have you accidentally deleted precious memories from your iPhone and are now wondering how to get deleted photos from iPhone? Don’t worry, dfphoto.net is here to guide you through the process of photo recovery, offering solutions for iPhone data recovery and iCloud photo recovery. We’ll explore various methods, from checking the Recently Deleted album to utilizing backup options and professional recovery services.
At dfphoto.net, you’ll discover a wealth of resources, including photography tutorials, stunning image collections, and a vibrant community of photography enthusiasts. Let’s dive into the world of photo retrieval and master the art of iPhone photography.
1. Understanding Photo Deletion on Your iPhone
1.1. What Happens When You Delete a Photo?
When you delete a photo from your iPhone, it isn’t immediately erased from your device. Instead, it’s moved to the “Recently Deleted” album within the Photos app. This acts as a temporary holding place, giving you a safety net in case you change your mind or accidentally delete something important. According to Apple Support, photos and videos remain in the Recently Deleted album for 30 days before being permanently removed.
1.2. The Recently Deleted Album: Your First Line of Defense
The Recently Deleted album is the first place you should check when trying to recover deleted photos. It’s a simple and quick way to restore photos you’ve deleted within the past 30 days. To access it:
- Open the Photos app on your iPhone.
- Tap the “Albums” tab at the bottom of the screen.
- Scroll down to the “Utilities” section and tap “Recently Deleted.”
- If you’re using iOS 16 or later, you may need to use Face ID or Touch ID to unlock the album.
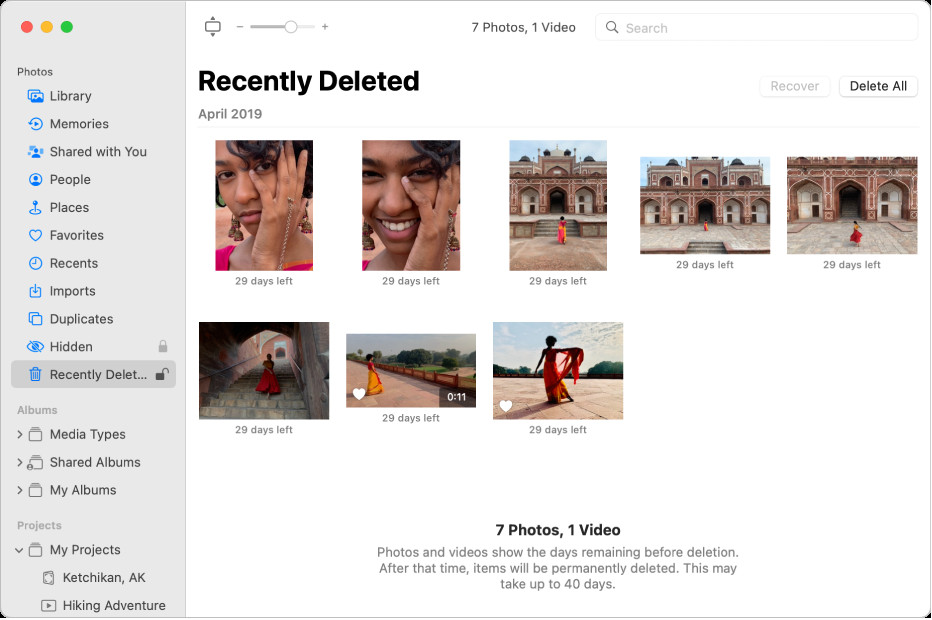 Recently Deleted album on iPhone
1.3. Limitations of the Recently Deleted Album
While the Recently Deleted album is a convenient feature, it does have its limitations:
- 30-Day Limit: Photos are only stored in the album for 30 days. After this period, they are permanently deleted and cannot be recovered from the album.
- Manual Deletion: You can manually delete photos from the Recently Deleted album, which will permanently erase them.
- iCloud Sync: If you use iCloud Photos and delete a photo from one device, it will be deleted from all devices synced with your iCloud account, including the Recently Deleted album.
2. Recovering Photos from the Recently Deleted Album
2.1. Step-by-Step Guide to Photo Recovery
Recovering photos from the Recently Deleted album is a straightforward process:
- Open the Photos app and navigate to the Recently Deleted album.
- Tap “Select” in the upper-right corner of the screen.
- Tap on the photos you want to recover. A checkmark will appear on each selected photo.
- Tap “Recover” in the bottom-right corner of the screen.
- Confirm that you want to recover the photos. They will be restored to your main Photos library.
2.2. Recovering All Photos at Once
If you want to recover all the photos in the Recently Deleted album, you can do so quickly:
- Open the Recently Deleted album.
- Tap “Select” in the upper-right corner.
- Tap “Recover All” in the bottom-right corner.
- Confirm that you want to recover all the photos.
2.3. What If the Photos Are Not in the Recently Deleted Album?
If you can’t find your deleted photos in the Recently Deleted album, it means they have either been permanently deleted or were never backed up to iCloud. In this case, you’ll need to explore other recovery methods, which we’ll discuss in the following sections.
3. iCloud Photo Recovery: Restoring from the Cloud
3.1. Understanding iCloud Photos and Backup
iCloud Photos is a service that automatically stores your photos and videos in iCloud, keeping them synced across all your devices. If you have iCloud Photos enabled, any changes you make to your photo library on one device will be reflected on your other devices. According to Apple, iCloud Photos ensures that your precious memories are always safe and accessible.
3.2. How to Check If iCloud Photos Is Enabled
To check if iCloud Photos is enabled on your iPhone:
- Open the Settings app.
- Tap on your name at the top of the screen.
- Tap “iCloud.”
- Tap “Photos.”
- Make sure the “iCloud Photos” toggle is switched on.
3.3. Recovering Photos from iCloud.com
If you have iCloud Photos enabled, you can try recovering deleted photos from iCloud.com:
- Open a web browser on your computer and go to iCloud.com.
- Sign in with your Apple ID and password.
- Click on the “Photos” icon.
- In the Photos app on iCloud.com, click the Recently Deleted album in the sidebar. If you don’t see the sidebar, click.
- Select the photos or videos you want to recover, then click Recover.
3.4. Limitations of iCloud Photo Recovery
- 30-Day Limit: Like the Recently Deleted album on your iPhone, iCloud.com also keeps deleted photos for only 30 days.
- iCloud Photos Must Be Enabled: This method only works if you had iCloud Photos enabled before deleting the photos.
- Storage Space: If you’re running out of iCloud storage space, your photos may not be fully backed up.
3.5. Restoring from an iCloud Backup
If you have an iCloud backup of your iPhone, you can restore your entire device from that backup to recover deleted photos. However, this will erase all current data on your iPhone, so it’s important to back up your current data before proceeding.
To restore from an iCloud backup:
- Erase your iPhone by going to Settings > General > Transfer or Reset iPhone > Erase All Content and Settings.
- Follow the on-screen instructions until you reach the “Apps & Data” screen.
- Tap “Restore from iCloud Backup.”
- Sign in to iCloud with your Apple ID and password.
- Choose the backup you want to restore from. Select a backup that you know contains the deleted photos.
- Wait for the restoration process to complete. This may take some time, depending on the size of the backup.
4. iTunes/Finder Backup: Retrieving Photos from Your Computer
4.1. Understanding iTunes/Finder Backups
iTunes (or Finder on macOS Catalina and later) allows you to create backups of your iPhone on your computer. These backups contain all the data on your device, including photos, videos, contacts, and settings.
4.2. How to Check If You Have an iTunes/Finder Backup
To check if you have an iTunes/Finder backup of your iPhone:
- iTunes (Windows or macOS Mojave and earlier): Open iTunes, go to Edit > Preferences > Devices. You’ll see a list of your device backups, along with the date and time they were created.
- Finder (macOS Catalina and later): Open Finder, connect your iPhone to your computer, and click on your iPhone in the Finder sidebar. Click “Manage Backups” to see a list of your backups.
4.3. Restoring Photos from an iTunes/Finder Backup
Restoring from an iTunes/Finder backup will erase all current data on your iPhone, so make sure to back up your current data first.
To restore from an iTunes/Finder backup:
- Connect your iPhone to your computer.
- Open iTunes (or Finder on macOS Catalina and later).
- Select your iPhone when it appears.
- Click “Restore Backup.”
- Choose the backup you want to restore from.
- Click “Restore” and wait for the process to complete.
4.4. Limitations of iTunes/Finder Backup Recovery
- Data Overwrite: Restoring from a backup will replace all current data on your iPhone with the data from the backup.
- Backup Required: This method only works if you have created a backup before deleting the photos.
- Time-Consuming: Restoring from a backup can take a significant amount of time.
5. Data Recovery Software: A Third-Party Solution
5.1. How Data Recovery Software Works
Data recovery software is designed to scan your iPhone’s internal storage for deleted files and attempt to recover them. These programs use sophisticated algorithms to locate and reconstruct data fragments that may still be present on your device.
5.2. Popular Data Recovery Software Options
Some popular data recovery software options for iPhone include:
- EaseUS MobiSaver: A user-friendly program that can recover photos, videos, contacts, and more.
- Dr.Fone – Data Recovery (iOS): A comprehensive recovery tool that supports various data types and recovery scenarios.
- iMyFone D-Back: A powerful recovery tool that can retrieve data from iCloud, iTunes, and your iPhone.
- Tenorshare UltData: A reliable recovery program that offers a high success rate.
5.3. Step-by-Step Guide to Using Data Recovery Software
The specific steps for using data recovery software may vary depending on the program you choose, but here’s a general outline:
- Download and install the data recovery software on your computer.
- Connect your iPhone to your computer.
- Launch the software and select the “Recover from iOS Device” mode.
- The software will scan your iPhone for deleted files.
- Preview the recoverable photos and select the ones you want to restore.
- Choose a location on your computer to save the recovered photos.
5.4. Risks and Limitations of Data Recovery Software
- Success Rate: The success rate of data recovery software can vary depending on factors such as how long ago the photos were deleted and whether the storage space has been overwritten.
- Cost: Data recovery software often comes with a price tag, and the more advanced features may require a premium subscription.
- Security: It’s important to choose reputable data recovery software to avoid malware or privacy risks.
- Overwriting: Continuously using your iPhone after deleting photos can overwrite the data, making recovery more difficult or impossible.
6. Contacting Apple Support or a Professional Recovery Service
6.1. When to Seek Professional Help
If you’ve tried all the above methods and still can’t recover your deleted photos, it may be time to seek professional help. This is especially true if the photos are critically important or if your iPhone has suffered physical damage.
6.2. Apple Support Options
Apple Support may be able to assist you with data recovery, depending on the circumstances. You can contact Apple Support through their website, phone, or by visiting an Apple Store. According to Apple’s website, they may offer data recovery services or recommend third-party providers.
6.3. Finding a Reputable Data Recovery Service
If Apple Support can’t help, you can consider using a professional data recovery service. These services have specialized tools and expertise to recover data from damaged or inaccessible devices. When choosing a data recovery service, consider the following factors:
- Reputation: Look for a service with positive reviews and a proven track record.
- Experience: Choose a service that has experience recovering data from iPhones.
- Cost: Get a quote before committing to the service, and be aware of any hidden fees.
- Data Security: Ensure the service has strict data security policies to protect your privacy.
6.4. Costs Associated with Professional Recovery
Professional data recovery services can be expensive, with costs ranging from a few hundred to several thousand dollars, depending on the complexity of the recovery process.
7. Preventing Future Photo Loss: Best Practices
7.1. Regularly Back Up Your iPhone
The best way to prevent future photo loss is to regularly back up your iPhone. You can use iCloud Backup, iTunes/Finder Backup, or a combination of both.
7.2. Enable iCloud Photos
Enabling iCloud Photos ensures that your photos are automatically backed up to the cloud, keeping them safe even if your iPhone is lost, stolen, or damaged.
7.3. Consider Using a Third-Party Cloud Storage Service
In addition to iCloud, you can use third-party cloud storage services like Google Photos, Dropbox, or OneDrive to back up your photos. These services often offer additional storage space and features.
7.4. Be Careful When Deleting Photos
Take a moment to review photos before deleting them to avoid accidental deletions.
7.5. Password Protect Your Recently Deleted Album
In iOS 16 and later, you can password protect your Recently Deleted album to prevent unauthorized access and accidental deletions.
8. Advanced Tips and Tricks for Photo Management on iPhone
8.1. Using Photo Albums and Folders
Organize your photos into albums and folders to make them easier to find and manage.
8.2. Utilizing Smart Albums
Smart Albums automatically organize your photos based on criteria like date, location, or people.
8.3. Sharing Photos with iCloud Shared Albums
iCloud Shared Albums allow you to share photos and videos with friends and family, and they can add their own photos and videos to the album.
8.4. Editing Photos on Your iPhone
The Photos app on your iPhone offers a range of editing tools to enhance your photos, including adjusting exposure, contrast, and color.
8.5. Using Third-Party Photo Editing Apps
For more advanced photo editing, consider using third-party apps like Adobe Lightroom Mobile, Snapseed, or VSCO.
9. Understanding Photo File Formats and Quality
9.1. Common Photo File Formats on iPhone
The most common photo file formats on iPhone are JPEG, HEIC, and PNG.
9.2. Choosing the Right File Format
JPEG is a widely compatible format that offers good compression, but it can lose some quality when edited and saved multiple times. HEIC is a more efficient format that preserves more quality at a smaller file size, but it may not be compatible with all devices and software. PNG is a lossless format that preserves all the original data, but it results in larger file sizes.
9.3. Understanding Photo Resolution and Size
Photo resolution refers to the number of pixels in an image, while photo size refers to the amount of storage space the image takes up. Higher resolution photos have more detail, but they also take up more storage space.
9.4. Optimizing Photo Quality and Storage
You can optimize photo quality and storage on your iPhone by adjusting the camera settings and choosing the right file format.
10. DFPhoto.net: Your Resource for Photography Tips and Inspiration
10.1. Exploring DFPhoto.net
At dfphoto.net, we offer a wealth of resources for photographers of all levels, including tutorials, gear reviews, and inspiring photo galleries.
10.2. Learning New Photography Techniques
Our tutorials cover a wide range of photography techniques, from basic composition to advanced lighting techniques.
10.3. Finding Inspiration for Your Photography
Our photo galleries showcase the work of talented photographers from around the world, providing inspiration for your own photography.
10.4. Connecting with the Photography Community
Join our community forum to connect with other photographers, share your work, and get feedback.
10.5. Improving Your Photography Skills
With our resources and community support, you can improve your photography skills and take your photography to the next level.
FAQ: How To Get Deleted Photos From iPhone
Q1: How long do photos stay in the Recently Deleted album on iPhone?
Photos remain in the Recently Deleted album for 30 days before being permanently removed, giving you a month to recover them.
Q2: Can I recover photos deleted from iPhone after 30 days?
After 30 days, photos are permanently deleted from the Recently Deleted album, but you can still recover them from iCloud or iTunes backups, or using data recovery software.
Q3: How do I recover deleted photos from iCloud?
You can recover deleted photos from iCloud by logging into iCloud.com, navigating to the Photos app, and checking the Recently Deleted album for photos deleted within the last 30 days.
Q4: Is it possible to recover permanently deleted photos from iPhone without a backup?
Recovering permanently deleted photos without a backup is challenging but possible using data recovery software, which scans your device for recoverable data fragments.
Q5: Does restoring my iPhone from a backup delete current data?
Yes, restoring your iPhone from a backup will erase all current data and replace it with the data from the backup, so ensure you back up your current data beforehand.
Q6: What is the best data recovery software for iPhone?
Popular data recovery software options for iPhone include EaseUS MobiSaver, Dr.Fone – Data Recovery (iOS), iMyFone D-Back, and Tenorshare UltData, each offering unique features and recovery capabilities.
Q7: How do I enable iCloud Photos on my iPhone?
To enable iCloud Photos, go to Settings > Your Name > iCloud > Photos, and toggle on the “iCloud Photos” option to automatically store your photos in iCloud.
Q8: What should I do if data recovery software fails to recover my photos?
If data recovery software fails, consider contacting Apple Support or a professional data recovery service, as they have specialized tools and expertise for complex recovery scenarios.
Q9: How can I prevent accidental photo deletion on my iPhone?
To prevent accidental photo deletion, regularly back up your iPhone, enable iCloud Photos, use third-party cloud storage, review photos before deleting, and password protect your Recently Deleted album.
Q10: Are there any advanced photo management tips for iPhone users?
Yes, using photo albums and folders, utilizing Smart Albums, sharing photos with iCloud Shared Albums, and editing photos on your iPhone with built-in or third-party apps can enhance your photo management experience.
Losing photos from your iPhone can be a distressing experience, but with the right knowledge and tools, you can increase your chances of successful photo recovery. Remember to regularly back up your iPhone, enable iCloud Photos, and be cautious when deleting photos.
Ready to Explore More Photography Tips?
Head over to dfphoto.net for a treasure trove of photography tutorials, gear reviews, and stunning photo galleries! Dive into the world of photography and elevate your skills today. Let dfphoto.net be your guide to capturing the world through your lens!