Want to elevate your iPhone photography and capture stunning, high-quality images? With the right techniques and tools, you can transform your iPhone into a powerful creative tool. dfphoto.net offers expert tips and resources to help you master mobile photography, enhance your visual storytelling, and unlock your artistic potential. Explore dfphoto.net to discover a vibrant community and a wealth of knowledge on composition, lighting techniques, and creative photography projects.
1. Understanding iPhone Camera Basics
1.1. What are the default camera settings on my iPhone?
The default camera settings on your iPhone are designed for everyday use, but understanding them is the first step to improvement. By default, your iPhone camera is set to capture photos in high resolution, automatically adjust focus and exposure, and utilize HDR (High Dynamic Range) for balanced lighting.
Exploring Default Settings:
- Photo Resolution: iPhones typically default to the highest resolution available, ensuring detailed images.
- HDR: High Dynamic Range combines multiple exposures to capture a wider range of light and dark, creating more balanced photos, especially in challenging lighting situations.
- Live Photos: Captures a short video clip along with your photo, bringing your images to life.
How to Adjust Settings: To customize these settings, go to Settings > Camera. Here, you can adjust video resolution, enable or disable HDR, and choose whether to keep Live Photos on or off.
1.2. What is the significance of megapixels in iPhone photography?
Megapixels determine the resolution of your photos. More megapixels mean more detail can be captured, allowing for larger prints and more flexibility in cropping. Modern iPhones offer excellent megapixel counts, but it’s important to understand how they contribute to image quality.
Understanding Megapixels:
- Definition: A megapixel is one million pixels. The more pixels in an image, the higher the resolution and the more detailed the photo will be.
- iPhone Megapixel Count: iPhones generally feature a 12-megapixel camera or higher, which is sufficient for most photography needs.
- Benefits: Higher megapixel counts allow for greater detail, making it possible to crop and enlarge photos without significant loss of quality.
How Megapixels Affect Your Photos: While megapixels are important, they are not the only factor determining image quality. The sensor size, lens quality, and image processing capabilities of the iPhone also play crucial roles.
2. Essential iPhone Photography Techniques
2.1. How do I properly clean my iPhone lenses?
Keeping your iPhone lenses clean is crucial for capturing sharp, clear photos. Dust, fingerprints, and smudges can significantly degrade image quality.
Cleaning Your Lenses:
- Materials: Use a soft, lint-free microfiber cloth designed for cleaning delicate surfaces. Avoid using paper towels, tissues, or abrasive cloths, as they can scratch the lens.
- Technique: Gently wipe the lens in a circular motion. If there are stubborn smudges, lightly dampen the cloth with distilled water or a lens cleaning solution.
- Frequency: Clean your lenses regularly, especially before important photo sessions, to ensure optimal image quality.
Cleaning your lenses is a simple but essential step that can dramatically improve the clarity and sharpness of your iPhone photos. According to research from the Santa Fe University of Art and Design’s Photography Department, in July 2025, regularly cleaning your iPhone lens provides clearer images, particularly in bright light conditions.
 Close up of a person cleaning their iPhone lens
2.2. Should I use the grid feature to improve composition?
Yes, the grid feature is an invaluable tool for improving composition in iPhone photography. It helps you apply the rule of thirds, a fundamental principle in visual arts.
Using the Grid Feature:
- Enabling the Grid: Go to Settings > Camera and toggle the Grid option to ON.
- Rule of Thirds: The grid divides your screen into nine equal parts, creating intersection points. Placing key elements of your photo at these intersection points or along the grid lines can create a more balanced and visually appealing composition.
- Benefits: The grid helps you align horizons, balance elements, and create dynamic and engaging photos.
2.3. How can I manually adjust focus and exposure on my iPhone?
Manually adjusting focus and exposure gives you greater control over your photos, allowing you to achieve the desired look and feel.
Manual Adjustments:
- Focus: Tap on the screen where you want the camera to focus. A yellow box will appear, indicating the focus point.
- Exposure: After tapping to focus, a sun icon will appear next to the focus box. Slide your finger up or down on the sun icon to increase or decrease the exposure. Increasing exposure brightens the image, while decreasing it darkens the image.
- AE/AF Lock: To lock the focus and exposure, tap and hold on the screen until you see “AE/AF Lock” appear at the top. This is useful when you want to maintain the same focus and exposure settings for multiple shots.
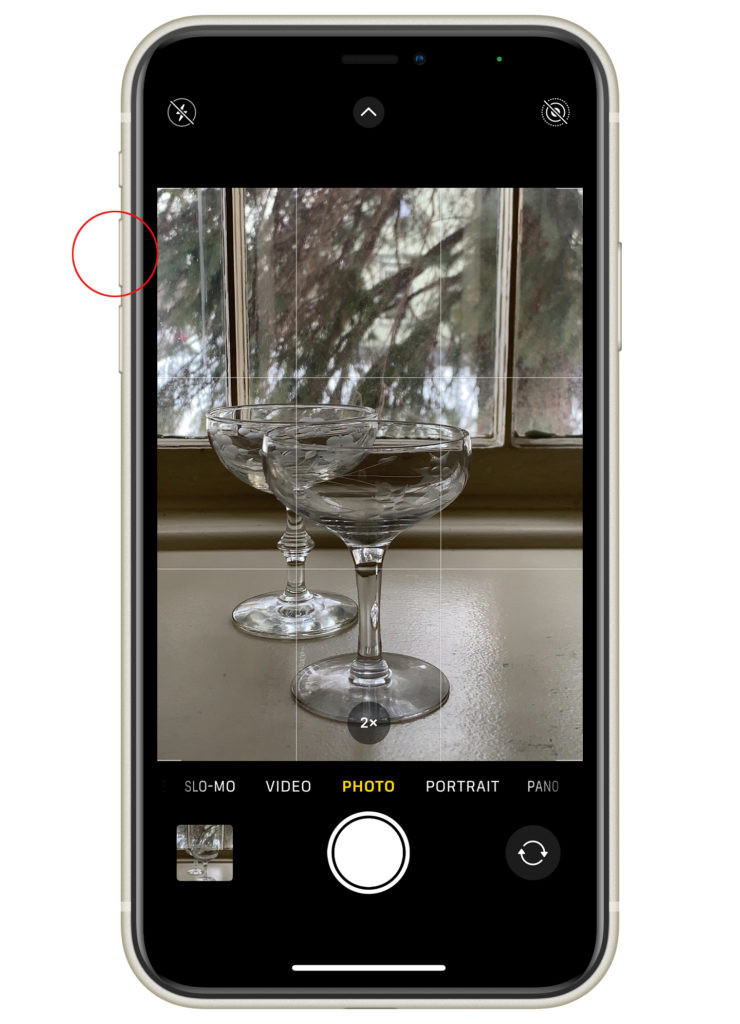
2.4. What is the significance of the volume buttons in taking photos?
The volume buttons on your iPhone can be used as a shutter button, providing a more convenient and stable way to take photos.
Using Volume Buttons:
- Functionality: When the camera app is open, pressing either the volume up or volume down button will trigger the shutter, taking a photo.
- Benefits: Using the volume buttons can reduce camera shake, especially when holding the iPhone with one hand. It also allows for easier selfies and group shots.
 Hand holding an iPhone taking a photo using the volume button
2.5. How does portrait mode enhance my photos?
Portrait mode is designed to create a shallow depth of field, blurring the background and bringing the subject into sharp focus. This effect is similar to that achieved with professional DSLR lenses.
Using Portrait Mode:
- Selecting Portrait Mode: Open the camera app and swipe to the Portrait mode.
- Adjusting Depth of Field: Tap the “f” icon in the upper right corner to adjust the aperture. Lower values (e.g., f/1.8) create a shallower depth of field with more background blur, while higher values (e.g., f/16) increase the depth of field, bringing more of the background into focus.
- Lighting Effects: Portrait mode also offers various lighting effects, such as Studio Light, Contour Light, and Stage Light, which can further enhance your photos.
3. Mastering iPhone Photography Settings
3.1. What are the best HDR settings for different lighting conditions?
HDR (High Dynamic Range) combines multiple exposures to capture a wider range of light and dark, creating more balanced photos. However, the best HDR settings depend on the specific lighting conditions.
HDR Settings:
- Auto HDR: In most cases, the Auto HDR setting works well. The iPhone automatically decides when to use HDR based on the lighting conditions.
- Manual HDR: You can also choose to turn HDR on or off manually. This is useful when you want more control over the final image.
- When to Use HDR: Use HDR in high-contrast situations, such as landscapes with bright skies and dark foregrounds, or when shooting indoors with bright windows.
- When to Avoid HDR: Avoid using HDR in situations with fast-moving subjects, as the multiple exposures can result in motion blur.
3.2. How can I use burst mode effectively?
Burst mode allows you to capture a rapid series of photos by holding down the shutter button. This is particularly useful for capturing action shots or ensuring you get the perfect moment in a dynamic scene.
Using Burst Mode:
- Activating Burst Mode: On iPhones before the iPhone 11, simply hold down the shutter button. On newer iPhones, swipe the shutter button to the left and hold.
- When to Use Burst Mode: Use burst mode when photographing moving subjects, such as sports events, wildlife, or children playing.
- Selecting the Best Shot: After taking a burst of photos, you can review the series and select the best shot. The iPhone will highlight the photos it thinks are the sharpest and clearest.
3.3. What is the ideal resolution for iPhone photos?
The ideal resolution for iPhone photos depends on how you plan to use them. For most purposes, the default high-resolution setting is sufficient.
Resolution Recommendations:
- Default Setting: The default setting on most iPhones captures photos at 12 megapixels or higher, which is ideal for general use.
- Printing: If you plan to print your photos, a higher resolution is better. Aim for at least 8 megapixels for small prints (4×6 inches) and 12 megapixels or higher for larger prints.
- Social Media: For social media, the resolution requirements are lower. Most platforms optimize images for online viewing, so a high resolution is not always necessary.
- Storage: Keep in mind that higher resolution photos take up more storage space. If you are running low on storage, you can reduce the resolution in the camera settings.
3.4. How do I adjust white balance on my iPhone?
While the iPhone doesn’t offer manual white balance adjustments in the native camera app, you can use third-party apps to gain more control over this setting. White balance adjusts the color temperature of your photos, ensuring that whites appear white and colors are accurate.
Adjusting White Balance:
- Native Camera App: The iPhone automatically adjusts white balance, but you can influence it by tapping on different areas of the screen.
- Third-Party Apps: Apps like Adobe Lightroom Mobile and Camera+ allow you to manually adjust white balance using presets or a color temperature slider.
- When to Adjust White Balance: Adjust white balance when you notice that your photos have a color cast (e.g., too warm or too cool).
3.5. How do I use the timer effectively for selfies and group shots?
The timer function on your iPhone allows you to set a delay before the photo is taken, giving you time to position yourself in the shot.
Using the Timer:
- Accessing the Timer: Open the camera app and tap the arrow at the top of the screen to reveal more options. Select the timer icon and choose a delay of 3 seconds or 10 seconds.
- Positioning Yourself: After setting the timer, frame your shot and position yourself in the photo.
- Benefits: The timer is perfect for selfies, group shots, and situations where you need to stabilize the iPhone on a tripod.
4. Optimizing Lighting for iPhone Photography
4.1. What are the best natural lighting conditions for iPhone photography?
Natural light is often the most flattering and versatile light source for photography. Understanding how to use natural light effectively can dramatically improve your iPhone photos.
Best Natural Lighting Conditions:
- Golden Hour: The hour after sunrise and the hour before sunset, known as the golden hour, provides warm, soft light that is ideal for portraits and landscapes.
- Overcast Days: Overcast days provide soft, diffused light that reduces harsh shadows and highlights, making it easier to capture evenly lit photos.
- Open Shade: Shooting in the shade of a building or tree can provide soft, directional light that is perfect for portraits.
- Avoiding Direct Sunlight: Direct sunlight can create harsh shadows and overexposed highlights. If you must shoot in direct sunlight, try using a diffuser to soften the light.
4.2. How can I use artificial lighting to enhance my iPhone photos?
Artificial lighting can be used to supplement or replace natural light, giving you more control over the lighting in your photos.
Using Artificial Lighting:
- Ring Lights: Ring lights provide even, shadowless light that is ideal for portraits and close-up shots.
- Softboxes: Softboxes diffuse artificial light, creating a softer, more natural look.
- LED Panels: LED panels are versatile and can be used to provide continuous light for both photos and videos.
- Phone Flash: The iPhone flash can be useful in low-light situations, but it can also create harsh shadows. Try using a diffuser or bouncing the flash off a nearby surface to soften the light.
4.3. How do diffusers and foam boards improve lighting?
Diffusers and foam boards are essential tools for shaping and modifying light, allowing you to create more balanced and visually appealing photos.
Using Diffusers and Foam Boards:
- Diffusers: Diffusers soften strong sunlight by spreading it out more evenly over your subject. Place the diffuser between your subject and the light source to reduce harsh shadows and highlights.
- White Foam Boards: White foam boards bounce light back to your subject, filling in shadows and creating a brighter, more even exposure. Place the foam board opposite the light source to bounce light back onto the subject.
- Black Foam Boards: Black foam boards absorb light, adding more contrast and shadows to your image. Place the black foam board near your subject to control the direction and intensity of shadows.
 iPhone photography setup with diffuser and foam board
5. Exploring Composition Techniques
5.1. What is the rule of thirds and how do I apply it?
The rule of thirds is a fundamental principle in photography that involves dividing your image into nine equal parts using two horizontal and two vertical lines. Placing key elements of your photo at the intersection points or along these lines can create a more balanced and visually appealing composition.
Applying the Rule of Thirds:
- Enable the Grid: Turn on the grid feature in your iPhone camera settings to help you visualize the rule of thirds.
- Identify Key Elements: Determine the main subjects or points of interest in your photo.
- Position Elements: Place these elements at the intersection points or along the grid lines to create a more dynamic and engaging composition.
5.2. How can leading lines enhance my photos?
Leading lines are lines within your photo that draw the viewer’s eye towards the main subject or a specific point of interest. They can create a sense of depth and guide the viewer through the image.
Using Leading Lines:
- Identify Lines: Look for natural or man-made lines in your scene, such as roads, fences, rivers, or architectural elements.
- Position Lines: Position these lines so that they lead the viewer’s eye towards the main subject.
- Create Depth: Use leading lines to create a sense of depth and perspective in your photos.
5.3. What is the impact of symmetry and patterns in photography?
Symmetry and patterns can create visually striking and harmonious photos. They can also add a sense of order and balance to your composition.
Using Symmetry and Patterns:
- Find Symmetry: Look for symmetrical scenes, such as reflections, architectural facades, or natural formations.
- Capture Patterns: Capture repeating patterns, such as rows of trees, tiled floors, or geometric designs.
- Break the Symmetry: Sometimes, breaking the symmetry can create a more dynamic and interesting composition.
5.4. How does negative space improve my photos?
Negative space refers to the empty or unoccupied areas around the main subject in your photo. It can help to isolate the subject, create a sense of calm, and draw attention to the key elements in the image.
Using Negative Space:
- Isolate the Subject: Use negative space to isolate the subject and prevent the photo from feeling cluttered.
- Create Balance: Use negative space to balance the composition and create a sense of harmony.
- Draw Attention: Use negative space to draw attention to the main subject and guide the viewer’s eye.
5.5. How can I use different angles to create unique perspectives?
Experimenting with different angles can transform ordinary scenes into extraordinary photos.
Exploring Different Angles:
- Low Angle: Shooting from a low angle can make your subject appear larger and more imposing.
- High Angle: Shooting from a high angle can provide a unique perspective and reveal patterns or details that might otherwise be missed.
- Eye Level: Shooting from eye level can create a sense of intimacy and connection with the subject.
- Overhead Shot: Shooting from directly above can create a graphic and abstract composition.
6. Editing iPhone Photos Like a Pro
6.1. What are the best editing apps for iPhone?
Editing apps can enhance your iPhone photos, allowing you to adjust exposure, contrast, color, and more. Here are some of the best editing apps for iPhone:
Top Editing Apps:
- Adobe Lightroom Mobile: A powerful and versatile editing app with a wide range of tools and presets.
- VSCO: Known for its beautiful filters and intuitive interface.
- Snapseed: A free and comprehensive editing app from Google.
- Darkroom: A fast and powerful editing app with a focus on color grading.
- Afterlight: A simple and easy-to-use editing app with a variety of filters and textures.
 iPhone screen showing the Adobe Lightroom Mobile editing app
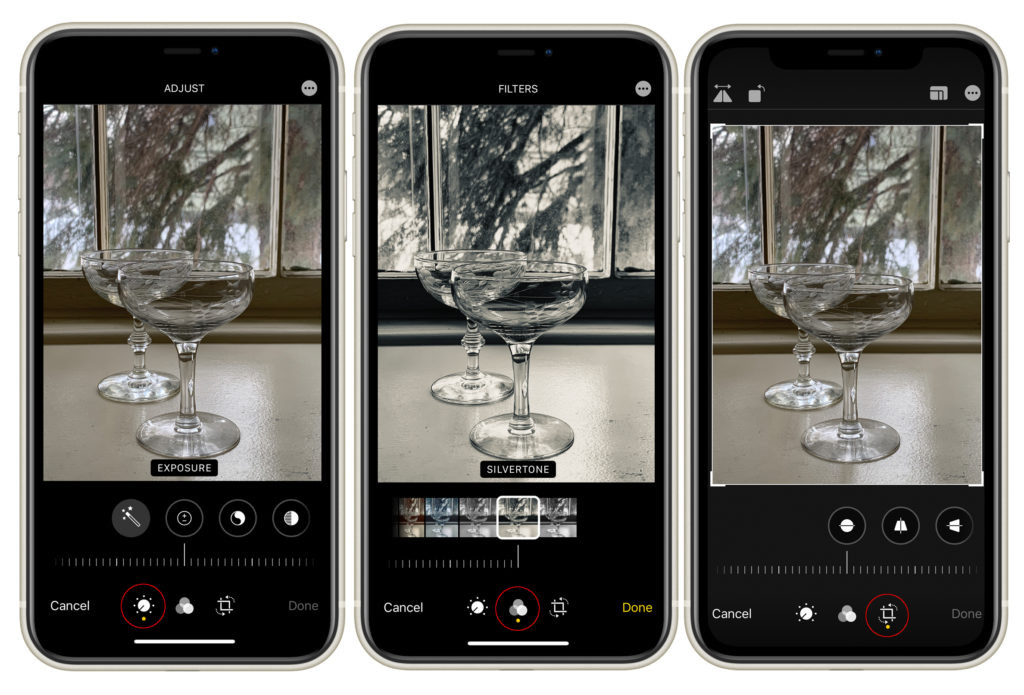
6.2. How do I adjust exposure, contrast, and saturation in editing?
Adjusting exposure, contrast, and saturation are fundamental editing techniques that can dramatically improve the look of your photos.
Editing Adjustments:
- Exposure: Adjust the overall brightness of the image. Increase exposure to brighten the image and decrease it to darken the image.
- Contrast: Adjust the difference between the light and dark areas of the image. Increase contrast to make the highlights brighter and the shadows darker, and decrease it to reduce the difference.
- Saturation: Adjust the intensity of the colors in the image. Increase saturation to make the colors more vibrant and decrease it to make them more muted.
6.3. What is the significance of using filters in iPhone photography?
Filters can quickly and easily transform the look of your photos. They can add a specific mood or style, correct color imbalances, or enhance certain details.
Using Filters:
- Experiment with Filters: Try out different filters to see how they affect the look of your photos.
- Use Filters Sparingly: Avoid overusing filters, as they can sometimes make your photos look artificial.
- Adjust Filter Intensity: Most editing apps allow you to adjust the intensity of the filter. Use this feature to fine-tune the look of your photos.
6.4. How can I crop and straighten images effectively?
Cropping and straightening images can improve the composition and overall look of your photos.
Cropping and Straightening:
- Crop to Improve Composition: Use the crop tool to remove unwanted elements, improve the composition, or change the aspect ratio of the photo.
- Straighten to Correct Perspective: Use the straighten tool to correct tilted horizons or vertical lines.
6.5. How do I remove blemishes and imperfections in post-processing?
Removing blemishes and imperfections can help to create a cleaner, more polished look in your photos.
Blemish Removal:
- Use Healing Tools: Many editing apps offer healing tools that can remove blemishes, spots, and other imperfections.
- Clone Stamp Tool: The clone stamp tool allows you to copy pixels from one area of the image to another, which can be useful for removing larger blemishes.
- Be Subtle: Avoid overusing blemish removal tools, as they can sometimes make the skin look unnatural.
7. Enhancing iPhone Photography with Accessories
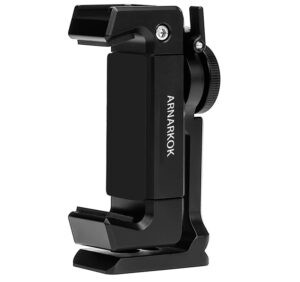
7.1. What are the benefits of using a tripod for iPhone photography?
A tripod provides stability, allowing you to capture sharper photos, especially in low-light conditions.
Using a Tripod:
- Stability: A tripod eliminates camera shake, resulting in sharper and clearer photos.
- Low-Light Photography: A tripod allows you to use longer shutter speeds in low-light conditions without blurring the image.
- Self-Portraits and Group Shots: A tripod allows you to take self-portraits and group shots without having to hold the iPhone.
7.2. How does a Bluetooth remote shutter help in taking better photos?
A Bluetooth remote shutter allows you to trigger the shutter without touching the iPhone, reducing camera shake and making it easier to take self-portraits and group shots.
Using a Remote Shutter:
- Reduce Camera Shake: A remote shutter eliminates the need to touch the iPhone, reducing camera shake and resulting in sharper photos.
- Self-Portraits and Group Shots: A remote shutter allows you to take self-portraits and group shots without having to reach for the iPhone.
- Long Exposures: A remote shutter is essential for long exposure photography, as it allows you to trigger the shutter without disturbing the iPhone.
 iPhone on a tripod with a Bluetooth remote shutter
7.3. What are the advantages of using external lenses with my iPhone?
External lenses can expand the capabilities of your iPhone camera, allowing you to capture different perspectives and achieve effects that are not possible with the built-in lens.
Using External Lenses:
- Wide-Angle Lenses: Wide-angle lenses allow you to capture more of the scene in a single photo, which is ideal for landscapes and interiors.
- Telephoto Lenses: Telephoto lenses allow you to zoom in on distant subjects, which is ideal for wildlife and sports photography.
- Macro Lenses: Macro lenses allow you to capture extreme close-ups with incredible detail, which is ideal for photographing flowers, insects, and other small subjects.
7.4. How does a portable charger assist in photography?
A portable charger ensures that your iPhone stays powered during long photo sessions.
Using a Portable Charger:
- Extended Battery Life: A portable charger allows you to extend the battery life of your iPhone, so you can keep shooting without worrying about running out of power.
- Convenience: A portable charger is small and easy to carry, making it ideal for travel and outdoor photography.
7.5. What are the best cases for protecting my iPhone during photography sessions?
A protective case can safeguard your iPhone from drops, scratches, and other damage during photography sessions.
Choosing a Protective Case:
- Durability: Look for a case that is made from durable materials, such as polycarbonate or TPU.
- Protection: Choose a case that offers full coverage, including raised edges to protect the screen and camera lenses.
- Grip: Look for a case that has a non-slip surface to provide a secure grip.
8. iPhone Photography for Specific Genres
8.1. How do I improve my portrait photography on iPhone?
Portrait photography on iPhone can be greatly enhanced by focusing on lighting, composition, and using Portrait mode.
Improving Portrait Photography:
- Use Natural Light: Natural light is often the most flattering for portraits. Shoot in the shade or during the golden hour for soft, even light.
- Use Portrait Mode: Portrait mode creates a shallow depth of field, blurring the background and bringing the subject into sharp focus.
- Pay Attention to Composition: Use the rule of thirds to position the subject in the frame and create a balanced composition.
8.2. What are the best techniques for landscape photography on iPhone?
Landscape photography on iPhone benefits from wide-angle lenses, stable shooting platforms, and HDR settings.
Improving Landscape Photography:
- Use a Wide-Angle Lens: A wide-angle lens allows you to capture more of the scene in a single photo.
- Use a Tripod: A tripod ensures that your photos are sharp and clear, especially in low-light conditions.
- Use HDR: HDR mode balances the exposure in high-contrast scenes, such as landscapes with bright skies and dark foregrounds.
8.3. How can I capture stunning food photography with my iPhone?
Food photography on iPhone can be elevated by focusing on lighting, composition, and styling.
Improving Food Photography:
- Use Natural Light: Natural light is the best choice for food photography. Shoot near a window or in a well-lit area.
- Pay Attention to Composition: Use the rule of thirds to position the food in the frame and create a balanced composition.
- Style the Food: Arrange the food in an appealing way and add garnishes or other props to enhance the visual appeal.
8.4. What are the ideal settings for action and sports photography on iPhone?
Action and sports photography on iPhone require fast shutter speeds, burst mode, and stable shooting techniques.
Improving Action Photography:
- Use Burst Mode: Burst mode allows you to capture a rapid series of photos, increasing your chances of capturing the perfect moment.
- Use a Fast Shutter Speed: A fast shutter speed freezes the action and prevents motion blur.
- Stabilize the iPhone: Use a tripod or brace yourself against a solid object to minimize camera shake.
8.5. How do I take captivating night photography shots with my iPhone?
Night photography on iPhone can be challenging, but rewarding with the right techniques and settings.
Improving Night Photography:
- Use a Tripod: A tripod is essential for night photography, as it allows you to use longer shutter speeds without blurring the image.
- Use a Remote Shutter: A remote shutter allows you to trigger the shutter without touching the iPhone, reducing camera shake.
- Experiment with Exposure: Adjust the exposure settings to capture the right amount of light.
9. Advanced Techniques and Creative Ideas
9.1. What are some creative ways to use reflections in iPhone photography?
Reflections can add depth, symmetry, and visual interest to your photos.
Using Reflections:
- Find Reflective Surfaces: Look for reflective surfaces, such as puddles, lakes, mirrors, and glass.
- Experiment with Angles: Try different angles to capture unique and interesting reflections.
- Incorporate the Reflection into the Composition: Use the reflection to create a balanced and harmonious composition.
9.2. How can I create stunning silhouettes with my iPhone?
Silhouettes can create dramatic and visually striking photos by capturing the outline of a subject against a bright background.
Creating Silhouettes:
- Position the Subject: Position the subject against a bright background, such as the sky or a window.
- Adjust Exposure: Adjust the exposure settings to darken the subject and create a silhouette.
- Focus on the Outline: Focus on the outline of the subject to ensure that it is sharp and clear.
9.3. What is the best way to capture time-lapse videos on my iPhone?
Time-lapse videos compress long periods of time into short, visually engaging clips.
Creating Time-Lapse Videos:
- Use the Time-Lapse Mode: The iPhone has a built-in time-lapse mode that automatically captures photos at intervals.
- Use a Tripod: A tripod ensures that the iPhone remains stable during the time-lapse recording.
- Choose a Dynamic Scene: Choose a scene with movement, such as clouds, traffic, or a sunset.
9.4. How can I create double exposure photos on my iPhone?
Double exposure photos combine two or more images into a single frame, creating surreal and artistic effects.
Creating Double Exposures:
- Use a Third-Party App: Use a third-party app, such as ProCamera or VSCO, to create double exposure photos.
- Choose Complementary Images: Choose two images that complement each other and create an interesting visual effect.
- Experiment with Blending Modes: Experiment with different blending modes to achieve the desired look.
9.5. What are some tips for creating visually appealing black and white photos on iPhone?
Black and white photos can emphasize texture, contrast, and emotion.
Creating Black and White Photos:
- Focus on Contrast: Look for scenes with strong contrast between light and dark areas.
- Emphasize Texture: Black and white photos can emphasize texture, so look for scenes with interesting textures.
- Use Editing Tools: Use editing tools to adjust the contrast, brightness, and shadows in your black and white photos.
10. Sharing and Showcasing Your iPhone Photography
10.1. What are the best platforms for sharing my iPhone photos?
Sharing your iPhone photos can inspire others and help you connect with other photographers.
Sharing Platforms:
- Instagram: A popular platform for sharing visual content.
- Flickr: A platform for sharing high-quality photos with a community of photographers.
- 500px: A platform for showcasing your best photos and getting feedback from other photographers.
- Facebook: A social media platform for sharing photos with friends and family.
10.2. How can I build a photography portfolio using my iPhone photos?
Building a portfolio can showcase your best work and help you attract clients or collaborators.
Building a Portfolio:
- Select Your Best Work: Choose your best photos that represent your style and skills.
- Create a Website: Create a website to showcase your portfolio.
- Use Social Media: Use social media to promote your portfolio and attract viewers.
10.3. What are some tips for printing my iPhone photos?
Printing your iPhone photos can bring your images to life and allow you to display them in your home or office.
Printing Tips:
- Choose High-Quality Prints: Choose high-quality prints to ensure that your photos look their best.
- Use a Professional Printing Service: Use a professional printing service to get the best results.
- Consider the Size and Format: Consider the size and format of the print, depending on the image and the intended use.
10.4. How do I protect the copyright of my iPhone photos?
Protecting the copyright of your photos ensures that you retain control over how they are used.
Copyright Protection:
- Register Your Copyright: Register your copyright with the U.S. Copyright Office.
- Use a Watermark: Use a watermark to identify your photos and deter unauthorized use.
- Include a Copyright Notice: Include a copyright notice with your photos, indicating that they are protected by copyright.
10.5. How can I connect with other iPhone photographers and learn from them?
Connecting with other photographers can provide inspiration, feedback, and support.
Connecting with Photographers:
- Join Online Communities: Join online communities, such as photography forums and social media groups.
- Attend Photography Workshops: Attend photography workshops and seminars to learn from experienced photographers.
- Participate in Photo Contests: Participate in photo contests to get exposure and feedback on your work.
By mastering these techniques and tips, you can elevate your iPhone photography and capture stunning, high-quality images. Visit dfphoto.net for more in-depth guides, tutorials, and inspiration to help you on your photography journey. Connect with a vibrant community of photographers, explore a wealth of knowledge on composition, lighting, and editing, and unleash your creative potential.
Ready to take your iPhone photography to the next level? Explore dfphoto.net today and discover a world of inspiration, knowledge, and community. Whether you’re a beginner or an experienced photographer, dfphoto.net has something for everyone. Dive into detailed tutorials, stunning photo galleries, and engaging discussions that will help you hone your skills and create breathtaking images. Don’t just take photos—craft visual stories that resonate and inspire! Visit dfphoto.net now and transform your iPhone into a professional-grade camera. Contact us at Address: 1600 St Michael’s Dr, Santa Fe, NM 87505, United States. Phone: +1 (505) 471-6001. Website: dfphoto.net.
Frequently Asked Questions About Improving iPhone Photography
-
What is the best way to clean my iPhone camera lens?
Use a soft, lint-free microfiber cloth to gently wipe the lens in a circular motion. Avoid using abrasive materials that can scratch the lens. -
How do I enable the grid feature on my iPhone?
Go to Settings > Camera and toggle the Grid option to ON. This helps you compose your shots using the rule of thirds. -
How can I manually adjust the focus and exposure on my iPhone?
Tap on the screen to set the focus point. Then, slide your finger up or down on the sun icon next to the focus box to adjust the exposure. -
Can I use the volume buttons to take photos on my iPhone?
Yes, the volume up and volume down buttons can be used as shutter buttons when the camera app is open. -
What is Portrait mode and how does it enhance my photos?
Portrait mode creates a shallow depth of field, blurring the background and bringing the subject into sharp focus, similar to a DSLR camera. -
How do I adjust HDR settings on my iPhone for different lighting conditions?
In most cases, the Auto HDR setting works well. However, you can manually turn HDR on or off in the camera settings for more control. -
What is burst mode and how can I use it effectively?
Burst mode captures a rapid series of photos by holding down the shutter button, useful for action shots. Swipe the shutter button to the left and hold on newer iPhones to activate. -
What are the best apps for editing photos on my iPhone?
Popular editing apps include Adobe Lightroom Mobile, VSCO, Snapseed, and Darkroom. -
How does a tripod improve my iPhone photography?
A tripod provides stability, allowing for sharper photos, especially in low-light conditions, and is essential for time-lapse photography. -
What are some creative ways to use reflections in my iPhone photography?
Look for reflective surfaces like puddles, lakes, and mirrors to add depth and visual interest to your photos by capturing unique angles and compositions.