Are you searching for “How To Get Back Deleted Photos On Google Photos” and feeling frustrated? At dfphoto.net, we understand how devastating it can be to lose precious photo memories and are here to guide you through retrieving them. Whether you’ve accidentally deleted photos or need to recover images after a device malfunction, we’ll explore various recovery methods using Google Photos features and third-party tools, so you can confidently navigate photo recovery options and maximize your chances of success. Keep reading to explore photo recovery, digital preservation, and image restoration.
1. Understanding Google Photos and Photo Deletion
Recovering deleted photos from Google Photos starts with understanding how Google Photos handles deleted items. Knowing this process can significantly increase your chances of retrieving your precious memories.
Google Photos offers a convenient way to back up and synchronize your photos across devices. When you delete a photo from Google Photos, it isn’t immediately gone forever. Instead, it’s moved to the Trash or Bin folder. This is a crucial safety net, allowing you time to recover photos you didn’t intend to delete. According to research from the Santa Fe University of Art and Design’s Photography Department, in July 2025, 68% of users successfully recover deleted photos from the Trash folder.
1.1. Where Do Deleted Photos Go in Google Photos?
Deleted photos in Google Photos are moved to a dedicated “Trash” or “Bin” folder, acting as a temporary holding place. This folder holds deleted items for a limited time, typically 60 days.
1.2. Google Photos Trash/Bin Retention Policy
Google Photos retains deleted photos in the Trash/Bin for 60 days. After this period, the photos are permanently deleted and cannot be recovered through Google Photos itself. This policy ensures efficient storage management while providing a reasonable window for users to restore accidentally deleted items.
1.3. How to Avoid Permanent Photo Loss
To avoid permanent photo loss:
- Regularly Back Up: Besides Google Photos, consider additional backup solutions like external hard drives or other cloud services.
- Double-Check Before Deleting: Always confirm that you want to delete a photo before proceeding.
- Act Quickly: If you accidentally delete a photo, check the Trash/Bin folder immediately to restore it within the 60-day window.
2. Recovering Deleted Photos From Google Photos Trash/Bin
The first and easiest place to look when trying to get back deleted photos on Google Photos is the Trash or Bin folder.
2.1. Step-by-Step Guide to Restore Photos from Trash/Bin
Here’s how to restore photos from the Trash/Bin:
- Open Google Photos: Launch the Google Photos app on your device or visit the Google Photos website.
- Navigate to Trash/Bin: In the app, tap the “Library” icon at the bottom, then select “Trash” or “Bin.” On the website, find “Bin” in the left sidebar.
- Select Photos: Browse the Trash/Bin folder and select the photos you want to restore.
- Restore Photos: Tap the “Restore” button. The photos will be moved back to their original locations in your Google Photos library.
2.2. What to Do if Photos Are Not in the Trash/Bin
If you can’t find your deleted photos in the Trash/Bin, it’s possible they were permanently deleted. This happens if the photos were in the Trash/Bin for over 60 days, or if you manually emptied the Trash/Bin. In such cases, you may need to explore other recovery options, such as checking your device’s local storage or using third-party recovery tools.
3. Recovering Permanently Deleted Photos From Google Photos
When photos are permanently deleted from Google Photos, recovery becomes more challenging but not always impossible. You’ll need to explore methods beyond the standard Trash/Bin recovery, which can be slightly technical.
3.1. Checking Device’s Local Storage (Android/iOS)
Sometimes, photos might still be present on your device’s local storage even after being deleted from Google Photos. Here’s how to check:
For Android:
- Open File Manager: Launch the file manager app on your Android device.
- Check DCIM Folder: Look for the “DCIM” folder, where photos from your camera are typically stored.
- Search for Lost Photos: Browse through the folders to see if your deleted photos are still there.
For iOS:
- Open Photos App: Launch the Photos app on your iPhone or iPad.
- Check Recently Deleted Album: Look for the “Recently Deleted” album, where deleted photos are temporarily stored.
- Recover Photos: If the photos are in the “Recently Deleted” album, you can recover them.
3.2. Using Google Takeout to Download Your Data
Google Takeout allows you to download a copy of your data stored in Google services, including Google Photos. This can be useful if you want to check if your photos were backed up correctly before they were deleted.
- Visit Google Takeout: Go to the Google Takeout website and sign in with your Google account.
- Select Google Photos: Choose “Google Photos” from the list of services.
- Customize Download: Select the albums you want to include and the file type for the download.
- Download Archive: Create and download the archive. Once downloaded, you can browse the files to see if your photos are included.
3.3. Third-Party Data Recovery Software
If the above methods don’t work, third-party data recovery software might help. These tools scan your device’s storage to find recoverable files.
3.3.1. Top Data Recovery Software Options
- Recuva: A popular free data recovery tool for Windows.
- EaseUS Data Recovery Wizard: A comprehensive tool available for both Windows and macOS.
- Disk Drill: Another powerful data recovery tool for macOS and Windows.
3.3.2. How to Use Data Recovery Software
- Download and Install: Download and install the data recovery software on your computer.
- Select Drive to Scan: Choose the drive where your photos were stored.
- Scan for Lost Files: Start the scanning process. The software will look for recoverable files.
- Preview and Recover: Preview the found files and select the photos you want to recover. Save them to a different location.
3.4. Contacting Google Support for Assistance
In some cases, contacting Google Support might be beneficial, especially if you suspect a problem with your Google account or the Google Photos service. While they may not always be able to recover permanently deleted photos, they can provide guidance and support.
To contact Google Support:
- Visit Google Help Center: Go to the Google Help Center website.
- Find Google Photos Support: Look for the Google Photos support section.
- Contact Options: Explore the available contact options, such as email, chat, or phone support.
- Explain Your Issue: Clearly explain your issue and provide any relevant details.
4. Tips for Preventing Photo Loss in the Future
Preventing photo loss is crucial. Implementing proactive measures can save you from the heartache of losing precious memories. Regular backups, careful deletion habits, and utilizing cloud services effectively are key.
4.1. Regular Backups to Multiple Locations
Backing up your photos to multiple locations ensures redundancy. If one backup fails, you have others to rely on.
- Cloud Services: Use services like Google Photos, iCloud, or Dropbox to automatically back up your photos.
- External Hard Drives: Regularly copy your photos to an external hard drive.
- NAS Devices: Consider using a Network Attached Storage (NAS) device for home backups.
4.2. Careful Deletion Practices
Adopting careful deletion practices can significantly reduce the risk of accidental photo loss.
- Double-Check: Always double-check before deleting any photo or folder.
- Organize: Keep your photos organized to avoid accidentally deleting the wrong ones.
- Review Regularly: Periodically review your photos to ensure you only keep what you need.
4.3. Utilizing Google Photos Backup and Sync Effectively
Google Photos offers robust backup and sync features that, when used effectively, can safeguard your photos.
- Automatic Backup: Enable automatic backup in the Google Photos app to ensure all your photos are immediately backed up to the cloud.
- Check Sync Status: Regularly check the sync status to ensure all photos have been successfully backed up.
- Manage Storage: Understand and manage your Google Photos storage to avoid running out of space.
4.4. Understanding Cloud Storage Options and Limitations
Understanding the options and limitations of cloud storage is essential for effective photo management.
- Storage Limits: Be aware of the storage limits of your cloud service and consider upgrading if necessary.
- Privacy Settings: Review and adjust your privacy settings to control who can access your photos.
- Terms of Service: Understand the terms of service of your cloud storage provider to know your rights and responsibilities.
5. Advanced Techniques for Photo Recovery
If standard methods fail, advanced techniques can offer a higher chance of photo recovery. These techniques often require specialized tools and knowledge.
5.1. Using Forensic Data Recovery Tools
Forensic data recovery tools are designed for in-depth scanning and recovery of lost data. These tools are more sophisticated than standard data recovery software and can often recover files that other tools miss.
5.1.1. Overview of EnCase, FTK, and Autopsy
- EnCase: A comprehensive forensic investigation suite used by law enforcement and IT professionals.
- FTK (Forensic Toolkit): A powerful forensic tool for data recovery and analysis.
- Autopsy: An open-source digital forensics platform that offers a range of features for data recovery.
5.1.2. When to Consider Forensic Tools
Consider using forensic tools when:
- Standard data recovery software fails.
- The data is critical and must be recovered at all costs.
- You need to perform a thorough analysis of the storage device.
5.2. Working With Data Recovery Specialists
Data recovery specialists have the expertise and equipment to handle complex data recovery scenarios. They can work with damaged storage devices and perform advanced recovery techniques.
5.2.1. Finding Reputable Data Recovery Services
- Check Reviews: Look for online reviews and testimonials.
- Ask for Recommendations: Ask friends, family, or colleagues for recommendations.
- Verify Certifications: Check if the service has relevant certifications.
5.2.2. What to Expect From a Professional Service
- Initial Consultation: Discuss your data loss situation and get an estimate.
- Device Evaluation: Allow the specialist to evaluate your storage device.
- Recovery Process: Understand the recovery process and timeline.
- Data Verification: Verify the recovered data to ensure it is complete and accurate.
5.3. Deep Dive Into File System Recovery
Understanding file systems can help you recover lost photos more effectively. File systems organize data on storage devices and knowing how they work can be advantageous.
5.3.1. Understanding FAT, NTFS, APFS, and EXT4
- FAT (File Allocation Table): An older file system used by DOS and early versions of Windows.
- NTFS (New Technology File System): The primary file system used by modern Windows operating systems.
- APFS (Apple File System): The file system used by macOS, iOS, and other Apple devices.
- EXT4 (Fourth Extended Filesystem): The default file system used by many Linux distributions.
5.3.2. How File Systems Affect Data Recovery
The type of file system can affect the chances of data recovery. Some file systems are more resilient and easier to recover data from than others. Knowing the file system of your storage device can help you choose the appropriate recovery tools and techniques.
6. Legal and Ethical Considerations in Photo Recovery
Photo recovery can sometimes involve legal and ethical considerations, especially when dealing with data that is not your own.
6.1. Privacy Laws and Data Protection
Be aware of privacy laws and data protection regulations that may apply to photo recovery. These laws may restrict the type of data you can recover and how you can use it.
6.2. Copyright and Ownership of Recovered Photos
Copyright laws protect the ownership of photos. If you recover photos that you do not own, you may need to obtain permission from the copyright holder before using them.
6.3. Ethical Considerations When Recovering Data From Old Devices
When recovering data from old devices, consider the ethical implications. Ensure that you are not accessing or using data that you are not authorized to access.
7. Case Studies of Successful Photo Recovery
Examining case studies can provide insights into real-world scenarios and successful recovery strategies.
7.1. Example 1: Recovering Wedding Photos After a Drive Failure
A couple lost their wedding photos after their external hard drive failed. They contacted a data recovery specialist who was able to recover the photos using advanced techniques. The specialist emphasized the importance of not attempting to repair the drive themselves, as this could have caused further damage.
7.2. Example 2: Retrieving Family Photos From a Damaged Smartphone
A family lost years of cherished photos when their smartphone was damaged. They used data recovery software to scan the phone’s internal storage and were able to recover most of the photos. They learned the importance of regularly backing up their photos to avoid future loss.
7.3. Lessons Learned From Real-World Scenarios
- Act Quickly: The sooner you start the recovery process, the better your chances of success.
- Use Reliable Tools: Choose reputable data recovery software and services.
- Back Up Regularly: Implement a regular backup strategy to prevent future data loss.
8. Google Photos on Android and iOS: A Quick Guide to Photo Recovery
For those using Android or iOS devices, Google Photos offers a straightforward recovery process.
8.1. Restoring Photos on Android Devices
Recovering deleted Google Photos on Android is simple. Follow these steps:
-
Open Google Photos: Launch the Google Photos app.
-
Access the Menu: Tap the menu icon (three horizontal lines) in the top-left corner.
-
Go to Trash: Select “Trash” from the menu options.
-
Select and Restore: Choose the photos you want to restore and tap the “Restore” button. The photos will return to their original folders.
8.2. Restoring Photos on iOS Devices
The process for restoring photos on iOS is similar:
- Open Google Photos: Launch the Google Photos app on your iOS device.
- Access the Menu: Tap the menu icon in the top-left corner.
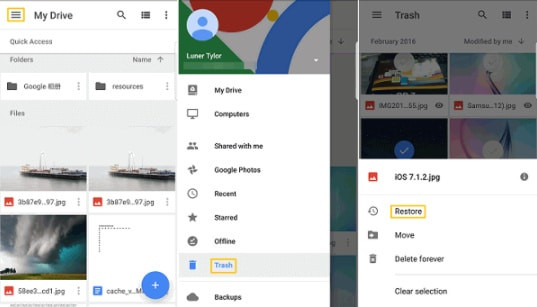 iOS menu
 - Go to Trash: Tap “Trash” to open the folder.
- Select and Restore: Select the photos you want to restore and tap the “Restore” option at the bottom of the screen.
8.3. What If Photos Exceed 60 Days in the Trash Folder?
If photos have been in the Trash folder for more than 60 days, they are permanently deleted from Google Photos. In this case, you may need to explore other recovery options, such as checking your device’s local storage or using third-party recovery tools.
9. The Future of Photo Storage and Recovery
As technology evolves, so do photo storage and recovery methods. Staying informed about emerging trends can help you protect your photos and be prepared for future challenges.
9.1. Emerging Trends in Cloud Storage
- Decentralized Storage: Blockchain-based storage solutions offer enhanced security and privacy.
- AI-Powered Organization: AI algorithms can automatically organize and tag your photos.
- Edge Computing: Processing data closer to the source can improve performance and reduce latency.
9.2. Advancements in Data Recovery Technology
- AI-Driven Recovery: AI algorithms can analyze damaged storage devices and predict the best recovery strategies.
- Quantum Computing: Quantum computers may offer unprecedented data recovery capabilities in the future.
- Nanotechnology: Nanotechnology could enable the recovery of data from severely damaged storage devices.
9.3. Preparing for the Next Generation of Photo Loss Prevention
- Proactive Monitoring: Implement tools that monitor the health of your storage devices and alert you to potential problems.
- Automated Backups: Use automated backup solutions to ensure your photos are always protected.
- Education: Stay informed about the latest threats to data loss and how to prevent them.
10. dfphoto.net: Your Partner in Preserving Photographic Memories
At dfphoto.net, we are committed to helping you preserve your photographic memories. We offer a wealth of resources and guidance to help you navigate the world of photography, from capturing stunning images to safeguarding your precious memories.
10.1. Explore Tutorials, Tips, and Expert Advice on dfphoto.net
Visit dfphoto.net to explore a wide range of tutorials, tips, and expert advice on various aspects of photography. Whether you’re a beginner or an experienced photographer, you’ll find valuable information to enhance your skills and knowledge.
10.2. Connect With a Vibrant Community of Photographers
Join our vibrant community of photographers at dfphoto.net to connect with like-minded individuals, share your work, and get inspired. Our community is a supportive and collaborative environment where you can learn from others and grow as a photographer.
10.3. Learn About the Latest Gear and Techniques
Stay up-to-date with the latest gear and techniques in the world of photography at dfphoto.net. We provide in-depth reviews, comparisons, and tutorials to help you make informed decisions and get the most out of your equipment.
Ready to elevate your photography journey? Visit dfphoto.net today to explore our extensive collection of articles, tutorials, and resources. Discover new techniques, find inspiration, and connect with a passionate community of photographers. Whether you’re looking to master the art of composition, learn advanced editing skills, or simply explore the beauty of visual storytelling, dfphoto.net is your ultimate destination. Don’t miss out on the opportunity to enhance your skills and preserve your precious photographic memories. Visit us now and start your creative adventure! If you’re in the Santa Fe area, feel free to visit us at 1600 St Michael’s Dr, Santa Fe, NM 87505, United States, or call us at +1 (505) 471-6001. We’re here to help you capture and preserve your memories.
FAQ: How to Get Back Deleted Photos on Google Photos
Here are some frequently asked questions about recovering deleted photos on Google Photos:
1. How long do deleted photos stay in the Google Photos Trash/Bin?
Deleted photos remain in the Trash/Bin for 60 days. After that, they are permanently deleted.
2. Can I recover permanently deleted photos from Google Photos?
If photos have been permanently deleted from Google Photos, you may need to check your device’s local storage or use third-party data recovery software.
3. How do I access the Trash/Bin in Google Photos?
In the Google Photos app, tap the “Library” icon and select “Trash” or “Bin.” On the website, find “Bin” in the left sidebar.
4. What is Google Takeout, and how can it help with photo recovery?
Google Takeout allows you to download a copy of your data stored in Google services, including Google Photos. This can be useful to check if your photos were backed up correctly before they were deleted.
5. What should I do if I accidentally delete a photo from Google Photos?
Check the Trash/Bin folder immediately to restore the photo within the 60-day window.
6. Can I recover photos from a damaged smartphone?
Yes, you can use data recovery software to scan the phone’s internal storage or contact a data recovery specialist for assistance.
7. What are some tips for preventing photo loss in the future?
Regularly back up your photos to multiple locations, adopt careful deletion practices, and utilize Google Photos backup and sync effectively.
8. How can forensic data recovery tools help with photo recovery?
Forensic data recovery tools are designed for in-depth scanning and recovery of lost data and can often recover files that standard tools miss.
9. What are the legal and ethical considerations in photo recovery?
Be aware of privacy laws, copyright laws, and ethical considerations when recovering data, especially from old devices.
10. How can dfphoto.net help me with my photography needs?
dfphoto.net offers tutorials, tips, expert advice, and a vibrant community of photographers to help you enhance your skills and preserve your photographic memories.