Achieving a perfectly white background in your photos is a skill that elevates your photography, whether you’re creating professional headshots, product images, or artistic portraits. At dfphoto.net, we’re dedicated to helping you master this technique, enhancing your visual storytelling and photographic precision. With the right approach, turning your backdrop into a seamless white canvas becomes an achievable art form.
1. What Is White Background Photography and Why Is It Important?
White background photography involves capturing images against a backdrop that is pure white, removing any distractions and focusing attention solely on the subject. This technique is crucial because it:
- Enhances Focus: Eliminates distractions, ensuring the viewer’s eye is drawn directly to the subject.
- Provides Versatility: Allows for easy integration of the subject into various designs and layouts.
- Creates Cleanliness: Conveys a sense of professionalism and sophistication, ideal for commercial use.
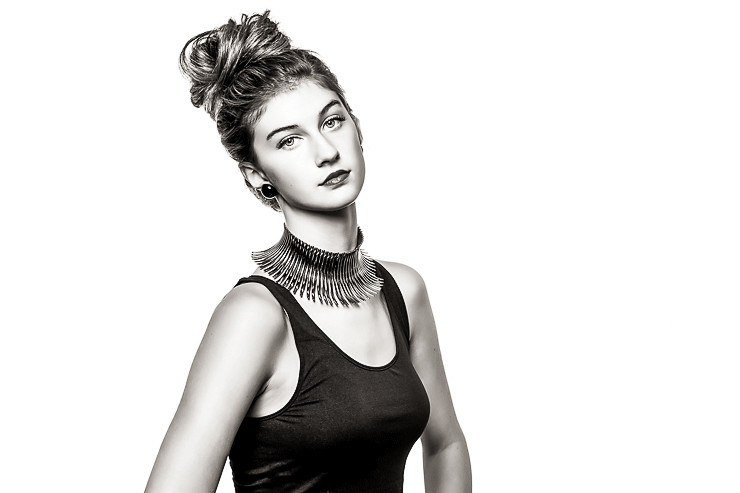 photographing white background
2. Who Benefits Most from Learning White Background Techniques?
White background photography is beneficial for a wide range of individuals, including:
- Photographers (Amateur and Professional): Expanding their skill set and offering versatile shooting options.
- Graphic Designers: Creating clean, easily editable images for design projects.
- E-commerce Businesses: Showcasing products in a consistent and appealing manner, which, according to a 2023 study by the E-Commerce Photography Association, can increase conversion rates by up to 30%.
- Marketing Professionals: Producing high-quality visuals for advertising and promotional materials.
- Individuals: Taking professional-looking headshots or creative portraits at home.
3. What Are the Key Elements for Achieving a White Background?
Mastering white background photography involves understanding and controlling several key elements:
- Lighting: Proper lighting is critical for creating a background that is evenly lit and free of shadows.
- Background Material: The choice of background material can affect the final look of your images.
- Camera Settings: Adjusting your camera settings can help you achieve the desired exposure and clarity.
- Post-Processing: Minor adjustments in post-processing can perfect the white background effect.
4. What Equipment Is Needed for White Background Photography?
Gathering the right equipment is the first step towards achieving a flawless white background. Here’s a list of essential items:
- Camera: A DSLR or mirrorless camera with manual settings for full control over exposure.
- Lens: A versatile lens (e.g., 50mm, 24-70mm) suitable for portraits or product photography.
- Lights: Studio strobes or speedlights with modifiers like softboxes or umbrellas for soft, even lighting.
- Background:
- Seamless Paper: Provides a smooth, continuous white backdrop. Savage Universal is a popular brand, with “Fashion Gray #60” being a versatile option.
- Muslin Backdrop: A fabric backdrop that can be draped and lit to create a white background.
- Vinyl Backdrop: Durable and easy to clean, suitable for product photography.
- Light Stands: To securely hold your lights in the desired positions.
- Reflectors: To bounce light onto your subject and fill in shadows.
- Light Meter: To accurately measure light levels and ensure proper exposure (optional but recommended).
- Clamps and Tape: To secure your background in place.
- Editing Software: Adobe Photoshop or Lightroom for post-processing adjustments.
5. How Do You Set Up Your Studio for White Background Photography?
Setting up your studio space correctly is essential for achieving a pure white background. Follow these steps for optimal results:
- Choose a Location: Select a room that is large enough to accommodate your subject, background, and lighting equipment.
- Set Up the Background:
- Seamless Paper: Mount the roll of seamless paper on a background stand and extend it to create a sweep that curves from the wall to the floor.
- Muslin Backdrop: Hang the muslin backdrop and stretch it to remove wrinkles.
- Vinyl Backdrop: Position the vinyl backdrop on a stand or against a wall.
- Position the Lights:
- Background Lights: Place two lights behind the subject, aimed at the background. These lights should be powerful enough to overexpose the background by about two stops.
- Main Light: Position one or two lights in front of the subject to provide the primary illumination. Use modifiers like softboxes or umbrellas to diffuse the light and create soft shadows.
- Distance: Ensure there is enough distance between the subject and the background (at least 6-10 feet) to prevent light spill and unwanted shadows.
- Meter the Lights: Use a light meter to measure the light levels on the subject and the background. The background should be about two stops brighter than the subject.
6. What Are the Best Camera Settings for White Background Photography?
Choosing the right camera settings is crucial for capturing well-exposed images with a pure white background. Here are some recommended settings:
- ISO: Keep the ISO as low as possible (e.g., ISO 100 or 200) to minimize noise and maintain image quality.
- Aperture: Use an aperture that provides sufficient depth of field to keep your subject sharp. For portraits, f/2.8 to f/5.6 is often ideal. For product photography, you may need a higher aperture like f/8 or f/11.
- Shutter Speed: Adjust the shutter speed to achieve proper exposure. Start with 1/200th of a second and adjust as needed.
- White Balance: Set the white balance to “Flash” or use a custom white balance setting to ensure accurate colors.
- Shooting Mode: Shoot in manual mode to have full control over all camera settings.
- File Format: Shoot in RAW format to capture the most data and provide flexibility in post-processing.
7. What Lighting Techniques Work Best for White Backgrounds?
Achieving a perfectly white background depends heavily on your lighting setup. Here are several effective lighting techniques:
7.1. Two Lights on the Background
This is the most common method for lighting a white background.
- Setup: Place two lights behind the subject, aimed at the background. Use reflectors to ensure even coverage.
- Benefits: Provides consistent, even lighting across the background.
- Drawbacks: Requires careful metering to avoid overexposure.
7.2. One Light Behind the Subject
A simpler setup that can still produce excellent results.
- Setup: Position one light directly behind the subject, aimed at the background.
- Benefits: Minimal equipment needed, easy to set up.
- Drawbacks: May not provide as even coverage as using two lights, potentially leading to hotspots.
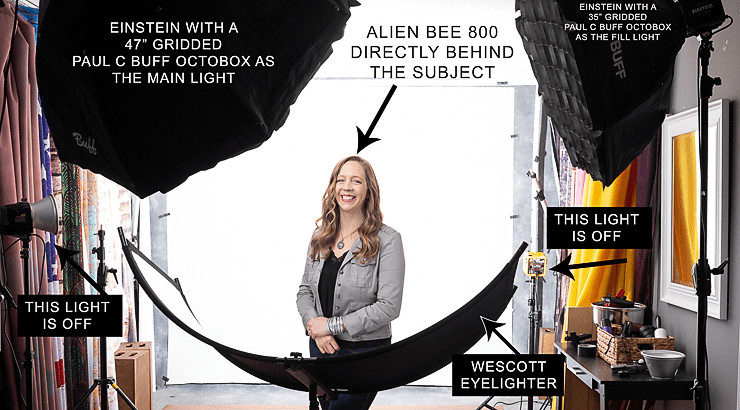 one light setup for white background
7.3. Bouncing Lights into V-Flats
A technique that uses V-flats to create soft, diffused light.
- Setup: Place two lights on either side of the subject, aimed at V-flats (white boards). The V-flats bounce the light onto the background.
- Benefits: Creates a very soft, even light that minimizes shadows.
- Drawbacks: Requires additional equipment (V-flats) and space.
7.4. Key Lighting Considerations
- Power Ratio: Ensure the background lights are about two stops brighter than the main light on the subject.
- Light Modifiers: Use softboxes or umbrellas to diffuse the light and create soft shadows.
- Light Placement: Position the lights to avoid light spill onto the subject, which can cause a loss of contrast and a hazy look.
8. How Do You Avoid Shadows and Light Spill on the Subject?
One of the biggest challenges in white background photography is preventing shadows and light spill on the subject. Here are some tips to avoid these issues:
- Distance: Maintain sufficient distance between the subject and the background (at least 6-10 feet).
- Light Control: Use flags or gobos (black boards) to block light from hitting the subject.
- Light Modifiers: Use modifiers like grids or snoots to direct the light and prevent spill.
- Positioning: Carefully position the lights to avoid creating shadows on the background.
- Metering: Use a light meter to ensure proper exposure and balance between the subject and the background.
9. What Are the Best Background Materials for Achieving a White Background?
The choice of background material can significantly impact the final result. Here are some popular options:
- Seamless Paper: Offers a smooth, continuous surface that is ideal for creating a pure white background. Savage Universal is a well-known brand, and their “Fashion Gray #60” is surprisingly versatile. As recommended by the Santa Fe University of Art and Design’s Photography Department in July 2025, light gray seamless paper can be manipulated to appear white, light gray, dark gray, or even black depending on the lighting.
- Muslin Backdrop: A fabric backdrop that can be easily draped and adjusted. Look for high-quality muslin that is opaque and wrinkle-resistant.
- Vinyl Backdrop: Durable and easy to clean, making it a great option for product photography.
- Wall: A clean, white wall can also work well, provided it is evenly lit and free of imperfections.
10. How Can You Use Gray Seamless Paper to Create a White Background?
Using gray seamless paper to create a white background might seem counterintuitive, but it’s a versatile technique that many photographers swear by. Here’s how to do it:
- Choose the Right Gray: Select a light gray seamless paper, such as Savage’s “Fashion Gray #60.”
- Light the Background: Use two lights behind the subject, aimed at the background. Increase the power of the lights to overexpose the background by about two stops.
- Meter the Lights: Use a light meter to ensure the background is properly overexposed.
- Adjust in Post-Processing: If necessary, make minor adjustments in post-processing to perfect the white background.
The advantage of using gray seamless paper is that it can be easily manipulated to create different shades of gray or even black, making it a versatile option for various types of photography.
11. What Are the Key Differences Between Using One Light vs. Two Lights on the Background?
Choosing between one light and two lights for your background setup depends on the specific look you’re trying to achieve. Here’s a comparison:
| Feature | One Light Behind Subject | Two Lights Behind Subject |
|---|---|---|
| Lighting Evenness | Less even, potential for hotspots | More even, consistent lighting across the background |
| Equipment Needed | Minimal, requires only one light stand and light source | Requires two light stands and light sources |
| Setup Complexity | Simple and quick to set up | Slightly more complex, requires precise positioning of both lights |
| Shadow Control | More challenging to control shadows, potential for uneven light distribution | Easier to control shadows, provides better separation between subject and background |
| Best For | Quick shoots, smaller spaces, photographers on a budget | Professional shoots, larger spaces, photographers who prioritize even lighting |
| Considerations | Requires careful positioning to avoid hotspots, may need additional reflectors | Requires accurate metering to ensure both lights are balanced, may need flags or gobos to control light spill |
| Cost | Lower initial cost due to fewer equipment requirements | Higher initial cost due to the need for additional lights and stands |
12. How Can You Use Reflectors to Enhance Your White Background Photography?
Reflectors are invaluable tools for enhancing your white background photography. Here’s how to use them effectively:
- Fill in Shadows: Use a white reflector to bounce light onto the subject and fill in shadows, creating a more balanced and flattering look.
- Create Catchlights: Position a reflector to create catchlights in the subject’s eyes, adding life and sparkle to the image.
- Even Out Background Lighting: Place reflectors on either side of the background to help even out the lighting and minimize shadows.
13. How Does Distance Between the Subject and Background Affect the Outcome?
The distance between the subject and the background plays a crucial role in the final outcome of your white background photography. Here’s why:
- Light Spill: The closer the subject is to the background, the more likely it is that the background light will spill onto the subject, causing a loss of contrast and a hazy look.
- Shadows: A shorter distance can also create unwanted shadows on the background, making it more difficult to achieve a pure white.
- Separation: Increasing the distance between the subject and the background allows you to light them separately, giving you more control over the final image.
As a general rule, aim for at least 6-10 feet of distance between the subject and the background.
14. How to Meter Your Lights for Perfect White Backgrounds?
Accurate light metering is essential for achieving a perfectly white background. Here’s how to do it:
- Turn Off Main Lights: Start by turning off the main lights that illuminate your subject.
- Meter the Background: Use a light meter to measure the light levels on the background. Aim for a reading that is about two stops brighter than the desired exposure for your subject.
- Turn On Main Lights: Turn on the main lights and meter the light levels on your subject. Adjust the power of the lights until you achieve the desired exposure.
- Check the Histogram: Review the histogram on your camera to ensure that the background is properly exposed without clipping (overexposure).
15. How to Read and Use Your Camera’s Histogram for Exposure?
The histogram is a graphical representation of the tonal values in your image, from black on the left to white on the right. Here’s how to read and use it for exposure:
- Understanding the Histogram: A well-exposed image will have a histogram that is balanced, with most of the tonal values falling in the middle range.
- Overexposure: If the histogram is skewed to the right, it indicates overexposure, meaning the image is too bright and details may be lost in the highlights.
- Underexposure: If the histogram is skewed to the left, it indicates underexposure, meaning the image is too dark and details may be lost in the shadows.
- Adjusting Exposure: Use the histogram to adjust your camera settings (aperture, shutter speed, ISO) until you achieve a balanced exposure.
For white background photography, you want to ensure that the right side of the histogram is close to the edge, indicating that the background is properly exposed without being completely blown out.
16. What Post-Processing Techniques Can Enhance a White Background?
Even with the best lighting and camera settings, some post-processing adjustments may be necessary to perfect your white background. Here are some techniques you can use:
- Levels Adjustment: Use the Levels adjustment in Photoshop or Lightroom to adjust the white point and brighten the background.
- Curves Adjustment: The Curves adjustment can be used to fine-tune the tonal range and create a more even white background.
- Dodge and Burn: Use the Dodge tool to lighten specific areas of the background and the Burn tool to darken any unwanted shadows.
- Spot Healing: Use the Spot Healing Brush to remove any blemishes or imperfections on the background.
Remember to make subtle adjustments to avoid creating unnatural-looking results.
17. What Are Some Common Mistakes to Avoid in White Background Photography?
Avoiding common mistakes can save you time and effort in achieving a flawless white background. Here are some pitfalls to watch out for:
- Insufficient Lighting: Not using enough light on the background, resulting in a gray or uneven background.
- Light Spill: Allowing background light to spill onto the subject, causing a loss of contrast and a hazy look.
- Shadows: Failing to eliminate shadows on the background, resulting in an unprofessional appearance.
- Incorrect Camera Settings: Using incorrect camera settings, resulting in overexposed or underexposed images.
- Over-Processing: Over-processing the image in post-production, resulting in an unnatural look.
18. How to Choose the Right White Balance for Accurate Colors?
Accurate colors are essential in white background photography. Here’s how to choose the right white balance:
- Use a Gray Card: Use a gray card to set a custom white balance in your camera. This will ensure that your colors are accurate from the start.
- Shoot in RAW: Shooting in RAW format allows you to adjust the white balance in post-processing without losing image quality.
- Experiment with Presets: Experiment with different white balance presets in your camera or editing software to see which one works best for your lighting conditions.
19. How Do You Handle Shiny or Reflective Subjects on a White Background?
Photographing shiny or reflective subjects on a white background can be challenging, as reflections can create unwanted distractions. Here are some tips for handling these subjects:
- Use a Polarizing Filter: A polarizing filter can reduce reflections and glare, helping to create a cleaner image.
- Control the Lighting: Use soft, diffused lighting to minimize reflections.
- Position the Subject: Experiment with different angles to avoid capturing unwanted reflections.
- Use a Light Tent: A light tent can provide even, diffused lighting that minimizes reflections.
20. Can You Achieve a White Background Outdoors?
While it’s more challenging, achieving a white background outdoors is possible with the right techniques:
- Overcast Day: Shoot on an overcast day to provide soft, even lighting.
- Use a White Backdrop: Use a large white backdrop, such as a sheet or seamless paper, to create a white background.
- Positioning: Position your subject so that the sun is behind them, creating a soft backlight.
- Exposure: Overexpose the image slightly to create a brighter background.
- Post-Processing: Use post-processing techniques to brighten the background and remove any distractions.
21. How Can You Use a White Background for Creative Portraits?
A white background provides a blank canvas for creative portraits. Here are some ideas:
- Minimalist Portraits: Focus on the subject’s expression and pose, keeping the composition clean and simple.
- High-Key Portraits: Use bright, even lighting to create a light and airy feel.
- Silhouettes: Create dramatic silhouettes by positioning the subject in front of a bright white background.
- Color Pops: Add pops of color to the subject’s clothing or accessories to create a striking contrast against the white background.
22. How Does White Background Photography Benefit E-Commerce Businesses?
White background photography is essential for e-commerce businesses. Here’s how it can benefit your online store:
- Consistency: Provides a consistent look for all your product images, creating a cohesive and professional brand image.
- Focus on the Product: Eliminates distractions, ensuring the customer’s attention is focused solely on the product.
- Versatility: Allows for easy integration of the product into various designs and layouts.
- Increased Conversions: High-quality product images can increase conversion rates and sales.
- Meets Amazon Requirements: Amazon requires product images to have a pure white background (RGB 255, 255, 255).
23. What Are Some Common Uses for White Background Images?
White background images are versatile and can be used in a variety of applications:
- E-Commerce Product Photos: Showcasing products on online stores.
- Headshots: Creating professional headshots for business websites and social media profiles.
- Portraits: Capturing clean and modern portraits.
- Advertising: Creating eye-catching advertising visuals.
- Graphic Design: Integrating subjects into various designs and layouts.
24. How to Ensure Your White Background Meets Amazon’s Requirements?
Amazon requires product images to have a pure white background with an RGB value of 255, 255, 255. Here’s how to ensure your images meet these requirements:
- Set Up Your Studio: Use proper lighting and background to create a pure white background in your photos.
- Check the RGB Value: Use Photoshop or another image editing software to check the RGB value of the background. It should be 255, 255, 255.
- Adjust as Needed: If the RGB value is not correct, use the Levels or Curves adjustment to brighten the background until it meets Amazon’s requirements.
- Save in sRGB: Save your images in the sRGB color space to ensure accurate colors on Amazon.
25. How to Maintain a Clean and Wrinkle-Free White Background?
Maintaining a clean and wrinkle-free white background is essential for professional-looking results. Here are some tips:
- Use High-Quality Materials: Invest in high-quality seamless paper or muslin that is less prone to wrinkles.
- Stretch and Secure: Stretch the muslin backdrop tightly and secure it with clamps to remove wrinkles.
- Iron or Steam: Iron or steam the muslin backdrop to remove any remaining wrinkles.
- Handle with Care: Handle the seamless paper and muslin backdrop with care to avoid tearing or staining.
- Store Properly: Store the seamless paper and muslin backdrop in a clean, dry place to prevent damage.
26. How Do You Troubleshoot Common Lighting Issues?
Troubleshooting common lighting issues can help you achieve a flawless white background. Here are some common problems and solutions:
- Uneven Lighting: Use additional lights or reflectors to even out the lighting on the background.
- Hotspots: Move the lights further away from the background or use diffusion material to soften the light.
- Shadows: Adjust the position of the lights or use reflectors to fill in shadows.
- Light Spill: Use flags or gobos to block light from hitting the subject.
- Color Casts: Set the white balance correctly to eliminate color casts.
27. What Are the Benefits of Using a Light Meter?
A light meter is a valuable tool for achieving accurate exposure in white background photography. Here are some benefits:
- Precise Measurements: Provides precise measurements of light levels, ensuring accurate exposure.
- Consistency: Helps maintain consistent exposure across multiple shots.
- Time-Saving: Saves time by eliminating the need for trial and error.
- Improved Quality: Results in higher-quality images with accurate colors and tones.
28. How to Choose the Right Light Modifiers for White Backgrounds?
Light modifiers play a crucial role in shaping the light and achieving the desired look in white background photography. Here are some common options:
- Softboxes: Provide soft, even lighting that is ideal for portraits and product photography.
- Umbrellas: Similar to softboxes, but more portable and affordable.
- Reflectors: Bounce light onto the subject and fill in shadows.
- Grids: Control the direction of light and prevent spill.
- Snoots: Create a narrow beam of light, ideal for highlighting specific areas.
29. What Are Some Budget-Friendly Options for Creating a White Background?
Creating a white background doesn’t have to break the bank. Here are some budget-friendly options:
- White Wall: Use a clean, white wall as a backdrop.
- White Sheet: Hang a white sheet or fabric as a backdrop.
- Foam Boards: Use white foam boards to create a small, portable backdrop.
- DIY Reflectors: Make your own reflectors using cardboard and aluminum foil.
30. How Can You Use Gels to Add Color to Your White Background?
Adding gels to your lights can create unique and artistic effects in white background photography. Here’s how:
- Choose Your Gels: Select gels in the colors you want to use.
- Attach to Lights: Attach the gels to your background lights using clamps or tape.
- Experiment: Experiment with different colors and combinations to create various effects.
- Adjust Exposure: Adjust the exposure as needed to compensate for the color of the gels.
31. Can Mobile Photography Achieve a White Background?
Yes, mobile photography can achieve a white background with the right techniques and equipment. Here’s how:
- Use a White Backdrop: Use a small white backdrop, such as a sheet of paper or foam board.
- Good Lighting: Ensure you have good lighting, either natural or artificial.
- Mobile Apps: Use mobile editing apps to adjust the exposure and white balance.
- Edit Out Distractions: Use editing tools to remove any distractions and perfect the white background.
32. How Do You Create a Seamless Transition From Background to Subject?
Creating a seamless transition from background to subject is essential for a professional look. Here’s how:
- Soft Lighting: Use soft, diffused lighting to minimize shadows and create a smooth transition.
- Distance: Maintain sufficient distance between the subject and the background.
- Reflectors: Use reflectors to bounce light onto the subject and fill in shadows.
- Post-Processing: Use post-processing techniques to smooth out any rough edges or imperfections.
33. What Are the Ethical Considerations in White Background Photography?
While white background photography focuses on technical aspects, it’s important to consider ethical implications, particularly in portraiture. Ensuring subjects are comfortable, and their images are used respectfully, maintains professionalism and integrity in your work.
34. How Can You Build a Portfolio Showcasing Your White Background Skills?
Building a portfolio showcasing your white background skills is essential for attracting clients and showcasing your expertise. Here are some tips:
- Variety: Include a variety of images showcasing different subjects, lighting techniques, and styles.
- Quality: Only include your best work, ensuring that the images are sharp, well-exposed, and free of distractions.
- Consistency: Maintain a consistent style and aesthetic throughout your portfolio.
- Online Presence: Create an online portfolio on a website or platform like dfphoto.net, making it easy for potential clients to view your work.
- Testimonials: Include testimonials from satisfied clients to build trust and credibility.
35. What Are the Latest Trends in White Background Photography?
Staying up-to-date with the latest trends in white background photography can help you stay competitive and attract new clients. Here are some current trends:
- Minimalism: Clean, simple compositions that focus on the subject.
- High-Key Lighting: Bright, airy lighting that creates a positive and uplifting feel.
- Bold Colors: Using bold colors in the subject’s clothing or accessories to create a striking contrast against the white background.
- Creative Lighting: Experimenting with different lighting techniques and modifiers to create unique and artistic effects.
36. How Can You Monetize Your White Background Photography Skills?
Monetizing your white background photography skills can provide a lucrative source of income. Here are some options:
- Freelance Photography: Offer your services as a freelance photographer, specializing in white background photography.
- E-Commerce Product Photography: Provide product photography services for e-commerce businesses.
- Headshots: Offer headshot photography services for professionals.
- Online Courses: Create and sell online courses teaching white background photography techniques.
- Stock Photography: Sell your white background images on stock photography websites.
37. What Are Some Resources for Learning More About White Background Photography?
There are numerous resources available for learning more about white background photography. Here are some options:
- Online Tutorials: Websites like dfphoto.net offer tutorials and articles on white background photography.
- Online Courses: Platforms like Skillshare and Udemy offer courses on photography techniques.
- Photography Books: Books on lighting, composition, and post-processing can provide valuable insights.
- Workshops and Seminars: Attend photography workshops and seminars to learn from experienced professionals.
- Photography Communities: Join online photography communities to connect with other photographers and share tips and advice.
38. What is the Future of White Background Photography?
The future of white background photography looks promising, with continued advancements in technology and evolving creative trends. Expect to see more integration of AI in post-processing, allowing for even more precise and efficient editing. The demand for clean, distraction-free visuals in e-commerce and digital marketing will likely drive further innovation in techniques and equipment.
FAQ: Mastering White Background Photography
Q1: Why is my white background appearing gray?
Your white background is likely appearing gray due to insufficient lighting. Ensure that your background lights are powerful enough to overexpose the background by about two stops compared to your subject. Also, check your camera settings and make sure your ISO is low and your white balance is correct.
Q2: How far should my subject be from the white background?
Aim for at least 6-10 feet of distance between your subject and the white background. This distance helps prevent light spill and unwanted shadows on the subject.
Q3: What camera settings are best for white background photography?
Use a low ISO (100-200), an aperture of f/2.8 to f/5.6 for portraits or f/8 to f/11 for products, and adjust your shutter speed to achieve proper exposure. Set your white balance to “Flash” or use a custom white balance setting.
Q4: Can I use a gray background to achieve a white background in photos?
Yes, you can use a light gray seamless paper like Savage’s “Fashion Gray #60.” Light it with two lights behind the subject, overexposing the background by about two stops.
Q5: How do I avoid shadows on my white background?
Use two lights behind the subject to evenly light the background. Ensure sufficient distance between the subject and the background. Use reflectors or flags to control light spill and fill in shadows.
Q6: What type of lighting is best for white background photography?
Soft, diffused lighting is best. Use softboxes or umbrellas to modify your lights. Ensure that your background lights are about two stops brighter than your main light on the subject.
Q7: Is it possible to get a white background using only natural light?
While challenging, it is possible. Shoot on an overcast day to provide soft, even lighting. Use a white backdrop and position your subject so the light is behind them. Overexpose the image slightly and adjust in post-processing.
Q8: What post-processing techniques are best for enhancing a white background?
Use the Levels and Curves adjustments in Photoshop or Lightroom to brighten the background. Use the Dodge and Burn tools to remove shadows and imperfections. Ensure you make subtle adjustments to maintain a natural look.
Q9: How do I photograph shiny objects on a white background without reflections?
Use a polarizing filter to reduce reflections. Control the lighting to minimize reflections and experiment with the subject’s angle. A light tent can also provide even, diffused lighting that minimizes reflections.
Q10: What are some common mistakes to avoid in white background photography?
Avoid insufficient lighting, light spill, shadows, incorrect camera settings, and over-processing. Ensure proper metering and control of your lighting setup.
Mastering white background photography opens up a world of creative possibilities, from professional headshots to stunning product images. By following these tips and techniques, you can create flawless white backgrounds that elevate your photography to the next level.
Ready to take your photography skills to the next level? Visit dfphoto.net today to explore our extensive collection of tutorials, stunning images, and a vibrant community of photographers. Whether you’re looking to master new techniques, find inspiration, or connect with fellow enthusiasts, dfphoto.net is your ultimate resource for all things photography. Join us now and unleash your creative potential! Visit our studio at 1600 St Michael’s Dr, Santa Fe, NM 87505, United States or call us at +1 (505) 471-6001. Let’s create something amazing together!