Are you struggling with limited storage on your iPhone due to your ever-growing photo and video collection? At dfphoto.net, we understand the importance of capturing and preserving your memories. This guide provides actionable strategies to optimize your iPhone photo storage, reclaim valuable space, and continue capturing stunning images. Dive into our guide for expert tips and LSI keywords to manage your digital assets effectively, ensuring you never miss a shot!
1. Understanding iPhone Storage and Its Impact on Photography
1.1. How Can I Check My iPhone Storage to See What’s Taking Up Space?
The easiest way to check your iPhone storage is by going to Settings, then General, and finally, iPhone Storage. This section provides a detailed breakdown of how much space each app and type of file (photos, videos, etc.) is consuming. This is crucial because understanding your storage usage patterns helps you identify what needs to be optimized. For instance, if photos and videos are taking up the most space, you know where to focus your efforts.
To view your iPhone storage:
- Open the Settings app.
- Tap General.
- Select iPhone Storage.
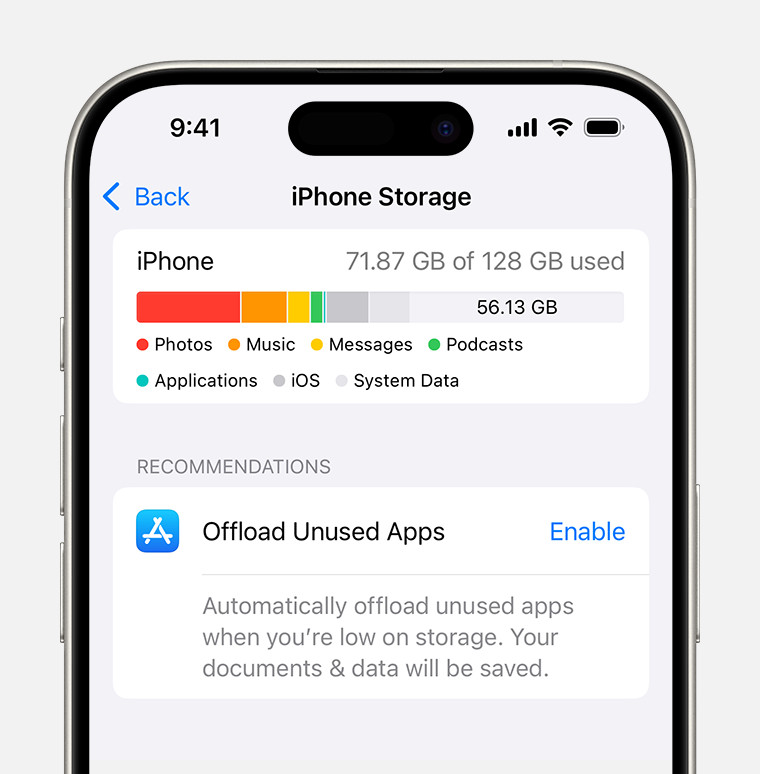 iPhone storage section of Settings displaying a recommendation to Offload Unused Apps
1.2. Why Is Managing iPhone Storage Important for Photographers?
For photographers, managing iPhone storage is particularly vital because high-resolution photos and videos consume significant space. A full storage can prevent you from capturing new images at crucial moments and degrade your phone’s overall performance. Regular storage management ensures you can continue to take high-quality photos and videos without interruption.
1.3. What Happens When My iPhone Storage Is Full?
When your iPhone storage is full, you will encounter several issues:
- Inability to Take New Photos/Videos: The camera app will likely show an error message, preventing you from capturing new memories.
- App Performance Issues: Apps may crash or run slowly due to insufficient storage space.
- Software Update Problems: You might not be able to download and install the latest iOS updates, which can leave your device vulnerable to security threats.
- Syncing Issues: iCloud backups and syncing may fail, putting your data at risk.
- General Slowdown: Overall device performance can degrade, leading to a frustrating user experience.
2. Optimizing iCloud Photos for iPhone Storage
2.1. What Is iCloud Photos and How Does It Help Free Up Space?
iCloud Photos is Apple’s cloud storage service that automatically uploads and syncs your photo and video library across all your Apple devices. It helps free up space on your iPhone by storing the full-resolution versions of your photos and videos in the cloud while keeping optimized, smaller versions on your device.
2.2. How Do I Enable iCloud Photos on My iPhone?
To enable iCloud Photos:
- Go to Settings.
- Tap on your Apple ID at the top.
- Select iCloud.
- Tap Photos.
- Toggle Sync this iPhone (or iCloud Photos in older iOS versions) to the on position.
- Choose Optimize iPhone Storage.
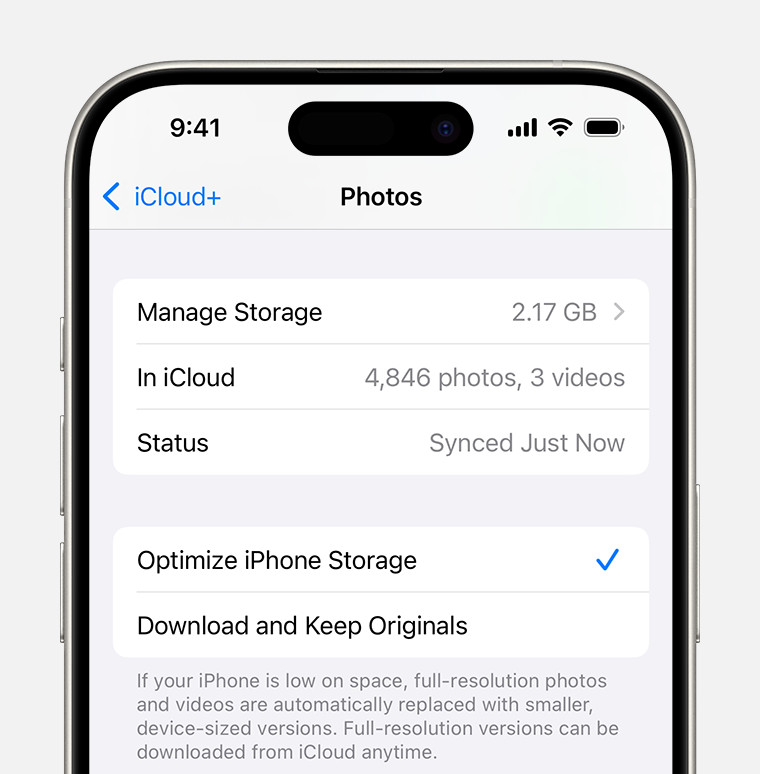 iCloud Photos section of iCloud settings showing status and photo storage options
2.3. What Is the Difference Between “Optimize iPhone Storage” and “Download and Keep Originals”?
- Optimize iPhone Storage: This setting stores full-resolution photos and videos in iCloud, and smaller, space-saving versions are kept on your device. When you view a photo or video, the full-resolution version is downloaded from iCloud as needed. This option is ideal for saving space.
- Download and Keep Originals: This setting downloads and stores the full-resolution versions of all your photos and videos on your device, which means they take up more space. This is best if you want to have immediate access to all your original files without needing an internet connection.
2.4. How Much iCloud Storage Do I Need for My Photos and Videos?
The amount of iCloud storage you need depends on the size of your photo and video library. Apple offers several iCloud storage plans:
| Storage Plan | Price (USD per month) | Best For |
|---|---|---|
| 5 GB | Free | Light users with few photos and videos |
| 50 GB | $0.99 | Users with a moderate amount of photos and videos |
| 200 GB | $2.99 | Families or users with extensive photo and video libraries |
| 2 TB | $9.99 | Professional photographers or videographers |
To determine how much storage you need:
- Go to Settings > Photos.
- Look at the size of your library.
If your library exceeds 5 GB, you’ll need to upgrade to a paid plan.
2.5. Can I Access My iCloud Photos on Other Devices?
Yes, you can access your iCloud Photos on any device where you’re signed in with the same Apple ID. This includes iPhones, iPads, Macs, and even Windows PCs via the iCloud website or iCloud for Windows app.
3. Deleting Unnecessary Photos and Videos
3.1. How Do I Identify and Delete Unwanted Photos and Videos on My iPhone?
Regularly reviewing and deleting unwanted photos and videos is an effective way to free up space. Here’s how to identify and delete them:
- Review Your Library: Open the Photos app and go through your library. Look for duplicates, blurry shots, accidental captures, and photos you no longer need.
- Use the “Duplicates” Album: iOS 16 and later versions have a “Duplicates” album that identifies identical or very similar photos. To access it, go to the Photos app, tap the Albums tab, and scroll down to the Utilities section.
- Delete Unwanted Items: Tap Select in the upper-right corner, select the photos and videos you want to delete, and tap the Trash icon.
3.2. What Is the “Recently Deleted” Album and How Does It Work?
When you delete photos and videos, they are moved to the “Recently Deleted” album. These items remain in this album for 30 days before being permanently deleted. This gives you a chance to recover any mistakenly deleted items.
To access the “Recently Deleted” album:
- Open the Photos app.
- Tap the Albums tab.
- Scroll down to the Utilities section and tap Recently Deleted.
You can either recover the items by tapping Recover or permanently delete them by tapping Delete. Permanently deleting items from this album immediately frees up storage space.
3.3. Can I Recover Photos and Videos That I’ve Accidentally Deleted?
Yes, as long as the photos and videos are still in the “Recently Deleted” album, you can recover them. Simply go to the “Recently Deleted” album, select the items you want to recover, and tap Recover.
However, once the 30-day period has passed, the items are permanently deleted and cannot be recovered from your iPhone. If you have iCloud Photos enabled, check your iCloud account on other devices or via the iCloud website to see if the photos are still there.
3.4. How to Delete Photos Permanently from iPhone?
To permanently delete photos from your iPhone and immediately free up storage space:
- Open the Photos app.
- Tap the Albums tab.
- Scroll down to the Utilities section and tap Recently Deleted.
- Tap Select in the upper-right corner.
- Select the photos and videos you want to permanently delete.
- Tap Delete and confirm the deletion.
4. Transferring Photos and Videos to External Storage
4.1. What Are the Benefits of Transferring Photos and Videos to External Storage?
Transferring photos and videos to external storage provides several benefits:
- Frees Up iPhone Storage: Moving large files to an external drive clears space on your iPhone, improving performance.
- Provides Backup: External storage acts as a backup in case something happens to your iPhone or iCloud account.
- Accessibility: You can easily access your photos and videos on other devices, such as computers or TVs, without needing an internet connection.
- Organization: External drives allow you to organize your photos and videos into folders and categories, making them easier to manage.
4.2. What Types of External Storage Devices Can I Use?
You can use various types of external storage devices:
- External Hard Drives: These offer large storage capacities and are suitable for archiving large photo and video libraries.
- USB Flash Drives: Compact and portable, these are useful for transferring smaller sets of photos and videos.
- SD Cards: If you have an iPhone with a Lightning or USB-C port, you can use an SD card reader to transfer files directly from an SD card to your iPhone.
- NAS (Network-Attached Storage) Devices: These devices connect to your home network and allow you to store and access your photos and videos from any device on the network.
4.3. How Do I Transfer Photos and Videos to an External Hard Drive Using a Computer?
To transfer photos and videos to an external hard drive using a computer:
- Connect Your iPhone to Your Computer: Use a USB cable to connect your iPhone to your computer.
- Unlock Your iPhone: If prompted, unlock your iPhone and tap Trust This Computer.
- Open the Photos App on Your Computer:
- Mac: The Photos app should open automatically. If not, open it from the Applications folder.
- Windows: The Photos app should also open automatically. If not, open it from the Start menu.
- Import Photos and Videos:
- Mac: Click on your iPhone in the sidebar of the Photos app. Click Import All New Items or select the photos and videos you want to import and click Import Selected.
- Windows: Click on your iPhone in the left pane of the Photos app. Click Import and follow the on-screen instructions.
- Choose Your External Hard Drive as the Destination: When prompted, select your external hard drive as the destination for the imported photos and videos.
- Verify the Transfer: Once the transfer is complete, verify that all your photos and videos have been successfully copied to the external hard drive.
- Delete from iPhone (Optional): After verifying the transfer, you can delete the photos and videos from your iPhone to free up space.
4.4. Can I Transfer Photos and Videos Directly to an External Drive Without a Computer?
Yes, you can transfer photos and videos directly to an external drive without a computer using specific accessories:
- Lightning or USB-C to USB Adapter: Connect a Lightning or USB-C to USB adapter to your iPhone.
- Connect External Drive: Plug your external drive into the USB port on the adapter.
- Use the Files App: Open the Files app on your iPhone.
- Locate Photos and Videos: Go to Photos or iCloud Drive to find the photos and videos you want to transfer.
- Copy and Paste: Select the photos and videos, tap Share, and choose Save to Files. Select your external drive as the destination.
5. Using Cloud Storage Services Other Than iCloud
5.1. What Are Some Alternative Cloud Storage Services for Photos and Videos?
Besides iCloud, several other cloud storage services are suitable for storing photos and videos:
- Google Photos: Offers unlimited storage for “high quality” photos and videos (compressed) or limited storage for “original quality” (counts against your Google Drive storage).
- Dropbox: A versatile cloud storage service that allows you to store and sync various types of files, including photos and videos.
- Amazon Photos: Provides unlimited photo storage for Amazon Prime members and limited video storage.
- Microsoft OneDrive: Integrated with Microsoft Office, OneDrive allows you to store and share photos, videos, and other files.
5.2. How Does Google Photos Work for Backing Up iPhone Photos?
Google Photos is a popular choice for backing up iPhone photos due to its ease of use and generous storage options. Here’s how it works:
- Download and Install the Google Photos App: Download the Google Photos app from the App Store and install it on your iPhone.
- Sign In to Your Google Account: Open the app and sign in to your Google account. If you don’t have one, you can create one for free.
- Enable Backup & Sync: Tap your profile picture in the upper-right corner and select Photos settings. Tap Backup & sync and toggle the switch to the on position.
- Choose Upload Size: Select either High quality (unlimited storage with slight compression) or Original quality (uses your Google Drive storage).
- Automatic Backup: Google Photos will automatically back up your photos and videos to your Google account whenever your iPhone is connected to Wi-Fi.
5.3. What Are the Pros and Cons of Using Google Photos Compared to iCloud Photos?
| Feature | Google Photos | iCloud Photos |
|---|---|---|
| Storage | Unlimited “High quality” or limited “Original quality” | Limited free storage (5 GB), paid upgrades available |
| Platform | Cross-platform (iOS, Android, web) | Primarily Apple ecosystem |
| Integration | Tightly integrated with Google services | Tightly integrated with Apple ecosystem |
| Compression | Compresses photos in “High quality” mode | No compression if “Download and Keep Originals” is enabled |
| Ease of Use | Simple and user-friendly interface | Seamless integration with iOS, but can be less intuitive for non-Apple users |
| Cost | Free for “High quality,” paid for “Original quality” (via Google Drive) | Paid for storage above 5 GB |
5.4. How Do I Transfer Photos from iCloud Photos to Another Cloud Service?
To transfer photos from iCloud Photos to another cloud service:
- Download Photos from iCloud:
- On a Computer: Go to the iCloud website, sign in with your Apple ID, and go to the Photos app. Select the photos and videos you want to download and click the download icon.
- On an iPhone: Open the Photos app, select the photos and videos you want to transfer, tap the Share icon, and choose Save to Files. Save the files to your iPhone.
- Upload to the New Cloud Service:
- Google Photos: Open the Google Photos app, tap the upload icon, and select the photos and videos you saved to your iPhone.
- Dropbox, OneDrive, Amazon Photos: Open the respective app, navigate to the upload section, and select the photos and videos you saved to your iPhone.
6. Optimizing Photo and Video Settings on iPhone
6.1. What Photo and Video Settings Affect Storage Space?
Several photo and video settings impact storage space:
- Photo Resolution: Higher resolution photos (e.g., 48MP) take up more space.
- Video Resolution and Frame Rate: Higher resolution videos (e.g., 4K) and higher frame rates (e.g., 60 fps) consume more storage.
- HDR (High Dynamic Range): HDR photos can take up more space because they contain more information.
- Live Photos: These capture a few seconds of video along with the still image, increasing file size.
6.2. How Can I Adjust Photo Resolution to Save Space?
To adjust photo resolution:
- Open the Settings app.
- Tap Camera.
- Tap Formats.
- Choose High Efficiency to save photos and videos in HEIF/HEVC format, which offers better compression and smaller file sizes compared to JPEG/H.264.
For iPhones with 48MP cameras:
- Open the Settings app.
- Tap Camera.
- Tap Formats and enable ProRes.
- Tap ProRes and select the lower resolution.
6.3. How Can I Adjust Video Resolution and Frame Rate to Reduce File Size?
To adjust video resolution and frame rate:
- Open the Settings app.
- Tap Camera.
- Tap Record Video.
- Choose a lower resolution and frame rate, such as 1080p HD at 30 fps or 720p HD at 30 fps.
6.4. Should I Turn Off HDR and Live Photos to Save Space?
- HDR: While HDR improves the dynamic range of your photos, it can increase file size. If storage space is a concern, you can turn off HDR by going to Settings > Camera and toggling off Smart HDR.
- Live Photos: Live Photos capture a short video clip along with the still image, which doubles the file size. To save space, you can turn off Live Photos by tapping the Live Photos icon in the Camera app (the icon looks like concentric circles).
7. Managing Apps and Other Files on iPhone
7.1. Do Apps Take Up a Lot of Storage Space on My iPhone?
Yes, apps can take up a significant amount of storage space, especially games and apps with large media files. Over time, app caches and data can accumulate, further increasing their storage footprint.
7.2. How Can I Identify Which Apps Are Taking Up the Most Space?
To identify which apps are taking up the most space:
- Open the Settings app.
- Tap General.
- Tap iPhone Storage.
The list of apps will be displayed in order of storage usage, with the apps using the most space at the top.
7.3. What Is “Offload Unused Apps” and How Does It Work?
“Offload Unused Apps” is a feature that automatically removes apps you haven’t used in a while, but keeps their data and documents. This frees up storage space without deleting your personal data. When you reinstall the app, your data is restored.
To enable “Offload Unused Apps”:
- Open the Settings app.
- Tap App Store.
- Toggle Offload Unused Apps to the on position.
7.4. How Do I Delete Apps That I No Longer Use?
To delete apps you no longer use:
- From the Home Screen: Touch and hold the app icon until the menu appears. Tap Remove App and then tap Delete App.
- From Settings: Go to Settings > General > iPhone Storage, select the app, and tap Delete App.
7.5. Can I Clear App Cache and Data to Free Up Space?
Some apps allow you to clear their cache and data within the app settings. However, not all apps offer this feature.
To clear app cache and data:
- Open the app.
- Look for a “Storage” or “Cache” option in the app settings.
- Tap Clear Cache or Clear Data if available.
For apps that don’t offer this option, you can try deleting and reinstalling the app, which will clear its cache and data.
8. Using File Compression Techniques
8.1. What Is File Compression and How Can It Help Save Space?
File compression reduces the size of files by removing redundant data. Compressed files take up less storage space and are easier to share.
8.2. How Can I Compress Photos and Videos on My iPhone?
While the iPhone doesn’t have a built-in feature to compress photos and videos, you can use third-party apps to compress files:
- Compress Photos & Pictures: This app allows you to compress photos by adjusting the resolution and quality.
- Video Compressor: This app compresses videos by reducing the resolution, bitrate, or frame rate.
8.3. What Are HEIF and HEVC Formats and How Do They Save Space?
- HEIF (High Efficiency Image File Format): This is a modern image format that offers better compression than JPEG, resulting in smaller file sizes without sacrificing image quality.
- HEVC (High Efficiency Video Coding): Also known as H.265, this is a video compression standard that provides better compression than H.264, resulting in smaller video file sizes.
To use HEIF and HEVC formats:
- Open the Settings app.
- Tap Camera.
- Tap Formats.
- Choose High Efficiency.
8.4. Are There Any Downsides to Using Compressed Files?
While compressed files save space, there are a few potential downsides:
- Loss of Quality: Compressing files can sometimes result in a slight loss of image or video quality.
- Compatibility Issues: Some older devices or software may not support HEIF and HEVC formats.
- Time and Effort: Compressing files requires additional time and effort.
9. Regularly Backing Up Your iPhone
9.1. Why Is It Important to Regularly Back Up My iPhone?
Regularly backing up your iPhone is crucial for several reasons:
- Data Protection: Backups protect your data in case your iPhone is lost, stolen, damaged, or experiences a software issue.
- Easy Restoration: Backups allow you to easily restore your data to a new iPhone or after a factory reset.
- Peace of Mind: Knowing that your data is safely backed up provides peace of mind.
9.2. How Can I Back Up My iPhone to iCloud?
To back up your iPhone to iCloud:
- Connect your iPhone to a Wi-Fi network.
- Go to Settings.
- Tap on your Apple ID at the top.
- Select iCloud.
- Tap iCloud Backup.
- Toggle iCloud Backup to the on position.
- Tap Back Up Now.
9.3. How Can I Back Up My iPhone to a Computer Using iTunes or Finder?
To back up your iPhone to a computer using iTunes or Finder:
- Connect your iPhone to your computer using a USB cable.
- On macOS Catalina or later: Open Finder.
- On macOS Mojave or earlier, or on Windows: Open iTunes.
- Select your iPhone when it appears in Finder or iTunes.
- Click Back Up Now.
- If you want to encrypt your backup, select Encrypt local backup and create a password.
9.4. What Data Is Included in an iPhone Backup?
An iPhone backup includes:
- Photos and videos
- App data
- Device settings
- Messages
- Contacts
- Calendar events
- Notes
- And more
However, an iPhone backup does not include:
- Data already stored in iCloud (e.g., iCloud Photos, Contacts, Calendar)
- Face ID or Touch ID settings
10. Consulting Photography Experts and Resources
10.1. Where Can I Find Expert Advice on iPhone Photography?
You can find expert advice on iPhone photography from various sources:
- Online Photography Websites: Websites like dfphoto.net offer articles, tutorials, and reviews on iPhone photography techniques and equipment.
- Photography Blogs: Many professional photographers and enthusiasts share their tips and experiences on blogs.
- Photography Forums: Online forums allow you to ask questions and get advice from other photographers.
- Photography Books and Magazines: Books and magazines dedicated to photography often include sections on iPhone photography.
- Photography Workshops and Courses: Attending workshops and courses can provide hands-on training and personalized feedback from instructors.
10.2. Are There Any Photography Communities or Forums Where I Can Ask for Help?
Yes, several photography communities and forums are available:
- DPReview Forums: A popular forum for discussing all aspects of digital photography, including iPhone photography.
- Photography Stack Exchange: A question and answer site for photographers.
- Reddit Photography Subreddits: Subreddits like r/iPhoneography and r/photography are great places to ask questions and share your photos.
- Facebook Photography Groups: Many Facebook groups are dedicated to iPhone photography, where members share tips, photos, and advice.
10.3. How Can dfphoto.net Help Me Improve My iPhone Photography Skills?
At dfphoto.net, we are dedicated to helping you enhance your iPhone photography skills. Our website offers:
- Comprehensive Guides: Detailed articles on various iPhone photography techniques, settings, and accessories.
- Inspirational Content: Showcases of stunning iPhone photos to inspire your creativity.
- Community Engagement: A platform to connect with other iPhone photographers, share your work, and receive feedback.
- Product Reviews: Honest reviews of iPhone photography apps and accessories to help you make informed decisions.
10.4. What Are Some Recommended Books or Online Courses on iPhone Photography?
- The iPhone Photography Book by Scott Kelby: A comprehensive guide to taking better photos with your iPhone.
- iPhone Photography School Online Course: A structured online course that covers all aspects of iPhone photography.
- Pro Camera by Hunter Hammersen: Learn to master the iPhone camera settings.
FAQ: Freeing Up Photo Space on Your iPhone
1. Why is my iPhone storage full even though I have iCloud Photos enabled?
Even with iCloud Photos enabled, your iPhone keeps optimized versions of your photos on the device. To maximize space, ensure “Optimize iPhone Storage” is selected in iCloud Photos settings.
2. How often should I clean up my iPhone storage?
Ideally, clean up your iPhone storage regularly, such as once a month, or whenever you receive a notification that your storage is almost full.
3. Will deleting photos from my iPhone also delete them from iCloud?
Yes, if you have iCloud Photos enabled, deleting a photo from your iPhone will also delete it from iCloud and any other devices synced with your Apple ID. Be sure you have backed up important photos before deleting.
4. Is it safe to use third-party apps to compress photos and videos?
Yes, but ensure you download apps from reputable sources like the App Store to avoid malware or privacy issues. Read reviews and check the app’s permissions before installing.
5. How can I tell if my photos are being stored in full resolution on iCloud?
Go to Settings > Your Name > iCloud > Photos. If “Download and Keep Originals” is selected, your photos are stored in full resolution on iCloud. If “Optimize iPhone Storage” is selected, full-resolution photos are stored in iCloud, and optimized versions are on your device.
6. What happens if I stop paying for iCloud storage?
If you exceed your free 5GB iCloud storage and stop paying for a plan, new photos and videos won’t sync to iCloud. Apple may eventually delete data if you don’t reduce your storage usage or upgrade your plan.
7. Can I use an Android phone to access my iCloud Photos?
No, iCloud Photos is primarily designed for Apple devices. However, you can access your iCloud Photos on a Windows PC via the iCloud for Windows app or through the iCloud website.
8. How do I prevent my iPhone from taking up too much storage in the future?
Adjust your camera settings to lower resolutions and frame rates, regularly clean up your photo library, and consider using cloud storage services to offload your photos and videos.
9. What should I do if my “Recently Deleted” album is also full?
If your “Recently Deleted” album is full, permanently delete the items in the album to immediately free up storage space.
10. Are there any accessories that can help me manage my iPhone storage?
Yes, accessories like Lightning or USB-C flash drives and SD card readers can help you transfer photos and videos to external storage without using a computer.
Freeing up photo space on your iPhone involves a combination of strategies, from utilizing iCloud Photos and alternative cloud services to optimizing your camera settings and regularly managing your files. By following these tips, you can ensure that your iPhone always has enough space to capture your precious moments.
Ready to take your iPhone photography to the next level? Visit dfphoto.net for more in-depth guides, inspiring galleries, and a vibrant community of photographers. Don’t miss out on the opportunity to elevate your skills and connect with fellow enthusiasts. Explore dfphoto.net today and start capturing the world through your lens like never before!