Keeping your photo editing skills sharp and trendy is essential in today’s visually driven social media landscape. Mirror images have emerged as a simple yet effective technique to add a unique touch to your photos and make your content stand out. While the process is straightforward, many users are unaware of how to achieve this effect, especially on their Android devices. This guide will walk you through the easiest and most effective methods to flip photos on Android, transforming you into a mirror image expert in no time.
Understanding Mirror Images and Photo Flipping
Mirror images are created by combining a regular photo with its flipped version. This combination results in a visually appealing mirrored effect. You can achieve this by flipping an image either horizontally or vertically. A horizontal flip positions the original and flipped images side-by-side, while a vertical flip stacks them one above the other.
Creating a mirror image involves these basic steps:
- Select an image: Choose the photo you wish to transform.
- Duplicate the image: Create a copy of your selected photo.
- Flip one image: Reverse the duplicate image, either horizontally or vertically.
- Combine the images: Merge the original and flipped versions to create the mirror effect.
Let’s delve into the specifics of flipping an image directly on your Android phone.
How to Flip a Photo on Android Using Google Photos
For Android users, flipping an image is conveniently accessible through the default Google Photos app. This method offers a quick and easy way to reverse your photos directly on your device without needing to download any extra applications.
Here’s How To Flip A Photo On Android using Google Photos:
- Open Google Photos: Launch the Google Photos app on your Android device.
- Select the image: Navigate through your gallery and tap on the photo you want to flip.
- Tap Edit: Once you’ve selected your image, tap the “Edit” button, usually located at the bottom center of the screen. It’s represented by an icon with three horizontal lines and sliders.
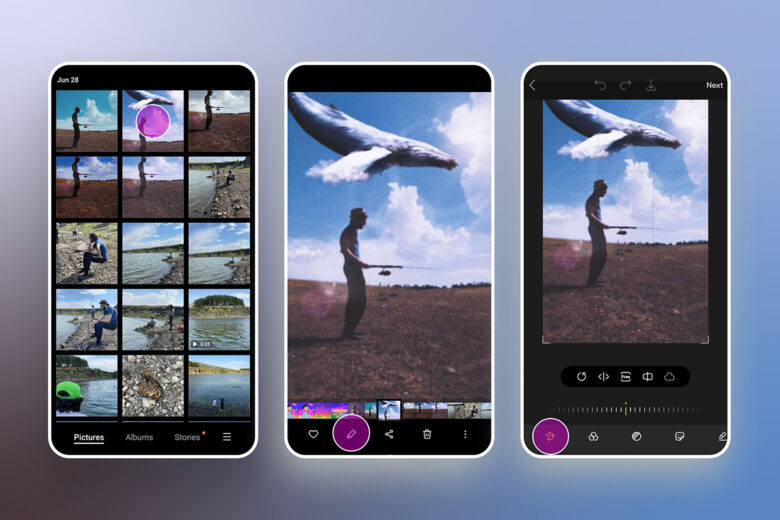 Steps to access the crop and rotate tools in Google Photos on Android
- Go to Crop: Within the editing options, look for and select the “Crop” tool. It’s typically represented by a square icon.
- Find the Flip option: In the Crop menu, you will see a “Rotate” icon, and often a separate “Flip” icon. The Flip icon usually looks like a triangle with a horizontal or vertical arrow indicating the direction of the flip. Tap the Flip icon. This will horizontally flip your image immediately. Some versions may have a Rotate icon that, when tapped repeatedly, will eventually offer a flip option.
- Save your flipped photo: After flipping your image, tap “Done” or “Save copy” (depending on your Google Photos version) to save the changes. Saving as a copy ensures your original photo remains untouched.
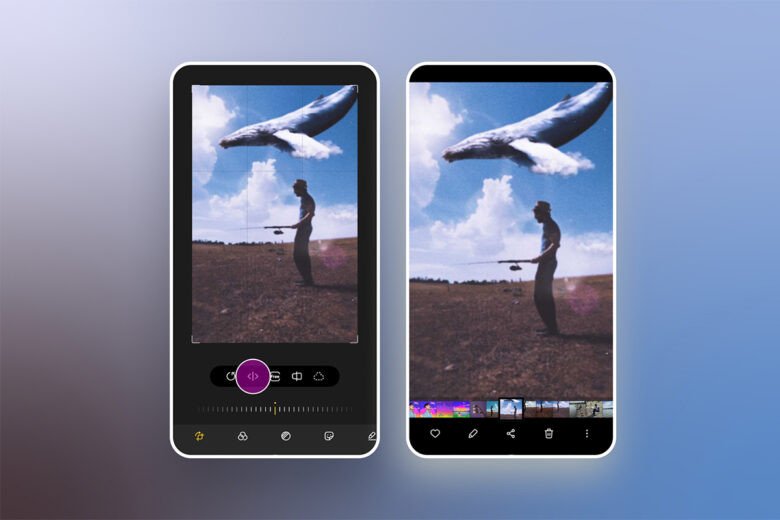 Steps to flip and save an image using Google Photos on Android
That’s all it takes to flip a photo on your Android using Google Photos! It’s a simple process built right into your phone’s default photo management system.
Flipping Images on iPhone: A Quick Guide
While our focus is Android, for comparison and completeness, here’s how to flip images on an iPhone using the default Photos app, as the process is also straightforward:
- Open Photos app: Launch the Photos app on your iPhone.
- Select image: Choose the image you want to flip.
- Tap Edit: Tap “Edit” in the top right corner.
- Select Crop tool: Choose the Crop icon.
- Tap Flip: Tap the Flip icon in the top left corner.
- Tap Done: Save your edit by tapping “Done” in the bottom right corner.
The process is very similar, highlighting the universal need for basic photo editing features across different mobile platforms.
The Psychology Behind Phone Camera Photo Flipping
 A woman playfully poses for a mirrored selfie, highlighting the effect of camera flipping in self-portraits
Ever noticed how your phone’s front camera seems to flip your selfies? There’s a reason for this! Essentially, your phone attempts to show you how others perceive you. Initially, the front camera mirrors your image, reflecting how you typically see yourself – like looking in a mirror. However, upon capturing the selfie, the phone often flips the image to represent your perspective to the outside world.
Interestingly, many people find the flipped version of themselves slightly unsettling. This is rooted in psychological familiarity. We tend to prefer what we are most accustomed to seeing, and in our case, it’s usually our mirrored reflection. Since we spend considerable time viewing ourselves in mirrors, seeing our non-mirrored image can feel a bit strange or “off.”
This phenomenon presents a creative opportunity. Flipping your selfies can offer a fresh perspective. It might be the subtle change needed to make your photos more engaging and unique on your social media feed. Sometimes, that simple flip button is the key to an even better selfie!
Controlling Camera Flip: Options and Alternatives
You might wonder if you can prevent your phone camera from automatically flipping photos. Unfortunately, most default phone camera apps do not offer a setting to disable auto-flipping for the front camera.
However, you always have the option to flip your photos back after capture using editing tools like Google Photos, as described earlier. Alternatively, third-party camera apps, like Picsart, often provide more control and may not automatically flip your photos. This gives you greater flexibility in how your selfies are initially captured and presented.
Advanced Mirror Image Creation with Apps
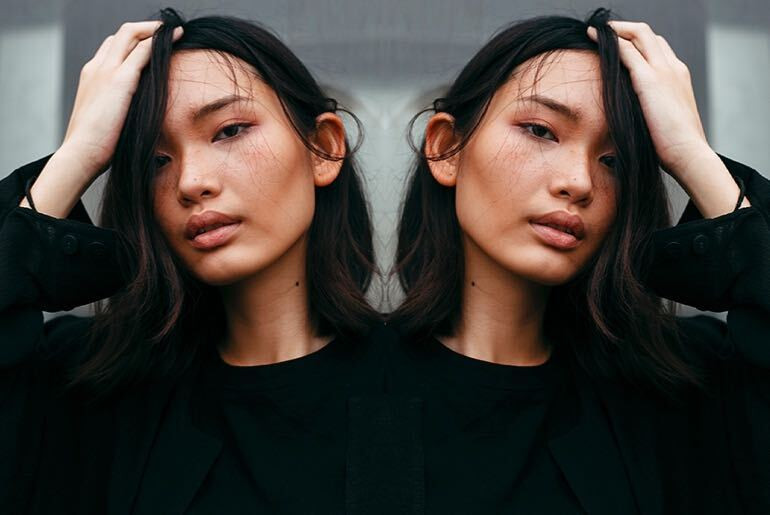
 Horizontal mirror image of a surfer riding a wave, demonstrating the artistic potential of mirror effects
Beyond simply flipping photos, creating true mirror images involves combining flipped versions to achieve artistic effects. While basic flipping is useful, dedicated photo editing apps offer powerful tools for creating sophisticated mirror images. Picsart is a prime example, offering versatile mirroring options.
Picsart provides a range of mirror effects, including vertical, horizontal, and even quadrant reflections. Its comprehensive editing suite eliminates the need for multiple apps, streamlining the entire creative process. Want to enhance that stunning golden hour shot with a perfect reflection? Picsart makes it easy.
Here’s a step-by-step guide to creating mirror images using Picsart:
- Open Picsart: Launch the Picsart photo editor app.
- Start a new project: Tap the “+” icon at the bottom to begin editing.
- Select your image: Choose the photo you want to mirror from your gallery or explore the #FreeToEdit library for inspiration.
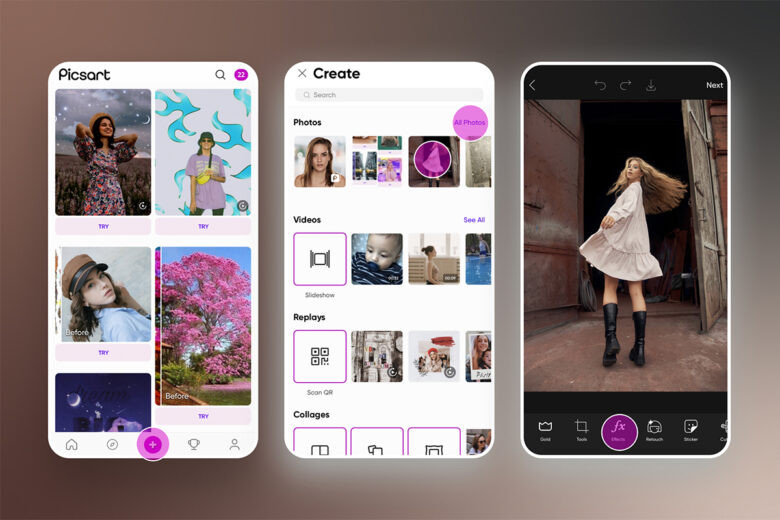 Steps to start a mirror image project in Picsart
- Access Effects: Tap “Effects” and scroll to the “Distort” category, then select “Mirror.”
- Customize Mirror Settings: Tap “Mirror” again to open detailed settings.
- Choose Mirror Type: Experiment with vertical and horizontal mirror options to find the perfect effect for your image.
- Apply and Save: Tap “Apply,” then “Next,” and finally “Save” to finalize and store your mirrored image.
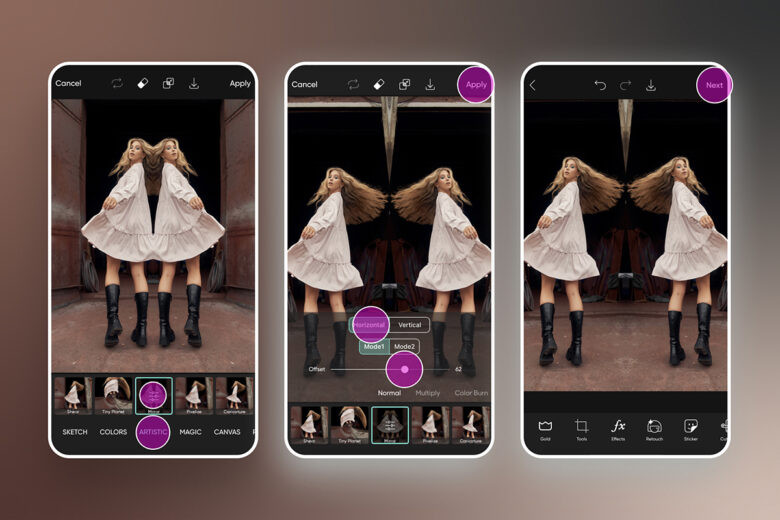 Steps to apply and customize the mirror effect in Picsart
Pro Tip: Horizontal mirror effects often complement portraits and selfies, creating balanced symmetry. Vertical mirror effects can add a dramatic, dreamy reflection to landscape photos, enhancing their visual appeal.
With these techniques, you’re now equipped to create compelling mirror images and master photo flipping on your Android device. Ready to explore further? Consider experimenting with cloning effects to elevate your photo editing skills even more!
Create at the Speed of Culture
Picsart is a comprehensive creative platform with free content, powerful editing tools, and endless inspiration. Join millions of creators and explore your artistic potential. Download the app or start editing on web today! Unlock premium features with Gold and take your creativity to the next level.
