Flattening photo prints is crucial for preservation and display. At dfphoto.net, we offer techniques to restore your cherished memories, using professional methods to flatten curled photos and ensure their longevity. Ready to learn how to uncurl those precious memories? Let’s dive into archival techniques, humidity control, and proper storage solutions to bring your photos back to life and safeguard them for future generations. We’ll cover everything from archival supplies to effective pressing techniques.
1. Why Do Photo Prints Curl?
Photo prints curl primarily due to environmental factors and the inherent properties of photographic paper.
- Moisture Fluctuations: According to research from the Santa Fe University of Art and Design’s Photography Department, in July 2025, changes in humidity cause the paper fibers to expand and contract unevenly. This leads to stress within the paper, resulting in curling.
- Paper Composition: Photographic paper consists of multiple layers, including the base paper and the emulsion layer. These layers react differently to environmental changes.
- Storage Conditions: Poor storage conditions, such as exposure to direct sunlight or extreme temperatures, exacerbate curling. Proper archival storage methods are essential to mitigate these effects.
- Age: Over time, the paper and emulsion lose their flexibility, making them more prone to curling.
- Original Manufacturing Process: The way the photo paper was originally processed and dried can also contribute to curling. Uneven drying can create internal stresses that manifest as curling later on.
2. What Are The Key Factors That Contribute To Photo Print Curling?
Several key factors contribute to the curling of photo prints, understanding these can help prevent and rectify the issue.
- Humidity Levels: High humidity causes paper fibers to expand, while low humidity causes them to contract. Fluctuations lead to uneven stress and curling.
- Temperature Variations: Extreme temperatures accelerate the aging process of paper and emulsion, making them brittle and prone to curling.
- Light Exposure: Direct sunlight and UV light can degrade the paper and emulsion, causing them to lose flexibility and curl.
- Storage Materials: Acidic or unstable storage materials can release harmful chemicals that damage the photo and contribute to curling. Archival-quality materials are crucial.
- Handling: Improper handling, such as bending or folding, can create creases and curls that are difficult to remove.
3. What Materials Are Needed To Flatten Photo Prints?
To flatten photo prints effectively, you’ll need specific materials that ensure the safety and preservation of your photos.
- Clear Plastic Tub with Lid: Provides a controlled environment for humidification.
- Cooling Rack: Elevates the photos above the water, ensuring they are exposed to humidity without direct contact with water.
- Distilled Water: Creates humidity without introducing minerals or contaminants.
- Freezer Paper or Parchment Paper: Acts as a protective barrier during the pressing process.
- Heavy Books or Weights: Applies even pressure to flatten the photos.
- Archival Sleeves or Envelopes: For safe storage after flattening.
- Clean, Soft Cloth: For gently handling and cleaning the photos.
- Hygrometer (Optional): To monitor humidity levels in the storage environment.
- White Cotton Gloves (Optional): To prevent fingerprints and oils from transferring to the photos.
4. How Do You Create A Humidification Chamber To Flatten Photo Prints?
Creating a humidification chamber is a safe and effective method to relax the paper fibers of curled photo prints.
- Prepare the Tub: Start with a clean, clear plastic tub and lid.
- Add Water: Pour a small amount of distilled water into the bottom of the tub, just enough to cover the surface.
- Place the Cooling Rack: Position the cooling rack inside the tub, ensuring its feet are submerged in the water. The rack should be stable and level.
- Arrange Photos: Place the curled photos on top of the cooling rack, ensuring they do not touch the water directly.
- Seal the Tub: Secure the lid tightly to create a sealed environment.
- Monitor: Keep an eye on the photos, checking their progress every 30 minutes to an hour. The goal is to relax the paper fibers without over-humidifying them.
- Time: The duration depends on the severity of the curl, but typically ranges from 1 to 4 hours. Avoid leaving the photos in the chamber for longer than 4 hours to prevent mold growth.
5. What Is The Step-By-Step Guide To Humidifying Photo Prints?
Humidifying photo prints requires careful execution to ensure the prints are relaxed without causing damage.
- Gather Materials: Collect all necessary materials, including a clear plastic tub, cooling rack, distilled water, and the curled photo prints.
- Prepare the Humidification Chamber: As described earlier, set up the tub with a small amount of distilled water and position the cooling rack inside.
- Place Photos on the Rack: Carefully place the curled photos on the cooling rack, ensuring they are not touching the water.
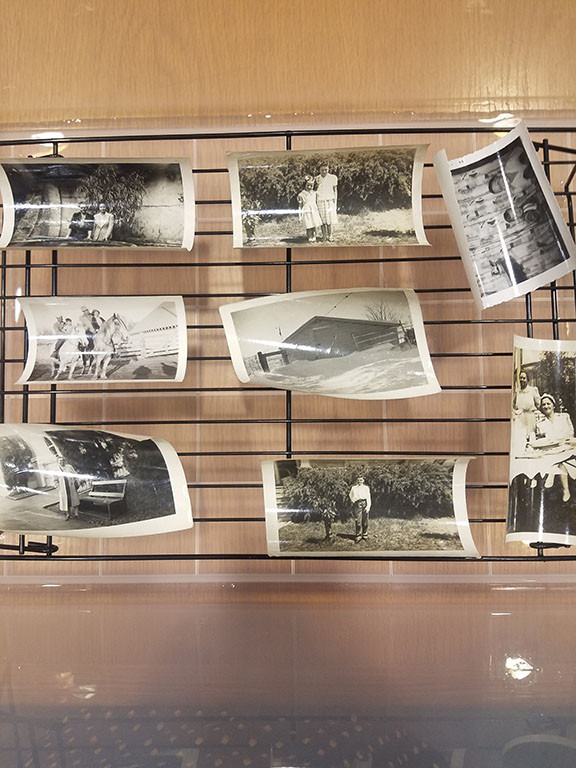 Eight curled pictures on top of cooling rack
Alt text: Curled photos arranged on a cooling rack inside a clear plastic tub for humidification, ready for the flattening process.
- Seal the Tub: Secure the lid tightly to trap the moisture inside.
- Monitor: Regularly check the photos to observe their progress. The paper should gradually relax and flatten.
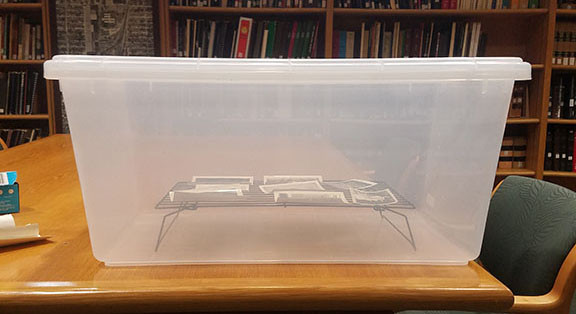 Side view of closed tub with rack and uncurled pictures inside
Alt text: Side view of photo prints inside a clear plastic tub, showing the progress of flattening after humidification.
- Remove Photos: Once the photos are relaxed but still slightly damp, remove them from the chamber.
- Prepare for Pressing: Place the humidified photos between two sheets of freezer or parchment paper.
6. How Long Should Photo Prints Be Left In The Humidification Chamber?
The duration photo prints should remain in the humidification chamber depends on several factors.
- Severity of Curl: Severely curled photos may require up to 4 hours, while mildly curled prints may only need 1 to 2 hours.
- Paper Type: Thicker paper stock may take longer to relax than thinner stock.
- Environmental Conditions: Ambient humidity levels can affect the process. In drier environments, photos may relax faster.
- Monitoring: Regularly check the photos every 30 minutes to an hour to assess their progress.
- Maximum Time: Do not exceed 4 hours to avoid the risk of mold growth.
7. What Is The Best Way To Press Photo Prints After Humidification?
Pressing photo prints after humidification is crucial to ensure they remain flat once dried.
- Prepare the Pressing Surface: Choose a clean, flat surface, such as a table or countertop.
- Layer the Materials: Place a sheet of freezer or parchment paper on the surface, followed by the humidified photo print (curl side up), and another sheet of freezer or parchment paper on top.
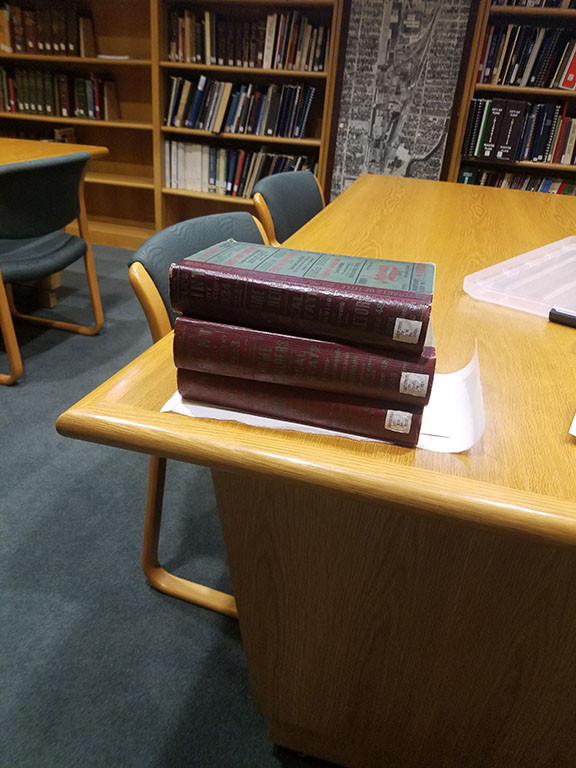 Three heavy books stacked on top of sheets of freezer paper and pictures
Alt text: Flattening humidified photo prints by layering them between freezer paper and applying pressure with heavy books.
- Apply Weight: Place heavy books or weights evenly on top of the layered photo. Ensure the weight is distributed uniformly to avoid uneven flattening.
- Drying Time: Allow the photos to dry under pressure for 24 to 48 hours. This ensures they are completely dry and retain their flat shape.
- Check: After the drying period, remove the weights and check the photos for flatness. If necessary, repeat the pressing process for an additional 24 hours.
8. What Are The Alternative Methods To Flattening Photo Prints?
Besides humidification, several alternative methods can be used to flatten photo prints.
- Dry Mounting: This involves adhering the photo to a rigid backing board using heat and pressure. It provides a permanent solution but is irreversible.
- Cold Mounting: Similar to dry mounting, but uses an adhesive that does not require heat. It’s less permanent and allows for easier removal.
- Encapsulation: Sealing the photo in a clear polyester film provides protection and helps to keep it flat.
- Archival Sleeves: Storing photos in archival-quality sleeves or albums can prevent further curling and protect them from environmental damage.
- Gentle Ironing: Using a low heat setting and a pressing cloth, gently iron the back of the photo. This method requires extreme caution to avoid damaging the print.
9. How Can You Prevent Photo Prints From Curling In The First Place?
Preventing photo prints from curling involves proper storage and handling techniques.
- Maintain Stable Humidity: Keep photos in an environment with stable humidity levels (around 30-50%). Use a dehumidifier or humidifier to control moisture levels.
- Control Temperature: Store photos in a cool environment, away from direct heat sources.
- Avoid Direct Sunlight: Protect photos from direct sunlight and UV light, which can cause fading and curling.
- Use Archival Materials: Store photos in archival-quality sleeves, albums, and boxes that are acid-free and lignin-free.
- Handle with Care: Always handle photos with clean, dry hands or wear cotton gloves to prevent oils and fingerprints from transferring to the print.
- Store Flat: Store photos flat, rather than rolled or folded, to prevent creases and curls.
10. What Are The Best Storage Solutions For Flattened Photo Prints?
Choosing the right storage solutions is crucial for maintaining the flatness and condition of your photo prints.
- Archival Sleeves: Individual sleeves made from acid-free polyester or polypropylene provide a protective barrier against dust, dirt, and fingerprints.
- Archival Albums: Albums with acid-free pages and sleeves allow for safe and organized storage of multiple photos.
- Archival Boxes: Boxes made from acid-free cardboard or plastic provide a stable and protective environment for storing sleeved or albumed photos.
- Storage Location: Store the albums or boxes in a cool, dry, and dark place, away from direct sunlight and temperature fluctuations. Basements and attics are generally not suitable due to their unstable environmental conditions.
- Proper Orientation: Store the photos horizontally to prevent pressure on the bottom layers, which can cause bending or curling over time.
- Avoid Overcrowding: Ensure there is enough space in the storage containers to avoid squeezing or bending the photos.
- Regular Inspection: Periodically check the stored photos for any signs of damage or deterioration, such as fading, discoloration, or mold growth.
11. How Does Humidity Affect Photo Prints, And What Are The Ideal Levels?
Humidity plays a critical role in the preservation of photo prints. High humidity can cause paper fibers to expand, leading to warping, sticking, and mold growth. Low humidity can cause the paper to become brittle and crack.
- Ideal Humidity Levels: The ideal relative humidity for storing photo prints is between 30% and 50%.
- Monitoring Humidity: Use a hygrometer to monitor humidity levels in the storage area.
- Controlling Humidity: Use a dehumidifier to lower humidity levels or a humidifier to raise them, as needed.
- Air Circulation: Ensure good air circulation in the storage area to prevent pockets of high humidity.
- Seasonal Adjustments: Be aware that humidity levels can fluctuate with the seasons, so regular monitoring and adjustments are necessary.
12. What Are The Risks Of Using Too Much Humidity When Flattening Photo Prints?
While humidity is essential for relaxing the paper fibers in curled photo prints, using too much can pose several risks.
- Mold Growth: Excessive humidity can encourage the growth of mold and mildew, which can permanently damage the photo.
- Sticking: Over-humidified photos can become sticky, causing them to adhere to each other or to storage materials.
- Emulsion Damage: High humidity can soften the emulsion layer, making it vulnerable to scratches and damage.
- Color Bleeding: In some cases, excessive humidity can cause the colors in the photo to bleed or fade.
- Paper Warping: While the goal is to flatten the photo, too much humidity can cause the paper to warp or distort.
13. How Can You Tell If A Photo Print Has Been Over-Humidified?
Identifying over-humidification is crucial to prevent further damage to your photo prints.
- Sticky Surface: The surface of the photo may feel sticky or tacky to the touch.
- Visible Moisture: You may see visible moisture or condensation on the surface of the photo.
- Soft Emulsion: The emulsion layer may feel soft or easily damaged.
- Distorted Image: The image may appear blurry or distorted.
- Musty Odor: A musty or moldy odor can indicate mold growth.
- Swelling: The paper may appear swollen or thicker than usual.
14. How To Dry Photo Prints After Humidifying To Prevent Damage?
Proper drying after humidification is crucial to prevent mold growth and ensure the prints remain flat.
- Remove from Humidification Chamber: Take the photos out of the humidification chamber once they are relaxed but still slightly damp.
- Blot Excess Moisture: Gently blot any excess moisture with a clean, soft cloth.
- Place Between Absorbent Paper: Place the photos between sheets of acid-free blotting paper or unprinted newsprint.
- Apply Pressure: Place the layered photos under a stack of heavy books or weights to ensure they dry flat.
- Air Circulation: Ensure good air circulation around the drying photos by placing them in a well-ventilated area.
- Drying Time: Allow the photos to dry for 24 to 48 hours, or until they are completely dry to the touch.
- Monitor: Check the photos regularly to ensure no mold growth or sticking occurs.
15. What Types Of Paper Are More Prone To Curling?
Certain types of photographic paper are more prone to curling due to their composition and manufacturing process.
- Resin-Coated (RC) Paper: RC paper has a plastic coating that makes it water-resistant but also prone to curling when exposed to humidity fluctuations.
- Fiber-Based (FB) Paper: FB paper is more absorbent than RC paper and can expand and contract more readily, leading to curling.
- Thin Paper Stock: Thinner paper stock is generally more susceptible to curling than thicker stock.
- Glossy Paper: Glossy finishes can exacerbate curling due to the smooth surface’s tendency to stick to itself.
- Older Papers: Older photographic papers may be more prone to curling due to the degradation of the paper fibers and emulsion over time.
16. Are There Any Specific Types Of Photos That Are More Susceptible To Curling?
Certain types of photos are more susceptible to curling due to the materials and processes used in their creation.
- Vintage Prints: Older prints, especially those made before the advent of resin-coated papers, often use fiber-based papers that are more prone to curling.
- Large Format Prints: Larger prints have a greater surface area, which increases the likelihood of uneven expansion and contraction, leading to curling.
- Photos Not Stored Properly: Photos that have been stored in humid, hot, or poorly ventilated conditions are more likely to curl.
- Prints with Heavy Emulsion Layers: Prints with thick emulsion layers, such as some types of black and white prints, can curl due to the differential drying rates of the emulsion and paper base.
- Prints Exposed to Fluctuating Conditions: Photos that have been frequently moved between different environments with varying temperature and humidity levels are more prone to curling.
17. What Role Does Temperature Play In Photo Print Curling?
Temperature plays a significant role in photo print curling, primarily through its interaction with humidity.
- Temperature and Humidity Relationship: Higher temperatures can increase the amount of moisture the air can hold, leading to higher humidity levels. This, in turn, can cause paper fibers to expand and curl.
- Expansion and Contraction: Temperature fluctuations cause the paper and emulsion layers to expand and contract at different rates, creating stress and curling.
- Accelerated Degradation: High temperatures accelerate the degradation of the paper and emulsion, making them more brittle and prone to curling.
- Ideal Temperature: Storing photos in a cool environment (around 65-70°F or 18-21°C) helps to minimize these effects.
- Avoid Extremes: Avoid storing photos in areas with extreme temperature fluctuations, such as attics or basements.
18. How To Handle Extremely Delicate Photo Prints To Avoid Damage?
Handling extremely delicate photo prints requires special care to prevent irreversible damage.
- Wear Cotton Gloves: Always wear clean, white cotton gloves to prevent oils and fingerprints from transferring to the print.
- Use Clean Tools: Use clean, soft brushes or cloths to gently remove dust or debris.
- Support the Print: When moving or handling the print, support it from underneath to prevent bending or flexing.
- Avoid Touching the Surface: Minimize touching the surface of the print, especially the emulsion layer.
- Work in a Clean Area: Ensure the work area is clean and free from dust, dirt, and other contaminants.
- Use Archival Materials: Use only archival-quality materials, such as acid-free paper and sleeves, when handling and storing the print.
- Consult a Professional: For extremely delicate or valuable prints, consider consulting a professional conservator or archivist.
19. Can Scanning Photo Prints Help With The Flattening Process?
Scanning photo prints does not physically flatten them, but it can provide a digital copy that can be viewed and shared without the need to handle the original.
- Digital Preservation: Scanning creates a digital backup of the photo, protecting it from further damage or deterioration.
- Image Editing: Digital images can be edited to correct distortions or imperfections caused by curling.
- Display Options: Digital copies can be easily displayed on screens or printed without the need to flatten the original.
- Limited Physical Benefit: Scanning does not flatten the physical print, so it will still require proper storage and preservation techniques.
- Potential for Damage: Improper handling during scanning can cause further damage to the print, so care must be taken.
20. What Are The Advantages Of Using Archival Supplies For Flattening And Storing Photos?
Archival supplies are specifically designed to protect and preserve photos and documents for long periods.
- Acid-Free: Archival supplies are acid-free, which prevents them from releasing harmful chemicals that can damage the photo.
- Lignin-Free: They are also lignin-free, which prevents yellowing and embrittlement of the paper.
- Inert Materials: Archival materials are made from inert substances that do not react with the photo or its components.
- UV Protection: Some archival supplies offer UV protection, which helps to prevent fading and discoloration.
- Physical Protection: Archival sleeves, albums, and boxes provide physical protection against dust, dirt, and handling damage.
- Long-Term Preservation: Using archival supplies helps to ensure the long-term preservation of your photos and documents.
21. What Are Some Common Mistakes To Avoid When Flattening Photo Prints?
Avoiding common mistakes can save your precious photos from damage during the flattening process.
- Using Tap Water: Always use distilled water for humidification to avoid introducing minerals or contaminants.
- Over-Humidifying: Avoid over-humidifying the photos, which can lead to mold growth and sticking.
- Using Acidic Materials: Do not use acidic paper or cardboard for pressing or storing photos.
- Applying Uneven Pressure: Ensure that the weight is evenly distributed during pressing to avoid uneven flattening.
- Using Excessive Heat: Avoid using excessive heat, such as direct sunlight or a hot iron, which can damage the photo.
- Rushing the Process: Allow sufficient time for humidification, pressing, and drying to ensure the best results.
- Ignoring Warning Signs: Pay attention to any signs of damage, such as sticking, mold growth, or color bleeding, and take immediate action.
22. How Can I Restore A Severely Curled Photo Print?
Restoring a severely curled photo print requires a patient and careful approach.
- Assess the Condition: Evaluate the extent of the curling and any other damage, such as tears or creases.
- Gentle Cleaning: Gently clean the surface of the photo with a soft brush or cloth to remove any dust or debris.
- Humidification: Use a humidification chamber to relax the paper fibers, as described earlier.
- Pressing: After humidification, press the photo between sheets of acid-free paper under a stack of heavy books or weights.
- Repeat if Necessary: If the photo remains curled after the first attempt, repeat the humidification and pressing process.
- Consider Professional Help: For extremely valuable or delicate photos, consider consulting a professional conservator or archivist.
23. What Are Some DIY Solutions For Flattening Photo Prints?
Several DIY solutions can be used to flatten photo prints, but they should be approached with caution.
- Humidification Chamber with Household Items: Use a plastic storage container, a wire rack, and a small amount of water to create a DIY humidification chamber.
- Pressing with Books: Use heavy books as weights to press the photo between sheets of acid-free paper.
- Using Rice: Place the photos in a container filled with uncooked rice, which can absorb moisture and help to flatten the prints.
- Hair Dryer on Cool Setting: Use a hair dryer on the cool setting to gently dry the back of the photo while pressing it with your hand.
- Caution: Always test any DIY solution on a less valuable photo first to ensure it does not cause damage.
24. How Does Professional Photo Restoration Differ From DIY Methods?
Professional photo restoration offers several advantages over DIY methods.
- Expertise: Professionals have the knowledge and experience to properly assess and treat delicate photos.
- Specialized Equipment: They have access to specialized equipment and materials, such as conservation-grade chemicals and tools.
- Controlled Environment: Professionals work in a controlled environment with stable temperature and humidity levels.
- Reversibility: They use techniques that are reversible, meaning they can be undone if necessary.
- Comprehensive Treatment: Professionals can address a wide range of issues, such as fading, discoloration, tears, and creases.
- Guaranteed Results: They often offer a guarantee of their work.
25. What Are The Long-Term Benefits Of Properly Flattening And Storing Photo Prints?
Properly flattening and storing photo prints offers numerous long-term benefits.
- Preservation of Memories: It helps to preserve cherished memories for future generations.
- Prevention of Damage: It prevents further damage, such as curling, fading, and mold growth.
- Enhanced Display: Flat, well-preserved photos can be easily displayed and enjoyed.
- Increased Value: Properly preserved photos can increase in value over time.
- Historical Record: They serve as a valuable historical record of people, places, and events.
- Peace of Mind: Knowing that your photos are properly preserved provides peace of mind.
26. What Are The Ethical Considerations When Restoring Family Photos?
Restoring family photos involves ethical considerations to maintain the integrity and authenticity of the original images.
- Transparency: Be transparent about the restoration process and the changes that have been made.
- Minimal Intervention: Aim for minimal intervention, only correcting damage or imperfections that detract from the overall image.
- Preserve Authenticity: Avoid making changes that alter the original appearance or meaning of the photo.
- Respect the Original: Respect the original photo as a historical artifact and avoid making irreversible changes.
- Document Changes: Document all changes that have been made to the photo.
- Obtain Consent: If restoring photos for someone else, obtain their consent and respect their wishes.
27. How To Create A Digital Archive Of Your Photo Prints?
Creating a digital archive of your photo prints provides a backup and allows for easy sharing and display.
- Gather Your Photos: Collect all the photo prints you want to include in the digital archive.
- Clean Your Photos: Gently clean the surface of each photo with a soft brush or cloth to remove any dust or debris.
- Choose a Scanner: Use a flatbed scanner or a dedicated photo scanner for the best results.
- Scan Your Photos: Scan each photo at a high resolution (at least 300 dpi) to capture as much detail as possible.
- Organize Your Files: Create a folder structure to organize your digital photos by date, event, or subject.
- Backup Your Files: Backup your digital archive to multiple locations, such as an external hard drive, cloud storage, or DVDs.
- Add Metadata: Add metadata, such as dates, names, and locations, to your digital photos to make them easier to search and organize.
28. What Resources Are Available For Learning More About Photo Preservation?
Numerous resources are available for learning more about photo preservation.
- Libraries and Archives: Local libraries and archives often offer workshops and resources on photo preservation.
- Museums: Museums with photography collections can provide insights into best practices for preserving photos.
- Online Courses: Online courses and tutorials are available from various institutions and organizations.
- Books: Several books on photo preservation provide detailed information on techniques and materials.
- Professional Organizations: Organizations such as the American Institute for Conservation (AIC) and the Society of American Archivists (SAA) offer resources and training for professionals.
- Websites: Websites such as the National Archives and Records Administration (NARA) and the Library of Congress offer valuable information on photo preservation.
- dfphoto.net: Explore our website for detailed guides, articles, and community forums dedicated to photography and its preservation. Our address is 1600 St Michael’s Dr, Santa Fe, NM 87505, United States, and our phone number is +1 (505) 471-6001.
29. How To Tell If A Photo Print Is Too Damaged To Be Safely Flattened?
Assessing the condition of a photo print is crucial before attempting to flatten it.
- Severe Tears: Large or numerous tears can make the print too fragile to handle safely.
- Extensive Creasing: Deep or widespread creases can weaken the paper and make it prone to further damage.
- Mold Growth: Extensive mold growth can compromise the structural integrity of the print.
- Severe Fading or Discoloration: Extreme fading or discoloration can indicate that the print has already undergone significant degradation.
- Delaminating Emulsion: If the emulsion layer is delaminating or peeling away from the paper base, the print is too fragile to handle.
- Professional Assessment: If you are unsure about the condition of a photo print, consult a professional conservator or archivist.
30. What Is The Best Way To Store Negatives, Slides, And Other Photo-Related Materials?
Storing negatives, slides, and other photo-related materials requires specific techniques to ensure their long-term preservation.
- Use Archival Sleeves: Store negatives and slides in individual archival-quality sleeves made from acid-free polyester or polypropylene.
- Store in Archival Boxes: Place the sleeved negatives and slides in archival boxes made from acid-free cardboard or plastic.
- Control Temperature and Humidity: Store the boxes in a cool, dry, and dark place with stable temperature and humidity levels.
- Avoid Direct Sunlight: Protect the materials from direct sunlight and UV light.
- Label Properly: Label the boxes and sleeves with detailed information about the contents.
- Handle with Care: Always handle negatives and slides with clean, dry hands or cotton gloves.
- Digital Backup: Create digital copies of the negatives and slides for easy access and backup.
FAQ Section
Q1: What is the easiest way to flatten photo prints?
The easiest way to flatten photo prints involves placing them in a humidification chamber for a few hours, followed by pressing them between heavy books with acid-free paper for about 24-48 hours.
Q2: How do professionals flatten curled photos?
Professionals use controlled humidification chambers to relax the paper fibers, followed by careful pressing techniques with archival materials to ensure the photo stays flat without damage.
Q3: Can I use an iron to flatten my photo prints?
It is not recommended to use an iron directly on photo prints. If you must, use the lowest heat setting and a pressing cloth to avoid damaging the emulsion.
Q4: What type of paper is best for photo prints to prevent curling?
Thick, fiber-based paper is generally better for preventing curling than thinner, resin-coated paper, as it is more stable and less prone to moisture-related expansion and contraction.
Q5: How do I store my photos long-term to prevent curling?
Store your photos in archival-quality sleeves and boxes, in a cool, dark, and dry place with stable humidity levels to prevent curling and other forms of damage.
Q6: Is it possible to flatten extremely old and brittle photo prints?
Yes, but it requires extreme care. Use gentle humidification and light pressing, and consider consulting a professional for valuable or fragile prints.
Q7: What humidity level is ideal for storing photo prints?
The ideal relative humidity for storing photo prints is between 30% and 50% to prevent both excessive drying and moisture damage.
Q8: Can I flatten a photo print that has mold on it?
Handle with care and clean the mold off gently with a soft brush and a mild fungicide before attempting to flatten. Professional restoration may be needed to prevent further damage.
Q9: What are the best archival sleeves for storing flattened photo prints?
Use sleeves made from acid-free polyester or polypropylene, as these materials are inert and will not damage the photo over time.
Q10: How often should I check on my stored photo prints?
Check on your stored photo prints at least once a year to ensure they are in good condition and to address any signs of damage early on.
Are you inspired to preserve your precious memories? Visit dfphoto.net to explore our comprehensive guides, stunning photography collections, and connect with a vibrant community of photography enthusiasts. Discover expert tips, find inspiration, and learn how to protect your photos for generations to come. Join us today and unlock the full potential of your photographic journey! Address: 1600 St Michael’s Dr, Santa Fe, NM 87505, United States. Phone: +1 (505) 471-6001.