Fixing the resolution of a photo can be a game-changer, whether you’re aiming for stunning prints or crystal-clear digital displays. This guide from dfphoto.net will walk you through everything you need to know about image resolution, upscaling techniques, and how to achieve the best possible results for your photography, ensuring your images look their absolute best.
1. Understanding Photo Resolution
What does resolution mean when we talk about digital images?
Resolution refers to the number of pixels in an image, typically expressed as width x height, like 3000 x 2000 pixels. More pixels generally mean more detail and a sharper image. High resolution is crucial for printing and displaying photos on large screens, while low resolution can result in blurry or pixelated images.
1.1 DPI vs. PPI: What’s the Difference?
What is the real difference between DPI and PPI?
DPI (dots per inch) refers to the number of printed dots within an inch and is primarily used for printing. PPI (pixels per inch) refers to the number of pixels within an inch on a digital display. While often used interchangeably, understanding the distinction is important. For digital images, PPI is the more relevant term when discussing resolution. A higher PPI generally results in a sharper image on screens. According to research from the Santa Fe University of Art and Design’s Photography Department, a PPI of 300 is generally recommended for high-quality prints.
1.2 Common Resolution Issues
What are the most common resolution problems in photos?
Common resolution issues include pixelation (where individual pixels become visible), blurriness (lack of sharpness), and loss of detail when an image is enlarged beyond its original resolution. These problems often arise when using low-resolution images for purposes that demand higher resolutions, such as printing large posters or displaying images on high-definition screens.
2. Why Fix Photo Resolution?
Why is important to fix photo resolution?
Fixing photo resolution is important for several reasons. High resolution ensures that your photos look sharp and detailed, whether you’re viewing them on a screen or printing them. It also allows you to enlarge images without significant loss of quality. Furthermore, optimizing resolution is crucial for professional applications like graphic design and commercial printing, where image quality directly impacts the final product.
2.1 Improving Print Quality
How can fixing resolution improve print quality?
Increasing the resolution of a photo can significantly improve its print quality. When you print a low-resolution image, the printer has to “invent” pixels to fill in the gaps, resulting in a blurry or pixelated print. By increasing the resolution beforehand, you provide the printer with more information, leading to sharper, more detailed prints. For optimal print quality, aim for a resolution of at least 300 DPI.
2.2 Enhancing Digital Displays
How does enhancing resolution affect digital displays?
A higher resolution ensures that your photos look crisp and clear on digital displays, especially on high-definition screens. Low-resolution images can appear pixelated or blurry, detracting from the viewing experience. Enhancing the resolution allows you to take full advantage of the capabilities of modern displays, showcasing your photos in the best possible light.
2.3 Professional Applications
Why is high resolution important in professional photography?
In professional photography, high resolution is essential for producing high-quality images that meet the demands of various applications. Whether you’re shooting for commercial advertising, editorial publications, or fine art prints, having images with sufficient resolution ensures that they can be reproduced at the desired size and quality without compromising detail or sharpness.
3. When Should You Increase Photo Resolution?
When is the right moment to increase photo resolution?
You should consider increasing photo resolution when you need to print an image at a larger size, display it on a high-definition screen, or use it for professional purposes where image quality is critical. Additionally, if you notice pixelation or blurriness when viewing an image, increasing its resolution can help to improve its overall appearance.
3.1 Preparing for Large Prints
When preparing for large prints, what minimum resolution should I consider?
When preparing for large prints, it’s crucial to ensure that your images have sufficient resolution to maintain quality at the desired print size. As a general rule, aim for a resolution of at least 300 DPI for prints. If you’re starting with a low-resolution image, you may need to increase its resolution using software tools to avoid pixelation or blurriness in the final print.
3.2 Optimizing Web Images
How to optimize web images with a resolution increase?
While high resolution is important for print and display, it’s also important to optimize web images for faster loading times. Large, high-resolution images can slow down website loading speeds, which can negatively impact user experience. To optimize web images, you can reduce their file size by compressing them or resizing them to appropriate dimensions for web display. A good balance between image quality and file size is key for optimizing web images.
3.3 Archiving and Future Use
How does resolution impact archiving photos?
Archiving photos at a high resolution ensures that you have the flexibility to use them for various purposes in the future, including printing, displaying, and editing. By preserving the original resolution of your images, you avoid the need to increase resolution later, which can sometimes result in loss of quality. High-resolution archives provide a valuable resource for future projects and ensure that your photos remain usable for years to come.
4. Methods to Fix Resolution on Photo
What are some popular and effective methods to fix the resolution on a photo?
There are several methods to fix resolution on photo, including using image editing software like Adobe Photoshop, GIMP, or online tools like waifu2x and LetsEnhance.io. These tools employ various techniques such as resampling, interpolation, and AI-powered upscaling to increase the resolution of images while minimizing loss of quality.
4.1 Using Adobe Photoshop
How to use Photoshop to fix resolution on photo?
Adobe Photoshop offers powerful tools for fixing resolution on photo. To increase resolution in Photoshop, go to Image > Image Size. In the Image Size dialog box, enter the desired width and height, and choose a resampling method such as Bicubic Smoother for enlargement. Ensure that the “Resample” option is checked to enable resolution adjustment. Photoshop will then interpolate new pixels based on the existing ones, effectively increasing the resolution of the image.
4.2 Using GIMP (GNU Image Manipulation Program)
How to use GIMP to fix resolution on photo?
GIMP, a free and open-source image editing software, provides similar capabilities for fixing resolution on photo. To increase resolution in GIMP, go to Image > Scale Image. Enter the desired width and height, and choose an interpolation method such as Lanczos (Sinc) for best results. GIMP will then resample the image to the new dimensions, increasing its resolution.
4.3 Online Tools for Resolution Enhancement
What are some recommended online tools for resolution enhancement?
Several online tools offer resolution enhancement services, including waifu2x, LetsEnhance.io, and VanceAI. These tools utilize AI-powered algorithms to upscale images and enhance details, often producing impressive results. Simply upload your image to the website, specify the desired resolution or scaling factor, and let the tool process the image. Be aware that some online tools may have limitations on file size or require a subscription for full access.
5. Step-by-Step Guide: Increasing Resolution in Photoshop
Can you provide a step-by-step guide to increasing resolution in Photoshop?
Here’s a detailed step-by-step guide to increasing resolution in Photoshop:
- Step 1: Open your image in Photoshop.
- Step 2: Go to Image > Image Size.
- Step 3: In the Image Size dialog box, enter the desired width and height for the image.
- Step 4: Choose a resampling method from the dropdown menu. Bicubic Smoother is generally recommended for enlargement.
- Step 5: Ensure that the “Resample” option is checked.
- Step 6: Adjust the resolution (PPI) if needed. For printing, aim for 300 PPI.
- Step 7: Click OK to apply the changes.
- Step 8: Save the image with a new name to preserve the original.
5.1 Opening the Image in Photoshop
How do I properly open an image in Photoshop?
To open an image in Photoshop, go to File > Open and select the image file from your computer. You can also drag and drop the image file directly into the Photoshop window. Once the image is open, it will appear in the main workspace, ready for editing.
5.2 Navigating to Image Size Settings
Where can I find image size settings in Photoshop?
To access the image size settings in Photoshop, go to the Image menu located at the top of the screen. From the dropdown menu, select “Image Size.” This will open the Image Size dialog box, where you can adjust the dimensions and resolution of your image.
5.3 Adjusting Width, Height, and Resolution
How do I adjust width, height, and resolution in Photoshop?
In the Image Size dialog box, you’ll find fields for adjusting the width, height, and resolution of your image. You can enter the desired values directly into these fields. Make sure the “Resample” option is checked to enable resolution adjustment. Photoshop will automatically calculate the corresponding values based on the proportions of the image.
5.4 Choosing the Right Resampling Method
What resampling method should I choose in Photoshop?
Photoshop offers several resampling methods, each suited for different types of images and editing tasks. For increasing resolution, Bicubic Smoother is generally recommended as it produces smooth results with minimal artifacts. Other options include Bicubic Sharper (for reducing size), Nearest Neighbor (for preserving hard edges), and Bilinear (a balance between speed and quality).
5.5 Saving the Enhanced Image
How do I save the enhanced image in Photoshop?
To save the enhanced image in Photoshop, go to File > Save As. Choose a file format such as JPEG or PNG, depending on your needs. JPEG is suitable for photos with continuous tones, while PNG is better for images with sharp lines and text. Give the file a new name to avoid overwriting the original, and choose a location to save it on your computer.
6. Best Practices for Upscaling Photos
What are some best practices to keep in mind when upscaling photos?
When upscaling photos, it’s important to use appropriate tools and techniques to minimize loss of quality. Start with the highest quality original image possible, choose the right resampling method, and avoid excessive upscaling, which can lead to artifacts and blurriness. Additionally, consider using AI-powered upscaling tools for more advanced results.
6.1 Starting with High-Quality Originals
Why should I start with high-quality originals for upscaling?
Starting with high-quality originals is crucial for achieving the best results when upscaling photos. The more information available in the original image, the better the upscaling algorithm can reconstruct details and produce a sharper, more detailed result. Low-quality originals with excessive noise or artifacts may not upscale well, leading to unsatisfactory results.
6.2 Avoiding Over-Upscaling
How do I avoid over-upscaling images?
Over-upscaling can lead to noticeable artifacts, blurriness, and loss of detail in the final image. To avoid over-upscaling, try to limit the amount of enlargement to what is necessary for your intended use. As a general rule, avoid increasing the resolution by more than 200-300% of the original size. If you need to enlarge an image significantly, consider using AI-powered upscaling tools, which can often produce better results than traditional resampling methods.
6.3 Using AI-Powered Upscaling Tools
What are the benefits of using AI-powered upscaling tools?
AI-powered upscaling tools utilize advanced algorithms to analyze and reconstruct details in images, often producing superior results compared to traditional resampling methods. These tools can intelligently fill in missing information, reduce noise, and enhance sharpness, resulting in more natural-looking and detailed upscaled images. Several AI-powered upscaling tools are available, both as standalone software and as online services.
7. Common Mistakes to Avoid
What are the common mistakes to avoid when fixing resolution on photo?
Common mistakes to avoid when fixing resolution on photo include starting with low-quality originals, over-upscaling images, using inappropriate resampling methods, and neglecting to save the enhanced image with a new name. These mistakes can lead to unsatisfactory results and loss of image quality.
7.1 Starting with Low-Quality Images
Why should I avoid starting with low-quality images for fixing resolution?
Starting with low-quality images can limit the effectiveness of resolution enhancement techniques. Low-quality images often lack detail and may contain noise or artifacts that cannot be easily removed during upscaling. In such cases, it’s better to try to obtain a higher quality original image or consider alternative methods for improving image quality.
7.2 Incorrect Resampling Methods
What happens when I use incorrect resampling methods?
Using incorrect resampling methods can lead to unwanted artifacts or blurriness in the final image. For example, using Nearest Neighbor resampling for enlarging photos can result in a pixelated appearance, while using Bicubic Sharper for reducing size may over-sharpen the image. It’s important to choose the appropriate resampling method based on the specific characteristics of the image and the desired outcome.
7.3 Overlooking Image Sharpening
Why is image sharpening important in fixing resolution?
Image sharpening is an important step in the resolution enhancement process, as it can help to restore detail and improve the overall sharpness of the image. After increasing the resolution, the image may appear slightly soft or blurry. Applying a sharpening filter can help to counteract this effect and make the image look more crisp and defined. However, it’s important to use sharpening sparingly, as excessive sharpening can introduce unwanted artifacts or noise.
8. Software and Tools Recommendations
Which software and tools are recommended for fixing resolution on photo?
Recommended software and tools for fixing resolution on photo include Adobe Photoshop, GIMP, waifu2x, LetsEnhance.io, and VanceAI. These tools offer a range of features and capabilities for increasing resolution, enhancing details, and improving overall image quality.
8.1 Adobe Photoshop
What are the benefits of using Adobe Photoshop for fixing resolution?
Adobe Photoshop is a powerful and versatile image editing software that offers a comprehensive set of tools for fixing resolution on photo. Photoshop’s Image Size dialog box allows you to adjust the dimensions and resolution of images with precision, while its resampling methods ensure optimal results. Additionally, Photoshop provides advanced features for sharpening, noise reduction, and color correction, allowing you to fine-tune the final image to your exact specifications.
8.2 GIMP (GNU Image Manipulation Program)
What are the benefits of using GIMP for fixing resolution?
GIMP is a free and open-source image editing software that offers many of the same capabilities as Adobe Photoshop, including tools for fixing resolution on photo. GIMP’s Scale Image dialog box allows you to adjust the dimensions and resolution of images, while its interpolation methods ensure high-quality results. GIMP is a great option for users who want a powerful image editing software without the cost of a commercial license.
8.3 Online AI Upscalers: waifu2x, LetsEnhance.io, VanceAI
How can online AI upscalers help with fixing resolution?
Online AI upscalers like waifu2x, LetsEnhance.io, and VanceAI utilize advanced artificial intelligence algorithms to upscale images and enhance details. These tools can intelligently fill in missing information, reduce noise, and improve sharpness, resulting in more natural-looking and detailed upscaled images. Online AI upscalers are a convenient option for users who want to quickly and easily improve the resolution of their photos without having to install or learn complex software.
9. Real-World Examples: Before and After
What can I expect to see in real-world examples of before and after resolution fixes?
Real-world examples of before and after resolution fixes demonstrate the tangible improvements that can be achieved through upscaling techniques. In the “before” examples, images may appear blurry, pixelated, or lacking in detail. In the “after” examples, the same images will appear sharper, more defined, and with greater clarity. These examples showcase the potential for enhancing the visual impact of photos through resolution enhancement.
9.1 Example 1: Improving a Low-Resolution Scan
How can resolution fixes improve low-resolution scans?
Low-resolution scans often suffer from a lack of detail and sharpness, making them unsuitable for printing or displaying at larger sizes. By increasing the resolution of a low-resolution scan, you can restore lost detail and improve overall image quality. This can be particularly useful for preserving old photos or documents that have been scanned at low resolutions.
9.2 Example 2: Enhancing a Mobile Phone Photo
How can resolution fixes enhance a mobile phone photo?
Mobile phone photos, while convenient, often lack the resolution and detail of images captured with dedicated cameras. By upscaling a mobile phone photo, you can improve its sharpness and clarity, making it more suitable for printing or displaying on larger screens. This can be especially useful for sharing photos on social media or creating photo albums.
9.3 Example 3: Restoring Detail to a Blurry Image
How can resolution fixes restore detail to a blurry image?
Blurry images can result from various factors, including camera shake, focus errors, or low-quality lenses. While it’s impossible to completely eliminate blur, increasing the resolution of a blurry image can help to restore some detail and improve its overall appearance. This can be particularly useful for rescuing photos that would otherwise be unusable.
10. Frequently Asked Questions (FAQ)
10.1 Will increasing the resolution always improve image quality?
Increasing resolution doesn’t always guarantee improved image quality. While it can make images sharper and more detailed, it can also introduce artifacts or blurriness if not done correctly. It’s essential to use appropriate tools and techniques to minimize loss of quality during upscaling.
10.2 What is the best resolution for printing photos?
The best resolution for printing photos is generally 300 DPI (dots per inch). This resolution ensures that the printed image will appear sharp and detailed, without any noticeable pixelation. However, for very large prints, a lower resolution may be acceptable, depending on the viewing distance.
10.3 Can I increase the resolution of a very small image?
While it’s possible to increase the resolution of a very small image, the results may not be satisfactory. The more you upscale an image, the more likely you are to encounter artifacts or blurriness. In such cases, it’s better to try to obtain a higher quality original image or consider alternative methods for improving image quality.
10.4 Does increasing resolution increase file size?
Yes, increasing resolution does increase file size. The more pixels an image contains, the more storage space it requires. When increasing resolution, be mindful of the resulting file size and consider compressing the image if necessary to reduce storage space and improve loading times.
10.5 Is it better to upscale or downscale images?
It’s generally better to downscale images than to upscale them. Downscaling involves reducing the number of pixels in an image, which can be done without significant loss of quality. Upscaling, on the other hand, involves increasing the number of pixels, which can introduce artifacts or blurriness if not done carefully.
10.6 How do AI upscaling tools work?
AI upscaling tools use advanced algorithms to analyze and reconstruct details in images. These tools are trained on large datasets of images and can intelligently fill in missing information, reduce noise, and enhance sharpness, resulting in more natural-looking and detailed upscaled images.
10.7 What are the limitations of resolution enhancement?
The limitations of resolution enhancement include the potential for introducing artifacts or blurriness, the increase in file size, and the dependence on the quality of the original image. Resolution enhancement cannot create detail that was not originally present in the image, and excessive upscaling can lead to unsatisfactory results.
10.8 Can I fix the resolution of a blurry photo?
While it’s impossible to completely fix a blurry photo, increasing the resolution can help to restore some detail and improve its overall appearance. Applying sharpening filters and noise reduction techniques can also help to enhance the clarity of the image.
10.9 What file format is best for high-resolution images?
The best file format for high-resolution images depends on the intended use. For photos with continuous tones, JPEG is a good option as it offers a good balance between image quality and file size. For images with sharp lines and text, PNG is a better choice as it preserves detail without introducing compression artifacts. For archival purposes, TIFF is often preferred as it is a lossless format that preserves all of the original image data.
10.10 Are there any mobile apps for fixing photo resolution?
Yes, there are several mobile apps available for fixing photo resolution, including Adobe Photoshop Express, Remini, and Photo Editor Pro. These apps offer a range of features for upscaling images, enhancing details, and improving overall image quality directly on your mobile device.
Increasing photo resolution is a powerful technique for enhancing the visual impact of your images, whether you’re preparing for prints, optimizing for digital displays, or archiving for future use. By following the steps and best practices outlined in this guide, you can achieve impressive results and showcase your photography in the best possible light. Remember to start with high-quality originals, choose the right tools and techniques, and avoid common mistakes to ensure optimal results. Ready to take your photography to the next level? Visit dfphoto.net for more tips, tutorials, and inspiration! Explore our extensive collection of stunning photographs and connect with a vibrant community of photographers. Don’t forget to check out our services for professional photo editing and enhancement. Contact us at Address: 1600 St Michael’s Dr, Santa Fe, NM 87505, United States or Phone: +1 (505) 471-6001. Let dfphoto.net be your guide to mastering the art of photography.
 Original photo 634 by 982 pixels, harsh look, pixelated, detail of the original
 Original photo 634 by 982 pixels, harsh look, pixelated, detail of the original
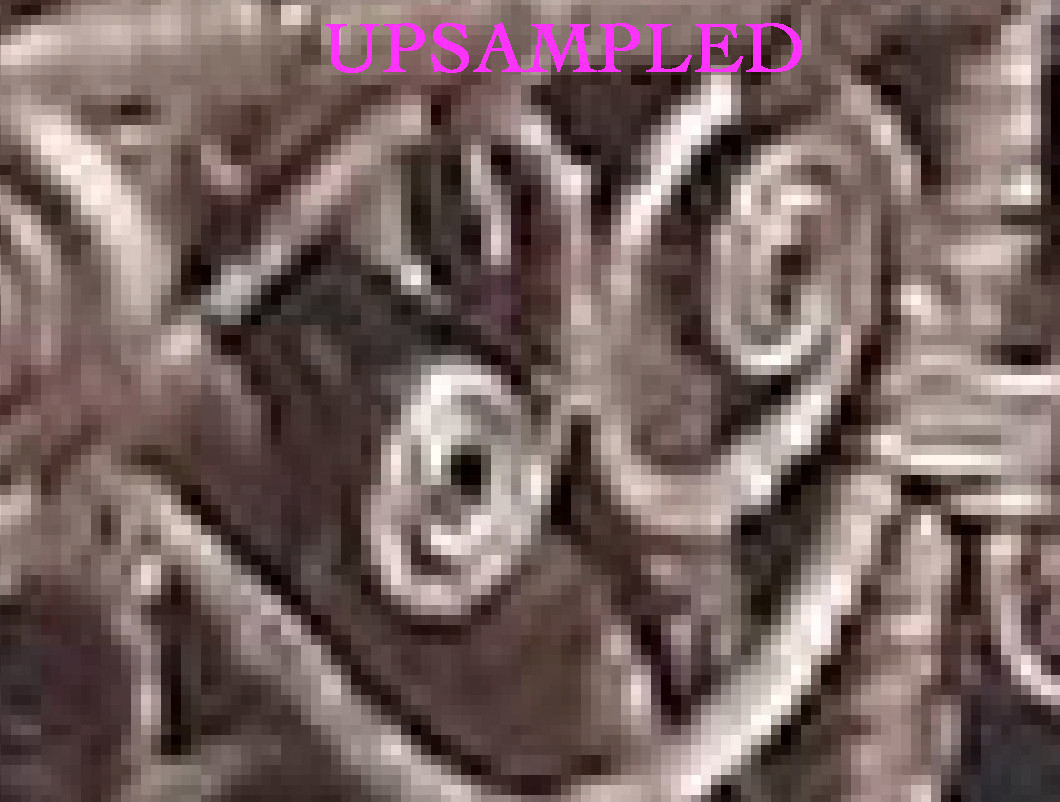 Upsampled photo smooth, detail
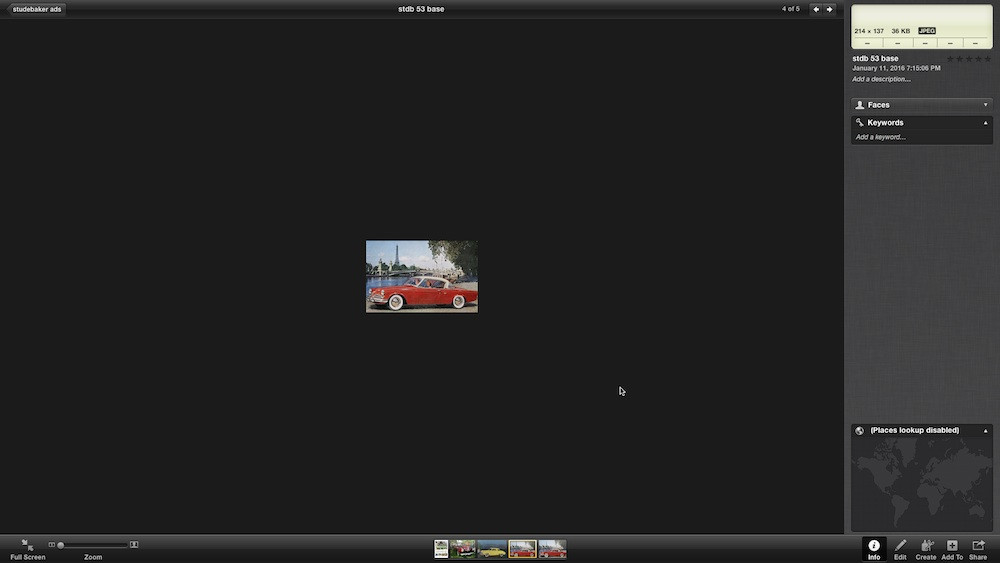 Web image Studebaker ad, barely 214 pixels wide
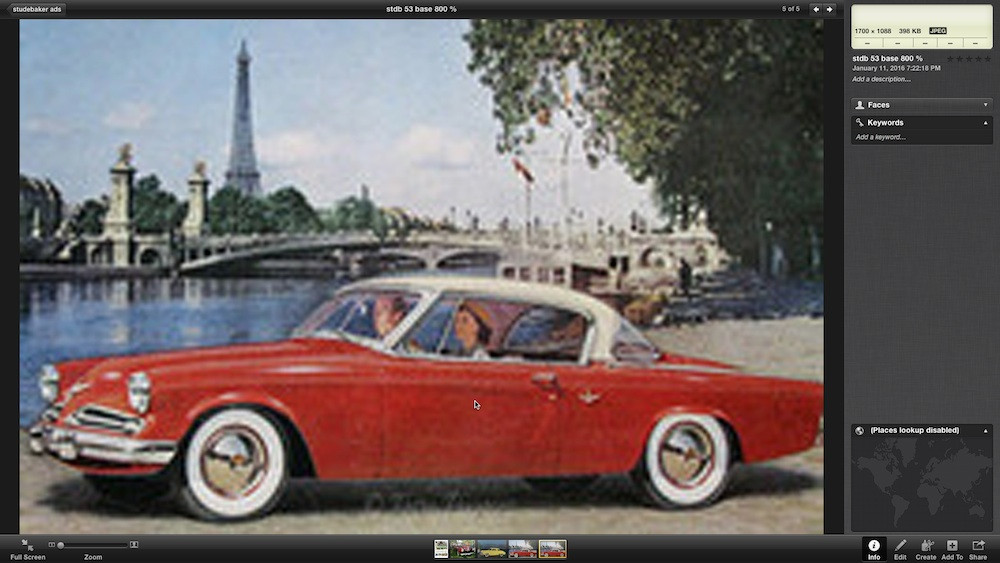 Web image Studebaker upsized 800%
