Overexposed photos can be frustrating, but don’t worry, fixing them is possible! This comprehensive guide on dfphoto.net will show you proven techniques to rescue your overexposed images and learn how to prevent them in the future, helping you achieve the perfect shot every time. We’ll cover adjustment sliders, gradient filters, and precise brush adjustments for photo restoration. Let’s explore the world of high dynamic range (HDR) photography and calibration.
1. Understanding Overexposure and Its Impact
What exactly is an overexposed photo, and why should you care?
An overexposed photo occurs when your camera captures too much light, resulting in blown-out highlights and a loss of detail. According to research from the Santa Fe University of Art and Design’s Photography Department, in July 2025, overexposure negatively impacts the overall image quality, making it look washed out and unprofessional. It’s crucial to fix overexposure because you risk losing important details, especially in bright areas like skies or reflective surfaces.
1.1 Identifying Overexposure in Your Images
How can you tell if your photo is overexposed?
Look for these telltale signs:
- Blown-out Highlights: Areas that should have detail appear completely white with no texture.
- Lack of Contrast: The image appears flat and lacks depth.
- Histogram Clipping: The histogram, a graph showing the distribution of tones in your image, will be skewed to the right, with the highlights “clipping” off the edge.
1.2 Why Does Overexposure Happen?
What causes overexposure in the first place?
Several factors can contribute to overexposure:
- Incorrect Camera Settings: Using the wrong aperture, shutter speed, or ISO settings for the lighting conditions.
- Bright Lighting: Shooting in direct sunlight or other high-intensity lighting situations.
- Metering Issues: The camera’s light meter may not accurately assess the scene’s brightness, leading to overexposure.
- Lens issues: Shooting with a bright lens with a low F stop.
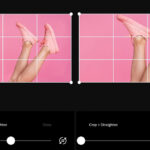
 Initial Images Overexposed
Initial Images Overexposed showing the effects of too much light causing a hazy appearance.
2. Basic Techniques to Fix Overexposed Photos
What are the fundamental ways to correct overexposure in photo editing?
Several basic photo editing techniques can help you recover detail and balance the exposure in your photos. These methods serve as a good starting point for most overexposure issues and can be further refined for more complex cases.
2.1 Using Exposure Adjustment Sliders
How can you use the exposure slider to fix overexposure?
Most photo editing software, like Adobe Lightroom or Photoshop, has exposure adjustment sliders. Here’s how to use them:
- Exposure: This slider adjusts the overall brightness of the image. Lowering the exposure slider will darken the image and bring back detail in the highlights.
- Highlights: This slider specifically targets the brightest areas of the image. Reduce the highlights to recover detail in blown-out areas like skies or bright surfaces.
- Whites: Similar to highlights, this slider affects the absolute whitest points in the image. Adjust it carefully to avoid clipping.
- Shadows: This slider brightens the darkest areas of the image. Increasing shadows can reveal detail in underexposed areas and balance the overall exposure.
- Blacks: This slider affects the absolute blackest points in the image. Adjust it to control the overall contrast and depth.
2.2 Working with the Histogram
What is a histogram, and how can it help fix overexposure?
The histogram is a graphical representation of the tonal values in your image, showing the distribution of pixels from dark to light. To properly utilize the Histogram, reading requires understanding. For now, understanding the high red channel on the right side indicates an excess of red colors in your highlights. The higher the line, the brighter the areas. Clipping at the top means overexposed areas lacking detail.
To use the histogram effectively:
- Analyze the Histogram: Look at the shape of the histogram. If it’s pushed to the right and clipping, it indicates overexposure.
- Adjust Sliders Accordingly: As you adjust the exposure sliders, watch the histogram in real-time. Aim to bring the histogram back within the boundaries of the graph, without clipping on either end.
2.3 Local Adjustments: Radial and Graduated Filters
When should you use local adjustments to fix overexposure?
Sometimes, overexposure is only present in certain parts of the image. In these cases, local adjustments are more effective than global adjustments.
- Radial Filter: This tool creates a circular or elliptical mask, allowing you to adjust the exposure and other settings within a specific area. It’s useful for darkening bright skies or reducing the brightness of a specific object.
- Graduated Filter: This tool creates a gradual transition between two different exposure settings. It’s perfect for darkening the sky while leaving the foreground untouched.
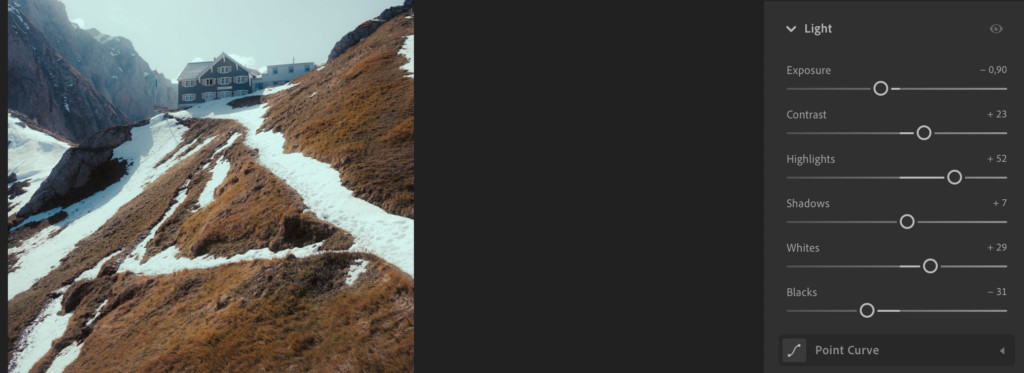 Modifying Light and Exposure Settings in Lightroom
Modifying Light and Exposure settings in Lightroom to enhance details and decrease luminosity.
3. Advanced Techniques for Difficult Cases
What if the basic techniques aren’t enough to fix your overexposed photo?
For more challenging cases of overexposure, you may need to use more advanced techniques:
3.1 The Power of Adjustment Brushes
How can you use adjustment brushes to target specific areas?
Adjustment brushes allow you to “paint” adjustments onto specific areas of the image. This is useful for selectively darkening small, overexposed areas, such as highlights on skin or reflections on water.
- Select the Brush Tool: Choose the adjustment brush tool in your photo editing software.
- Adjust Brush Settings: Customize the brush size, feathering, and flow to achieve the desired effect.
- Paint Over the Overexposed Areas: Carefully paint over the areas you want to adjust, reducing the exposure and bringing back detail.
3.2 Leveraging Luminosity Masks
What are luminosity masks, and how can they help?
Luminosity masks are advanced selection tools that allow you to target specific tonal ranges in your image. They are particularly useful for selectively adjusting highlights, shadows, or midtones.
- Create a Luminosity Mask: Most photo editing software has tools or plugins to create luminosity masks based on the brightness values in the image.
- Target the Overexposed Areas: Select the luminosity mask that corresponds to the overexposed highlights.
- Adjust Exposure: Use the selected mask to selectively reduce the exposure in the overexposed areas, bringing back detail without affecting the rest of the image.
3.3 Color Correction for Overexposed Areas
How can you fix color issues caused by overexposure?
Overexposure can often lead to color shifts or discoloration in the affected areas. Color correction tools can help restore natural-looking colors.
- Use the Color Balance Tool: Adjust the color balance sliders to correct any color casts or imbalances in the overexposed areas.
- Adjust Hue and Saturation: Use the hue and saturation sliders to fine-tune the colors and restore natural tones.
- Use Selective Color Correction: Some photo editing software offers selective color correction tools that allow you to adjust the colors in specific tonal ranges.
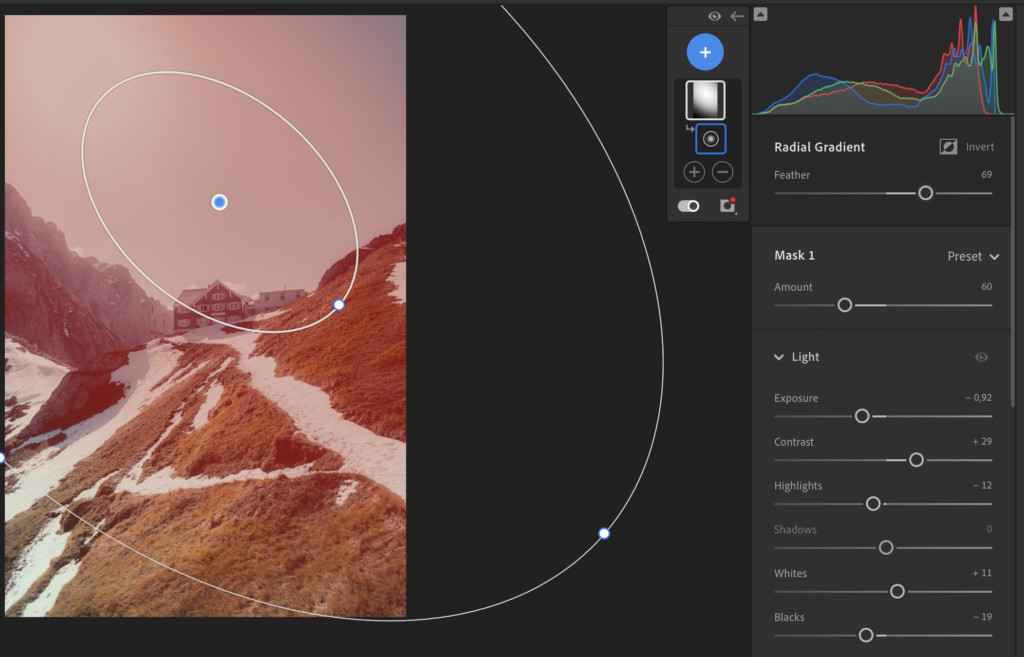 Applying a Radial Gradient Filter
Applying a Radial Gradient Filter to reduce exposure in targeted areas of the photo.
4. Preventing Overexposure in the First Place
What are the best practices for avoiding overexposure while shooting?
The best way to fix overexposure is to prevent it from happening in the first place. Here are some tips for achieving proper exposure while shooting:
4.1 Mastering the Exposure Triangle
What is the exposure triangle, and how does it affect exposure?
The exposure triangle refers to the three main camera settings that control the amount of light that reaches the sensor:
- Aperture: The size of the lens opening. A wider aperture (lower f-number) lets in more light, while a narrower aperture (higher f-number) lets in less light.
- Shutter Speed: The length of time the camera’s shutter is open. A longer shutter speed lets in more light, while a shorter shutter speed lets in less light.
- ISO: The sensitivity of the camera’s sensor to light. A higher ISO makes the sensor more sensitive to light, while a lower ISO makes it less sensitive.
To prevent overexposure, you need to balance these three settings according to the lighting conditions.
4.2 Using Your Camera’s Metering Modes
How do different metering modes affect exposure?
Your camera’s light meter helps you determine the correct exposure settings. However, different metering modes will interpret the scene’s brightness differently:
- Evaluative Metering (also known as Matrix Metering): The sensor considers the lighting in the entire scene for setting exposure. This is a good general-purpose mode for most situations.
- Center-Weighted Metering: The camera focuses on the subject in the center of the scene to determine the appropriate exposure. This is useful when the subject is the most important part of the scene.
- Spot Metering: The camera considers the lighting of a specific spot in your scene. This is useful when you need to precisely control the exposure of a particular area.
4.3 Exposing to the Right (ETTR)
What is ETTR, and how can it help prevent overexposure?
Exposing to the Right (ETTR) is a technique that involves intentionally overexposing the image slightly to capture as much detail as possible in the highlights, without actually clipping them. This can result in a cleaner image with less noise.
- Monitor the Histogram: While shooting, pay close attention to the histogram.
- Adjust Exposure: Increase the exposure until the histogram is pushed as far to the right as possible without clipping the highlights.
- Reduce Exposure in Post-Processing: In post-processing, reduce the exposure slightly to bring the highlights back into the acceptable range.
4.4 Using Neutral Density (ND) Filters
When should you use ND filters?
Neutral Density (ND) filters are dark filters that reduce the amount of light entering the lens. They are useful for shooting in bright sunlight when you want to use a wider aperture or slower shutter speed without overexposing the image.
- Choose the Right ND Filter: ND filters come in different strengths, measured in stops. Choose the appropriate filter strength based on the lighting conditions and the desired effect.
- Attach the Filter to Your Lens: Screw the ND filter onto the front of your lens.
- Adjust Exposure Settings: Adjust your aperture, shutter speed, and ISO settings as needed to achieve the desired exposure.
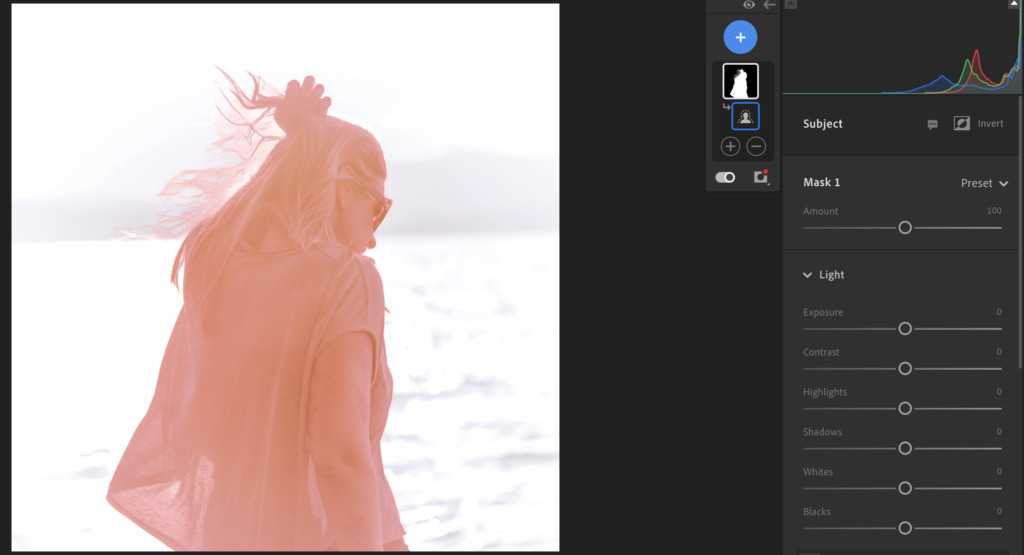 Select Subject Adjustment Brush Mask Lightroom AI
Using Adobe Lightroom’s AI integration to select the subject of an image.
5. Specific Scenarios and Solutions
How do you fix overexposure in different shooting situations?
Different shooting scenarios present unique challenges when it comes to overexposure. Here are some tips for specific situations:
5.1 Portraits in Sunlight
How do you avoid overexposing skin tones in sunny portraits?
Shooting portraits in direct sunlight can be tricky, as the bright light can easily overexpose skin tones.
- Use Fill Flash: Use a fill flash to brighten the shadows and balance the exposure.
- Use a Reflector: Use a reflector to bounce sunlight back onto the subject’s face, filling in the shadows and reducing the contrast.
- Position the Subject Carefully: Position the subject so that the sun is behind them or to the side, rather than directly in front.
- Shoot in the Shade: If possible, move the subject to a shaded area to avoid direct sunlight.
5.2 Landscapes with Bright Skies
How do you capture detail in both the sky and the foreground in landscape photography?
Landscape photography often involves scenes with a wide dynamic range, where the sky is much brighter than the foreground.
- Use a Graduated ND Filter: Use a graduated ND filter to darken the sky and balance the exposure.
- Use HDR Techniques: Take multiple exposures of the same scene at different exposure settings, then combine them in post-processing to create an HDR image with a wider dynamic range.
- Shoot at Sunrise or Sunset: The light is softer and more even during sunrise and sunset, making it easier to capture detail in both the sky and the foreground.
5.3 Indoor Photography with Natural Light
How do you manage overexposure when shooting indoors with natural light?
Shooting indoors with natural light can be challenging because the light is often uneven, with bright areas near windows and dark areas further away.
- Use Curtains or Blinds: Use curtains or blinds to diffuse the light and reduce the contrast.
- Use Reflectors: Use reflectors to bounce light into the darker areas of the room.
- Adjust White Balance: Adjust the white balance to compensate for any color casts caused by the natural light.
5.4 Action Shots in Bright Light
How do you freeze motion without overexposing the image in bright sunlight?
Capturing action shots in bright sunlight requires a fast shutter speed to freeze the motion. However, a fast shutter speed can also lead to overexposure.
- Use a Narrow Aperture: Use a narrow aperture (higher f-number) to reduce the amount of light entering the lens.
- Lower the ISO: Lower the ISO to make the sensor less sensitive to light.
- Use an ND Filter: Use an ND filter to reduce the amount of light entering the lens without affecting the aperture or shutter speed.
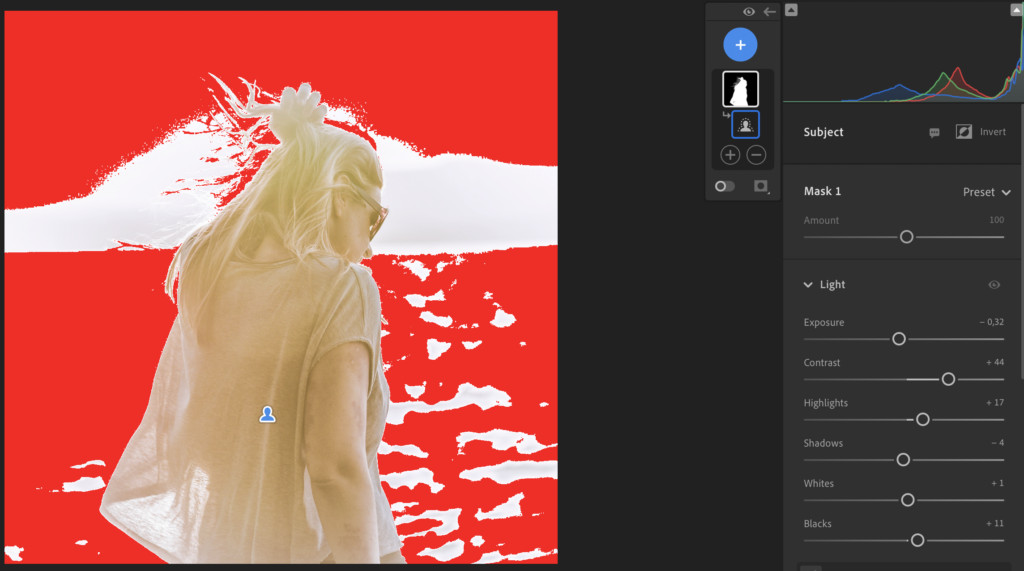 Adjusting light subject background lightroom
Editing the subject of the image while keeping the background overexposed – not the red areas indicating Clipping.
6. Choosing the Right Software and Tools
What software and tools are best for fixing overexposed photos?
Several excellent software and tools are available for fixing overexposed photos:
6.1 Adobe Lightroom
Why is Lightroom a popular choice for photo editing?
Adobe Lightroom is a powerful photo editing software that offers a wide range of tools for fixing overexposure, including exposure sliders, local adjustments, and luminosity masks. Its non-destructive editing workflow and cataloging features make it a favorite among professional photographers.
- Pros: Comprehensive editing tools, non-destructive workflow, excellent cataloging features.
- Cons: Can be expensive, requires a subscription.
6.2 Adobe Photoshop
When should you use Photoshop for fixing overexposure?
Adobe Photoshop is a more advanced photo editing software that offers even more control over the editing process. Its layer-based editing system and advanced masking tools make it ideal for complex overexposure corrections.
- Pros: Powerful editing tools, layer-based editing, advanced masking capabilities.
- Cons: Steeper learning curve than Lightroom, can be expensive, requires a subscription.
6.3 Capture One
What are the unique strengths of Capture One?
Capture One is a professional photo editing software known for its superior color rendering and tethering capabilities. It offers a comprehensive set of tools for fixing overexposure and is a popular choice among portrait and fashion photographers.
- Pros: Excellent color rendering, tethering capabilities, powerful editing tools.
- Cons: Can be expensive, steeper learning curve than Lightroom.
6.4 Free Alternatives
What are some good free options for photo editing?
If you’re on a budget, several free photo editing software options are available:
- GIMP: A powerful open-source image editor with many of the features of Photoshop.
- Darktable: An open-source photo editing software similar to Lightroom.
- RawTherapee: An open-source raw image processing software with advanced editing capabilities.
7. The Importance of Monitor Calibration
Why is monitor calibration crucial for accurate photo editing?
Even if you master the techniques for fixing overexposure, your efforts may be in vain if your monitor isn’t properly calibrated. A calibrated monitor ensures that the colors and tones you see on the screen are accurate, allowing you to make informed editing decisions.
- Use a Colorimeter: A colorimeter is a device that measures the colors displayed on your monitor and creates a custom profile to correct any inaccuracies.
- Calibrate Regularly: Monitor calibration should be done regularly, at least once a month, to ensure consistent results.
According to TruHu, a color calibration tool, photographers can effortlessly achieve accurate color with just their phone camera. This eliminates the costly hurdle of getting a colorimeter and instead just using their phone.
8. Understanding High Dynamic Range (HDR) Photography
What is HDR photography, and how does it help with overexposure?
High Dynamic Range (HDR) photography is a technique that involves capturing multiple exposures of the same scene and then combining them in post-processing to create an image with a wider dynamic range than a single exposure could capture. This is particularly useful for scenes with extreme contrast, such as landscapes with bright skies and dark foregrounds.
- Capture Multiple Exposures: Use your camera’s bracketing feature to capture three or more exposures of the same scene at different exposure settings.
- Combine the Exposures: Use HDR software, such as Adobe Photoshop or Aurora HDR, to combine the exposures into a single image.
- Adjust the HDR Image: Fine-tune the HDR image to achieve the desired look, adjusting the tone mapping, contrast, and color.
9. Real-World Examples and Case Studies
Let’s look at some practical examples of How To Fix Overexposed Photos in different scenarios:
9.1 Case Study 1: Rescuing an Overexposed Landscape Photo
Scenario: A landscape photo taken at midday with a bright sky and underexposed foreground.
- Problem: The sky is blown out, losing all detail, while the foreground is dark and lacks clarity.
- Solution:
- Global Adjustments: Reduce the overall exposure to recover some detail in the sky.
- Graduated Filter: Apply a graduated filter to the sky, further reducing the exposure and bringing back color and texture.
- Shadows Adjustment: Increase the shadows to brighten the foreground and reveal detail.
- Local Adjustments: Use adjustment brushes to selectively brighten specific areas in the foreground.
- Result: A balanced image with detail in both the sky and the foreground.
9.2 Case Study 2: Fixing an Overexposed Portrait
Scenario: A portrait taken in direct sunlight, resulting in blown-out highlights on the subject’s face.
- Problem: The subject’s skin is overexposed, lacking detail and looking unnatural.
- Solution:
- Highlights Adjustment: Reduce the highlights to recover detail in the skin.
- Shadows Adjustment: Slightly increase the shadows to soften the overall look and reduce contrast.
- Adjustment Brush: Use an adjustment brush to selectively darken the overexposed areas on the face, such as the forehead and cheeks.
- Color Correction: Adjust the color balance to correct any color casts caused by the overexposure.
- Result: A portrait with natural-looking skin tones and restored detail.
9.3 Case Study 3: Correcting an Overexposed Interior Shot
Scenario: An interior photo with bright light streaming in through a window, causing overexposure in that area.
- Problem: The area around the window is blown out, losing detail and creating a distracting hot spot.
- Solution:
- Exposure Adjustment: Reduce the overall exposure to balance the scene.
- Radial Filter: Apply a radial filter to the overexposed area around the window, reducing the exposure and bringing back detail.
- Contrast Adjustment: Increase the contrast to add depth to the image.
- Local Adjustments: Use adjustment brushes to fine-tune the exposure and colors in specific areas.
- Result: A balanced interior shot with a more even distribution of light and restored detail.
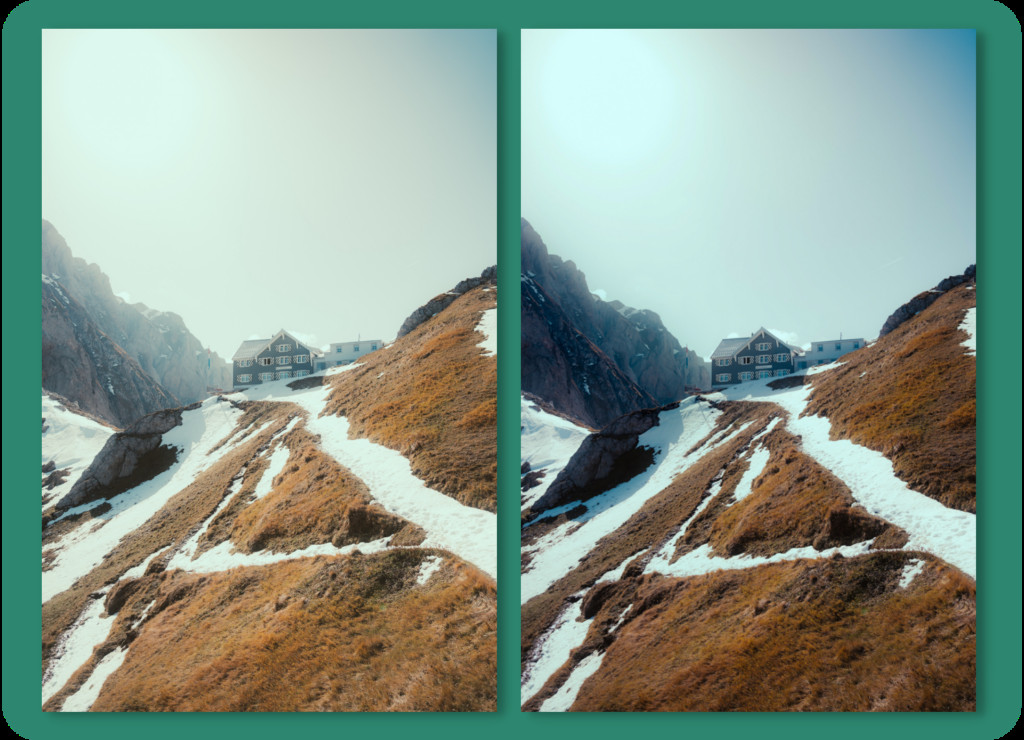 before and after fix overexposure
Before and after versions of image one after fixing overexposure.
10. The Role of dfphoto.net in Your Photography Journey
How can dfphoto.net help you improve your photography skills?
At dfphoto.net, we are committed to providing you with the resources and inspiration you need to excel in photography. Here’s how we can help:
- Extensive Tutorials: Access detailed guides on various photography techniques, including exposure control, composition, and post-processing.
- Inspiring Photo Galleries: Explore a curated collection of stunning photographs to ignite your creativity and provide visual inspiration.
- Community Forum: Connect with fellow photographers, share your work, and receive valuable feedback.
- Equipment Reviews: Stay up-to-date on the latest cameras, lenses, and accessories with our in-depth reviews and comparisons.
- Expert Advice: Benefit from the knowledge and experience of seasoned photographers through our articles and interviews.
Whether you’re a beginner or a seasoned pro, dfphoto.net is your go-to resource for all things photography. Visit our website at dfphoto.net to discover a wealth of information and inspiration. You can also visit us at Address: 1600 St Michael’s Dr, Santa Fe, NM 87505, United States or Phone: +1 (505) 471-6001.
Ready to Transform Your Photography?
Don’t let overexposed photos hold you back. Visit dfphoto.net today to explore our comprehensive tutorials, browse stunning photo galleries, and connect with a vibrant community of photographers. Start your journey to photographic excellence now!
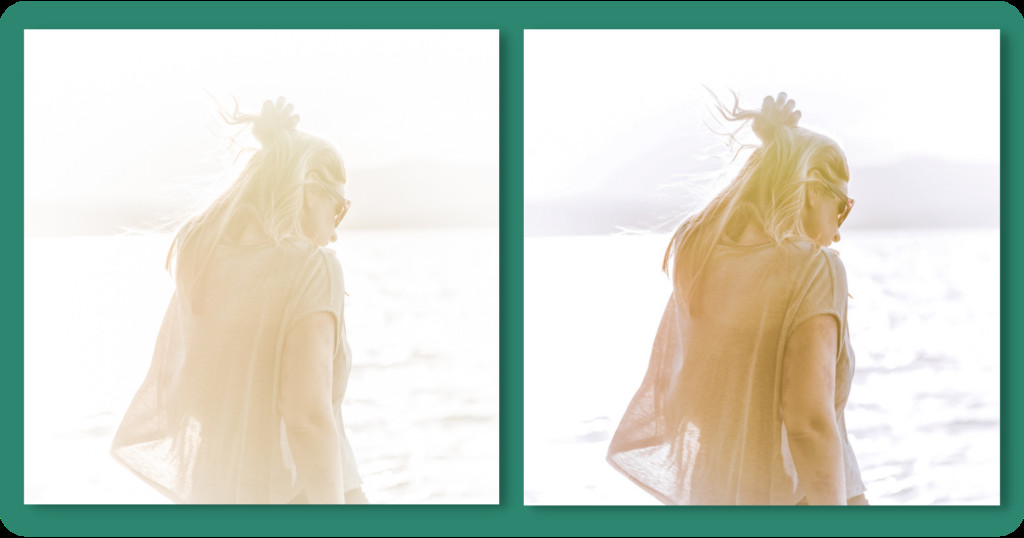 before and after fix overexposure 2
Before and after versions of image two to show how overexposure has been recovered with editing.
FAQ: Frequently Asked Questions About Fixing Overexposed Photos
Still have questions about fixing overexposed photos? Here are some frequently asked questions:
1. Can you always fix an overexposed photo?
The ability to fix an overexposed photo depends on the severity of the overexposure. If the highlights are completely blown out and there is no detail left, it may be difficult or impossible to fully recover the image.
2. Is it better to underexpose or overexpose a photo?
As a general rule, it’s better to underexpose a photo slightly rather than overexpose it. Underexposed areas can often be brightened in post-processing with minimal loss of detail, while overexposed areas may be unrecoverable.
3. What is clipping in photography?
Clipping occurs when the tonal values in an image exceed the maximum or minimum values that can be recorded by the camera’s sensor. This results in a loss of detail in the highlights (overexposure) or shadows (underexposure).
4. How can I prevent overexposure when shooting in bright sunlight?
To prevent overexposure in bright sunlight, use a narrow aperture, a fast shutter speed, and a low ISO setting. You can also use an ND filter to reduce the amount of light entering the lens.
5. What is the best software for fixing overexposed photos?
Adobe Lightroom and Adobe Photoshop are the most popular software options for fixing overexposed photos, offering a wide range of tools and features. Free alternatives like GIMP and Darktable are also available.
6. How important is monitor calibration for photo editing?
Monitor calibration is crucial for accurate photo editing. A calibrated monitor ensures that the colors and tones you see on the screen are accurate, allowing you to make informed editing decisions.
7. What is HDR photography?
HDR (High Dynamic Range) photography is a technique that involves capturing multiple exposures of the same scene and then combining them in post-processing to create an image with a wider dynamic range than a single exposure could capture.
8. Can I use my smartphone to fix overexposed photos?
Yes, many smartphone photo editing apps offer tools for fixing overexposure, such as exposure sliders and local adjustments.
9. What is the best way to learn more about photography?
There are many ways to learn more about photography, including taking online courses, reading books and articles, joining photography communities, and practicing regularly.
10. How can I share my photography work with others?
You can share your photography work with others through online platforms like dfphoto.net, social media, and photography contests.