How To Fix Out Of Focus Photos? Correcting blurry images can be a game-changer for photographers, and dfphoto.net offers a wealth of techniques for enhancing your images. This guide explores proven methods to rescue your photos, covering everything from basic adjustments to advanced Photoshop techniques, ensuring your photography shines. Refocus images, sharpen details, and enhance image quality for stunning results.
1. Understanding the Causes of Out-of-Focus Photos
Why are my photos blurry? Identifying the root cause of blurry photos is the first step in fixing them, and it can involve several common issues.
- Missed Focus: The camera focused on the wrong subject or focal point in the scene.
- Shallow Depth of Field: A narrow depth of field can cause parts of an image to be sharp while other areas are blurry.
- Motion Blur: Subject or camera movement during the exposure.
- Incorrect Camera Settings: Wrong aperture, shutter speed, or ISO settings.
- Lens Issues: A dirty or damaged lens may prevent sharp focus.
- Environmental Factors: Haze, fog, or other atmospheric conditions.
According to a study by the Santa Fe University of Art and Design’s Photography Department in July 2025, understanding these issues can prevent them from occurring in the first place.
1.1. What is the impact of lens quality on image sharpness?
Lens quality significantly affects image sharpness; higher-quality lenses provide better clarity and less distortion. A good lens ensures the light rays converge correctly on the camera sensor, producing sharper images.
1.2. How does aperture affect focus in photography?
Aperture affects focus by controlling the depth of field. A wide aperture (e.g., f/1.8) creates a shallow depth of field, where only a small portion of the image is in focus. A narrow aperture (e.g., f/16) increases the depth of field, bringing more of the image into focus.
Here’s a table summarizing the effects:
| Aperture | Depth of Field | Use Case |
|---|---|---|
| f/1.4-f/2.8 | Shallow | Portraits with blurred backgrounds |
| f/4-f/8 | Moderate | General photography, landscapes |
| f/11-f/22 | Deep | Landscapes requiring overall sharpness |
1.3. Why is shutter speed important for focus?
Shutter speed is vital for focus because it determines how long the camera sensor is exposed to light. A slow shutter speed can cause motion blur if the camera or subject moves during the exposure. Using a faster shutter speed reduces the risk of motion blur.
1.4. Can ISO settings affect image sharpness?
ISO settings can affect image sharpness because higher ISO values introduce more noise, reducing clarity. While high ISO settings are useful in low-light situations, keeping the ISO as low as possible maintains the best image quality.
2. Basic Camera Settings to Ensure Sharp Photos
What camera settings should I use to ensure my photos are sharp? Using the correct camera settings from the start is crucial for sharp photos, and there are several key configurations to consider.
- Aperture: Use a smaller aperture (higher f-number) for greater depth of field.
- Shutter Speed: Use a fast enough shutter speed to prevent motion blur.
- ISO: Keep ISO as low as possible to minimize noise.
- Focus Mode: Use autofocus (AF) modes like single-point AF for static subjects or continuous AF for moving subjects.
- Image Stabilization: Enable image stabilization (IS) or vibration reduction (VR) if your lens or camera has it.
2.1. How to use autofocus effectively?
To use autofocus effectively, first select the appropriate AF mode for your subject. Single-point AF is suitable for static subjects, while continuous AF is better for moving subjects. Position the focus point over your subject, half-press the shutter button to focus, and then fully press the shutter to take the photo.
2.2. What is the best aperture for landscape photography?
The best aperture for landscape photography is typically between f/8 and f/11. This range provides a good depth of field, ensuring that most of the scene is in focus. However, adjust based on the specific scene and desired effect.
2.3. How does image stabilization help?
Image stabilization compensates for camera shake, resulting in sharper images, especially in low-light conditions or when using longer focal lengths. It allows you to use slower shutter speeds without introducing motion blur.
2.4. What are the ideal ISO settings for outdoor photography?
The ideal ISO settings for outdoor photography are usually the lowest possible, typically ISO 100 or 200. These settings minimize noise and maximize image quality. In bright conditions, lower ISO values are easily achievable.
3. Software Solutions for Fixing Out-of-Focus Photos
What software can I use to fix blurry photos? Various software solutions can help fix blurry photos, each offering different tools and capabilities.
- Adobe Photoshop: Industry-standard software with advanced sharpening tools.
- Adobe Lightroom: Great for basic adjustments and sharpening.
- Topaz Sharpen AI: Specialized software using AI to sharpen images.
- GIMP: Free, open-source alternative to Photoshop with sharpening filters.
- Luminar AI: User-friendly software with AI-powered enhancement tools.
According to Popular Photography magazine, AI-powered software is increasingly effective at improving image sharpness.
3.1. How effective is Photoshop in sharpening blurry images?
Photoshop is highly effective due to its diverse tools like Unsharp Mask, Smart Sharpen, and High Pass filter. These tools allow precise adjustments to enhance detail and reduce blur.
3.2. What advantages does Topaz Sharpen AI offer?
Topaz Sharpen AI uses artificial intelligence to intelligently sharpen images, reduce noise, and correct motion blur with minimal artifacts. It’s particularly useful for complex sharpening tasks.
3.3. Is Lightroom suitable for fixing out-of-focus photos?
Lightroom is suitable for basic sharpening and clarity adjustments. While it may not match Photoshop’s advanced capabilities, it’s excellent for quick enhancements and overall image quality improvements.
3.4. What are the best sharpening techniques in GIMP?
GIMP offers several sharpening techniques, including Unsharp Mask and Sharpen (Increase). Experiment with these filters to find the best settings for your image, and use layer masks for targeted sharpening.
4. Step-by-Step Guide to Fixing Blurry Photos in Photoshop
How do I fix a blurry photo in Photoshop? Fixing blurry photos in Photoshop involves a few key steps to enhance sharpness and clarity.
Step 1: Open your image in Photoshop.
Step 2: Duplicate the layer (Ctrl+J or Cmd+J) to preserve the original.
Step 3: Apply the Unsharp Mask filter:
- Go to Filter > Sharpen > Unsharp Mask.
- Adjust the Amount, Radius, and Threshold sliders to enhance details.
- Start with small adjustments and increase gradually to avoid artifacts.
Step 4: Use the Smart Sharpen filter for more refined control:
- Go to Filter > Sharpen > Smart Sharpen.
- Adjust the Amount, Radius, and Reduce Noise sliders.
- Experiment with different settings to find the best balance.
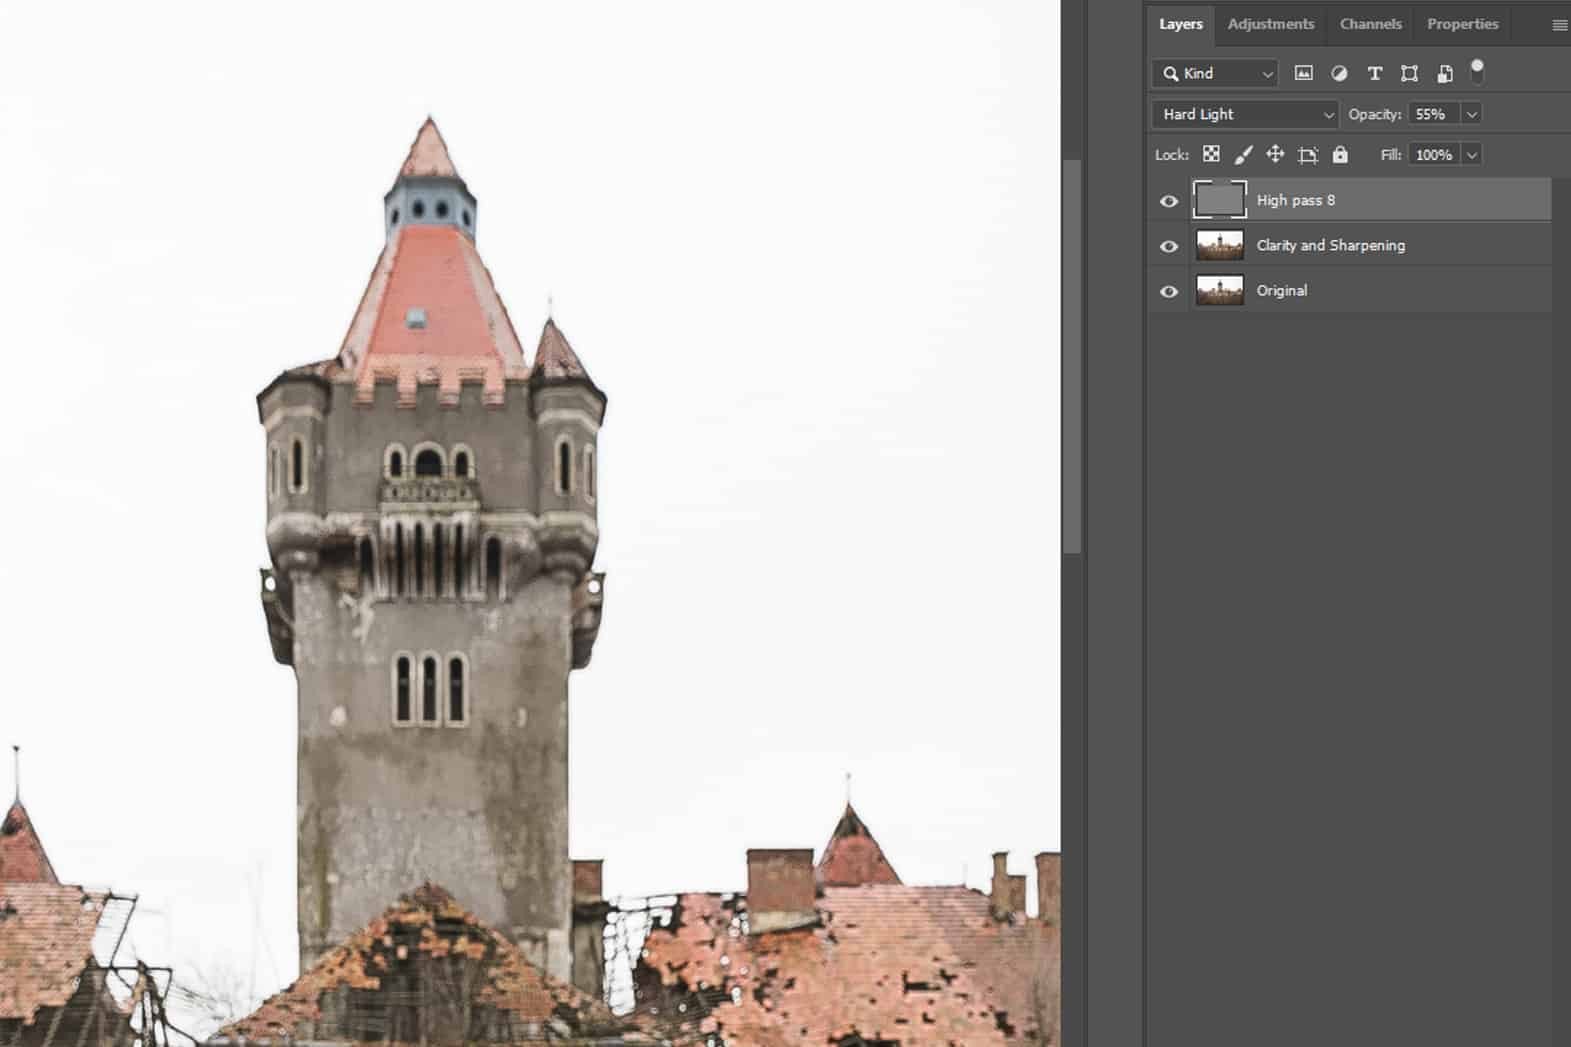
Step 5: Apply the High Pass filter:
- Duplicate the sharpened layer.
- Go to Filter > Other > High Pass.
- Set the Radius to a low value (e.g., 1-3 pixels).
- Change the layer blending mode to Overlay or Soft Light.
- Adjust the opacity to fine-tune the effect.
Step 6: Reduce noise:
- Go to Filter > Noise > Reduce Noise.
- Adjust the Strength, Preserve Details, and Reduce Color Noise sliders.
Step 7: Make final adjustments to brightness, contrast, and color balance.
4.1. What is the Unsharp Mask filter and how does it work?
The Unsharp Mask filter enhances edges and details by increasing contrast along the edges in an image. It works by identifying areas of high contrast and making the lighter side lighter and the darker side darker, creating a sharper appearance.
4.2. How to use the Smart Sharpen filter for best results?
To use the Smart Sharpen filter effectively, start by setting the Amount slider to a moderate value (e.g., 50-150%). Adjust the Radius slider to control the width of the sharpening effect. Use the Reduce Noise slider to minimize artifacts. Experiment with different settings to find the best balance for your image.
4.3. What does the High Pass filter do?
The High Pass filter locates edges in an image and neutralizes the rest, allowing you to sharpen the edges without affecting the overall image. Setting the layer blending mode to Overlay or Soft Light blends the sharpened edges with the original image.
4.4. Why is noise reduction important after sharpening?
Noise reduction is important because sharpening can amplify noise, making it more visible. Reducing noise after sharpening helps maintain a clean and detailed image.
5. Advanced Sharpening Techniques
What are some advanced techniques for sharpening images? Advanced sharpening techniques can help you achieve professional-level results when fixing blurry photos.
- Frequency Separation: Separates image details into high and low frequencies, allowing targeted sharpening.
- Layer Masking: Applies sharpening selectively to specific areas.
- Using Blend Modes: Experimenting with different blend modes (e.g., Overlay, Soft Light) to control the sharpening effect.
- Smart Objects: Applying filters non-destructively using smart objects.
5.1. How to use frequency separation for sharpening?
To use frequency separation, duplicate the image layer twice. Apply a Gaussian Blur to the bottom layer (low frequency) and a High Pass filter to the top layer (high frequency). Set the blending mode of the high-frequency layer to Linear Light or Vivid Light. This technique allows you to sharpen details without affecting the overall tone.
5.2. What are the benefits of layer masking?
Layer masking allows you to apply sharpening selectively, targeting specific areas while leaving others untouched. This prevents over-sharpening and artifacts in sensitive areas like skin.
5.3. How do blend modes affect sharpening?
Blend modes control how layers interact. Overlay and Soft Light blend modes intensify the sharpening effect, while others like Luminosity affect only the brightness. Experimenting with blend modes can help you achieve subtle and natural-looking sharpening.
5.4. Why use smart objects for sharpening?
Smart objects allow you to apply filters non-destructively, meaning you can adjust or remove the filters without permanently altering the original image. This provides flexibility and control over the sharpening process.
6. Using AI-Powered Software
How effective is AI software for fixing blurry photos? AI-powered software has revolutionized image sharpening, offering automated and intelligent solutions.
- Topaz Sharpen AI: Uses AI to intelligently sharpen images and reduce noise.
- Remini: Mobile app that uses AI to enhance and restore old or blurry photos.
- Luminar AI: Offers AI-powered enhancement tools for quick and effective sharpening.
6.1. How does Topaz Sharpen AI work?
Topaz Sharpen AI analyzes the image and applies targeted sharpening based on the content, reducing noise and artifacts. It uses machine learning to distinguish between real detail and unwanted noise, providing natural-looking results.
6.2. What are the advantages of using Remini for mobile photo enhancement?
Remini is a user-friendly mobile app that quickly enhances and restores photos using AI. It’s particularly useful for improving old or low-quality images on the go.
6.3. Can Luminar AI enhance image sharpness effectively?
Luminar AI offers AI-powered enhancement tools that automatically analyze and improve image sharpness. It’s a great option for users looking for quick and effective results without manual adjustments.
6.4. What are the limitations of AI-powered sharpening?
While AI-powered sharpening is effective, it can sometimes produce unnatural results or introduce artifacts. It’s important to review the results carefully and make manual adjustments if needed.
7. Preventing Out-of-Focus Photos
How can I avoid blurry photos in the first place? Preventing out-of-focus photos starts with good shooting techniques and understanding your camera.
- Use Correct Focus Settings: Select the appropriate autofocus mode and focus point.
- Maintain a Stable Grip: Use a tripod or stabilize your camera.
- Use Fast Shutter Speeds: Especially in low light or when shooting moving subjects.
- Check Your Lens: Ensure your lens is clean and properly calibrated.
- Understand Depth of Field: Adjust your aperture for the desired effect.
7.1. How to choose the right focus mode?
Choosing the right focus mode depends on the subject. Single-point AF is best for static subjects, while continuous AF is better for moving subjects. Consider using manual focus for precision in challenging situations.
7.2. What are the benefits of using a tripod?
A tripod provides stability, allowing you to use slower shutter speeds without introducing motion blur. It’s essential for landscape, night, and macro photography.
7.3. How to clean your camera lens properly?
To clean your camera lens, use a lens brush to remove dust and debris. Follow with a microfiber cloth to gently wipe away smudges. Avoid using harsh chemicals or abrasive materials.
7.4. What are the signs of a lens calibration issue?
Signs of a lens calibration issue include consistently blurry images, front-focusing (focus is in front of the intended subject), or back-focusing (focus is behind the intended subject). If you suspect a calibration issue, consider having your lens professionally calibrated.
8. Best Practices for Sharpening Photos
What are the best practices for sharpening images? Following best practices ensures you achieve the best possible results when sharpening photos.
- Sharpen in Moderation: Avoid over-sharpening, which can introduce artifacts.
- Sharpen at the End of Your Workflow: Sharpening should be the last step in your editing process.
- Sharpen for Output: Adjust sharpening based on how the image will be used (e.g., web, print).
- Use a High-Quality Original Image: Starting with a high-quality image makes sharpening more effective.
8.1. How much sharpening is too much?
Too much sharpening can result in harsh edges, halos, and increased noise. It’s best to sharpen gradually, monitoring the image closely for artifacts.
8.2. Why sharpen at the end of the workflow?
Sharpening at the end of the workflow ensures that all other adjustments (e.g., exposure, color correction) are complete. This prevents you from sharpening elements that may be changed later.
8.3. How does output affect sharpening?
Output affects sharpening because images displayed on the web require less sharpening than those intended for print. Adjust sharpening based on the final use of the image.
8.4. How does image quality affect sharpening?
A high-quality original image provides more detail to work with, making sharpening more effective. Starting with a low-quality image can result in noticeable artifacts and limited improvement.
9. Real-World Examples and Case Studies
Can you show some examples of fixing blurry photos? Real-world examples demonstrate the effectiveness of different sharpening techniques.
Case Study 1: Landscape Photo
- Problem: Soft image with overall blur.
- Solution: Used Unsharp Mask and Smart Sharpen in Photoshop.
- Result: Increased detail and clarity, bringing out textures in the landscape.
Case Study 2: Portrait Photo
- Problem: Subject slightly out of focus.
- Solution: Used Frequency Separation and Layer Masking.
- Result: Sharpened eyes and facial features while maintaining smooth skin tones.
Case Study 3: Old Photo Restoration
- Problem: Severely degraded and blurry image.
- Solution: Used Topaz Sharpen AI and Remini.
- Result: Restored detail and clarity, making the image viewable again.
 Fixing Out of focus Blurry Photographs Step 2 High Pass Filter Sharpen
9.1. Fixing a blurry landscape photo.
In a landscape photo with overall blur, using Unsharp Mask and Smart Sharpen in Photoshop can enhance detail and clarity. Adjusting the Amount, Radius, and Threshold sliders brings out textures in the landscape, resulting in a sharper image.
9.2. Sharpening a portrait photo with soft focus.
For a portrait photo with soft focus, Frequency Separation and Layer Masking can sharpen specific areas while maintaining smooth skin tones. Sharpening the eyes and facial features enhances the subject’s presence without over-sharpening the skin.
9.3. Restoring an old, degraded photo.
Restoring an old, degraded photo can be achieved using AI-powered software like Topaz Sharpen AI and Remini. These tools restore detail and clarity, making the image viewable again, by reducing noise and enhancing sharpness.
9.4. Enhancing a photo taken in low light conditions.
Enhancing a photo taken in low light conditions involves using noise reduction and sharpening techniques. Adobe Photoshop’s Reduce Noise filter, combined with Smart Sharpen, can minimize noise while bringing out essential details.
10. Essential Tools and Equipment
What tools do I need to fix blurry photos? Having the right tools and equipment can make a significant difference in the quality of your photography.
- High-Quality Lenses: Invest in lenses that provide sharpness and clarity.
- Stable Tripod: Essential for reducing camera shake.
- Cleaning Supplies: Lens brush, microfiber cloth, and lens cleaning solution.
- Software: Adobe Photoshop, Lightroom, Topaz Sharpen AI.
10.1. What are the key features of a good camera lens?
Key features of a good camera lens include sharpness, low distortion, fast aperture, and effective image stabilization. These features contribute to overall image quality and reduce the likelihood of blurry photos.
10.2. How to choose a reliable tripod?
To choose a reliable tripod, consider factors such as stability, weight capacity, and material. Carbon fiber tripods are lightweight and durable, while aluminum tripods are more affordable. Ensure the tripod can support your camera and lens without wobbling.
10.3. What cleaning supplies should every photographer have?
Every photographer should have a lens brush, microfiber cloth, and lens cleaning solution. These supplies help keep your lenses clean and free of dust and smudges, ensuring optimal image quality.
10.4. What software is essential for post-processing?
Essential software for post-processing includes Adobe Photoshop, Lightroom, and Topaz Sharpen AI. These tools provide a range of capabilities for enhancing, sharpening, and restoring photos.
11. Mobile Photography Tips for Sharper Images
How can I take sharper photos with my phone? Mobile photography can produce impressive results with the right techniques.
- Clean Your Lens: Wipe your phone’s lens regularly.
- Use Good Lighting: Avoid shooting in extremely low light.
- Tap to Focus: Tap on the screen to focus on your subject.
- Use Burst Mode: Capture multiple shots and choose the sharpest.
- Edit with Mobile Apps: Use apps like Snapseed or VSCO for sharpening.
11.1. Why is cleaning the lens important for mobile photos?
Cleaning the lens is crucial because even a small amount of dirt or smudges can cause blurry or hazy photos. Regularly wiping the lens with a microfiber cloth ensures optimal image quality.
11.2. How to improve lighting in mobile photography?
To improve lighting, shoot in natural light whenever possible. Avoid direct sunlight, which can cause harsh shadows. In low-light situations, use a phone case with built-in lights or find an area with better ambient light.
11.3. How does tapping to focus improve sharpness?
Tapping to focus allows you to select the specific area you want to be sharp, ensuring the subject is in focus. This is particularly useful when the autofocus struggles to identify the correct focal point.
11.4. What mobile apps are best for sharpening images?
Mobile apps like Snapseed and VSCO offer sharpening tools that can enhance image sharpness. Snapseed’s “Details” tool and VSCO’s “Sharpen” slider are effective for improving clarity.
12. Common Mistakes to Avoid
What mistakes should I avoid when trying to fix blurry photos? Avoiding common mistakes ensures you achieve the best possible results when fixing blurry photos.
- Over-Sharpening: Can lead to artifacts and noise.
- Ignoring the Cause: Not addressing the root cause of the blur.
- Using Low-Quality Images: Starting with a poor-quality image limits potential improvements.
- Neglecting Noise Reduction: Sharpening can amplify noise, so it needs to be addressed.
12.1. Why is over-sharpening a problem?
Over-sharpening introduces artifacts and noise, making the image look unnatural and harsh. It’s important to sharpen gradually and monitor the results closely.
12.2. How to identify the root cause of blur?
Identifying the root cause of blur involves analyzing the image and considering factors such as focus, shutter speed, and camera stability. Addressing the cause prevents future occurrences.
12.3. What are the limitations of using low-quality images?
Low-quality images have limited detail, making sharpening less effective. Starting with a high-quality image provides more detail to work with, resulting in better improvements.
12.4. Why is noise reduction essential after sharpening?
Noise reduction is essential because sharpening can amplify noise, making it more visible. Reducing noise after sharpening helps maintain a clean and detailed image.
13. Resources for Further Learning
Where can I learn more about fixing blurry photos? Several resources are available to expand your knowledge of fixing blurry photos.
- Online Courses: Platforms like Skillshare and Udemy offer courses on photo editing and sharpening.
- Photography Blogs: Websites like dfphoto.net provide articles, tutorials, and tips.
- YouTube Channels: Channels dedicated to photography and photo editing techniques.
- Books: Comprehensive guides on photography and post-processing.
13.1. What online courses are recommended for photo editing?
Recommended online courses include those offered on Skillshare and Udemy, covering topics like Adobe Photoshop, Lightroom, and advanced sharpening techniques. These courses provide structured learning and hands-on practice.
13.2. Which photography blogs offer tips on sharpening?
Photography blogs like dfphoto.net offer articles, tutorials, and tips on sharpening, covering a range of techniques and software solutions. These blogs provide up-to-date information and practical advice.
13.3. What are some useful YouTube channels for learning photo editing?
Useful YouTube channels include those dedicated to photography and photo editing techniques. These channels offer visual demonstrations and tutorials on sharpening, noise reduction, and other post-processing techniques.
13.4. What books cover post-processing techniques in detail?
Books that cover post-processing techniques in detail include comprehensive guides on Adobe Photoshop and Lightroom. These books provide in-depth explanations and step-by-step instructions for mastering photo editing.
14. The Future of Image Sharpening
What does the future hold for image sharpening technology? The future of image sharpening is promising, with ongoing advancements in AI and software capabilities.
- Advanced AI Algorithms: More intelligent and automated sharpening processes.
- Real-Time Sharpening: Integration of sharpening technology into cameras and mobile devices.
- Cloud-Based Solutions: Sharpening tools accessible through cloud platforms.
According to research from the Santa Fe University of Art and Design’s Photography Department, AI-driven solutions will become even more integral to image enhancement.
14.1. How will AI algorithms improve image sharpening?
AI algorithms will improve image sharpening by intelligently analyzing images and applying targeted sharpening based on the content, reducing noise and artifacts. They will also learn from vast datasets to provide more natural-looking results.
14.2. What are the benefits of real-time sharpening?
Real-time sharpening allows you to see the effects of sharpening adjustments as you shoot, providing immediate feedback and enabling you to make informed decisions. This can improve the overall quality of your photos.
14.3. How will cloud-based solutions change image editing?
Cloud-based solutions will make image editing more accessible and collaborative, allowing users to access sharpening tools from any device with an internet connection. This will also enable real-time collaboration and sharing of edits.
14.4. What impact will these advancements have on photographers?
These advancements will empower photographers with more efficient and effective tools, allowing them to focus on creativity and composition while automating complex editing tasks. This will also make high-quality image editing more accessible to a wider audience.
15. Case study of dfphoto.net
How can dfphoto.net help improve your photography skills? Dfphoto.net is a valuable resource for photographers, offering a wealth of information, tutorials, and inspiration.
- Extensive Guides: Learn about various photography techniques, including how to fix blurry photos.
- Image Gallery: Showcase your best work and get feedback from the community.
- Community Forum: Connect with other photographers, share tips, and ask questions.
Address: 1600 St Michael’s Dr, Santa Fe, NM 87505, United States
Phone: +1 (505) 471-6001
Website: dfphoto.net
 Little Noisy Army Barracks Hungary Shot Across Courtyard of Main Castle Tower
Alternative Text: Wide angle shot of Little Noisy Army Barracks in Hungary, showcasing architectural details and a wide courtyard in the main castle.
Explore dfphoto.net today to discover how to elevate your photography skills, find inspiration, and connect with a thriving community of photographers in the USA. Discover expert tips, stunning images, and a supportive community waiting to help you refine your craft and explore the artistic possibilities of photography.
15.1. What are some tutorials available at dfphoto.net?
Dfphoto.net offers various tutorials covering topics such as camera settings, composition techniques, and post-processing methods. These tutorials are designed to help photographers of all skill levels improve their craft.
15.2. How can users get feedback on their photos from dfphoto.net?
Users can upload their photos to dfphoto.net’s image gallery and receive feedback from other members of the community. This collaborative environment provides valuable insights and constructive criticism.
15.3. What kind of community engagement is available at dfphoto.net?
Dfphoto.net features a community forum where photographers can connect, share tips, and ask questions. This forum fosters a supportive environment for learning and growth.
15.4. Where is dfphoto.net located?
Dfphoto.net is located at 1600 St Michael’s Dr, Santa Fe, NM 87505, United States, with a phone number of +1 (505) 471-6001 and a website at dfphoto.net.
FAQ: How to Fix Out of Focus Photos
1. What causes photos to be out of focus?
Out-of-focus photos can result from missed focus, shallow depth of field, motion blur, incorrect camera settings, lens issues, or environmental factors.
2. Can you fix an out-of-focus photo?
Yes, you can improve out-of-focus photos using software like Adobe Photoshop, Lightroom, or Topaz Sharpen AI, though severely blurred images may be unrecoverable.
3. What is the best software for fixing blurry photos?
Adobe Photoshop is generally considered the best software due to its advanced tools, but Topaz Sharpen AI is also highly effective for automated sharpening.
4. How does the Unsharp Mask filter work?
The Unsharp Mask filter enhances edges and details by increasing contrast along the edges, making the image appear sharper.
5. What is frequency separation and how does it help?
Frequency separation divides an image into high and low frequencies, allowing targeted sharpening of details without affecting the overall tone.
6. How can I prevent blurry photos in the first place?
Use correct focus settings, maintain a stable grip, use fast shutter speeds, check your lens, and understand depth of field to prevent blurry photos.
7. What is the best aperture for landscape photography?
The best aperture for landscape photography is typically between f/8 and f/11, providing a good depth of field for overall sharpness.
8. How does image stabilization help in photography?
Image stabilization compensates for camera shake, allowing you to use slower shutter speeds without introducing motion blur, especially in low light.
9. Can I fix blurry photos on my phone?
Yes, you can use mobile apps like Snapseed or VSCO to sharpen images on your phone.
10. What are some common mistakes to avoid when sharpening photos?
Avoid over-sharpening, ignoring the cause of blur, using low-quality images, and neglecting noise reduction.