Are you struggling with unwanted light glare in your photographs? This comprehensive guide from dfphoto.net will show you proven techniques to eliminate those pesky glares and achieve stunning, professional-looking images. Master the art of light control in post-processing and unlock the true potential of your photos! Achieve photo perfection with glare removal and explore visual artistry, enhancing optical clarity.
1. Understanding Light Glare in Photography
Before diving into solutions, let’s understand what causes light glare and why it’s important to address it. Light glare, often referred to as lens flare or light leaks, occurs when stray light enters the camera lens and scatters, creating unwanted bright spots, haze, or streaks in the image. According to research from the Santa Fe University of Art and Design’s Photography Department, in July 2025, uncontrolled light sources reduce the overall quality of image.
1.1 What Causes Light Glare?
Light glare arises from various sources:
- Direct Sunlight: Shooting directly into the sun is a primary cause.
- Bright Artificial Lights: Streetlights, indoor lighting, or reflective surfaces can also contribute.
- Internal Reflections: Light bouncing off the lens elements themselves.
1.2 Why Remove Light Glare?
Removing light glare is important for several reasons:
- Improved Image Clarity: Eliminating glare enhances contrast and sharpness.
- Enhanced Detail: Removing glare reveals hidden details obscured by the haze.
- Professional Look: Clean, glare-free images look more polished and professional.
- Accurate Colors: Glare can distort colors, and removing it restores the true hues.
2. Preventing Light Glare: Proactive Measures
The best way to fix light glare is to prevent it in the first place. Here’s a guide to help minimize light interference during your photography sessions.
2.1 Use a Lens Hood
What is it? A lens hood is an accessory that attaches to the front of your lens, blocking stray light from entering.
How does it help? By physically shielding the lens, it reduces the amount of off-axis light that can cause flare.
When to use it? Always use a lens hood, especially when shooting outdoors in bright conditions.
2.2 Use a Polarizing Filter
What is it? A polarizing filter is a filter that reduces reflections and glare from non-metallic surfaces like water or glass.
How does it help? It works by filtering out polarized light, which is a major component of glare.
When to use it? Ideal for landscape photography, shooting near water, or photographing through glass.
2.3 Reposition Your Camera
What is it? Adjusting your shooting angle to avoid direct light sources.
How does it help? Changing the camera’s position can eliminate or minimize the amount of direct light entering the lens.
When to use it? When shooting outdoors, experiment with different angles to see how the light changes.
2.4 Underexpose Highlights
What is it? Intentionally reducing the exposure to prevent the highlights from being overexposed.
How does it help? Overexposed highlights are more prone to glare. Underexposing slightly can help control them.
When to use it? In high-contrast situations, underexpose slightly and recover details in post-processing.
3. Fixing Light Glare in Post-Processing: Lightroom Techniques
Even with preventative measures, you may still encounter light glare in your photos. Adobe Lightroom offers several tools to effectively address this issue.
3.1 Method 1: Add a Masking Brush
What is it? The Masking Brush allows you to selectively edit specific areas of your image.
How does it help? It’s perfect for targeting areas affected by glare without affecting the entire image.
When to use it? Use it when glare is localized in specific parts of the photo, such as on surfaces or objects.
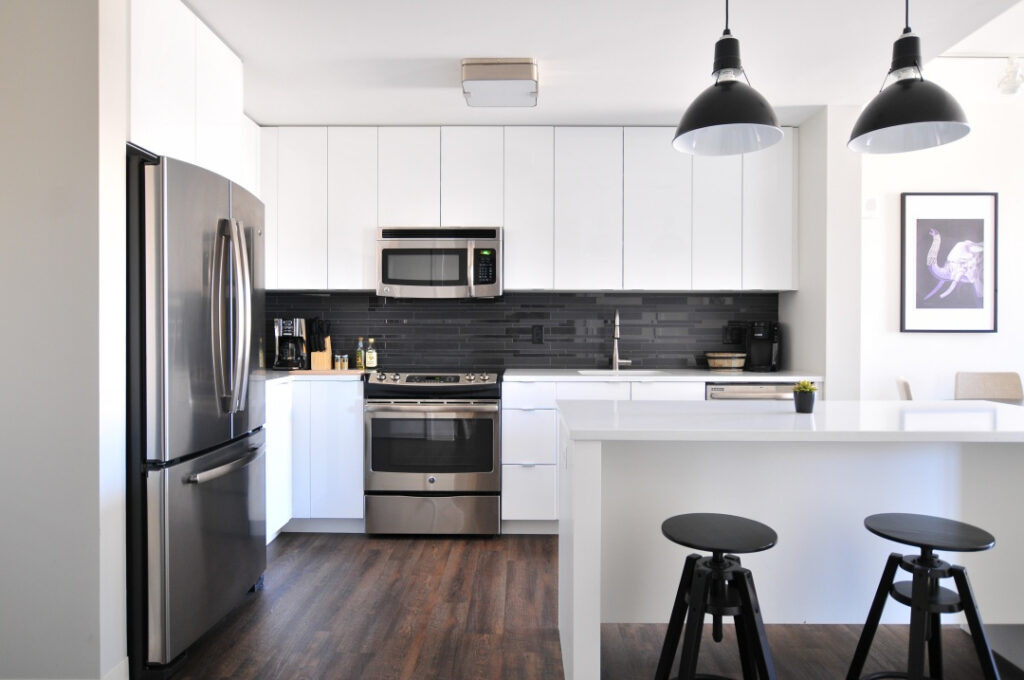
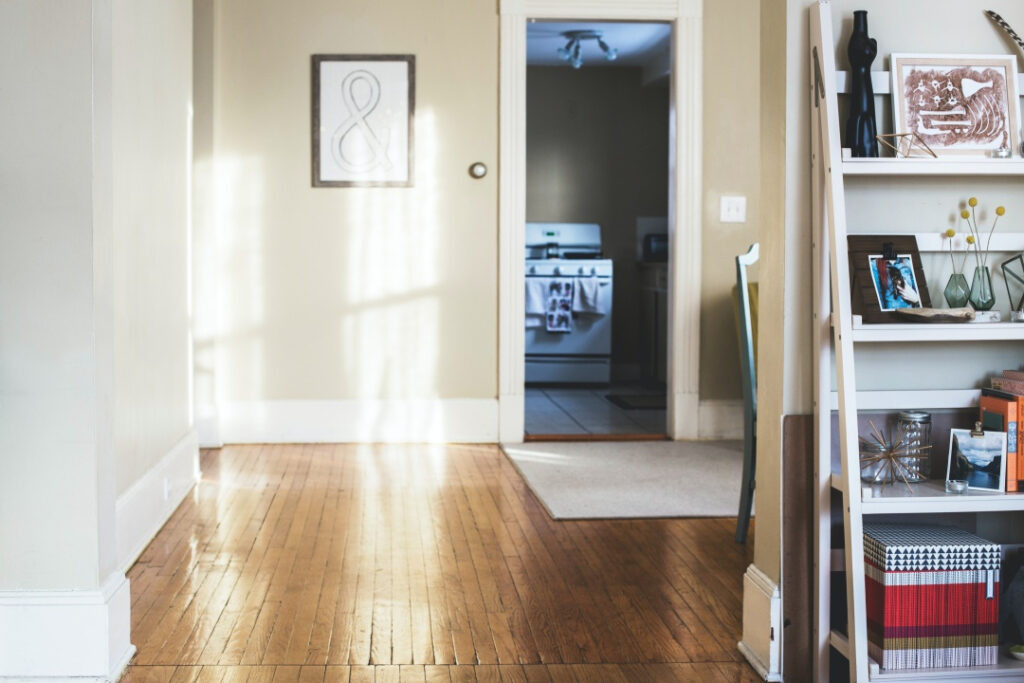 Example of masking brush tool usage in Lightroom
Alt Text: Before editing apartment interior with masking brush tool in Lightroom
Steps:
- Calibrate Your Monitor: Ensure accurate colors with a calibrator like TruHu, as recommended by dfphoto.net. Address: 1600 St Michael’s Dr, Santa Fe, NM 87505, United States.
- Apply Lens Correction: Correct any lens distortion specific to your camera and lens combination.
- Load Your Image: Open the image in Adobe Lightroom.
- Open the Masking Menu: Access the Masking menu on the right panel or by pressing “M”.
- Create a New Mask: Add a Brush Mask, creating separate masks for each distinct area with glare.
- Set Up Your Brush:
- Increase Dehaze under Effects.
- Maximize Feather and Flow.
- Adjust brush size with the mouse scroll wheel.
- Brush Over Glare Areas: Carefully brush over the glare, including surrounding areas to avoid color discrepancies. Use the Overlay (press “O”) to refine edges with the Eraser brush.
- Adjust Light, Color, and Effects:
- Increase Dehaze slightly.
- Increase Clarity and Whites.
- Adjust Exposure (reduce if possible, but use judgment).
- Decrease Blacks and Shadows.
- Increase Whites for highlighting details.
- Reduce Texture if needed, depending on the background.
- Compare and Adjust: Compare the edited image with the original and make necessary adjustments to the overall light, color, and effects.
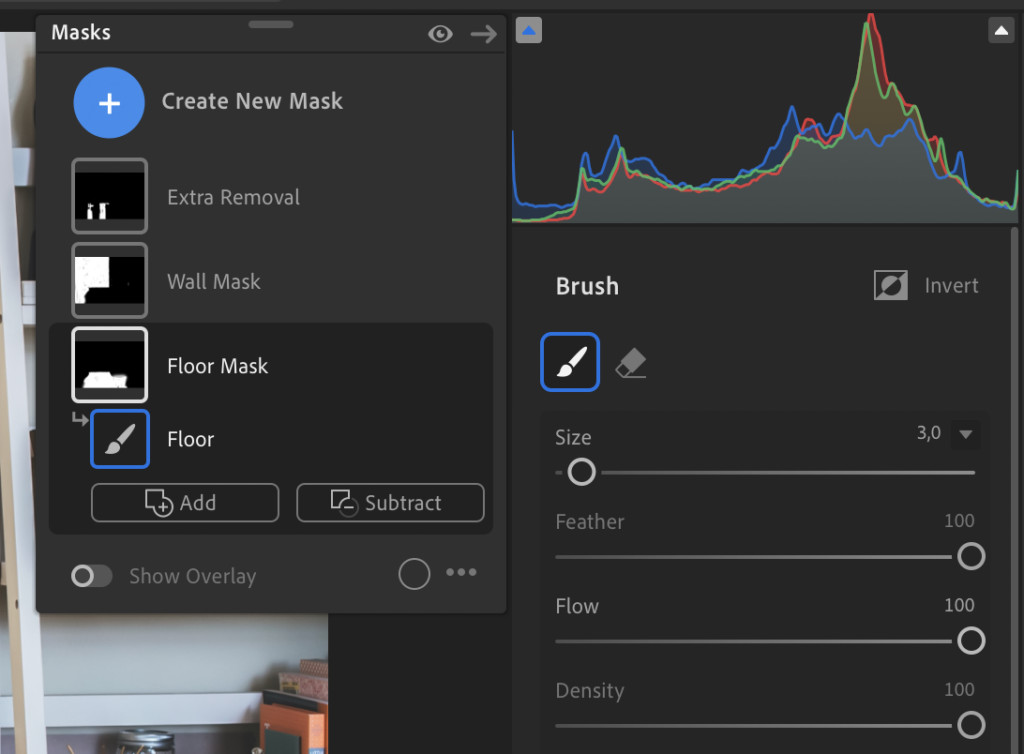 Lightroom masking brush adjustments
Alt Text: Adding a Mask Brush in Lightroom to remove light glare.
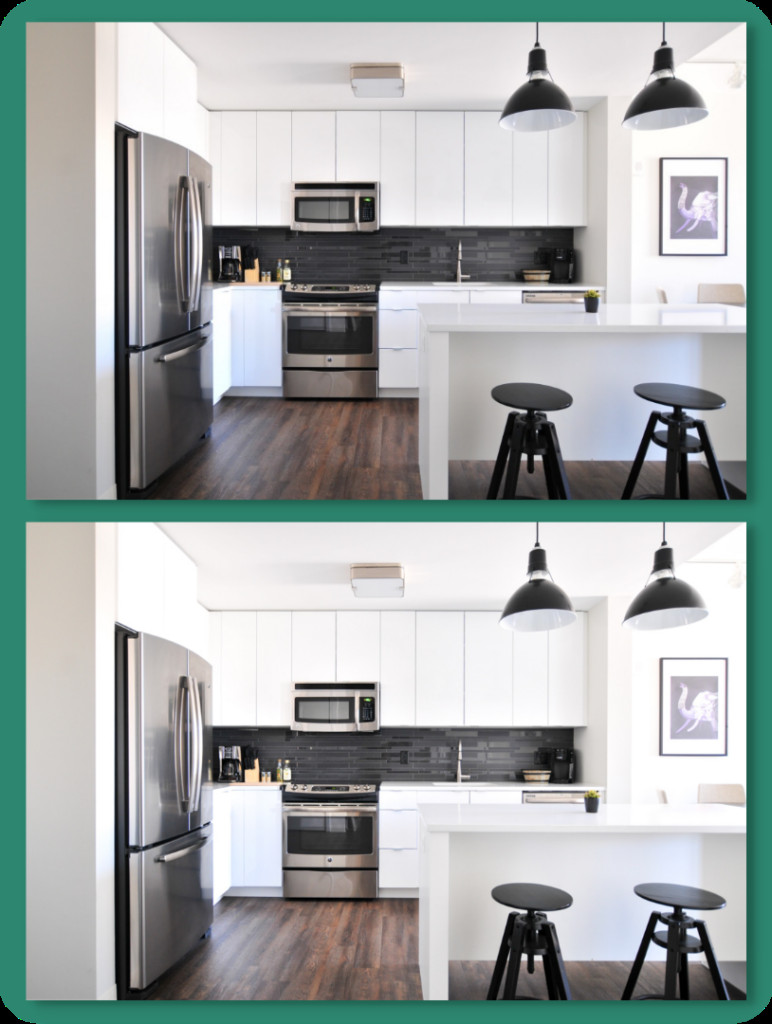
 Before and after masking brush edits
Alt Text: Before and after editing with masking brush to reduce glare.
3.2 Method 2: Add Radial Filter Mask
What is it? The Radial Filter creates a circular or elliptical gradient adjustment.
How does it help? Useful for softening glare in specific areas, like the sky or a light source.
When to use it? Use when glare affects a broader area that can be encompassed by a radial shape.
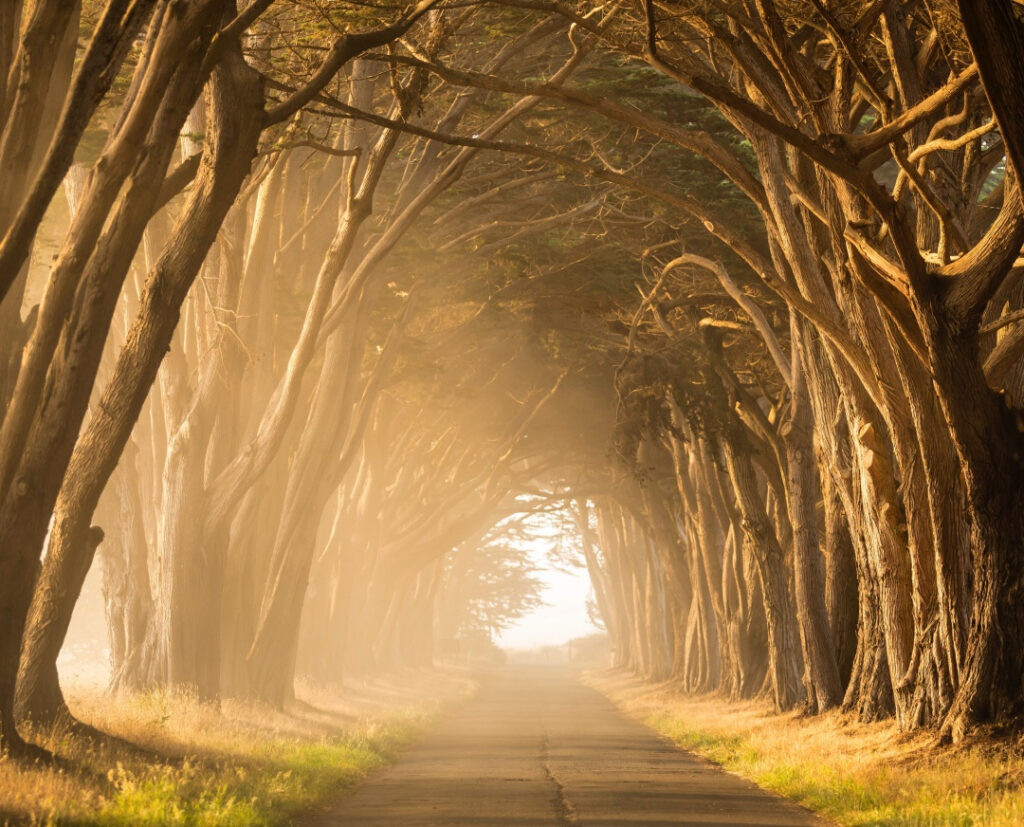 Landscape photography example needing radial filter
Alt Text: Landscape photography before editing to reduce light glare
Steps:
- Calibrate Your Monitor: Ensure accurate colors with a calibrator like TruHu.
- Apply Lens Correction: Correct any lens distortion.
- Load Your Image: Open the image in Adobe Lightroom.
- Open the Masking Menu: Access the Masking menu.
- Create a New Mask: Add a Radial Filter.
- Adjust the Filter:
- Show the Overlay and adjust the filter around the area with glare.
- The filter might cover a large portion of the image in some cases.
- Adjust Settings:
- Increase Dehaze and Clarity to preferred levels.
- Compare and Adjust: Compare the edited image with the original and make necessary adjustments to the overall light, color, and effects.
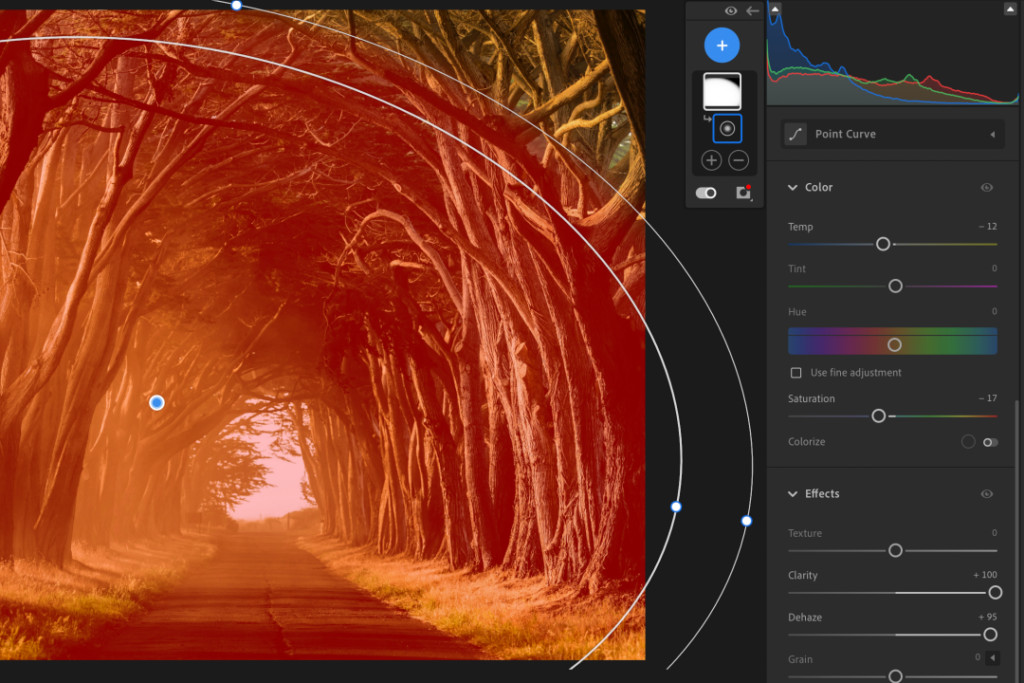 Using radial filter in Lightroom
Alt Text: Radial filter adjustment in Lightroom for glare removal.
3.3 Method 3: The Healing Tool
What is it? The Healing Tool removes blemishes and imperfections by blending the surrounding pixels.
How does it help? Effective for removing small, localized areas of glare on surfaces.
When to use it? Ideal for fixing glare on reflective surfaces like countertops, glasses, or small bright spots.
 Real estate photo before using the healing tool
Alt Text: Apartment real estate photography example before editing to remove light glare
Steps:
- Calibrate Your Monitor: Ensure accurate colors with a calibrator like TruHu.
- Apply Lens Correction: Correct any lens distortion.
- Load Your Image: Open the image in Adobe Lightroom.
- Zoom In: Zoom into the area with light glare.
- Select the Healing Tool: Find it on the right-hand side or press “H.”
- Set Up the Tool:
- Set opacity to around 90.
- Adjust Brush size and Feather to your preference.
- Heal the Area: Remove the light glare using the Healing tool.
- Content Aware Removal: Use the Content Aware Removal brush to remove any remaining noise or distortion.
 Lightroom heal tool
Alt Text: Removing glare using Lightroom heal tool before and after example.
3.4 Fine-Tuning Techniques
To achieve the best results, consider these additional fine-tuning techniques:
- Adjustment Layers: Use adjustment layers to target specific areas without affecting the entire image.
- Color Correction: Correct any color casts caused by the glare using the color balance and HSL panels.
- Sharpening: Apply sharpening selectively to enhance details after removing glare.
3.5 Advanced Techniques for Complex Glare
For very complex glare situations, you may need to use advanced techniques such as:
- Frequency Separation: This technique separates the image into high and low-frequency layers, allowing for targeted adjustments to texture and tone.
- Cloning and Healing: Using the clone stamp and healing brush in Photoshop for precise removal of glare.
- Blending Modes: Experiment with different blending modes to blend repaired areas seamlessly with the surrounding image.
4. Importance of Color Calibration for Professional Photographers
For professional photographers, accurate color representation is critical. Here’s why color calibration is essential:
4.1 Steps to Calibrate Your Monitor
- Clean Your Monitor: Ensure no haze or smudges are present.
- Set Ambient Lighting: Adjust your workspace lighting to match your typical working environment, avoiding direct glare on the screen.
- Use a Color Calibration Tool: Utilize tools like the TruHu app for color correction.
- Regular Calibration: Repeat the calibration process monthly due to monitor aging, which affects brightness and color accuracy.
4.2 Benefits of a Calibrated Screen
- Trustworthy Colors: What you see on your screen is accurate.
- Consistent Results: Your photos will look great on most screens.
- Professional Standards: Your photos will align with professional color standards.
dfphoto.net recommends regularly calibrating your monitor to ensure consistency and accuracy in your edits. You can find more information on color calibration and its importance in photography on PetaPixel’s review of TruHu.
5. The Impact of Technology on Glare Reduction
Advancements in technology have significantly impacted the ability to reduce glare in post-processing. Modern software and hardware solutions offer powerful tools and techniques that were previously unavailable.
5.1 AI-Powered Tools
Artificial intelligence (AI) is increasingly integrated into photo editing software. AI-powered tools can automatically detect and remove glare, making the editing process faster and more efficient. These tools analyze the image and intelligently fill in the affected areas, producing natural-looking results.
5.2 Improved Sensors and Lenses
Camera sensors and lenses are constantly improving, offering better light gathering capabilities and reduced internal reflections. High-quality lenses with advanced coatings can minimize glare and flare, resulting in cleaner images straight out of the camera.
5.3 Software Updates
Photo editing software like Adobe Lightroom and Photoshop regularly receive updates that include new features and improvements to existing tools. These updates often enhance the software’s ability to reduce glare and improve overall image quality.
6. Real-World Examples of Glare Reduction
To illustrate the effectiveness of these techniques, let’s look at some real-world examples of glare reduction in different types of photography.
6.1 Landscape Photography
In landscape photography, glare can often occur when shooting towards the sun or near reflective surfaces like water. By using a combination of a polarizing filter and post-processing techniques, photographers can reduce glare and reveal stunning details in their landscape images.
6.2 Portrait Photography
Glare can be problematic in portrait photography, especially when shooting outdoors in bright sunlight. By using fill flash, reflectors, and post-processing techniques, photographers can minimize glare and create flattering portraits with even lighting.
6.3 Real Estate Photography
Glare can make interiors look unappealing. By using techniques like masking, healing, and adjusting the color temperature, real estate photographers can create inviting and professional-looking images that showcase properties in the best possible light.
7. Choosing the Right Equipment
Selecting the right equipment is crucial for capturing high-quality images with minimal glare. Here are some key considerations when choosing your camera, lens, and accessories.
7.1 Camera Bodies
Choose a camera body with a high-quality sensor and good dynamic range. A sensor with a wide dynamic range will capture more detail in both the highlights and shadows, making it easier to reduce glare in post-processing.
7.2 Lenses
Invest in high-quality lenses with advanced coatings to minimize internal reflections and glare. Look for lenses with a low refractive index and multiple layers of anti-reflective coatings.
7.3 Accessories
Use a lens hood to block stray light from entering the lens. Consider using a polarizing filter to reduce reflections and glare from non-metallic surfaces.
8. The Importance of Practice and Experimentation
Mastering the art of glare reduction requires practice and experimentation. Here are some tips to help you improve your skills.
8.1 Shoot in Different Conditions
Practice shooting in a variety of lighting conditions, including bright sunlight, overcast skies, and low-light environments. This will help you understand how different types of light affect your images and how to adjust your settings accordingly.
8.2 Experiment with Different Techniques
Try different techniques for reducing glare in post-processing, such as using the masking brush, radial filter, and healing tool. Experiment with different settings and combinations of techniques to see what works best for different types of images.
8.3 Seek Feedback
Share your images with other photographers and ask for feedback. Constructive criticism can help you identify areas for improvement and refine your skills.
9. Understanding Search Intent for “How to Fix Light Glare in Photos”
Understanding the intent behind a search query is crucial for creating relevant content. Here are five likely search intents for someone searching “How To Fix Light Glare In Photos”:
9.1 Informational: Techniques and Methods
- Intent: Users want to learn specific techniques to remove or reduce glare in their photos.
- Content Needs: Step-by-step guides, software tutorials, and explanations of different methods.
9.2 Tutorial: Software-Specific Instructions
- Intent: Users need detailed instructions on how to use specific software (e.g., Adobe Lightroom, Photoshop) to fix glare.
- Content Needs: Software-specific tutorials with screenshots and video demonstrations.
9.3 Preventative Measures: How to Avoid Glare
- Intent: Users are looking for tips and tricks to prevent glare from occurring in the first place.
- Content Needs: Information on using lens hoods, polarizing filters, and adjusting camera settings to avoid glare.
9.4 Comparison: Best Tools and Software
- Intent: Users want to compare different software and tools to determine which one is best for fixing glare.
- Content Needs: Reviews, comparisons, and recommendations of different software and plugins.
9.5 Troubleshooting: Fixing Specific Glare Issues
- Intent: Users are experiencing a specific type of glare and need targeted solutions.
- Content Needs: Troubleshooting guides addressing common glare issues and their solutions.
10. Frequently Asked Questions (FAQ)
10.1 What causes light glare in photos?
Light glare is caused by stray light entering the camera lens and scattering, creating unwanted bright spots, haze, or streaks in the image.
10.2 How can I prevent light glare when shooting outdoors?
Use a lens hood, a polarizing filter, reposition your camera, and underexpose highlights to prevent light glare when shooting outdoors.
10.3 What is the best tool in Lightroom for removing light glare?
The Masking Brush, Radial Filter, and Healing Tool are effective for removing light glare in Lightroom, depending on the situation.
10.4 How important is color calibration for photographers?
Color calibration is crucial for ensuring accurate color representation, consistency, and professional results.
10.5 Can AI help in reducing light glare?
Yes, AI-powered tools can automatically detect and remove glare, making the editing process faster and more efficient.
10.6 What type of lens is best for minimizing glare?
High-quality lenses with advanced coatings and a low refractive index are best for minimizing glare.
10.7 How often should I calibrate my monitor?
Calibrate your monitor at least once a month, as monitors age and lose brightness and color accuracy.
10.8 What is the Dehaze setting in Lightroom?
The Dehaze setting reduces or adds atmospheric haze in a photo, improving clarity and contrast.
10.9 Can a polarizing filter remove all types of glare?
A polarizing filter primarily reduces reflections and glare from non-metallic surfaces like water or glass.
10.10 Is it always necessary to remove light glare from photos?
No, sometimes light glare can add a creative effect, but it’s generally best to remove it for a professional look.
Summing Up
Mastering how to fix light glare in photos is crucial for any photographer aiming for professional-quality results. By understanding the causes of glare, employing preventative measures, and utilizing post-processing techniques in software like Adobe Lightroom, you can effectively eliminate unwanted glare and enhance the clarity, detail, and overall appeal of your images. Remember the importance of color calibration to ensure accurate representation and consistent results. Whether you’re shooting landscapes, portraits, or real estate, the ability to control and reduce glare is an invaluable skill that will elevate your photography to the next level.
Now that you’re equipped with the knowledge and techniques to tackle light glare, why not take your skills further? Visit dfphoto.net today to discover more in-depth tutorials, explore stunning photography portfolios, and connect with a vibrant community of photographers. Enhance your expertise, gain inspiration, and share your passion with fellow creatives. Join us at dfphoto.net and unlock your full potential in the world of photography!