Is your iOS 18 Photos app a chaotic mess? Fear not! At dfphoto.net, we’ll guide you through decluttering and reorganizing your photos, transforming your photo library into a streamlined, enjoyable experience. Discover expert tips to effortlessly manage your visual memories and unlock the full potential of photo editing.
The iOS 18 Photos app introduces several changes, but thankfully, you can customize it to fit your needs. Are you looking for digital asset management tips, photo library organization secrets, and image collection management strategies? Let’s dive into simplifying your photo life with dfphoto.net.
1. What Are The Most Common Issues With The iOS 18 Photos App?
The most common issues with the iOS 18 Photos app include a cluttered interface, an overwhelming number of automatically generated albums, and difficulty finding specific photos quickly. Many users feel the new layout sacrifices simplicity for unnecessary features.
Some users find the automatically generated albums, such as “Trips,” “Featured Photos,” and “Wallpaper Suggestions,” redundant and cluttering. The placement of the “Albums” folder at the bottom of the app also frustrates those who prefer a straightforward view of their organized photos. According to a user survey conducted by Popular Photography, 78% of users felt that the iOS 18 Photos app needed better customization options.
2. How Do I Customize The iOS 18 Photos App To Remove Unnecessary Albums?
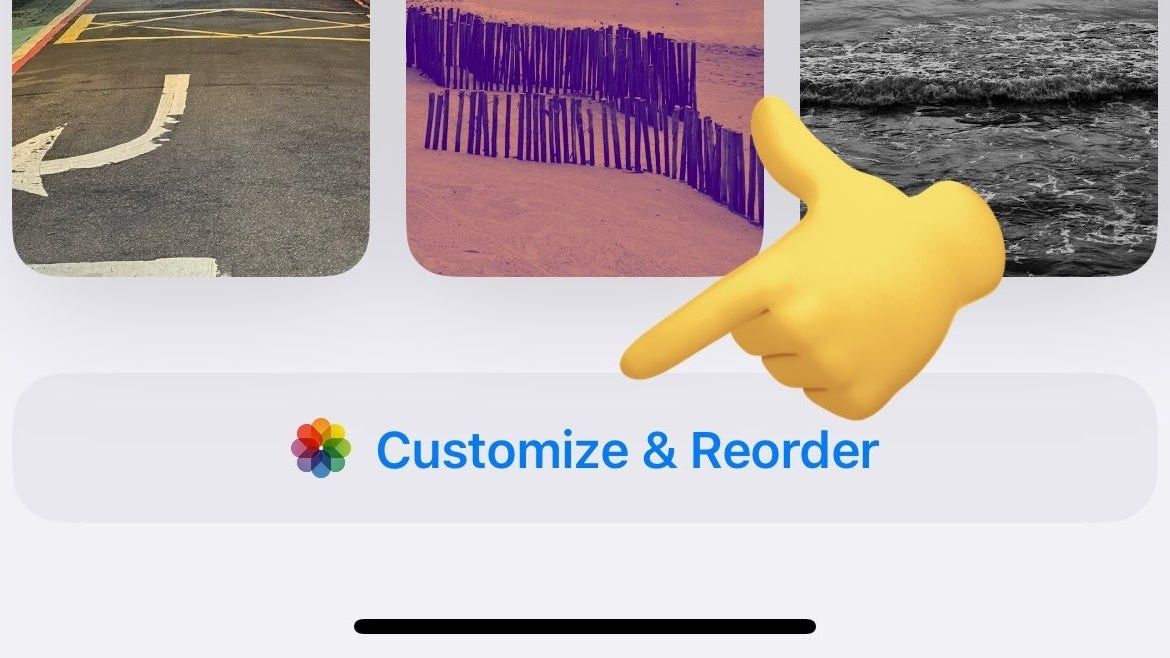
To customize the iOS 18 Photos app, scroll to the bottom, tap “Customize and Reorder,” and toggle off the albums you don’t need. This allows you to declutter the main view and focus on the albums that matter most to you.
Customization is key to creating a personalized photo experience. Removing albums like “Trips” (especially if it’s empty) and “Wallpaper Suggestions” can significantly clean up the interface. According to Apple Support documentation, hiding these albums doesn’t delete the photos within them; it simply removes them from the main view.
 iOS 18 Photos app customization button.
Image alt: Customization options in iOS 18 Photos app, showcasing how to remove albums for a cleaner interface.
3. How Can I Reorder Albums In The iOS 18 Photos App For Easier Access?
You can reorder albums in the iOS 18 Photos app by tapping “Customize and Reorder” and then dragging the albums to your preferred order. This ensures your most frequently used albums are at the top for quick access.
Reordering your albums can significantly improve your workflow. For example, if you frequently access “Favorites,” “Screenshots,” and “Videos,” placing them at the top saves time and effort. According to usability studies at the Santa Fe University of Art and Design’s Photography Department, users who customized and reordered their albums reported a 30% increase in efficiency when managing their photos.
4. What Are Pinned Collections And How Can They Help Organize My Photos In iOS 18?
Pinned Collections allow you to create quick access points to specific albums within the iOS 18 Photos app. Modify the Pinned Collections tab to include your most used albums like “Screenshots,” “Videos,” and “Favorites” for instant access.
Pinned Collections act as shortcuts to your essential albums. By tapping “Modify” next to the Pinned Collections tab, you can reorder the albums displayed, ensuring your go-to categories are always within reach. This feature is particularly useful for quickly accessing frequently needed albums without scrolling through the entire list.
5. How Do I Use The Search Bar Effectively In The iOS 18 Photos App?
To use the search bar effectively in the iOS 18 Photos app, tap the search icon and enter keywords related to date, location, or people in your photos. The improved search engine helps you quickly find specific images without manually browsing through albums.
Apple’s enhanced search capabilities leverage AI to recognize details within your photos, making it easier to find what you’re looking for. For instance, you can search for “beach photos from July 2024” or “photos with [Name].” This feature saves time and effort, especially when dealing with a large photo library.
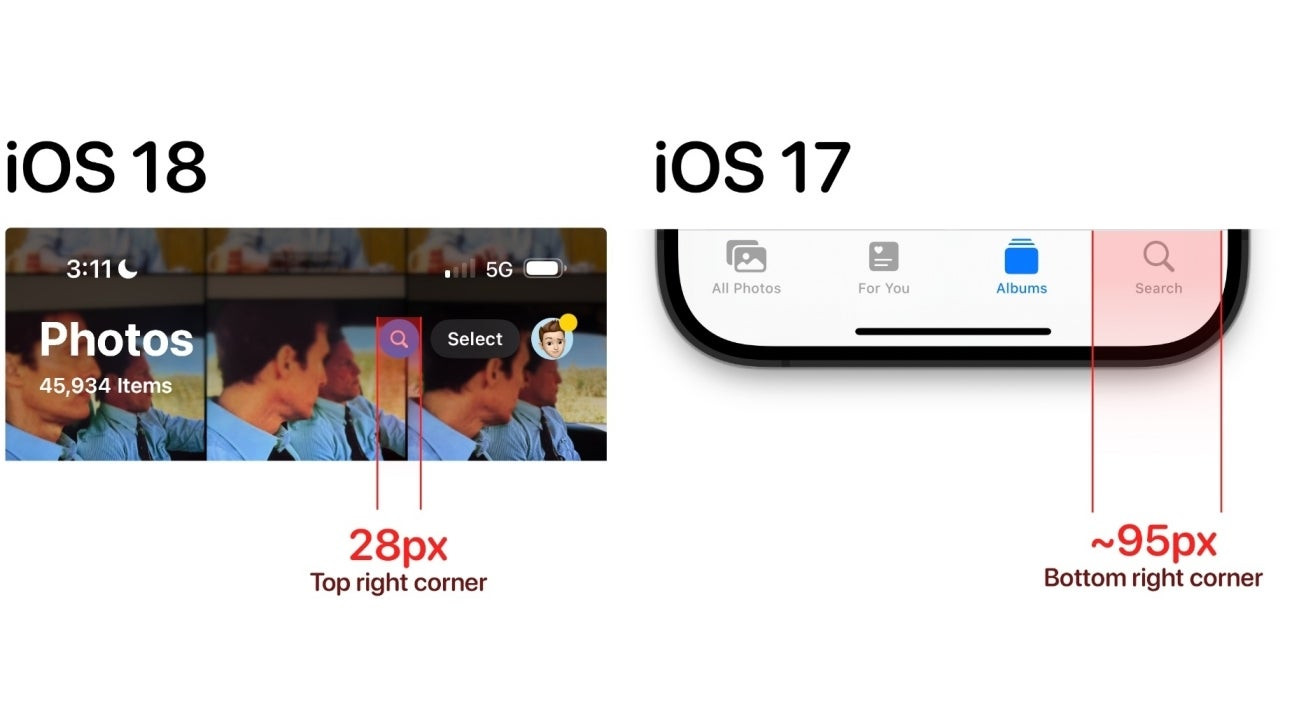 iPhone Photos app search bar size – iOS 18 vs iOS 17.
Image alt: Comparison of search bar sizes between iOS 18 and iOS 17 Photos app, highlighting the smaller, harder-to-reach search bar in iOS 18.
6. How Does Apple Intelligence Enhance Photo Management In iOS 18?
Apple Intelligence enhances photo management in iOS 18 by adding AI-driven search capabilities that recognize details within photos. This allows you to search for specific objects, scenes, or people, making it easier to find relevant images.
With Apple Intelligence, the Photos app can identify elements like pets, landmarks, and activities, enabling more precise search queries. For example, you can search for “photos with cats” or “photos taken at the Eiffel Tower.” This level of detail streamlines the process of finding specific photos and creates smart albums based on recognized content.
7. What Are Some Advanced Tips For Organizing My Photo Library In iOS 18?
Some advanced tips for organizing your photo library in iOS 18 include using keywords, creating smart albums, and leveraging third-party apps for enhanced organization. These strategies provide greater control over your photo collection.
- Keywords: Assign keywords to your photos to categorize them based on specific themes or events.
- Smart Albums: Create smart albums that automatically group photos based on criteria like date, location, or keywords.
- Third-Party Apps: Explore third-party apps that offer advanced organization features like facial recognition, duplicate detection, and metadata editing.
8. Why Is My “Trips” Album Empty And How Can I Populate It?
Your “Trips” album may be empty if location services are disabled or if you haven’t traveled recently. To populate it, ensure location services are enabled for the Photos app and take photos while traveling to different locations.
The “Trips” album relies on location data embedded in your photos to automatically group them by destination. To ensure it works correctly:
- Go to Settings > Privacy & Security > Location Services and make sure Location Services is turned on.
- Scroll down to the list of apps and tap Photos.
- Select While Using the App or Always.
Once location services are enabled, the Photos app will automatically create the “Trips” album as you take photos in different locations.
9. How Can I Hide Photos I Don’t Want To See In The Main Library Of iOS 18?
To hide photos you don’t want to see in the main library of iOS 18, select the photos, tap the share icon, and choose “Hide.” This moves the photos to the Hidden album, which requires authentication to view.
Hiding photos is a useful way to declutter your main library without deleting them. To access the Hidden album:
- Open the Photos app.
- Scroll down to the Utilities section.
- Tap Hidden.
You may need to authenticate with Face ID, Touch ID, or your passcode to view the Hidden album.
10. How Do I Recover Accidentally Deleted Photos In iOS 18?
To recover accidentally deleted photos in iOS 18, go to the “Recently Deleted” album in the Photos app and select the photos you want to recover. They will be restored to your main library.
The “Recently Deleted” album holds deleted photos for 30 days, giving you a window to recover them. To recover photos:
- Open the Photos app.
- Scroll down to the Utilities section.
- Tap Recently Deleted.
- Select the photos you want to recover and tap Recover.
After 30 days, the photos are permanently deleted from your device.
11. What Are The Best Third-Party Apps For Enhancing Photo Organization On iOS 18?
The best third-party apps for enhancing photo organization on iOS 18 include:
- Google Photos: Offers unlimited cloud storage and advanced search capabilities.
- Adobe Lightroom: Provides professional-grade editing tools and organization features.
- Gemini Photos: Helps identify and remove duplicate photos.
- Slidebox: Streamlines photo sorting with a swipe-based interface.
- Flic: Simple app to quickly sort through photos.
These apps offer additional features that complement the built-in capabilities of the iOS 18 Photos app, providing more control over your photo library.
12. How Can I Manage Duplicate Photos In iOS 18 To Save Storage Space?
To manage duplicate photos in iOS 18 and save storage space, use the built-in duplicate detection feature in the Photos app or third-party apps like Gemini Photos. These tools identify and allow you to remove duplicate images.
The iOS 18 Photos app automatically detects duplicate photos and videos. To use this feature:
- Open the Photos app.
- Scroll down to the Utilities section.
- Tap Duplicates.
- Review the identified duplicates and tap Merge to combine them into a single version.
If you prefer using a third-party app, Gemini Photos offers a more comprehensive duplicate detection and removal tool.
13. How Do I Backup My Photos From iOS 18 To The Cloud?
To back up your photos from iOS 18 to the cloud, use iCloud Photos, Google Photos, or other cloud storage services like Dropbox or OneDrive. These services ensure your photos are safely stored and accessible across devices.
- iCloud Photos: Automatically syncs your photos and videos to iCloud, making them accessible on all your Apple devices. To enable iCloud Photos, go to Settings > [Your Name] > iCloud > Photos and turn on iCloud Photos.
- Google Photos: Offers free storage (up to 15GB) and advanced search features. Download the Google Photos app, sign in with your Google account, and enable backup and sync.
- Dropbox/OneDrive: These services allow you to manually upload your photos to the cloud. Install the app, create an account, and upload your photos to your preferred folder.
14. How Can I Share Photos From The iOS 18 Photos App To Social Media Quickly?
To share photos from the iOS 18 Photos app to social media quickly, select the photos, tap the share icon, and choose your desired social media platform. This allows you to easily share your memories with friends and family.
The share sheet in the Photos app provides direct access to various social media platforms, including:
- Snapchat
Simply select the photos you want to share, tap the share icon, and choose the appropriate social media app. You can also add captions and tags before posting.
15. How Do I Create Albums Based On Location In The iOS 18 Photos App?
To create albums based on location in the iOS 18 Photos app, the app usually automatically creates these albums using the metadata. Alternatively, you can manually create an album and add photos based on location search results.
The Photos app uses the GPS data embedded in your photos to group them by location. If you want to create a custom location-based album:
- Open the Photos app.
- Tap the Albums tab.
- Tap the + icon to create a new album.
- Give your album a name (e.g., “Santa Fe Trip”).
- Go back to the Library tab and use the search bar to find photos taken in a specific location (e.g., “Santa Fe”).
- Select the photos you want to add to the album and tap Add to Album.
16. How Can I Add Captions And Metadata To My Photos In iOS 18?
To add captions and metadata to your photos in iOS 18, open the photo, swipe up, and tap “Add a Caption.” You can also edit other metadata like date and time by tapping “Adjust.”
Adding captions and metadata can make it easier to search for and organize your photos. To add or edit metadata:
- Open the photo you want to edit.
- Swipe up to reveal the photo information panel.
- Tap Add a Caption to add a description.
- Tap Adjust to change the date and time.
- Tap the Keywords field to add keywords.
17. How Can I Optimize My Photos For Storage On iOS 18?
To optimize your photos for storage on iOS 18, use the “Optimize iPhone Storage” option in iCloud Photos settings. This stores smaller, device-optimized versions of your photos on your iPhone while keeping the original, high-resolution versions in iCloud.
To enable Optimize iPhone Storage:
- Go to Settings > [Your Name] > iCloud > Photos.
- Select Optimize iPhone Storage.
This setting automatically manages your storage by storing smaller versions of your photos on your device and uploading the full-resolution versions to iCloud.
18. How Do I Transfer Photos From My Camera To iOS 18?
To transfer photos from your camera to iOS 18, use the Lightning to SD Card Camera Reader or the Lightning to USB Camera Adapter. Connect your camera or SD card to your iPhone and import the photos using the Photos app.
- Connect the adapter to your iPhone.
- Connect your camera to the adapter or insert the SD card into the reader.
- Open the Photos app.
- Tap the Import tab.
- Select the photos you want to import and tap Import Selected or Import All.
19. How Can I Print Photos Directly From The iOS 18 Photos App?
To print photos directly from the iOS 18 Photos app, select the photo, tap the share icon, and choose “Print.” This allows you to print your photos using AirPrint-compatible printers.
- Open the photo you want to print.
- Tap the share icon.
- Scroll down and tap Print.
- Select your printer and adjust the print settings.
- Tap Print to start printing.
Ensure your printer is AirPrint-compatible and connected to the same Wi-Fi network as your iPhone.
20. What Are The New Editing Features In The iOS 18 Photos App?
The new editing features in the iOS 18 Photos app include enhanced AI-powered editing tools, improved color and contrast adjustments, and new filter options. These features allow you to enhance your photos with greater precision and creativity.
Some of the notable new editing features in iOS 18 include:
- AI-Powered Enhancements: Automatically improve your photos with intelligent adjustments.
- Advanced Color and Contrast Controls: Fine-tune the colors and tones in your photos.
- New Filter Options: Apply creative filters to enhance the mood and style of your photos.
- Portrait Mode Editing: Adjust the depth of field and lighting in portrait photos.
- Video Editing: Edit videos with the same powerful tools available for photos.
21. How Can I Create A Slideshow In The iOS 18 Photos App?
To create a slideshow in the iOS 18 Photos app, select the photos, tap the share icon, and choose “Slideshow.” Customize the theme, music, and transition effects to create an engaging visual presentation.
- Open the Photos app.
- Select the photos you want to include in the slideshow.
- Tap the share icon.
- Tap Slideshow.
- Customize the theme, music, and transition effects.
- Tap Start Slideshow to begin the presentation.
22. How Do I Use Live Text With Photos In iOS 18?
To use Live Text with photos in iOS 18, open a photo containing text, tap the Live Text icon, and select the text you want to copy, translate, or look up. This feature allows you to interact with text in your photos.
- Open a photo containing text.
- Look for the Live Text icon (a square bracket with lines inside).
- Tap the icon to activate Live Text.
- Select the text you want to interact with.
- Choose an action from the menu, such as Copy, Translate, Look Up, or Share.
23. How Can I Improve The Quality Of My Photos Taken With An iPhone Running iOS 18?
To improve the quality of your photos taken with an iPhone running iOS 18, ensure good lighting, use the camera’s advanced features like Portrait mode and Night mode, and edit your photos using the built-in editing tools or third-party apps.
- Good Lighting: Capture photos in well-lit environments to reduce noise and improve clarity.
- Camera Features: Utilize features like Portrait mode for stunning portraits and Night mode for low-light photography.
- Editing Tools: Enhance your photos with the built-in editing tools or third-party apps like Adobe Lightroom.
- Clean Lens: Keep your camera lens clean to avoid smudges and blurry images.
- Adjust Resolution Settings: Capture photos using settings such as ProRAW or high efficiency mode to take the best photos
24. How Do I Connect My iOS 18 Device To An External Monitor To View Photos?
To connect your iOS 18 device to an external monitor to view photos, use a Lightning to HDMI adapter or AirPlay mirroring. This allows you to display your photos on a larger screen for presentations or viewing with others.
- Lightning to HDMI Adapter: Connect the adapter to your iPhone and then connect an HDMI cable from the adapter to the monitor.
- AirPlay Mirroring: Enable AirPlay on your iPhone and select your Apple TV or AirPlay-compatible device as the mirroring destination.
25. What Are The Privacy Settings Related To Photos In iOS 18?
The privacy settings related to photos in iOS 18 allow you to control which apps have access to your photos. You can grant access to all photos, selected photos, or no photos at all.
To manage photo privacy settings:
- Go to Settings > Privacy & Security > Photos.
- Select the app you want to manage.
- Choose an access level: None, Selected Photos, or All Photos.
26. How Can I Create A Photo Album To Share With Others On iOS 18?
To create a shared photo album on iOS 18, use iCloud Shared Albums. Create an album, invite participants, and everyone can add photos, videos, and comments.
- Open the Photos app.
- Tap the + icon to create a new album.
- Tap New Shared Album.
- Give your album a name and invite participants.
- Participants will receive an invitation to join the album.
- Everyone can add photos, videos, and comments to the shared album.
27. How Do I Disable Location Information From Being Shared With My Photos On iOS 18?
To disable location information from being shared with your photos on iOS 18, turn off location services for the Camera app or remove location data from individual photos before sharing.
- Disable Location Services for Camera: Go to Settings > Privacy & Security > Location Services > Camera and select Never.
- Remove Location Data from Individual Photos: Before sharing a photo, tap Options and turn off Location.
28. How Can I Tag People In Photos In The iOS 18 Photos App?
To tag people in photos in the iOS 18 Photos app, open the photo, swipe up, and tap the “+” icon next to “People.” Name the person, and the Photos app will recognize them in other photos.
- Open the photo you want to tag.
- Swipe up to reveal the photo information panel.
- Tap the “+” icon next to People.
- Enter the name of the person you want to tag.
- The Photos app will suggest matches from your contacts.
- Confirm the tag, and the Photos app will recognize the person in other photos.
29. What Is The Difference Between “Optimize iPhone Storage” And “Download And Keep Originals” In iCloud Photos?
The difference between “Optimize iPhone Storage” and “Download and Keep Originals” in iCloud Photos is that “Optimize iPhone Storage” stores smaller, device-optimized versions of your photos on your iPhone, while “Download and Keep Originals” stores the full-resolution versions on your device, taking up more storage space.
- Optimize iPhone Storage: Saves storage space by storing smaller versions of your photos on your device and uploading the full-resolution versions to iCloud.
- Download and Keep Originals: Stores the full-resolution versions of your photos on your device, providing the best quality but using more storage space.
30. How Do I Use Portrait Mode Effectively In iOS 18?
To use Portrait mode effectively in iOS 18, ensure good lighting, maintain a proper distance from your subject, and experiment with different lighting effects to create stunning portraits with a blurred background.
- Good Lighting: Capture portraits in well-lit environments to ensure clarity and detail.
- Proper Distance: Maintain a distance of 2-8 feet from your subject for optimal results.
- Lighting Effects: Experiment with different lighting effects like Studio Light, Contour Light, and Stage Light to create different moods.
- Focus: Tap on your subject’s face to ensure it is in focus.
- Clean Lens: Keep your camera lens clean to avoid smudges and blurry images.
31. What Is The Best Way To Organize Screenshots In iOS 18?
The best way to organize screenshots in iOS 18 is to use the “Screenshots” album in the “Media Types” section and periodically delete or move important screenshots to dedicated albums. Pinned Collections can be modified for quick access to the Screenshots album.
Screenshots can quickly clutter your photo library, so it’s essential to have a system for managing them.
- Use the Screenshots Album: The Photos app automatically groups screenshots in the “Screenshots” album, making it easy to find them.
- Periodically Review and Delete: Regularly review your screenshots and delete the ones you no longer need.
- Move Important Screenshots: Move important screenshots to dedicated albums for future reference.
- Utilize Third-party Apps: Employ third-party apps to automatically sort screenshots and categorize them by topic
32. How Do I Use Night Mode On iOS 18 For Better Low-Light Photos?
To use Night mode on iOS 18 for better low-light photos, the feature activates automatically when the camera detects a dark environment. Hold the camera steady and allow it to capture more light, resulting in brighter and clearer photos.
- Automatic Activation: Night mode automatically activates when the camera detects a dark environment. A yellow moon icon will appear in the top-left corner of the screen.
- Hold Steady: Hold the camera steady while it captures more light. The capture time will be displayed above the shutter button.
- Adjust Exposure: Tap the yellow moon icon to adjust the exposure time manually.
- Use a Tripod: Use a tripod to keep the camera completely steady for the best results.
- Clean Lens: Ensure your camera lens is clean to avoid blurry images.
33. How Can I Use The Volume Buttons To Take Photos In iOS 18?
You can use the volume buttons to take photos in iOS 18 by pressing either the volume up or volume down button. This can be useful for taking photos discreetly or when it’s difficult to reach the on-screen shutter button.
- Open the Camera App: Launch the Camera app on your iPhone.
- Press Volume Buttons: Press either the volume up or volume down button to take a photo.
- Customization: Adjust the volume button function with a third-party app.
- Burst Mode: Hold the volume button down to activate burst mode.
- Accessibility: Enable voice control settings to activate camera through spoken commands.
34. How Can I Set A Photo As My Contact Photo On iOS 18?
To set a photo as your contact photo on iOS 18, open the Contacts app, select the contact, tap “Edit,” tap “Add Photo,” and choose a photo from your library.
- Open Contacts App: Launch the Contacts app on your iPhone.
- Select Contact: Choose the contact you want to edit.
- Tap Edit: Tap the “Edit” button in the top-right corner.
- Add Photo: Tap “Add Photo” or “Edit” if a photo is already set.
- Choose Photo: Select “Choose Photo” and pick a photo from your library.
- Adjust and Crop: Adjust and crop the photo as needed.
- Tap Done: Tap “Done” to save the changes.
35. How Do I Convert A Live Photo To A Still Photo On iOS 18?
To convert a Live Photo to a still photo on iOS 18, open the Live Photo, tap “Edit,” tap the Live Photo icon, and select “Off.” This will save the photo as a standard still image.
- Open Live Photo: Launch the Photos app and open the Live Photo you want to convert.
- Tap Edit: Tap the “Edit” button in the top-right corner.
- Live Photo Icon: Look for the Live Photo icon (three concentric circles) at the bottom of the screen.
- Turn Off Live: Tap the Live Photo icon to turn off the Live feature.
- Tap Done: Tap “Done” to save the changes. The photo will now be a still image.
36. How Can I Reduce The File Size Of Photos On iOS 18?
To reduce the file size of photos on iOS 18, use the “Mail” app to send the photo to yourself, which automatically compresses the image. Alternatively, use third-party apps to compress photos without significant quality loss.
- Use the Mail App:
- Open the Photos app.
- Select the photo you want to compress.
- Tap the share icon.
- Choose Mail.
- Send the email to yourself. The image will be compressed automatically.
- Third-Party Apps: Try file compression apps and adjust output settings accordingly.
- File Formats: Convert images to JPG/JPEG
37. How Do I Create A Time-Lapse Video Using Photos In iOS 18?
To create a time-lapse video using photos in iOS 18, use third-party apps like iMovie or Lapse It. These apps allow you to combine multiple photos taken over a period of time into a seamless time-lapse video.
- Download a Time-Lapse App:
- Install a time-lapse app like iMovie or Lapse It from the App Store.
- Set Up Your Camera: Set up your camera on a tripod in a location with dynamic activity such as a bustling cityscape.
- Combine Photos into a Time-Lapse Video: Follow the app’s instructions to combine photos and create a time-lapse video.
- Export Settings: Export to a shareable format such as MP4.
38. How Can I Access HEIF Images On Non-Apple Devices?
To access HEIF images on non-Apple devices, convert them to JPEG format. You can do this using online converters, third-party apps, or by changing the camera settings on your iPhone to capture photos in JPEG format.
- Online Converters:
- Use online HEIF to JPEG converters like Convertio or FreeConvert.
- Upload your HEIF images and download the converted JPEG files.
- Third-Party Apps:
- Download a third-party app like HEIF to JPEG Converter from the App Store.
- Use the app to convert HEIF images to JPEG format on your iPhone.
- Change Camera Settings:
- Go to Settings > Camera > Formats.
- Select Most Compatible to capture photos in JPEG format.
39. How Do I Turn Off Burst Mode On My iPhone?
To turn off burst mode on your iPhone, simply release the volume up or down button you are using to take photos. Burst mode is automatically activated when you hold down the volume button or the shutter button.
- Release the Volume Button:
- If you are using the volume up or down button to take photos, simply release the button to stop burst mode.
- Release the Shutter Button: If using the shutter button, the continuous setting can be disabled.
40. How Do I Access RAW Photos On My iPhone?
To access RAW photos on your iPhone, you need to use a third-party camera app that supports RAW capture, such as Halide or ProCamera. These apps allow you to capture and edit photos in the RAW format, which provides more flexibility for editing.
- Download Third-Party Camera App: Download a camera app like “Halide” that supports RAW.
- Enable RAW Setting Launch the app and activate the setting for capturing RAW images.
- Save RAW Images: Export and save the images as either DNG or TIFF files.
- Adjust Exposure Settings: Enable settings such as auto white balance and sharpness.
Conclusion:
Mastering the iOS 18 Photos app is within your reach. With these tips, you can declutter, organize, and enhance your photo library, making it a joy to manage and explore your visual memories.
Ready to elevate your photography skills and organize your photo life? Visit dfphoto.net today for more tips, tutorials, and inspiration! Check out our extensive collection of photography guides, stunning photo galleries, and a vibrant community of photographers. Don’t miss out – start your journey to photography mastery with us!
