Fixing glare on glasses in photos is a common challenge, but with the right techniques, you can eliminate those unwanted reflections and capture stunning portraits and dfphoto.net is here to provide effective solutions. Dive in to discover how to adjust your subject’s position, master editing techniques, and explore creative lighting setups to achieve glare-free photos, while enhancing your artistic vision and mastering digital imaging.
1. Understanding the Culprit: Why Glare Happens on Glasses
Glare occurs when light reflects off the surface of the lenses and bounces back into the camera, obscuring the eyes and distorting the image. To minimize glare, it’s crucial to understand the science of light behavior and apply techniques to control reflections, boosting your image processing skills.
- Angle of Incidence: The angle at which light hits the glasses affects the reflection. When light strikes the lens at a perpendicular angle, the reflection is most intense.
- Light Source: Direct light sources, such as the sun or a flash, are more likely to cause glare.
- Lens Material: Certain lens materials and coatings can exacerbate glare. High-index lenses, for example, tend to reflect more light. According to research from the Santa Fe University of Art and Design’s Photography Department, high-index lenses reflect approximately 50% more light compared to standard lenses.
2. Pre-Shoot Strategies: Minimizing Glare Before It Starts
The best way to fix glare is to prevent it from happening in the first place. Several strategies can be employed during the shoot to minimize reflections, providing you with practical photography tips.
2.1. Adjusting Your Subject’s Position
A simple shift in your subject’s position can make a world of difference. Experiment with different angles to find the sweet spot where glare is minimized, improving your portrait photography techniques.
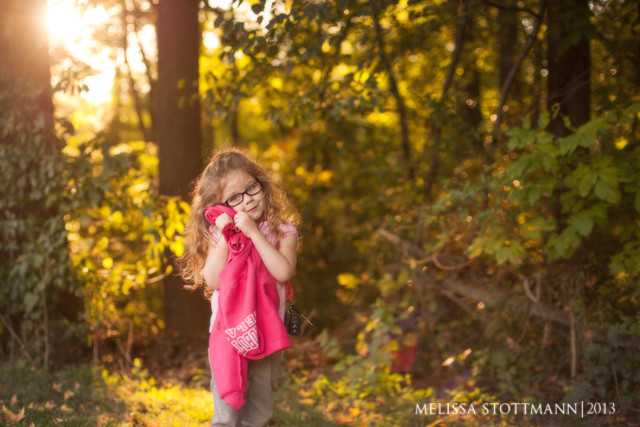
- Head Angle: Have your subject lower their head slightly and turn it away from the light source. This subtle adjustment can significantly reduce the amount of light reflecting into the camera.
 Subject tilting their head away from light to reduce glare in glasses
- Glasses Tilt: Ask your subject to tilt their glasses down a bit. By changing the angle of the glasses while keeping their face in the same position, the light will be less likely to reflect into the lenses.
2.2. Mastering Light: Direction and Diffusion
Manipulating light is key to capturing glare-free photos. Soft, diffused light is your best friend when photographing subjects with glasses, enhancing your understanding of photographic lighting.
- Diffuse the Light: Use a softbox, diffuser, or natural shade to soften the light source. Diffused light scatters in multiple directions, reducing harsh reflections.
- Backlighting: Position the light source behind your subject. This technique can create a beautiful silhouette effect while minimizing glare on the glasses.
 Backlighting technique to minimize glare on glasses
- Avoid Direct Light: Never position your subject so that they are facing directly into a strong light source.
2.3. Considering Lens Options and Coatings
The type of lenses your subject wears can also affect the amount of glare. Consider these options to minimize reflections, improving your studio photography setup.
- Anti-Reflective Coating: Encourage your subject to wear glasses with an anti-reflective (AR) coating. AR coatings reduce reflections and allow more light to pass through the lenses, resulting in clearer images.
- Lens Material: Certain lens materials, such as polycarbonate, are more prone to reflections. Consider suggesting lenses with a lower refractive index.
3. Post-Processing Techniques: Editing Out Glare in Photoshop
Even with the best pre-shoot strategies, some glare may still persist. Fortunately, Photoshop offers powerful tools for removing or reducing glare in post-processing, improving your digital art skills.
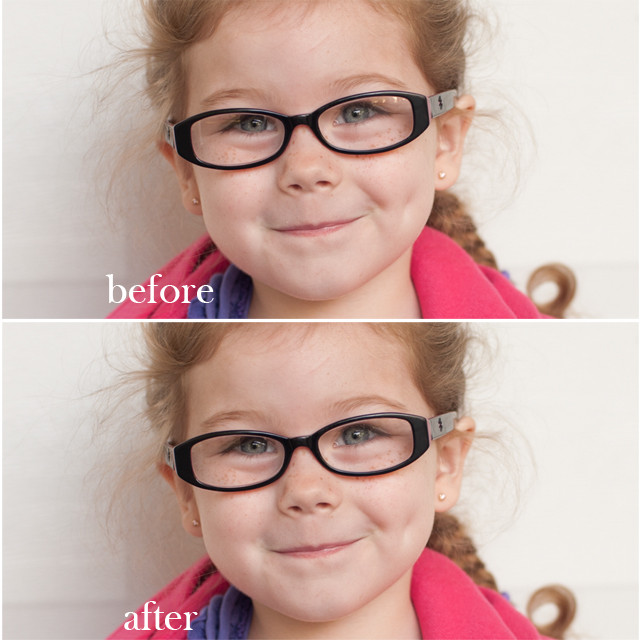
3.1. The Patch Tool: A Quick Fix for Small Areas
The Patch Tool is ideal for removing small, isolated areas of glare. It allows you to seamlessly replace the affected area with a clean sample from the surrounding area, helping you learn photo manipulation techniques.
- How to Use It: Select the Patch Tool from the toolbar. In the options bar, choose “Source” to select the area you want to replace and “Destination” to select the area you want to use as a replacement. Draw a selection around the glare and drag it to a clean area of skin or background. Photoshop will automatically blend the two areas together.
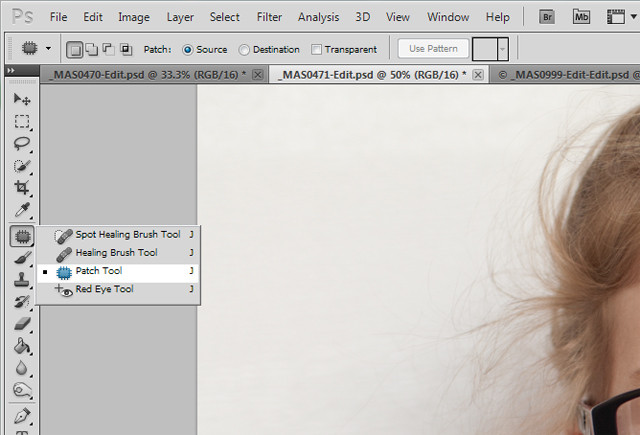 Using the Patch Tool to remove glare from glasses in Photoshop
3.2. The Clone Stamp Tool: Precision and Control
The Clone Stamp Tool provides more control over the editing process. It allows you to manually sample an area and paint it over the glare, improving your advanced Photoshop techniques.
- How to Use It: Select the Clone Stamp Tool from the toolbar. Hold down the Alt (Option) key and click on a clean area near the glare to set the sampling point. Release the Alt (Option) key and paint over the glare. Adjust the brush size, hardness, and opacity for optimal results.
 Using the Clone Stamp Tool to remove glare from glasses in Photoshop
3.3. The Burn Tool: Subtly Reducing Reflections
The Burn Tool darkens areas of an image, making it useful for subtly reducing the intensity of reflections. Use it sparingly to avoid creating unnatural dark spots.
- How to Use It: Select the Burn Tool from the toolbar. In the options bar, adjust the range to “Midtones” and the exposure to a low value (e.g., 10%). Gently brush over the glare to darken it. Repeat as needed until the glare is less noticeable.
3.4. Merging Multiple Images: The Ultimate Solution
For stubborn glare, consider merging two images: one with and one without glasses. This technique requires careful alignment and blending, but it can produce flawless results, improving your photo editing skills and composite photography techniques.
- How to Do It: Take two photos of your subject in the same position and lighting. In one photo, have them wear their glasses; in the other, have them remove them. Open both images in Photoshop and align them using the “Auto-Align Layers” command (Edit > Auto-Align Layers). Create a layer mask on the glasses layer and use a soft brush to paint out the glare, revealing the eyes from the underlying layer.
4. Creative Solutions: Thinking Outside the Box
Sometimes, the best way to deal with glare is to embrace creativity and think outside the box, broadening your understanding of photographic techniques.
4.1. Remove the Glasses
If your subject doesn’t need to wear their glasses all the time, simply ask them to remove them for the photo. This is the easiest and most effective way to eliminate glare, providing easy portrait solutions.
4.2. Embrace the Glare
In some cases, glare can add an interesting element to the photo. Instead of trying to eliminate it, consider incorporating it into your composition, improving your artistic vision and creative photo techniques.
4.3. Retouching Services
If you’re struggling to remove glare on your own, consider using a professional retouching service. These services can provide high-quality edits at a reasonable price, saving you time and effort, helping you understand the different types of photography services.
5. Essential Equipment: Gear That Can Help
Having the right equipment can make a big difference in your ability to minimize glare. Consider investing in these tools to improve your photography skills and upgrade your studio photography equipment.
5.1. Polarizing Filter
A polarizing filter reduces reflections and glare by blocking light waves that are vibrating in a particular direction. It’s especially useful for outdoor photography and can dramatically reduce glare on glasses. According to Popular Photography magazine, polarizing filters can reduce glare by up to 75%.
5.2. Softboxes and Diffusers
Softboxes and diffusers soften the light source, reducing harsh reflections. They are essential tools for studio photography and can be used to create flattering light for portraits.
5.3. Reflectors
Reflectors bounce light back onto your subject, filling in shadows and reducing the contrast between light and dark areas. They can be used to create a more balanced and even lighting, reducing glare.
6. Real-World Examples: Case Studies
Let’s look at some real-world examples of how these techniques can be applied in different scenarios, understanding the various types of photography styles.
6.1. Outdoor Portrait
Scenario: Photographing a subject with glasses in bright sunlight.
Solution: Position the subject in the shade, use a polarizing filter, and adjust their head angle to minimize glare.
6.2. Studio Portrait
Scenario: Photographing a subject with glasses in a studio setting.
Solution: Use softboxes to diffuse the light, position the subject slightly away from the light source, and consider using an anti-reflective coating on the glasses.
6.3. Event Photography
Scenario: Photographing a subject with glasses at an event with mixed lighting.
Solution: Use a flash with a diffuser, adjust the subject’s position to avoid direct light, and be prepared to edit out any remaining glare in post-processing.
7. Common Mistakes: What to Avoid
Avoiding these common mistakes can save you time and frustration, improving your photography tips and tricks.
7.1. Ignoring the Light Source
Failing to pay attention to the light source is a common mistake. Always be aware of the direction and intensity of the light and how it affects reflections on glasses.
7.2. Over-Editing
Over-editing can result in unnatural-looking photos. Use post-processing tools sparingly and aim for subtle adjustments.
7.3. Neglecting the Subject’s Comfort
Make sure your subject is comfortable and relaxed. If they are constantly fidgeting with their glasses, it will be difficult to capture a good photo.
8. The Future of Glare Reduction: Emerging Technologies
New technologies are constantly emerging that promise to make glare reduction even easier. Keep an eye on these developments:
8.1. AI-Powered Editing Tools
Artificial intelligence (AI) is being used to develop editing tools that can automatically detect and remove glare from photos. These tools promise to simplify the editing process and produce more natural-looking results, enhancing your understanding of digital art and AI photo editing.
8.2. Advanced Lens Coatings
New lens coatings are being developed that can further reduce reflections and improve image quality. These coatings are becoming increasingly affordable and accessible, improving your knowledge of lens technology.
9. Inspiration and Resources: Where to Learn More
Looking for more inspiration and resources? Check out these websites and publications:
- dfphoto.net: Offers a wealth of articles, tutorials, and tips on photography and editing, providing practical digital imaging tips.
- Popular Photography: A leading photography magazine with articles on techniques, equipment, and inspiration.
- Santa Fe University of Art and Design’s Photography Department: Offers courses and workshops on photography and digital imaging. Address: 1600 St Michael’s Dr, Santa Fe, NM 87505, United States. Phone: +1 (505) 471-6001.
10. Frequently Asked Questions (FAQs)
10.1. Why does glare happen on glasses in photos?
Glare happens when light reflects off the surface of the lenses and bounces back into the camera. The angle of incidence, light source, and lens material can all contribute to glare.
10.2. How can I prevent glare on glasses before taking a photo?
You can prevent glare by adjusting your subject’s position, diffusing the light source, and using glasses with an anti-reflective coating.
10.3. What Photoshop tools can I use to remove glare from glasses?
You can use the Patch Tool, Clone Stamp Tool, and Burn Tool to remove glare from glasses in Photoshop.
10.4. Is it better to use natural light or artificial light when photographing someone with glasses?
Natural light is generally better, as it is softer and more diffused than artificial light. However, if you are using artificial light, be sure to diffuse it with a softbox or diffuser.
10.5. Can a polarizing filter help reduce glare on glasses?
Yes, a polarizing filter can reduce reflections and glare by blocking light waves that are vibrating in a particular direction.
10.6. What is the best angle to photograph someone with glasses to minimize glare?
The best angle is to have your subject lower their head slightly and turn it away from the light source.
10.7. Are there any glasses lenses that are less likely to cause glare?
Yes, glasses lenses with an anti-reflective (AR) coating are less likely to cause glare.
10.8. How do I merge two images in Photoshop to remove glare from glasses?
Take one shot without glasses and another shot with glasses. Align them in Photoshop, create a layer mask on the glasses layer, and paint out the glare to reveal the eyes from the underlying layer.
10.9. Can I use a retouching service to remove glare from glasses?
Yes, there are many professional retouching services that can remove glare from glasses at a reasonable price.
10.10. What are some common mistakes to avoid when photographing someone with glasses?
Common mistakes include ignoring the light source, over-editing, and neglecting the subject’s comfort.
Mastering the art of photographing subjects with glasses requires a blend of technical knowledge, creative problem-solving, and a keen eye for detail. By understanding the science of light, employing pre-shoot strategies, and mastering post-processing techniques, you can capture stunning, glare-free photos that showcase your subject’s unique personality. Visit dfphoto.net to discover more detailed guides, explore beautiful photo collections, and connect with a thriving community of photographers in the USA. Elevate your photography skills and find the inspiration you need to capture breathtaking images.