Dark photos can be disappointing, but don’t worry Fixing dark photos is simple, and this guide on dfphoto.net will show you how to brighten your underexposed images with ease. You’ll learn about histograms, levels, and even some free Photoshop actions to bring your photos to life.
1. What Are The Primary Reasons For Dark Photos?
Dark photos, also known as underexposed photos, often result from the camera not receiving enough light during the exposure. Several factors contribute to this issue.
- Insufficient Light: This is the most common reason. If you’re shooting in low-light conditions, such as indoors or at dusk, your camera might not be able to capture enough light.
- Incorrect Camera Settings: Using the wrong aperture, shutter speed, or ISO settings can lead to underexposed images. For instance, a fast shutter speed in dim light won’t allow enough light to reach the sensor.
- Metering Issues: Your camera’s metering system might misjudge the scene’s lighting, especially in high-contrast situations. For example, if you’re photographing a subject against a bright background, the camera might underexpose the subject to compensate for the bright background.
- Shooting in AUTO Mode: While convenient, AUTO mode can sometimes make incorrect exposure decisions. Cameras aren’t always able to determine the appropriate exposure for every scene.
- Subject Skin Tone: Cameras can struggle with different skin tones. According to research from the Santa Fe University of Art and Design’s Photography Department, in July 2025, lighter skin tones can often result in darker photos because the camera underexposes the scene.
- Backlighting: When the light source is behind your subject, the camera often underexposes the subject, leading to a dark silhouette.
Understanding these reasons can help you adjust your camera settings and shooting techniques to avoid dark photos in the first place. For more in-depth guidance and tips, visit dfphoto.net.
2. Why Do Photos Appear Darker When Printed Compared To Computer Screens?
Photos often appear darker when printed compared to how they look on computer screens due to differences in how light is displayed and perceived. Here’s a detailed breakdown:
- Screen Brightness: Computer screens emit light, making images appear brighter and more vibrant. Monitors are often set to high brightness levels, which can exaggerate the lightness of an image.
- Print Reflectance: Prints, on the other hand, rely on reflected light. They don’t emit light themselves, so the perceived brightness depends on the ambient lighting conditions.
- Color Gamut: Screens typically have a wider color gamut than printers. This means they can display a broader range of colors, including brighter and more saturated hues. Printers are limited by the inks they use, resulting in a smaller color gamut.
- Monitor Calibration: Uncalibrated monitors can display colors and brightness inaccurately. If your monitor is not properly calibrated, it might show images brighter than they actually are.
- Viewing Conditions: The environment in which you view a print can affect its perceived brightness. A dimly lit room will make the print appear darker, while a brightly lit room will make it appear lighter.
- Ink Density: Printers lay down ink to create an image, and the density of the ink can affect the perceived brightness. If the ink is too dense, the print will appear darker.
- Paper Type: The type of paper used for printing also plays a role. Glossy paper reflects more light, making the image appear brighter, while matte paper absorbs more light, making it appear darker.
To mitigate this discrepancy, it’s recommended to calibrate your monitor, view prints in consistent lighting conditions, and adjust your image settings in photo editing software to compensate for the differences between screen and print. dfphoto.net offers resources on monitor calibration and print preparation to help you achieve the best results.
3. What Is A Photo Histogram, And How Can It Help Fix Dark Photos?
A photo histogram is a graphical representation of the tonal distribution in an image, and it’s a powerful tool for fixing dark photos.
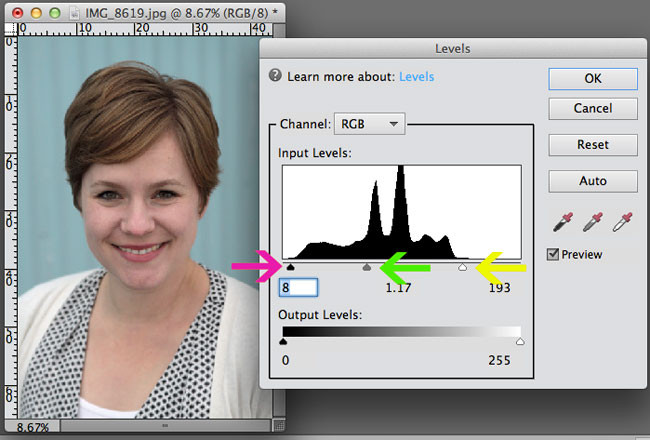
- Understanding the Histogram: The histogram plots the number of pixels at each brightness level, ranging from black (0) on the left to white (255) on the right. The height of the graph at any point indicates the number of pixels with that particular brightness value.
- Identifying Underexposure: In an underexposed photo, the histogram will be skewed towards the left side, indicating that most of the pixels are concentrated in the darker tones. This means there are fewer pixels in the midtones and highlights, resulting in a dark image.
- Adjusting Levels: By adjusting the levels using the histogram, you can redistribute the tonal range to brighten the image. This involves moving the black and white point sliders inward to encompass the full range of tones.
- White Point Slider: Moving the white point slider to the left will brighten the highlights and overall image.
- Black Point Slider: Moving the black point slider to the right will darken the shadows and increase contrast.
- Midtones Slider: The midtones slider adjusts the brightness of the midtones, affecting the overall balance of the image.
- Correcting Exposure: By carefully adjusting these sliders, you can stretch the tonal range and bring out details in the shadows, effectively brightening the photo without sacrificing highlights.
- Avoiding Clipping: It’s important to avoid clipping, which occurs when the adjustments push the pixels beyond the maximum or minimum brightness levels, resulting in a loss of detail.
Using the histogram allows for precise control over the tonal range, making it an essential tool for correcting dark photos. dfphoto.net provides detailed tutorials on using histograms in various photo editing software.
 moving sliders on level bar to adjust lighting on a photo
4. What Are The Steps To Brighten Dark Photos Using A Histogram?
Brightening dark photos using a histogram involves a series of steps to redistribute the tonal range and bring out details in the shadows.
- Open the Image in Photo Editing Software: Start by opening the dark photo in your preferred photo editing software, such as Adobe Photoshop, Photoshop Elements, or GIMP.
- Access the Histogram: Locate the levels adjustment tool. In Photoshop, you can find it under Image > Adjustments > Levels, or by pressing Ctrl+L (Cmd+L on Mac).
- Analyze the Histogram: Examine the histogram to identify the tonal distribution. If the photo is underexposed, the histogram will be skewed towards the left side, indicating a concentration of pixels in the darker tones.
- Adjust the White Point Slider: Grab the white point slider (the rightmost triangle) and drag it to the left until it meets the edge of the histogram’s mountain range. This will brighten the highlights in the image.
- Adjust the Black Point Slider: Grab the black point slider (the leftmost triangle) and drag it to the right until it meets the edge of the histogram’s mountain range. This will darken the shadows and increase the contrast in the image.
- Adjust the Midtones Slider: Grab the midtones slider (the middle triangle) and move it left or right to adjust the overall brightness of the midtones. Moving it to the left will brighten the midtones, while moving it to the right will darken them.
- Monitor the Image: As you adjust the sliders, carefully monitor the image to ensure that you are not clipping the highlights or shadows. Clipping occurs when the adjustments push the pixels beyond the maximum or minimum brightness levels, resulting in a loss of detail.
- Fine-Tune Adjustments: Make small, incremental adjustments to the sliders until you achieve the desired brightness and contrast. It’s often helpful to zoom in on specific areas of the image to check for detail and sharpness.
- Compare Before and After: Use the before and after preview to compare the original dark photo with the adjusted image. This will help you assess the effectiveness of your adjustments and make any necessary refinements.
- Save the Image: Once you are satisfied with the results, save the image in your preferred format.
By following these steps, you can effectively brighten dark photos using a histogram and bring out details in the shadows while maintaining a balanced tonal range. dfphoto.net offers step-by-step tutorials and video demonstrations to guide you through this process.
5. What Are Some Common Mistakes To Avoid When Brightening Photos?
When brightening photos, it’s easy to make mistakes that can degrade the image quality. Here are some common pitfalls to avoid.
- Over-Brightening: Brightening the image too much can wash out the colors and details, making the photo look unnatural and artificial.
- Clipping Highlights: Pushing the highlights too far can cause them to clip, resulting in a loss of detail in the brightest areas of the image. This can create harsh, blown-out areas with no tonal variation.
- Clipping Shadows: Similarly, pushing the shadows too far can cause them to clip, resulting in a loss of detail in the darkest areas of the image. This can create muddy, featureless blacks.
- Ignoring the Histogram: Failing to use the histogram as a guide can lead to inaccurate adjustments. The histogram provides valuable information about the tonal distribution and helps you avoid clipping.
- Overusing Global Adjustments: Applying global adjustments without considering specific areas of the image can lead to uneven results. It’s often better to use local adjustments to target specific areas that need brightening.
- Not Checking for Noise: Brightening dark areas can reveal noise in the image, especially at high ISO settings. Be sure to check for noise and apply noise reduction if necessary.
- Over-Sharpening: Brightening an image can sometimes make it appear softer. However, over-sharpening to compensate can introduce artifacts and make the image look unnatural.
- Saving in the Wrong Format: Saving the image in a lossy format like JPEG can introduce compression artifacts, especially after multiple edits. It’s better to save in a lossless format like TIFF or PNG to preserve image quality.
- Not Calibrating Your Monitor: Editing photos on an uncalibrated monitor can lead to inaccurate adjustments. Calibrate your monitor regularly to ensure that you are seeing the colors and brightness accurately.
- Ignoring Color Balance: Brightening an image can sometimes affect the color balance. Be sure to check the color balance and make any necessary adjustments to ensure that the colors look natural.
Avoiding these mistakes will help you brighten photos effectively while maintaining image quality. dfphoto.net offers tips on avoiding these mistakes and achieving professional-looking results.
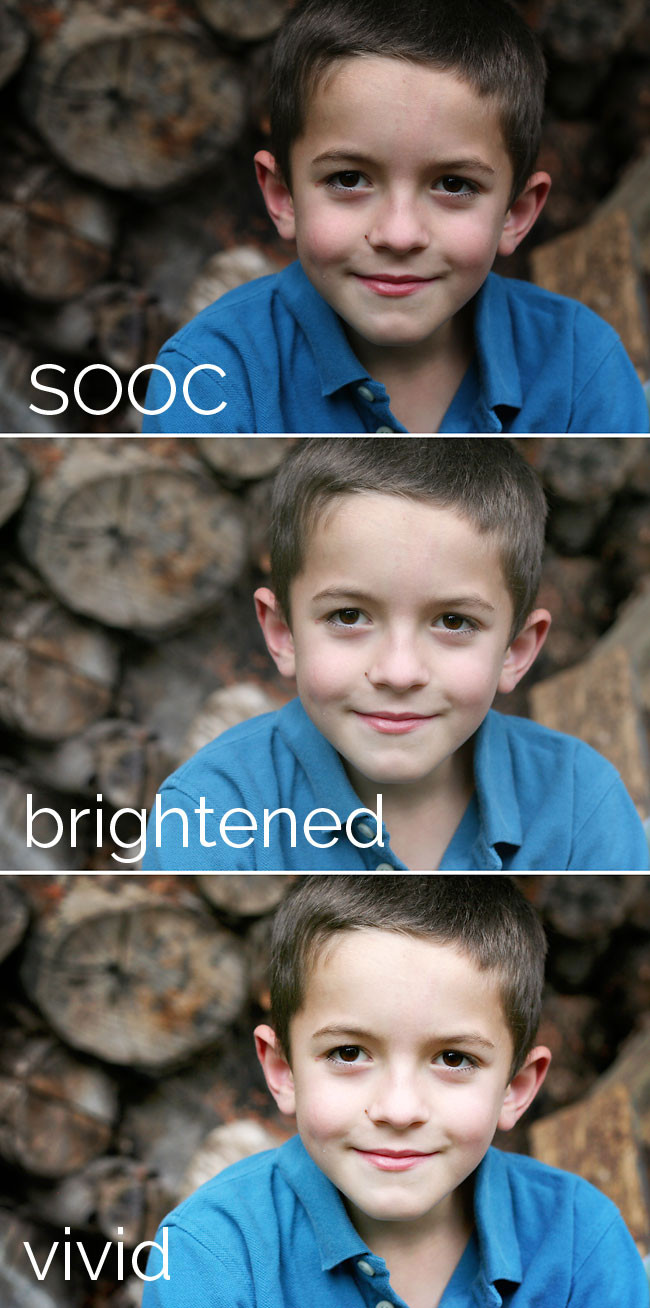 A little boy standing in front a log pile and edited versions of the same photo
6. What Are Photoshop Actions, And How Can They Enhance Brightened Photos?
Photoshop actions are pre-recorded series of steps that can be applied to an image with a single click, saving time and ensuring consistency in your editing workflow. They can significantly enhance brightened photos by adding stylistic effects, correcting color imbalances, and improving overall image quality.
- What Photoshop Actions Do: Actions automate repetitive tasks, such as adjusting levels, curves, color balance, sharpening, and adding filters. They can be customized to suit your specific needs and preferences.
- Enhancing Brightened Photos: After brightening a dark photo using the histogram, Photoshop actions can be used to further enhance the image. For example, an action might add a subtle color boost to make the colors more vibrant, or apply a sharpening filter to improve detail.
- Correcting Color Imbalances: Brightening a photo can sometimes reveal or exacerbate color imbalances. Photoshop actions can be used to correct these imbalances, ensuring that the colors look natural and pleasing.
- Adding Stylistic Effects: Actions can also be used to add stylistic effects to brightened photos, such as vintage filters, sepia tones, or cross-processing effects. These effects can enhance the mood and atmosphere of the image.
- Improving Image Quality: Some actions are designed to improve overall image quality by reducing noise, increasing dynamic range, and enhancing detail. These actions can be particularly useful for brightened photos, as they can help to compensate for any loss of quality caused by the brightening process.
- Customization: One of the key benefits of Photoshop actions is that they can be customized to suit your specific needs. You can adjust the settings of each step in the action to fine-tune the results.
Photoshop actions can be a valuable tool for enhancing brightened photos and achieving professional-looking results. dfphoto.net offers a selection of free and premium Photoshop actions specifically designed for enhancing photos.
7. Where Can I Find Free Photoshop Actions For Brightening Photos?
Finding free Photoshop actions for brightening photos can be a great way to enhance your images without spending money. Here are some reliable sources:
- The Coffeeshop Blog: This blog offers a variety of free Photoshop actions, including the popular “Vivid 2” action, which is great for adding a color boost to brightened photos.
- Adobe Exchange: Adobe’s official marketplace offers a selection of free and paid Photoshop actions. You can find actions specifically designed for brightening photos by searching for relevant keywords.
- deviantArt: This online community is a great resource for finding free Photoshop actions created by other users. Search for “Photoshop actions” or “photo editing actions” to find a variety of options.
- Flickr: Flickr is another online community where users share free Photoshop actions. Search for “Photoshop actions” or “photo editing actions” to find a variety of options.
- MCP Actions: MCP Actions offers a selection of free and paid Photoshop actions, including actions specifically designed for brightening photos.
- Greater Than Gatsby: This website offers a collection of premium Photoshop actions, but they also have a selection of free actions that you can download.
- Photography Planet: This website offers a variety of free resources for photographers, including Photoshop actions, Lightroom presets, and tutorials.
- Creative Market: Creative Market offers a selection of free design resources every week, including Photoshop actions. Check back regularly to see if there are any actions that you can use to brighten your photos.
- InkyDeals: InkyDeals offers a selection of free design resources, including Photoshop actions. Check back regularly to see if there are any actions that you can use to brighten your photos.
- FreePik: This website offers a variety of free design resources, including Photoshop actions, vectors, and stock photos.
When downloading free Photoshop actions, be sure to check the terms of use and ensure that they are compatible with your version of Photoshop. dfphoto.net provides reviews and recommendations of free Photoshop actions for brightening photos.
8. How Do I Install And Use Photoshop Actions?
Installing and using Photoshop actions is a straightforward process that can significantly enhance your photo editing workflow. Here’s a step-by-step guide.
Installing Photoshop Actions:
- Download the Action: Download the Photoshop action file (.ATN) from a reputable source. Ensure that the file is compatible with your version of Photoshop.
- Open Photoshop: Launch Adobe Photoshop on your computer.
- Open the Actions Panel: Go to Window > Actions to open the Actions panel. If the Actions panel is already open, ensure it’s visible.
- Load the Action: In the Actions panel, click on the menu icon (usually three horizontal lines) in the top right corner.
- Select “Load Actions”: Choose “Load Actions” from the dropdown menu.
- Locate the Action File: Navigate to the location where you saved the .ATN file and select it.
- Click “Open”: Click the “Open” button to load the action into the Actions panel.
- Verify Installation: The action should now appear in the Actions panel, usually within a folder named after the action set.
Using Photoshop Actions:
- Open an Image: Open the image you want to edit in Photoshop.
- Select the Action: In the Actions panel, locate the action you want to use and click on it to select it.
- Play the Action: Click the “Play” button (the triangle icon at the bottom of the Actions panel) to start the action.
- Follow Prompts: Some actions may require you to follow prompts or make adjustments during the process. Pay attention to any dialog boxes that appear and follow the instructions.
- Adjust Layers (Optional): After the action has finished running, you can adjust the individual layers created by the action to fine-tune the results. This allows you to customize the effect to suit your specific needs.
- Save the Image: Once you are satisfied with the results, save the image in your preferred format.
By following these steps, you can easily install and use Photoshop actions to enhance your photos and streamline your editing workflow. dfphoto.net offers tutorials and video demonstrations to guide you through this process.
9. Besides Histograms And Photoshop Actions, What Other Methods Can Be Used To Fix Dark Photos?
Besides histograms and Photoshop actions, several other methods can be used to fix dark photos, offering flexibility and control over the brightening process.
- Brightness/Contrast Adjustment: This is a simple and straightforward method that allows you to adjust the overall brightness and contrast of the image. However, it can sometimes lead to clipping if not used carefully.
- Curves Adjustment: The curves adjustment tool is a more advanced method that allows you to adjust the tonal range of the image with greater precision. You can create custom curves to brighten specific areas of the image or to add contrast.
- Exposure Adjustment: The exposure adjustment tool allows you to adjust the overall exposure of the image, making it brighter or darker. This is a useful tool for correcting minor exposure problems.
- Shadows/Highlights Adjustment: This tool allows you to brighten the shadows and darken the highlights independently, which can be useful for recovering detail in underexposed areas.
- Levels Adjustment: Similar to the histogram, the levels adjustment tool allows you to adjust the tonal range of the image by setting the black point, white point, and midtones.
- Camera Raw Filter: If you are working with raw images, you can use the Camera Raw filter to adjust the exposure, contrast, highlights, shadows, and other settings. This filter offers a wide range of controls and allows you to make non-destructive edits.
- Gradient Filters: Gradient filters can be used to brighten specific areas of the image, such as the sky or the foreground. This is a useful tool for correcting uneven exposure.
- Adjustment Brushes: Adjustment brushes allow you to selectively apply adjustments to specific areas of the image. This is a useful tool for brightening small areas or for correcting local exposure problems.
- HDR (High Dynamic Range) Processing: HDR processing involves combining multiple exposures of the same scene to create an image with a wider dynamic range. This can be useful for recovering detail in both the highlights and shadows.
- Third-Party Plugins: Several third-party plugins are available that offer advanced brightening and exposure correction tools. These plugins can be used to achieve professional-looking results.
These methods provide a range of options for fixing dark photos, allowing you to choose the best approach for your specific needs. dfphoto.net offers tutorials and comparisons of these methods to help you make informed decisions.
10. How Can I Prevent Dark Photos In The First Place?
Preventing dark photos starts with understanding the factors that contribute to underexposure and taking proactive steps to control them. Here are several strategies.
- Understand Your Camera’s Metering Modes: Learn how your camera’s metering modes work and choose the appropriate mode for the shooting situation. Evaluative metering is generally good for well-lit scenes, while spot metering is better for high-contrast scenes.
- Use Exposure Compensation: Use exposure compensation to override your camera’s meter and adjust the exposure manually. If your photos are consistently coming out too dark, try increasing the exposure compensation.
- Shoot in Manual Mode: Shooting in manual mode gives you full control over the aperture, shutter speed, and ISO settings, allowing you to dial in the perfect exposure.
- Use a Light Meter: A light meter can help you accurately measure the amount of light in a scene and determine the appropriate exposure settings.
- Use a Flash: Using a flash can provide additional light to brighten the scene and reduce the risk of underexposure.
- Increase ISO: Increasing the ISO sensitivity of your camera will make it more sensitive to light, allowing you to use faster shutter speeds or smaller apertures in low-light conditions. However, be aware that increasing the ISO can also increase noise in the image.
- Use a Wider Aperture: Using a wider aperture (smaller f-number) will allow more light to enter the lens, reducing the risk of underexposure.
- Slow Down Shutter Speed: Slowing down the shutter speed will allow more light to reach the sensor, but be careful to avoid motion blur.
- Shoot in RAW Format: Shooting in RAW format preserves more detail than shooting in JPEG format, giving you more flexibility when editing your photos.
- Monitor Your Histogram: Regularly check the histogram on your camera’s LCD screen to ensure that your photos are properly exposed.
- Practice and Experiment: The best way to prevent dark photos is to practice and experiment with your camera settings. The more you shoot, the better you will become at judging the amount of light in a scene and setting the appropriate exposure.
- Use Reflectors: Reflectors bounce light onto your subject, filling in shadows and brightening the overall scene.
By implementing these strategies, you can significantly reduce the occurrence of dark photos and capture well-exposed images in a variety of shooting situations. For more advanced techniques and tips, visit dfphoto.net.
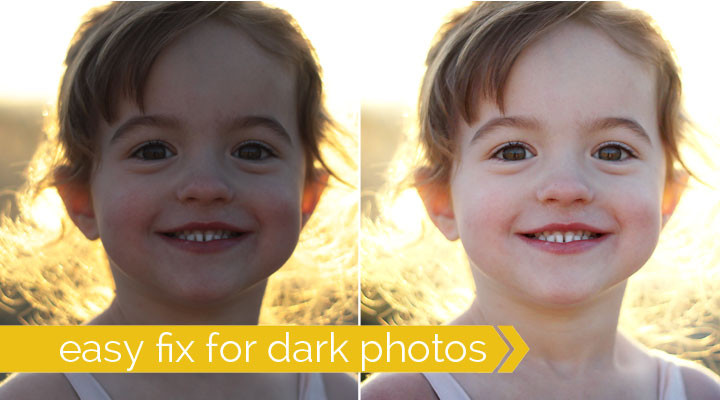 how to fix dark or underexposed photos with brightening
FAQ Section
1. Why do my photos always come out dark?
Your photos may be dark due to insufficient light, incorrect camera settings, or metering issues. Ensure you have enough light, use the correct aperture, shutter speed, and ISO, and adjust your camera’s metering mode.
2. How can I brighten a dark photo without Photoshop?
You can use free online photo editors like GIMP or Pixlr, which offer tools like levels, curves, and brightness/contrast adjustments to brighten dark photos.
3. What is the best ISO setting to avoid dark photos?
The best ISO setting depends on the lighting conditions. In low light, increase the ISO, but be mindful of noise. Start with a low ISO (e.g., 100 or 200) and increase it as needed.
4. How does the histogram help in fixing dark photos?
The histogram shows the tonal distribution in your image. If it’s skewed to the left, your photo is underexposed. Adjust the levels to redistribute the tones and brighten the image.
5. What is exposure compensation, and how does it help?
Exposure compensation allows you to override your camera’s meter and adjust the exposure manually. If your photos are consistently dark, increase the exposure compensation.
6. Should I shoot in manual mode to prevent dark photos?
Shooting in manual mode gives you full control over aperture, shutter speed, and ISO, allowing you to dial in the perfect exposure and prevent dark photos.
7. What are Photoshop Actions, and how do they help?
Photoshop Actions are pre-recorded series of steps that automate editing tasks. They can enhance brightened photos by adding stylistic effects and improving image quality.
8. How can I correct color imbalances when brightening photos?
Brightening photos can sometimes reveal color imbalances. Use Photoshop Actions or manual adjustments in your photo editor to correct these imbalances.
9. What are some common mistakes to avoid when brightening photos?
Avoid over-brightening, clipping highlights or shadows, ignoring the histogram, and over-sharpening to maintain image quality.
10. How can I use reflectors to prevent dark photos?
Reflectors bounce light onto your subject, filling in shadows and brightening the scene, reducing the risk of underexposure.
We hope this guide has equipped you with the knowledge to tackle those frustratingly dark photos. Remember, practice makes perfect, so keep experimenting with these techniques to find what works best for you. For more in-depth tutorials, stunning photography inspiration, and a vibrant community of fellow enthusiasts, be sure to visit dfphoto.net today! Address: 1600 St Michael’s Dr, Santa Fe, NM 87505, United States. Phone: +1 (505) 471-6001. Website: dfphoto.net.