Fixing bad lighting in iPhone photos is totally achievable, allowing you to transform dull or poorly lit images into visually appealing shots, and dfphoto.net is here to help. This guide dives deep into practical tips and techniques to correct exposure, reduce shadows, and enhance colors, ensuring your iPhone photos always look their best, with photo editing and visual storytelling secrets. Explore how to master iPhone photography and unlock the full potential of your smartphone camera through advanced adjustments.
1. Understanding the Challenges of Bad Lighting in iPhone Photography
What are the common lighting problems faced by iPhone photographers? Bad lighting can manifest in several ways, including underexposure, overexposure, harsh shadows, color casts, and lack of detail. Each of these issues impacts the overall quality and appeal of your photos, so understanding them is the first step in learning how to fix them and explore visual artistry.
1.1 Why is lighting crucial for iPhone photography?
Why does lighting play such a vital role in iPhone photography? Lighting is fundamental because it affects the mood, clarity, and overall impact of your images. Good lighting enhances colors, defines shapes, and reveals textures, whereas poor lighting can flatten your image and hide essential details.
1.2 What are the typical bad lighting scenarios encountered by iPhone users?
What specific scenarios present the most challenging lighting conditions for iPhone photographers? iPhone users often struggle with:
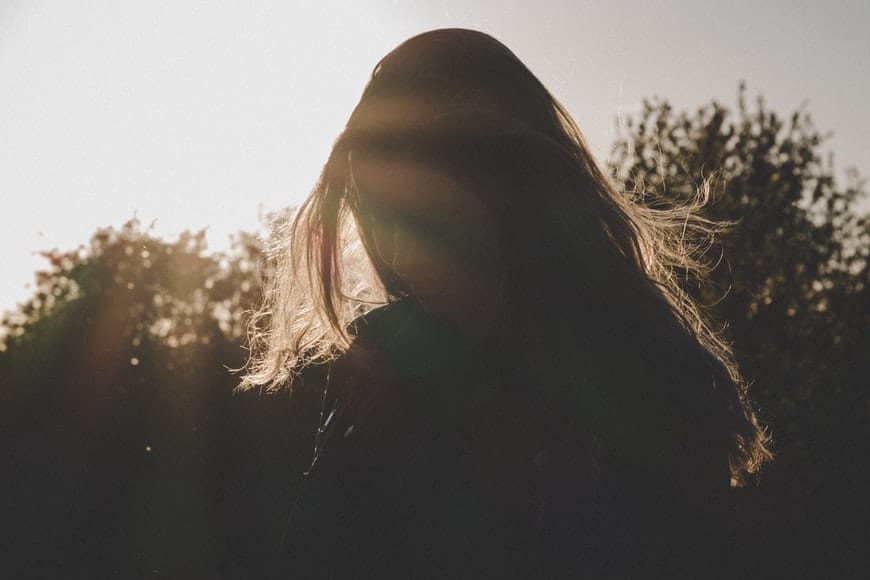
- Backlighting: Subjects appear as silhouettes because the light source is behind them.
- Low light: Images turn out noisy or blurry due to the iPhone’s attempt to compensate for the lack of light.
- Harsh sunlight: Creates strong shadows and blown-out highlights, making it difficult to capture detail.
1.3 How can bad lighting affect the quality of iPhone photos?
How does poor lighting diminish the quality of your iPhone photographs? Bad lighting can lead to:
- Loss of detail: Shadows can obscure important elements, while overexposed areas can lose all texture and color.
- Unflattering skin tones: Color casts can make skin look unnatural or unhealthy.
- Reduced sharpness: Insufficient light can force the iPhone to use higher ISO settings, which introduce noise and reduce sharpness.
2. Quick Fixes Directly on Your iPhone
Can you fix bad lighting directly on your iPhone without additional apps? Yes, the built-in Photos app offers several tools to quickly improve the lighting in your photos. These adjustments can make a noticeable difference in the quality of your images.
2.1 How to use the Auto Enhance feature
How does the Auto Enhance feature work? The Auto Enhance tool is a one-tap solution that automatically adjusts the exposure, contrast, highlights, and shadows in your photo to create a more balanced image.
- Open the Photos app and select the photo you want to edit.
- Tap Edit in the upper-right corner.
- Tap the magic wand icon to apply Auto Enhance.
- Adjust the intensity by sliding your finger along the scale.
- Tap Done to save your changes.
2.2 How to manually adjust exposure, brightness, and contrast
How can you manually fine-tune the lighting settings on your iPhone? Manually adjusting the exposure, brightness, and contrast allows for more precise control over the final look of your photo.
- Open the Photos app and select the photo you want to edit.
- Tap Edit.
- Tap the adjustments icon (a dial).
- Select Exposure, Brightness, or Contrast, and use the slider to make adjustments.
- Tap Done to save your changes.
2.3 How to correct white balance directly on your iPhone
How do you fix color casts using the iPhone’s built-in white balance settings? Correcting the white balance can eliminate unwanted color tints and make your photo look more natural.
- Open the Photos app and select the photo you want to edit.
- Tap Edit.
- Tap the adjustments icon (a dial).
- Select White Balance and choose from options like Auto, Cool, or Warm.
- Manually adjust the color temperature and tint sliders for precise control.
- Tap Done to save your changes.
 iPhone editing tools to adjust white balance
2.4 Practical examples of before-and-after using iPhone editing tools
Can you show examples of how these quick fixes improve photos? Here are examples that highlight the impact of these adjustments:
- Underexposed photo: Increasing exposure and brightness reveals hidden details and brightens the overall image.
- Overexposed photo: Reducing highlights and exposure recovers details in blown-out areas, creating a more balanced image.
- Photo with a color cast: Adjusting the white balance removes the unwanted tint, making the colors look more accurate.
3. Advanced Editing Apps for iPhone Photography
What are some powerful apps for editing iPhone photos beyond the built-in Photos app? Several advanced editing apps offer more sophisticated tools and features for fixing bad lighting and enhancing your photos.
3.1 Overview of popular apps like Adobe Lightroom Mobile, VSCO, and Snapseed
What do these apps offer that the native iPhone editor does not? These apps provide a wider range of editing tools, including:
- Adobe Lightroom Mobile: Professional-grade adjustments, RAW support, and syncing capabilities with desktop versions.
- VSCO: Film-inspired presets and advanced editing tools for creating a specific aesthetic.
- Snapseed: Powerful and free app with a variety of precise editing tools, including selective adjustments and healing.
3.2 Step-by-step guide to fixing bad lighting using Adobe Lightroom Mobile
How can you use Lightroom Mobile to correct lighting issues? Lightroom Mobile offers detailed control over exposure, contrast, highlights, shadows, and color.
- Open Lightroom Mobile and import the photo you want to edit.
- Tap the Light icon to access exposure controls.
- Adjust Exposure, Contrast, Highlights, Shadows, Whites, and Blacks sliders to balance the lighting.
- Use the Color icon to adjust white balance and remove any color casts.
- Tap the Detail icon to reduce noise and sharpen the image if necessary.
- Save your edited photo.
3.3 Utilizing VSCO presets to enhance photos with poor lighting
How do VSCO presets help improve poorly lit photos? VSCO presets apply pre-designed editing settings that can quickly enhance the mood and lighting of your photos.
- Open VSCO and import the photo you want to edit.
- Browse through the presets and select one that complements your photo.
- Adjust the intensity of the preset to your liking.
- Use the manual editing tools to fine-tune the exposure, contrast, and color.
- Save your edited photo.
3.4 Leveraging Snapseed’s selective adjustment tools
How can Snapseed’s selective tools fix specific lighting problems? Snapseed allows you to make precise adjustments to specific areas of your photo without affecting the entire image.
- Open Snapseed and import the photo you want to edit.
- Tap Tools and select Selective.
- Tap on the area you want to adjust and use the pinch gesture to adjust the size of the selected area.
- Swipe up or down to choose the adjustment type (Brightness, Contrast, Saturation) and adjust the slider.
- Tap the check mark to apply your changes.
- Save your edited photo.
4. Advanced Techniques for Tackling Complex Lighting Issues
What are some advanced techniques to address more challenging lighting problems in iPhone photos? Complex lighting issues, such as strong backlighting or mixed lighting, require more sophisticated editing techniques.
4.1 Using HDR techniques on iPhone
How can HDR mode help in high-contrast situations? HDR (High Dynamic Range) mode captures multiple photos at different exposures and combines them to create a single image with a wider range of detail in both the bright and dark areas.
- Open the Camera app on your iPhone.
- Ensure HDR is enabled (usually located at the top of the screen).
- Frame your shot and take the photo. The iPhone will automatically capture multiple exposures and merge them.
4.2 Dodging and burning techniques for localized adjustments
What are dodging and burning, and how can they improve iPhone photos? Dodging and burning are techniques used to lighten (dodge) and darken (burn) specific areas of an image, allowing you to refine the lighting and create more depth.
- Use an app like Snapseed or Lightroom Mobile.
- In Snapseed, use the Selective tool to target specific areas.
- Adjust the Brightness slider to dodge or burn the selected area.
- In Lightroom Mobile, use the Brush tool to paint over the areas you want to adjust.
- Adjust the Exposure slider to dodge or burn the painted area.
4.3 Correcting color casts using color correction tools
How can you eliminate unwanted color tints from your iPhone photos? Color casts can be corrected by adjusting the white balance and using color correction tools to neutralize the unwanted tint.
- Use an app like Lightroom Mobile or VSCO.
- In Lightroom Mobile, use the Color icon to adjust the Temperature and Tint sliders.
- In VSCO, use the White Balance tool to adjust the temperature and tint.
- Use the Color Mixer tool to adjust the hue, saturation, and luminance of individual colors.
 Manually adjusting exposure to fix bad lighting in iPhone photos
5. Preventing Bad Lighting: Shooting Tips for iPhone
What can you do while shooting to minimize lighting problems? Preventing bad lighting starts with understanding how to use your iPhone’s camera settings and positioning yourself and your subject effectively.
5.1 Utilizing natural light effectively
How can you make the most of natural light when shooting with your iPhone? Natural light is often the most flattering and can be used to create beautiful, well-lit photos.
- Shoot during the golden hours: The hour after sunrise and the hour before sunset provide warm, soft light.
- Avoid direct sunlight: Harsh sunlight can create strong shadows and blown-out highlights. Shoot in the shade or on a cloudy day.
- Position your subject: Place your subject so that the light is hitting them from the side or at an angle to create depth and dimension.
5.2 Using reflectors and diffusers with your iPhone
Can you use external accessories to control light with an iPhone? Yes, reflectors and diffusers can be used with your iPhone to redirect and soften light.
- Reflectors: Use a reflector to bounce light onto your subject, filling in shadows and creating a more balanced exposure.
- Diffusers: Use a diffuser to soften harsh sunlight and reduce shadows.
5.3 Adjusting iPhone camera settings for optimal lighting
What camera settings should you adjust to improve lighting while shooting? Adjusting the exposure compensation and using the focus lock feature can help you achieve optimal lighting.
- Exposure compensation: Tap on the screen to focus, then swipe up or down to adjust the exposure compensation.
- Focus lock: Tap and hold on the screen to lock the focus and exposure, allowing you to recompose your shot without changing the settings.
5.4 Composing shots to take advantage of available light
How does composition affect the lighting in your photos? Composing your shots to take advantage of available light can make a significant difference in the final result.
- Look for leading lines: Use leading lines to draw the viewer’s eye towards the subject and guide them through the scene.
- Pay attention to the background: Make sure the background is not too bright or distracting, as it can affect the overall exposure of your photo.
- Experiment with angles: Try shooting from different angles to see how the light changes and affects the mood of your photo.
6. Essential Accessories for iPhone Photography Lighting
What accessories can improve your iPhone photography lighting setup? While the iPhone camera is powerful, certain accessories can enhance your ability to control and manipulate light.
6.1 Portable LED lights for iPhone
How can LED lights improve your iPhone photos? Portable LED lights provide a constant and controllable light source, which is useful for shooting in low-light conditions or adding fill light to your subject.
- Advantages: Adjustable brightness, color temperature control, and portability.
- Examples: Lume Cube, Manfrotto Lumimuse.
6.2 External flashes and strobes
What benefits do external flashes offer over the iPhone’s built-in flash? External flashes and strobes offer more power and control over the light, allowing you to create more dramatic and professional-looking photos.
- Advantages: Higher power output, faster recycle times, and the ability to use modifiers like softboxes and umbrellas.
- Examples: Profoto B10, Godox AD200.
6.3 Reflectors and diffusers designed for smartphones
What are the best reflectors and diffusers for iPhone photography? Reflectors and diffusers designed for smartphones are compact and easy to use, allowing you to redirect and soften light for better results.
- Reflectors: Bounce light onto your subject to fill in shadows.
- Diffusers: Soften harsh light and reduce shadows.
6.4 Tripods and stabilizers for low-light shooting
Why are tripods and stabilizers important for low-light iPhone photography? Tripods and stabilizers help keep your iPhone steady, allowing you to use longer exposure times without introducing blur.
- Advantages: Sharp images in low-light conditions, stable video recording.
- Examples: Joby GripTight, DJI Osmo Mobile.
 Using LED light to fix bad lighting in iPhone photography
7. Creative Techniques to Overcome Lighting Limitations
How can you use creative approaches to make the most of challenging lighting situations? Sometimes, the best way to deal with bad lighting is to embrace it and use it creatively.
7.1 Embracing silhouettes in backlit situations
How can you create striking silhouettes with your iPhone? Silhouettes can be a powerful way to convey emotion and create a sense of mystery.
- Position your subject in front of a bright light source.
- Tap on the screen to focus on the background, which will underexpose the subject, creating a silhouette.
- Adjust the exposure compensation to darken the silhouette further if needed.
7.2 Utilizing shadows for dramatic effect
How can shadows enhance your iPhone photography? Shadows can add depth, dimension, and drama to your photos, creating a more visually interesting image.
- Look for interesting shadow patterns: Use shadows to create shapes and textures in your photo.
- Experiment with different angles: Change your perspective to see how the shadows change and affect the mood of your photo.
- Use shadows to highlight your subject: Position your subject so that they are partially in shadow, drawing attention to the lit areas.
7.3 Converting to black and white to minimize color issues
How does converting to black and white help with bad lighting? Converting to black and white can minimize color casts and other color-related issues, allowing you to focus on the composition and lighting of your photo.
- Open your photo in an editing app like Snapseed or Lightroom Mobile.
- In Snapseed, tap Tools and select Black & White.
- In Lightroom Mobile, tap the Color icon and reduce the Saturation to zero.
- Adjust the contrast, highlights, and shadows to create a balanced black and white image.
7.4 Focusing on textures and details instead of overall brightness
How can you create compelling photos even in low-light situations by focusing on details? In low-light situations, focusing on textures and details can create compelling photos even if the overall brightness is limited.
- Get close to your subject: Capture the fine details and textures.
- Use a macro lens: Enhance the details even further.
- Edit your photos to enhance the textures: Use sharpening and clarity adjustments to bring out the details.
8. Leveraging AI in iPhone Photography for Lighting Correction
How is artificial intelligence changing the way we fix lighting in iPhone photos? AI-powered editing tools are becoming increasingly sophisticated, offering automated solutions for fixing bad lighting.
8.1 AI-powered editing tools in apps like Luminar AI and Photoleap
What are the advantages of using AI for lighting correction? AI-powered editing tools can analyze your photo and automatically adjust the lighting, color, and detail to create a more balanced and visually appealing image.
- Luminar AI: Offers automated adjustments for sky replacement, skin enhancement, and overall lighting.
- Photoleap: Provides AI-powered filters and effects for creative lighting adjustments.
8.2 How AI can automatically detect and correct lighting problems
How do these AI tools identify and fix lighting issues? AI algorithms can detect common lighting problems such as underexposure, overexposure, color casts, and harsh shadows, and automatically apply corrections.
- Automated adjustments: AI can adjust the exposure, contrast, highlights, shadows, and white balance with a single tap.
- Smart enhancements: AI can selectively enhance specific areas of your photo based on its content.
8.3 Fine-tuning AI adjustments for personalized results
Can you still customize the results when using AI-powered tools? Yes, most AI-powered editing tools allow you to fine-tune the automated adjustments for personalized results.
- Adjustable sliders: Use sliders to adjust the intensity of the AI adjustments.
- Manual controls: Switch to manual editing mode to make precise adjustments to specific areas of your photo.
8.4 Ethical considerations of using AI in photo editing
What are the ethical implications of using AI to alter photos? It’s important to be transparent about the use of AI in photo editing and to avoid using it to create misleading or deceptive images.
- Transparency: Disclose the use of AI in your photo editing process.
- Authenticity: Avoid using AI to create images that are significantly different from the original scene.
9. Sharing and Showcasing Your Enhanced iPhone Photos
How can you effectively share your beautifully lit iPhone photos? Once you’ve perfected the lighting in your iPhone photos, it’s time to share them with the world.
9.1 Optimizing photos for social media platforms
What are the best settings for sharing on different platforms? Optimizing your photos for social media ensures that they look their best on each platform.
- Instagram: Use a square aspect ratio (1:1) or a vertical aspect ratio (4:5).
- Facebook: Use a horizontal aspect ratio (16:9) or a square aspect ratio (1:1).
- Twitter: Use a horizontal aspect ratio (16:9) or a vertical aspect ratio (2:1).
9.2 Creating a consistent look and feel across your portfolio
Why is consistency important for your photography portfolio? Creating a consistent look and feel across your portfolio helps establish your brand and makes your work more recognizable.
- Use the same editing style: Apply the same presets or editing techniques to all of your photos.
- Maintain a consistent color palette: Choose a color palette that reflects your style and use it consistently.
9.3 Participating in online photography communities
How can you get feedback and inspiration from other photographers? Participating in online photography communities can provide valuable feedback and inspiration.
- Share your photos: Post your photos in online forums and groups.
- Provide feedback: Offer constructive criticism on other photographers’ work.
- Learn from others: Study the work of successful photographers and learn from their techniques.
9.4 Printing your iPhone photos for a tangible experience
Why should you consider printing your iPhone photos? Printing your iPhone photos allows you to enjoy them in a tangible format and create lasting memories.
- Choose a high-quality printing service: Use a professional printing service for the best results.
- Select the right paper: Choose a paper that complements your photo and enhances its colors and textures.
10. Real-World Examples and Case Studies
Can you provide examples of how these techniques are used in practice? Real-world examples and case studies can illustrate how these techniques are used to fix bad lighting in iPhone photos.
10.1 Case study 1: Fixing underexposed indoor shots
How do you brighten indoor photos that are too dark? Underexposed indoor shots can be brightened by increasing the exposure and shadows in an editing app.
- Open the photo in Lightroom Mobile.
- Increase the Exposure slider to brighten the overall image.
- Increase the Shadows slider to reveal details in the dark areas.
- Adjust the Whites and Blacks sliders to balance the highlights and shadows.
10.2 Case study 2: Correcting overexposed outdoor photos
How do you recover details in photos taken in bright sunlight? Overexposed outdoor photos can be corrected by reducing the highlights and exposure in an editing app.
- Open the photo in Snapseed.
- Reduce the Highlights slider to recover details in the bright areas.
- Reduce the Exposure slider to darken the overall image.
- Use the Shadows slider to brighten the dark areas if needed.
10.3 Case study 3: Removing color casts from photos
How do you eliminate unwanted color tints in photos? Color casts can be removed by adjusting the white balance in an editing app.
- Open the photo in VSCO.
- Use the White Balance tool to adjust the Temperature and Tint sliders.
- Select the Auto white balance option for a quick fix.
- Manually adjust the sliders for more precise control.
10.4 Case study 4: Enhancing low-light portraits
How do you improve portraits taken in dimly lit environments? Low-light portraits can be enhanced by using a combination of exposure adjustments, noise reduction, and sharpening.
- Open the photo in Lightroom Mobile.
- Increase the Exposure slider to brighten the overall image.
- Use the Noise Reduction slider to reduce noise and grain.
- Use the Sharpening slider to enhance the details.
- Adjust the Skin Smoothing slider for a more flattering look.
FAQ: Addressing Common Questions About Fixing Bad Lighting
1. What is the best app for fixing bad lighting in iPhone photos?
The best app depends on your needs and skill level. Lightroom Mobile offers professional-grade adjustments, Snapseed is a powerful free option, and VSCO provides film-inspired presets.
2. How can I avoid bad lighting when taking photos with my iPhone?
Shoot during the golden hours, avoid direct sunlight, use reflectors and diffusers, and adjust your iPhone’s camera settings for optimal lighting.
3. Can I fix bad lighting on my iPhone without using any apps?
Yes, the built-in Photos app offers several tools to quickly improve the lighting in your photos, including Auto Enhance, exposure adjustments, and white balance correction.
4. How do I correct overexposed photos on my iPhone?
Reduce the highlights and exposure in the Photos app or a third-party editing app like Snapseed or Lightroom Mobile.
5. How do I brighten underexposed photos on my iPhone?
Increase the exposure and shadows in the Photos app or a third-party editing app like Snapseed or Lightroom Mobile.
6. What is the best way to remove color casts from my iPhone photos?
Adjust the white balance in the Photos app or a third-party editing app like VSCO or Lightroom Mobile.
7. How can I use shadows creatively in my iPhone photography?
Look for interesting shadow patterns, experiment with different angles, and use shadows to highlight your subject.
8. What are the best accessories for improving iPhone photography lighting?
Portable LED lights, external flashes and strobes, reflectors and diffusers, and tripods and stabilizers.
9. How can AI help with fixing bad lighting in iPhone photos?
AI-powered editing tools can automatically detect and correct lighting problems, offering automated solutions for fixing bad lighting.
10. How do I optimize my iPhone photos for sharing on social media?
Use the recommended aspect ratios for each platform, maintain a consistent look and feel across your portfolio, and participate in online photography communities for feedback and inspiration.
With these tips and techniques, you can transform your iPhone photos from poorly lit to beautifully enhanced, capturing the world around you in the best possible light. For more in-depth tutorials, stunning photo collections, and a vibrant community of fellow photographers, visit dfphoto.net today and start your journey to photographic excellence.
Address: 1600 St Michael’s Dr, Santa Fe, NM 87505, United States
Phone: +1 (505) 471-6001
Website: dfphoto.net.