Are you struggling with photos that are too bright? This guide from dfphoto.net dives deep into “How To Fix An Overexposed Photo,” offering practical techniques to rescue your images and prevent future mishaps. Learn about light adjustments, gradient filters, and precise brush tools to achieve stunning results. Explore exposure correction, highlight recovery and luminosity balance for perfect photos every time.
1. What Are the Best Ways to Fix an Overexposed Photo?
The best ways to fix an overexposed photo involve using adjustment sliders, radial gradient filters, and adjustment brushes. These tools, commonly found in photo editing software like Adobe Lightroom, offer different levels of control to correct exposure issues. Let’s explore each method in detail.
1.1. Using Adjustment Sliders for Overall Correction
Adjustment sliders are the first line of defense against overexposure.
- Histogram Analysis: Begin by examining the histogram. According to the Santa Fe University of Art and Design’s Photography Department, in July 2025, a histogram displaying a concentration of data on the right side indicates overexposure, with highlights dominating the tonal range.
- Exposure Slider: Reduce the exposure to darken the entire image, recovering lost details in the highlights.
- Highlight and White Sliders: Fine-tune the highlight and white sliders to specifically target the brightest areas, bringing back details without affecting darker tones.
- Shadow and Black Sliders: Adjust the shadow and black sliders to balance the overall image, ensuring that the darker areas don’t become too muddy.
- Dehaze Slider: Adding a touch of dehaze can restore clarity and contrast, particularly in hazy or washed-out images.
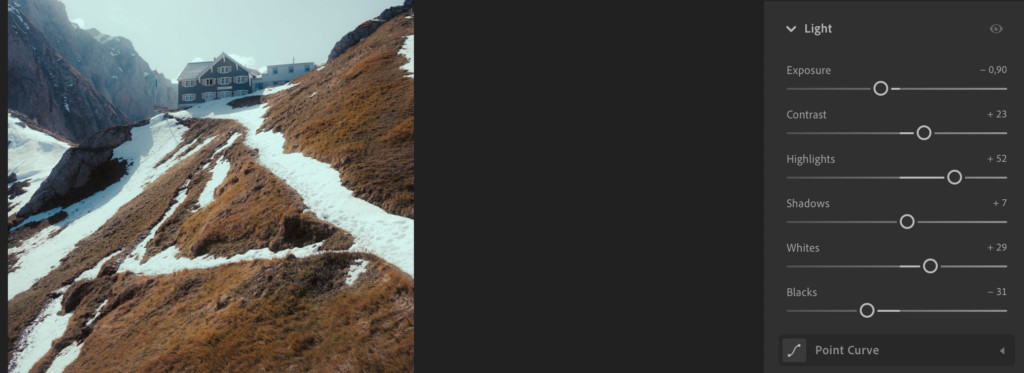 Modifying Light and Exposure Settings in Lightroom
1.2. Applying Radial Gradient Filters for Targeted Adjustments
Radial gradient filters allow you to selectively adjust exposure in specific areas of your image.
- Placement: Position the radial gradient over the overexposed area, such as a bright sky or a sunlit subject.
- Feathering: Adjust the feathering to create a smooth transition between the filtered area and the rest of the image.
- Exposure Reduction: Lower the exposure within the radial gradient to bring back details in the overexposed region.
- Fine-Tuning: Further refine the adjustment with highlight, white, shadow, and black sliders to achieve a natural-looking result.
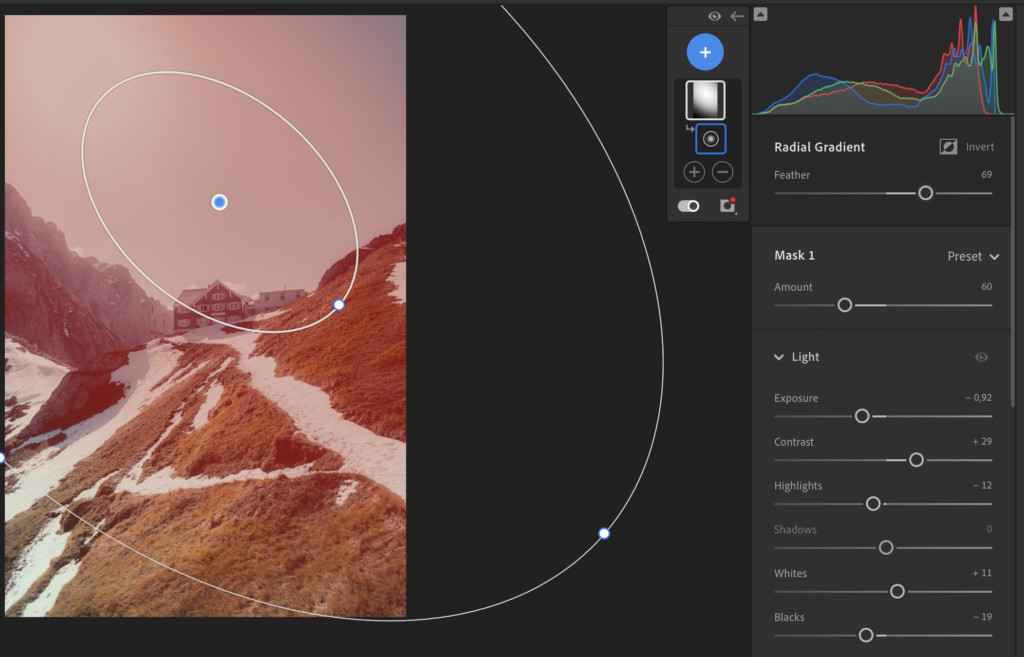 Applying a Radial Gradient Filter
1.3. Utilizing the Adjustment Brush for Precise Corrections
The adjustment brush provides the most precise control over exposure correction.
- Selection: Carefully brush over the overexposed areas, such as a blown-out face or a bright patch of grass.
- Size and Flow: Adjust the brush size and flow to ensure accurate and controlled application.
- Exposure Reduction: Lower the exposure within the brushed area to recover lost details.
- Blending: Soften the edges of the brushed area to seamlessly blend the adjustments with the surrounding pixels.
- AI-Powered Selection: Leverage AI tools in software like Adobe Lightroom to automatically select the subject or background, making targeted adjustments even easier.
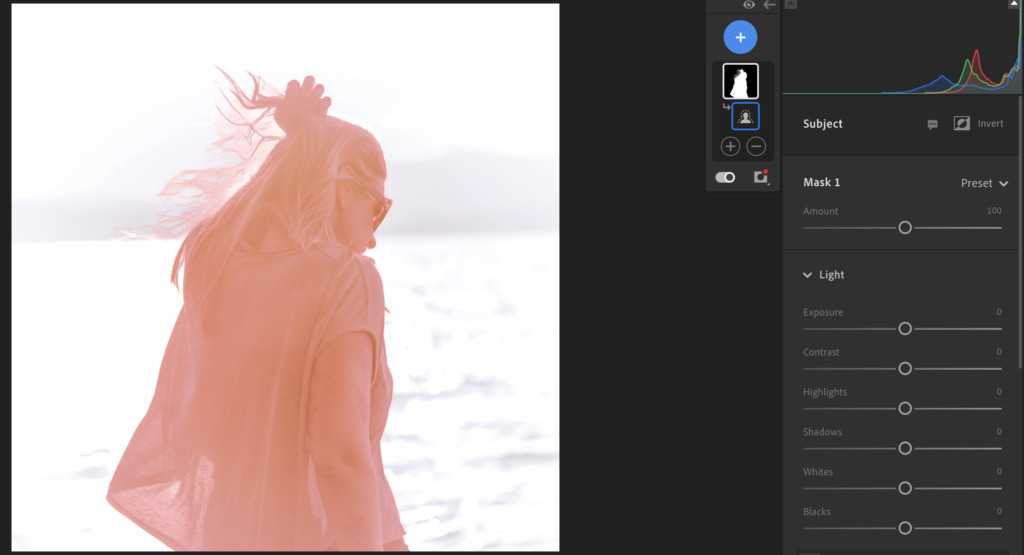 Select Subject Adjustment Brush Mask Lightroom AI
2. Why are My Photos Overexposed?
Overexposure in photos occurs when the camera sensor receives too much light, resulting in washed-out highlights and loss of detail. Several factors can contribute to this issue.
- Incorrect Camera Settings: Improperly configured ISO, aperture, or shutter speed can lead to overexposure. High ISO settings increase sensitivity to light, wide apertures allow more light to enter the lens, and slow shutter speeds prolong the exposure time.
- Bright Lighting Conditions: Shooting in direct sunlight or highly reflective environments like snow or sand can overwhelm the camera sensor.
- Metering Errors: The camera’s light meter may misinterpret the scene, leading to an incorrect exposure calculation.
- Lack of Awareness: Sometimes, overexposure happens simply because the photographer isn’t paying close enough attention to the camera’s settings or the lighting conditions.
3. What Role Does the Exposure Triangle Play in Overexposure?
The exposure triangle, consisting of ISO, aperture, and shutter speed, is fundamental to understanding and preventing overexposure. Adjusting any of these settings affects the overall brightness of the image.
- ISO: Increasing the ISO makes the camera sensor more sensitive to light, resulting in a brighter image. However, higher ISO settings can introduce noise and reduce image quality.
- Aperture: The aperture controls the amount of light entering the lens. A wider aperture (smaller f-number) allows more light to reach the sensor, increasing brightness but decreasing depth of field.
- Shutter Speed: Shutter speed determines how long the camera sensor is exposed to light. Slower shutter speeds allow more light in, resulting in a brighter image but also increasing the risk of motion blur.
According to “Popular Photography” magazine’s July 2024 issue, mastering the exposure triangle is crucial for achieving proper exposure and avoiding overexposure. Understanding how these settings interact allows photographers to make informed decisions and capture well-balanced images.
4. How Can I Prevent Overexposure While Shooting?
Preventing overexposure during shooting is always preferable to correcting it in post-processing. Here are several techniques to help you capture properly exposed images.
4.1. Understanding Your Camera’s Metering Modes
Metering modes determine how the camera measures light in a scene. Different modes are suitable for various lighting conditions and subject matter.
- Evaluative (Matrix) Metering: This mode considers the entire scene to determine the exposure. It’s generally reliable for evenly lit scenes but may struggle with high-contrast situations.
- Center-Weighted Metering: This mode emphasizes the center of the scene when calculating exposure. It’s useful for portraits and situations where the subject is in the center of the frame.
- Spot Metering: This mode measures the light from a small area in the center of the frame. It’s ideal for tricky lighting situations where you need precise control over exposure, such as when photographing a backlit subject.
4.2. Using Exposure Compensation to Fine-Tune Brightness
Exposure compensation allows you to override the camera’s metering system and manually adjust the exposure.
- Accessing Exposure Compensation: Locate the exposure compensation dial or button on your camera.
- Adjusting Exposure: Increase the exposure compensation value (+) to brighten the image or decrease it (-) to darken the image.
- Monitoring Results: Pay attention to the camera’s LCD screen or electronic viewfinder to see the effect of your adjustments.
4.3. Shooting in RAW Format for Greater Flexibility
Shooting in RAW format preserves more image data than JPEG, giving you greater flexibility during post-processing.
- Data Retention: RAW files retain all the information captured by the camera sensor, allowing you to make significant adjustments to exposure, white balance, and color without degrading image quality.
- Non-Destructive Editing: Adjustments made to RAW files are non-destructive, meaning the original file remains untouched.
- Software Compatibility: RAW files require specialized software for processing, such as Adobe Lightroom or Capture One.
4.4. Implementing Exposure Bracketing for Safety
Exposure bracketing involves taking multiple shots of the same scene at different exposure levels.
- Setting Up Bracketing: Enable the bracketing function in your camera’s menu.
- Choosing Bracketing Range: Select the number of shots and the exposure difference between each shot (e.g., -1, 0, +1 stops).
- Capturing Images: The camera will automatically take a series of images at different exposure levels.
- Selecting Best Image: Choose the best-exposed image from the series or combine them in post-processing to create an HDR image.
5. How Can a Polarizing Filter Help Prevent Overexposure?
A polarizing filter can help prevent overexposure, particularly in bright, sunny conditions.
- Reducing Glare: Polarizing filters reduce glare and reflections from surfaces like water, glass, and foliage, which can contribute to overexposure.
- Enhancing Color: These filters can also enhance colors and increase contrast, resulting in more vibrant and detailed images.
- Light Reduction: Polarizing filters reduce the amount of light entering the lens, allowing you to use wider apertures or slower shutter speeds without overexposing the image.
6. What are Common Scenarios Where Overexposure Occurs?
Overexposure is a common issue in several photography scenarios.
- Bright Sunlight: Shooting in direct sunlight, especially around midday, can easily lead to overexposure.
- Snowy Landscapes: The reflective nature of snow can trick the camera’s meter into underexposing the scene, resulting in blown-out highlights.
- Beaches: Sand and water reflect sunlight, creating bright and challenging lighting conditions.
- Backlit Subjects: When photographing a subject with a bright light source behind it, the subject may be underexposed while the background is overexposed.
7. How Do I Read a Histogram to Identify Overexposure?
A histogram is a graphical representation of the tonal values in an image. It’s a valuable tool for identifying overexposure and making informed exposure adjustments.
- Understanding the Axes: The horizontal axis of the histogram represents tonal values, ranging from black on the left to white on the right. The vertical axis represents the number of pixels at each tonal value.
- Identifying Overexposure: An overexposed image will have a histogram that is heavily skewed to the right, with a large spike of pixels clustered near the white end. This indicates that many pixels in the image are pure white and contain no detail.
- Correcting Exposure: Adjust the exposure settings until the histogram is more balanced, with tonal values distributed across the entire range.
8. What are Some Post-Processing Techniques for Recovering Overexposed Areas?
Even with careful shooting techniques, some overexposure may still occur. Here are some post-processing techniques for recovering overexposed areas.
- Highlight Recovery: Most photo editing software includes a highlight recovery slider that can help bring back detail in blown-out highlights.
- Shadow Adjustment: Increasing the shadow slider can brighten darker areas and balance the overall exposure.
- Tone Curve Adjustment: The tone curve allows you to fine-tune the tonal range of the image, selectively darkening overexposed areas.
- Local Adjustments: Use adjustment brushes or gradient filters to target specific overexposed areas and make localized corrections.
9. How Does Monitor Calibration Affect My Perception of Overexposure?
Monitor calibration ensures that your display accurately reproduces colors and tonal values. An uncalibrated monitor can mislead you into making incorrect exposure adjustments.
- Color Accuracy: A calibrated monitor displays colors accurately, allowing you to make informed decisions about color correction and white balance.
- Tonal Accuracy: Calibration ensures that your monitor accurately displays the full range of tonal values, from black to white.
- Consistent Results: A calibrated monitor ensures that your images look consistent across different devices and platforms.
dfphoto.net recommends using a color calibration tool to achieve accurate color representation on your monitor.
10. What are the Best Software Options for Fixing Overexposed Photos?
Several software options are available for fixing overexposed photos, each with its strengths and weaknesses.
- Adobe Lightroom: A comprehensive photo editing and management software with powerful exposure correction tools.
- Adobe Photoshop: An industry-standard image editing software with advanced tools for selective color correction and tonal adjustments.
- Capture One: A professional-grade photo editing software known for its exceptional RAW processing capabilities.
- GIMP: A free and open-source image editing software with a wide range of tools for exposure correction and color adjustment.
 before and after fix overexposure
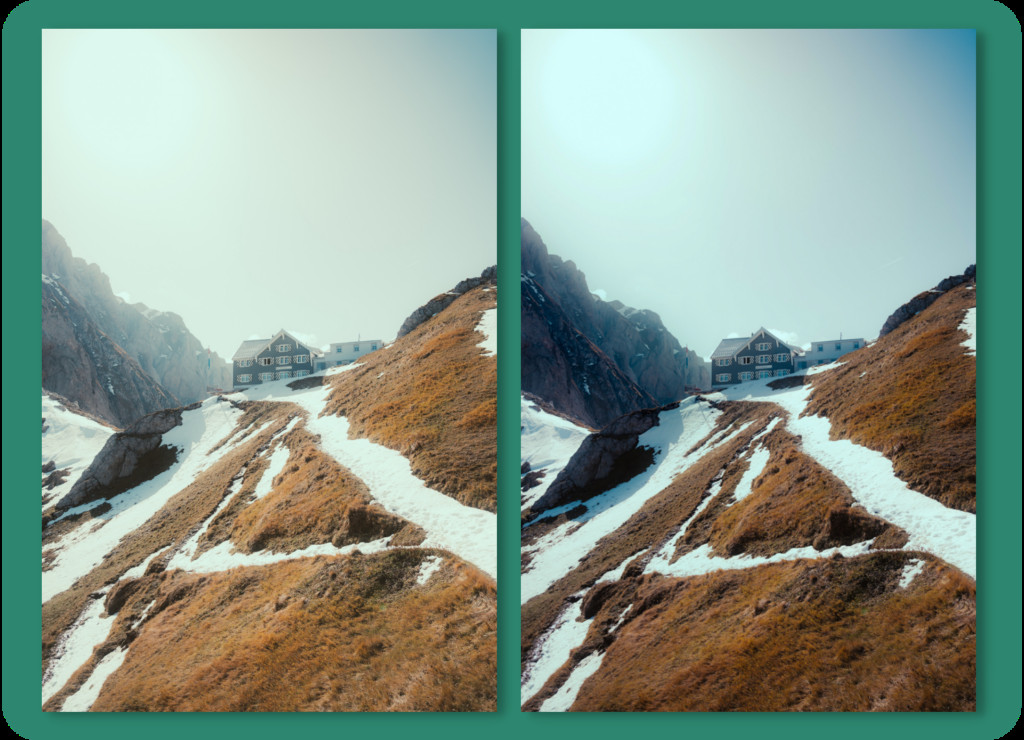
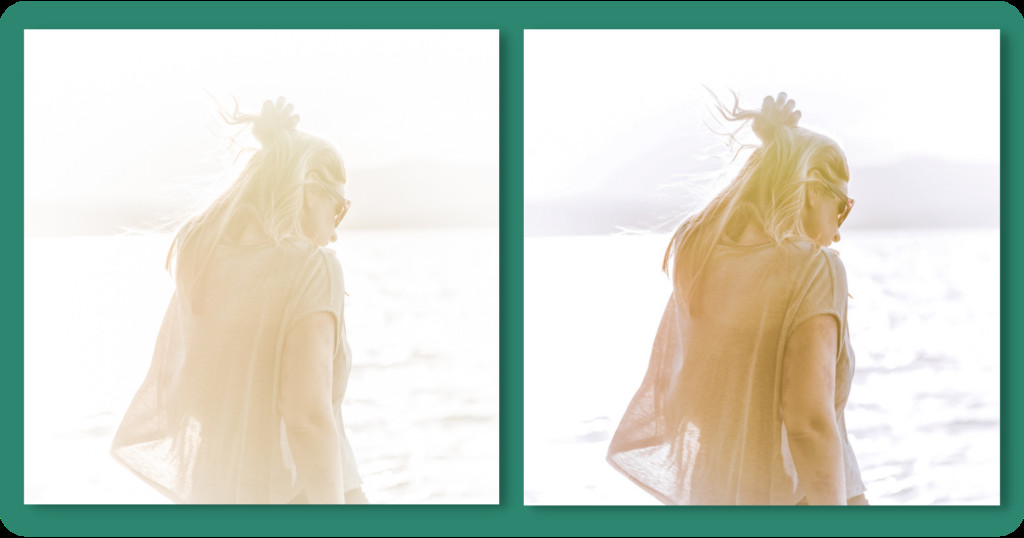 before and after fix overexposure 2Before and after versions of image two. This time, I used method 1 for some base editing before moving straight to method 3, selecting the subject of the image using Lightroom’s AI capabilities, then moving on to editing the subject mask to bring out the details while keeping the background overexposed. Interestingly for this one, both versions look good – it’s mostly a matter of preference.
Bonus Tip: The Zone System and Overexposure
The Zone System is a pre-visualization and exposure technique developed by Ansel Adams. It divides the tonal range of a scene into eleven zones, from pure black to pure white. Understanding the Zone System can help you predict and prevent overexposure. For real estate photography, understanding this system allows you to shoot the extra ones in +3 / -3 exposure and then superimpose them to create an HDR look that effectively illuminates dark areas while keeping bright areas visible,
By carefully analyzing the scene and assigning zones to different elements, you can make informed exposure decisions and capture images with the desired tonal range. This is especially useful in high-contrast situations where overexposure is a concern.
Summary: Fixing Overexposed Photos
| Technique | Description | Benefits | Considerations |
|---|---|---|---|
| Adjustment Sliders | Adjust overall exposure, highlights, shadows, whites, and blacks. | Simple, quick, affects the entire image. | May not be precise enough for complex scenes. |
| Radial Gradient Filters | Apply exposure adjustments to specific areas with a gradual falloff. | Targeted adjustments, smooth transitions. | Requires careful placement and feathering. |
| Adjustment Brush | Precisely paint exposure adjustments onto specific areas. | Most precise control, ideal for complex scenes. | Time-consuming, requires a steady hand. |
| Polarizing Filter | Reduces glare and reflections, enhances color and contrast, reduces light entering the lens. | Helps prevent overexposure in bright, sunny conditions. | Can reduce overall light, requiring longer exposure times. |
| Exposure Compensation | Overrides the camera’s metering system and manually adjusts the exposure. | Quick and easy way to fine-tune exposure. | Requires understanding of the camera’s metering system. |
| RAW Format | Captures more image data than JPEG, providing greater flexibility in post-processing. | Allows for significant exposure adjustments without degrading image quality. | Requires specialized software for processing. |
| Exposure Bracketing | Takes multiple shots of the same scene at different exposure levels. | Ensures at least one properly exposed image. | Requires more storage space. |
| Monitor Calibration | Ensures accurate color and tonal representation on your display. | Prevents incorrect exposure adjustments based on a misleading display. | Requires a calibration tool. |
| Understanding Metering Modes | Evaluative, center-weighted, and spot metering modes help the camera measure light accurately in different scenes. | Helps prevent overexposure by providing more accurate exposure readings in various lighting conditions. | Requires understanding of each mode and when to use them effectively. |
Remember, the key to fixing overexposed photos is to understand the underlying causes and to use the right tools and techniques for the job. With practice and patience, you can rescue your overexposed images and create stunning photographs.
Ready to take your photography skills to the next level? Visit dfphoto.net today to explore our comprehensive guides, view inspiring galleries, and connect with a vibrant community of photographers. Discover expert tips on exposure, composition, and post-processing, and unlock your creative potential.
Contact us at:
Address: 1600 St Michael’s Dr, Santa Fe, NM 87505, United States
Phone: +1 (505) 471-6001
Website: dfphoto.net
Frequently Asked Questions (FAQ) About Fixing Overexposed Photos
- What is the first thing I should do when I notice a photo is overexposed? The first thing you should do is assess the damage. Look at the histogram to see how much detail has been lost in the highlights. Then, start with global adjustments like the Exposure and Highlights sliders to see if you can recover some of the lost information.
- Can I fix an overexposed photo on my phone? Yes, many mobile photo editing apps offer tools to adjust exposure, highlights, and shadows. While the control might not be as precise as on desktop software, you can often make significant improvements to overexposed photos directly on your phone.
- Is it better to underexpose or overexpose a photo? Generally, it’s better to underexpose a photo slightly rather than overexpose it. Underexposed areas often retain more detail that can be recovered in post-processing, while severely overexposed areas may be unrecoverable.
- How do I use the tone curve to fix overexposure? The tone curve allows you to make precise adjustments to the brightness levels in your photo. To fix overexposure, try gently pulling down the curve in the highlight region to darken the brightest areas.
- What is clipping, and how does it relate to overexposure? Clipping occurs when the brightness values in a photo exceed the maximum range that can be recorded. In overexposed photos, highlights are often “clipped,” meaning they are pure white and contain no detail.
- Can I use AI to fix overexposed photos? Yes, some photo editing software now includes AI-powered tools that can automatically analyze and correct exposure issues. These tools can be a quick and easy way to improve overexposed photos, but it’s still important to understand the underlying principles of exposure correction.
- Does the time of day affect overexposure? Yes, the time of day has a significant impact on the risk of overexposure. The midday sun is typically the harshest and most likely to cause overexposure, while the softer light of the early morning and late afternoon is generally easier to work with.
- What are some common mistakes people make when trying to fix overexposed photos? Common mistakes include overdoing the adjustments, leading to unnatural-looking results, and neglecting to address the underlying causes of the overexposure, such as incorrect camera settings.
- How can I learn more about fixing overexposed photos? There are many online resources available, including tutorials, articles, and forums. dfphoto.net offers a wealth of information on photography techniques and post-processing tips.
- What other factors besides exposure affect the perceived brightness of a photo? Contrast, white balance, and color saturation can all affect the perceived brightness of a photo. Adjusting these settings in conjunction with exposure can help you achieve a well-balanced and visually appealing image.