Fixing a blurry photograph is possible with the right tools and techniques. dfphoto.net is here to guide you through proven methods to restore clarity to your precious memories. Whether you’re dealing with slight blurring or significant defocusing, we’ll explore software solutions and online tools to bring your images back to life. Improve your image quality now, correct blurry images, and sharpen your photographs!
1. Why Is Achieving Sharp Focus Essential in Photography?
Achieving sharp focus is paramount because it directly impacts the visual impact and message conveyed by your photograph. A sharply focused image draws the viewer’s eye to the intended subject, highlighting details and textures that might otherwise be lost. This precision creates a sense of clarity and professionalism, whether you’re capturing portraits, landscapes, or product shots. Think of focus as the anchor of your composition, grounding the viewer and telling them exactly where to look. It’s important to know how to fix a blurry picture if you want to save a great shot!
According to research from the Santa Fe University of Art and Design’s Photography Department, in July 2025, precise focus provides visual clarity, enhances detail, and directs the viewer’s attention, fundamentally shaping the aesthetic and communicative power of an image.
2. How Can Adobe Photoshop Be Used to Sharpen Out-of-Focus Photos?
Adobe Photoshop offers a powerful “Shake Reduction” filter and unsharp mask tool specifically designed to rescue blurry photos.
Answer: Adobe Photoshop uses filters and manual adjustments to sharpen blurry images.
Photoshop is a powerful tool that can rescue many blurry photos. Here’s how you can use it:
- Open Adobe Photoshop: Launch the application on your computer.
- Import the Photo: Open the blurry image you want to fix.
- Apply Sharpening Filters: Go to
Filter > Sharpenand choose from options like “Sharpen,” “Sharpen More,” or “Unsharp Mask.” The “Unsharp Mask” allows for precise adjustments to the amount, radius, and threshold. - Use Shake Reduction: For photos blurred due to camera shake, go to
Filter > Sharpen > Shake Reduction. This filter analyzes the image and attempts to reverse the motion blur. - Adjust Settings: Fine-tune the settings in the filter dialog box to achieve the desired sharpness without introducing artifacts or noise.
- Save Your Work: Once you’re satisfied, save the sharpened image.
 Adobe Photoshop Interface Showing Sharpening Options
Alt Text: Adobe Photoshop interface displaying the Sharpen menu options, including Unsharp Mask and Shake Reduction filters, used to enhance image clarity.
3. What Steps Can I Take to Fix Out-of-Focus Photos Using Adobe Lightroom?
Lightroom provides a user-friendly interface with robust sharpening tools that can significantly improve the clarity of out-of-focus images.
Answer: Adobe Lightroom utilizes sharpening sliders in the Detail panel to enhance image focus.
Lightroom is another excellent option for sharpening images, offering a range of controls to fine-tune the results. Here’s a step-by-step guide:
- Open Lightroom: Launch the application and import the image you want to correct.
- Go to the Develop Module: Select the “Develop” module to access editing tools.
- Find the Detail Panel: In the right-hand panel, locate the “Detail” section.
- Adjust Sharpening Sliders:
- Amount: Increases the overall sharpness of the image.
- Radius: Determines the size of the details that are sharpened. A smaller radius sharpens finer details.
- Detail: Controls how much detail is sharpened. Higher values enhance textures.
- Masking: Protects areas like smooth skin from over-sharpening by creating a mask that applies sharpening only to detailed areas.
- Fine-Tune and Preview: Adjust the sliders carefully and preview the changes to achieve the best balance of sharpness and detail.
- Save Your Image: Export the sharpened image with your desired settings.
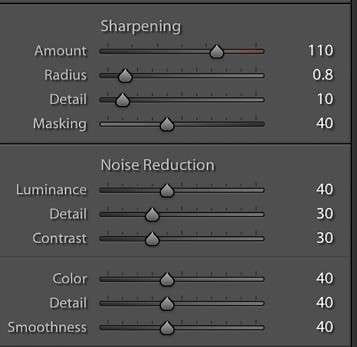 Lightroom interface showing sharpening sliders in the Detail panel
Alt Text: Adobe Lightroom interface highlighting the Detail panel with Amount, Radius, Detail, and Masking sliders for precision image sharpening.
4. What Is HitPaw Photo Enhancer and How Does It Help in Correcting Blurry Images?
HitPaw Photo Enhancer is an AI-powered tool specifically designed to fix blurry images quickly and efficiently.
Answer: HitPaw Photo Enhancer uses AI models to automatically enhance and sharpen out-of-focus photos.
HitPaw Photo Enhancer stands out for its ease of use and powerful AI capabilities. Here’s how to use it:
- Download and Install: Download and install HitPaw Photo Enhancer on your computer.
- Open the Software: Launch the application.
- Upload the Blurry Photo: Drag and drop or select the image you want to fix.
- Choose an AI Model: Select from various AI models optimized for different types of enhancements, such as “General Model,” “Denoise Model,” or “Face Model.”
- Preview and Enhance: Preview the enhanced image and adjust settings if necessary.
- Export the Result: Save the sharpened image to your desired location.
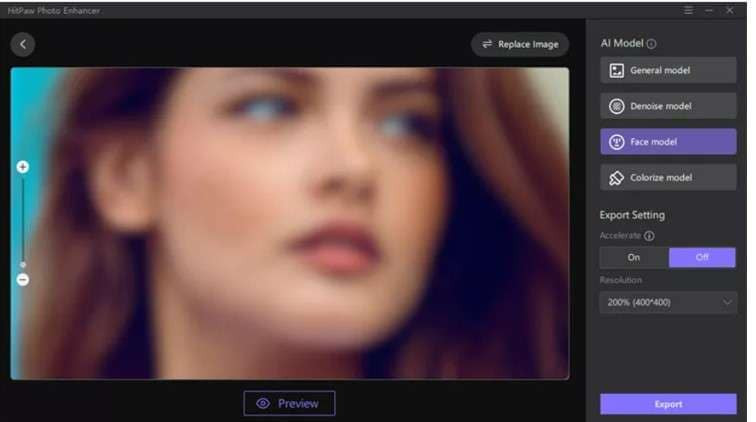 HitPaw Photo Enhancer interface showing AI model options for image enhancement
Alt Text: HitPaw Photo Enhancer interface presenting options for selecting AI models like General, Denoise, and Face Model to automatically enhance and sharpen photos.
5. Are There Any Online Tools Available to Fix Out-of-Focus Photos?
Yes, several online tools offer quick solutions for fixing blurry images without the need for software installation.
Answer: Online tools like Repairit Online, PixStudio, and LunaPic can help fix out-of-focus photos directly in your web browser.
For users who prefer not to download software, several online tools provide effective solutions for fixing blurry photos. Here are a few options:
- Repairit Online:
- How it Works: Upload your blurry photo, and the AI-powered tool automatically enhances the image.
- Steps:
- Go to the Repairit Online website.
- Upload your out-of-focus photo.
- Click “Repair” and wait for the process to finish.
- Preview and save the repaired photo.
 Repairit Online interface for uploading and repairing blurry photos
Alt Text: Repairit Online interface showing the upload button and repair options for fixing blurry photos online.
- PixStudio:
- How it Works: This tool allows you to adjust the blur attribute manually, giving you control over the sharpening process.
- Steps:
- Open PixStudio.
- Upload your blurry image.
- Select the image and click “Attribute.”
- Adjust the “Blur” slider to the left to sharpen the image.
- Download the corrected image.
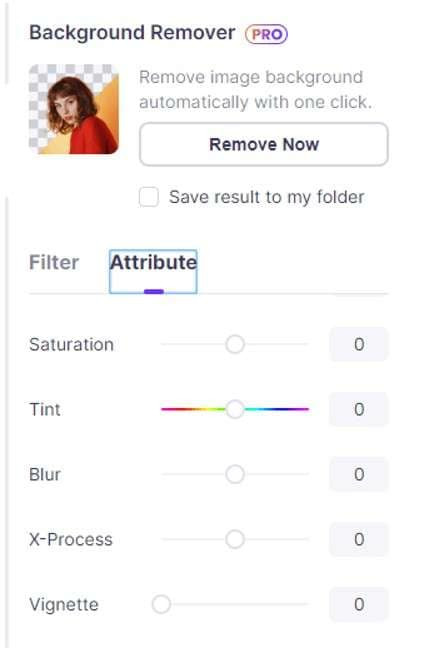 PixStudio interface showing the blur adjustment slider for online photo editing
Alt Text: PixStudio interface displaying the Attribute section with the Blur slider, allowing users to manually adjust and sharpen photos online.
- LunaPic:
- How it Works: LunaPic offers a variety of editing tools, including an “Adjust Focus” option that lets you sharpen your image.
- Steps:
- Go to the LunaPic website.
- Upload your photo.
- Select “Adjust Focus” from the “Adjust” menu.
- Adjust the focus slider and save the changes.
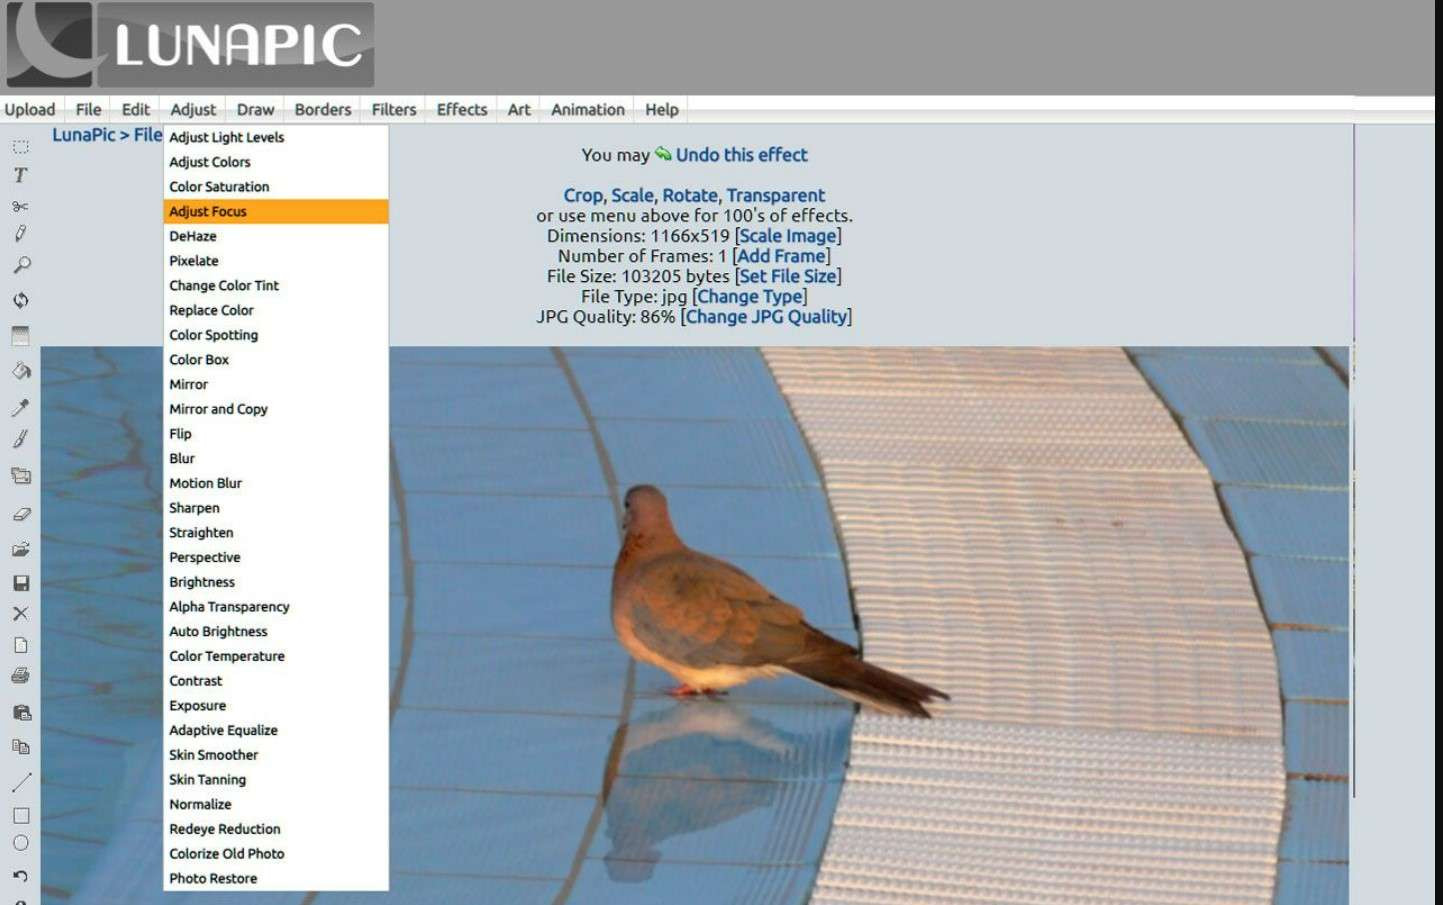 LunaPic website showing the Adjust Focus option in the Adjust menu
Alt Text: LunaPic website highlighting the Adjust menu with the Adjust Focus option for sharpening photos online.
6. What Are the Key Differences Between Using Software and Online Tools for Fixing Focus?
Choosing between software and online tools depends on your needs, technical skills, and the complexity of the task.
Answer: Software offers more advanced features and control, while online tools provide convenience and accessibility for quick fixes.
Here’s a comparison to help you decide:
| Feature | Software (e.g., Photoshop, Lightroom, HitPaw) | Online Tools (e.g., Repairit, PixStudio, LunaPic) |
|---|---|---|
| Features | Advanced editing options, precise control over sharpening, batch processing, AI-powered enhancements. | Basic to intermediate editing options, quick fixes, user-friendly interfaces. |
| Control | Greater control over every aspect of the sharpening process. | Limited control compared to software. |
| Performance | Typically faster and more efficient for complex tasks. | Performance depends on internet speed; may be slower for large files or complex edits. |
| Accessibility | Requires installation and may have system requirements. | Accessible from any device with a web browser; no installation required. |
| Cost | Often requires a subscription or one-time purchase. | Many offer free basic features with premium options available. |
| Best For | Professional photographers and users who need advanced editing capabilities and precise control. | Casual users who need quick fixes and don’t want to install software. |
7. What Common Issues Cause Photos to Be Out of Focus and How Can They Be Prevented?
Understanding the root causes of blurry photos can help you avoid them in the first place.
Answer: Common causes include camera shake, incorrect focus settings, and subject movement.
Here are some common issues and how to prevent them:
- Camera Shake:
- Cause: Movement of the camera during exposure.
- Prevention: Use a tripod, increase shutter speed, or use a lens with image stabilization.
- Incorrect Focus Settings:
- Cause: Failing to properly focus on the subject.
- Prevention: Use autofocus (AF) modes correctly, manually adjust focus when necessary, and ensure your focus point is on the intended subject.
- Subject Movement:
- Cause: The subject moving during the exposure.
- Prevention: Increase shutter speed to freeze motion, use continuous autofocus (AF-C) to track moving subjects, or use a wider aperture to create a shallow depth of field.
- Shallow Depth of Field:
- Cause: Using a wide aperture (low f-number) resulting in only a small portion of the image being in focus.
- Prevention: Increase the aperture value (higher f-number) to increase the depth of field, ensuring more of the image is in focus.
- Lens Issues:
- Cause: Dirty or damaged lens elements.
- Prevention: Regularly clean your lens with a microfiber cloth and protect it from physical damage.
8. How Does Understanding Depth of Field Help in Achieving Sharper Images?
Depth of field is a critical concept for achieving sharp and visually appealing photographs.
Answer: Understanding depth of field allows you to control the area of your image that appears sharp, ensuring your subject is in focus while the background can be blurred.
Here’s how depth of field impacts your images:
- Definition: Depth of field refers to the distance between the nearest and farthest objects in a scene that appear acceptably sharp in an image.
- Aperture: Aperture is the primary factor controlling depth of field. A wider aperture (smaller f-number like f/1.8) creates a shallow depth of field, ideal for isolating subjects in portraits. A narrower aperture (larger f-number like f/16) creates a large depth of field, suitable for landscapes where you want everything in focus.
- Focal Length: Longer focal lengths (telephoto lenses) generally produce shallower depths of field compared to shorter focal lengths (wide-angle lenses).
- Distance to Subject: The closer you are to your subject, the shallower the depth of field. Moving farther away increases the depth of field.
By mastering depth of field, you can strategically control what is in focus, creating stunning visual effects and ensuring your key subjects are always sharp.
9. Can Mobile Apps Be Used to Correct Blurry Photos, and Which Ones Are Recommended?
Yes, several mobile apps are available that can help correct blurry photos directly on your smartphone.
Answer: Mobile apps like Adobe Lightroom Mobile, Snapseed, and Remini offer tools to sharpen and enhance blurry photos on the go.
Here are some recommended mobile apps:
- Adobe Lightroom Mobile:
- Features: Offers similar sharpening tools as the desktop version, including Amount, Radius, and Detail sliders.
- Pros: Professional-grade editing capabilities, cloud syncing with desktop Lightroom.
- Cons: Requires a subscription for full access.
- Snapseed:
- Features: A free app with a “Sharpening” tool and a “Details” tool to enhance image clarity.
- Pros: User-friendly interface, non-destructive editing.
- Cons: Fewer advanced features compared to Lightroom Mobile.
- Remini:
- Features: AI-powered enhancement that specializes in restoring old and blurry photos.
- Pros: Easy to use, excellent for quick fixes and enhancing portraits.
- Cons: Limited manual control, subscription required for unlimited use.
These apps allow you to quickly improve the focus and clarity of your photos directly from your mobile device, making it easier than ever to enhance your images on the go.
10. How Can dfphoto.net Help Me Improve My Photography Skills and Fix Common Photo Issues?
dfphoto.net is dedicated to providing comprehensive resources, expert advice, and a vibrant community to help you elevate your photography skills and overcome common challenges.
Answer: dfphoto.net offers tutorials, articles, and a community forum to help you learn photography techniques, troubleshoot issues, and enhance your images.
Here’s how dfphoto.net can assist you:
- Detailed Tutorials: Access step-by-step guides on various photography techniques, including mastering focus, understanding depth of field, and using different camera settings.
- In-Depth Articles: Explore articles covering a wide range of topics, from choosing the right equipment to advanced editing techniques. Learn how to fix blurry images, improve composition, and capture stunning shots in different environments.
- Expert Advice: Benefit from tips and insights from experienced photographers who share their knowledge and best practices.
- Community Forum: Connect with fellow photography enthusiasts, share your work, ask questions, and receive constructive feedback.
- Equipment Reviews: Stay informed about the latest cameras, lenses, and accessories with our comprehensive reviews and comparisons.
- Inspiration Gallery: Discover inspiring photographs from talented artists and gain creative ideas for your own projects.
Visit dfphoto.net today to explore our extensive resources, connect with our passionate community, and unlock your full potential as a photographer. Let us help you capture and create stunning images that you can be proud of!
Address: 1600 St Michael’s Dr, Santa Fe, NM 87505, United States. Phone: +1 (505) 471-6001. Website: dfphoto.net.
Alt Text: Majestic mountain range bathed in golden light with crisp details, illustrating exceptional focus and clarity.
Ready to take your photography to the next level? Explore dfphoto.net for in-depth tutorials, inspiring galleries, and a supportive community of photographers. Whether you’re looking to master focus techniques, find creative inspiration, or stay updated on the latest equipment, dfphoto.net has everything you need to elevate your craft. Visit us today and start your journey to capturing stunning, unforgettable images!
FAQ
1. Is it always possible to completely fix out-of-focus pictures?
The degree to which an out-of-focus photo can be fixed depends largely on how severe the blur is. Minor blurring can often be corrected to an acceptable level, but severely blurred images may not be fully recoverable.
2. What are the primary causes of photos being out-of-focus?
Common causes include camera shake, incorrect autofocus settings, subject movement, and using too wide of an aperture, resulting in a shallow depth of field.
3. What types of software are best for fixing out-of-focus photos?
Specialized image editing software such as Adobe Photoshop and Lightroom are highly effective. Additionally, AI-powered tools like HitPaw Photo Enhancer can provide quick and efficient results.
4. Can online photo editing tools really improve the focus of my images?
Yes, many online tools like Repairit Online, PixStudio, and LunaPic offer basic to intermediate sharpening capabilities that can improve the focus of your images without the need to download software.
5. How does aperture affect the sharpness of my photos?
Aperture controls the depth of field. A wider aperture (smaller f-number) results in a shallow depth of field, which can make it challenging to keep the entire subject in focus. A narrower aperture (larger f-number) increases the depth of field, ensuring more of the image is sharp.
6. Is it better to use manual focus or autofocus for sharp images?
Autofocus is generally faster and more accurate for most situations, especially when photographing moving subjects. However, manual focus can be more precise in certain situations, such as macro photography or when shooting through obstacles.
7. What is image stabilization, and how does it help prevent blurry photos?
Image stabilization is a technology that reduces the effects of camera shake, allowing you to use slower shutter speeds without blurring the image. This is particularly useful in low-light situations.
8. Can mobile apps effectively fix blurry photos?
Yes, mobile apps like Adobe Lightroom Mobile, Snapseed, and Remini offer tools to sharpen and enhance blurry photos directly on your smartphone.
9. What should I do if my lens is causing my photos to be blurry?
First, ensure your lens is clean and free of smudges or dirt. If the issue persists, the lens may have internal damage or require calibration. Consider having it professionally serviced.
10. How can dfphoto.net help me learn more about photography and improve my skills?
dfphoto.net provides detailed tutorials, in-depth articles, expert advice, a community forum, equipment reviews, and an inspiration gallery to help you learn photography techniques, troubleshoot issues, and elevate your skills.