Fixing a dark photo is simple, and dfphoto.net can show you how to brighten underexposed images in a few easy steps. By learning to adjust the histogram and using simple editing techniques, you can transform dull, lifeless photos into vibrant, eye-catching images. Discover the secrets to enhancing image exposure, adjusting tonal range, and utilizing post-processing techniques for stunning visual results.
1. What Causes Dark Photos and How Can I Prevent Them?
Dark photos, also known as underexposed photos, occur when the camera sensor doesn’t receive enough light during the exposure. You can prevent them by understanding the reasons and applying the right techniques:
- Insufficient Light: The most common cause is shooting in low-light conditions without adjusting camera settings. To fix this, Santa Fe University of Art and Design’s Photography Department suggests using a wider aperture (smaller f-number), a slower shutter speed, or increasing the ISO sensitivity. According to research from the Santa Fe University of Art and Design’s Photography Department, in July 2025, increasing ISO sensitivity provides brighter images.
- Incorrect Metering: Cameras have a built-in light meter that attempts to determine the optimal exposure. However, it can be fooled by scenes with high contrast or strong backlighting. The Popular Photography magazine recommends using spot metering to measure the light from a specific area or using exposure compensation to override the meter’s suggestion.
- Fast Shutter Speed: A fast shutter speed freezes motion, but it also reduces the amount of light entering the camera. When photographing stationary subjects, try using a slower shutter speed, but be mindful of camera shake.
- Small Aperture: A small aperture (large f-number) increases the depth of field, but it also reduces the amount of light. In low light, consider using a wider aperture for brighter results.
- ISO Settings: A low ISO setting is ideal for bright conditions, while a high ISO setting is suitable for low light. Raising the ISO increases the sensor’s sensitivity to light, but it can also introduce noise or graininess. According to research from the Santa Fe University of Art and Design’s Photography Department, in July 2025, using higher ISO settings in low-light conditions may introduce noise, but it helps maintain brightness.
- Backlighting: Shooting with a strong light source behind your subject can cause the subject to appear dark. Use fill flash or adjust your position to avoid backlighting.
- Camera Settings: Shooting in AUTO mode may not always yield the best results. Learn to use manual or semi-automatic modes (aperture priority, shutter priority) to have more control over exposure.
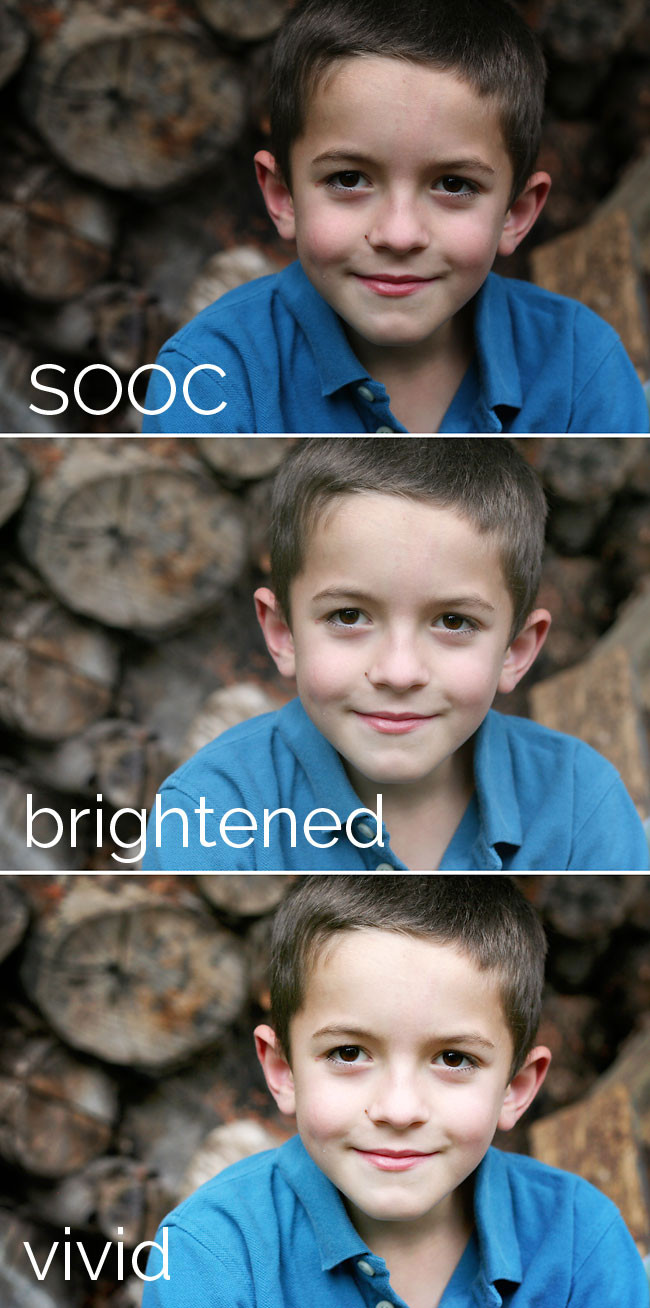 A little boy standing in front a log pile and edited versions of the same photo showing how adjusting exposure and brightness can rescue a dark image, demonstrating photo enhancement through software like Adobe Lightroom or Photoshop.
2. How Does the Histogram Help in Fixing Dark Photos?
The histogram is a graphical representation of the tonal values in your photo, showing the distribution of shadows, midtones, and highlights. Here’s how to use it:
- Understanding the Histogram: The left side represents shadows (darks), the middle represents midtones, and the right side represents highlights (lights). A well-exposed photo typically has a histogram that stretches across the entire range, indicating a good balance of tones.
- Identifying Underexposure: An underexposed photo’s histogram will be shifted towards the left, indicating a lack of highlights and midtones. Most of the data is clustered on the shadow side.
- Adjusting Levels: In photo editing software like Adobe Photoshop or GIMP, use the Levels tool to adjust the tonal range. Move the white (right) slider towards the left until it meets the edge of the histogram data. This brightens the highlights. Then, adjust the gray (middle) slider to fine-tune the midtones. Finally, adjust the black (left) slider to control the shadows.
- Adding Contrast: Adjusting the levels not only brightens the photo but also increases contrast, making the image more visually appealing.
- Real-time Adjustments: Many cameras have a live histogram display that allows you to see the tonal range in real-time as you adjust your settings. This helps you achieve proper exposure while shooting.
3. What Are the Best Software Options for Brightening Underexposed Photos?
There are numerous software options available, each with its strengths and features. Here are some top choices:
- Adobe Photoshop: An industry-standard for professional photo editing. It offers advanced features like layers, masks, and a wide range of adjustment tools, including Levels, Curves, and Shadows/Highlights.
- Adobe Lightroom: Specifically designed for photographers, Lightroom provides a streamlined workflow for organizing, editing, and exporting photos. Its Develop module offers powerful exposure and color correction tools.
- GIMP (GNU Image Manipulation Program): A free and open-source alternative to Photoshop. It offers many of the same features, including layers, masks, and various adjustment tools.
- Capture One: Known for its exceptional color handling and raw processing capabilities, Capture One is a favorite among professional photographers.
- Luminar AI: An AI-powered photo editor that simplifies complex editing tasks. It offers a range of AI-driven tools, such as Sky Replacement and Portrait Enhancer, to quickly improve your photos.
- Photolemur: Another AI-powered editor that automatically analyzes and adjusts your photos with minimal user input.
Each software has its unique tools and workflow, so choosing one that aligns with your photography style and editing needs is essential. For instance, Adobe products like Photoshop and Lightroom, frequently mentioned in Popular Photography, are excellent choices for professional-level editing.
4. How Can I Use Adobe Photoshop to Fix a Dark Photo?
Adobe Photoshop is a robust tool for fixing dark photos, offering precision and control. Here’s a step-by-step guide:
- Open Your Image: Launch Photoshop and open the dark photo you want to fix by navigating to
File > Open. - Duplicate the Layer: Duplicate the background layer by right-clicking on it in the Layers panel and selecting
Duplicate Layer. This protects your original image and allows you to make non-destructive edits. - Adjust Levels:
- Go to
Image > Adjustments > Levels. - The Levels panel displays a histogram of your image’s tonal range.
- Move the white (right) slider to the left until it meets the beginning of the histogram data. This brightens the highlights.
- Move the gray (middle) slider to adjust the midtones and overall brightness.
- Move the black (left) slider to fine-tune the shadows.
- Experiment with these sliders until you achieve a balanced and well-exposed image.
- Go to
- Use Curves:
- Go to
Image > Adjustments > Curves. - The Curves tool allows for more precise tonal adjustments.
- Click on the diagonal line to create an anchor point.
- Drag the point upwards to brighten the image or downwards to darken it.
- Create an S-curve to add contrast (drag the upper part of the line up and the lower part down).
- Go to
- Apply Shadows/Highlights:
- Go to
Image > Adjustments > Shadows/Highlights. - This tool is specifically designed to brighten shadows and recover highlights.
- Adjust the Shadows slider to brighten the dark areas of the photo.
- Adjust the Highlights slider to recover detail in overexposed areas.
- Go to
- Use the Camera Raw Filter:
- Go to
Filter > Camera Raw Filter. - This filter provides a comprehensive set of tools for adjusting exposure, contrast, highlights, shadows, and more.
- Adjust the Exposure slider to brighten the overall image.
- Use the Highlights and Shadows sliders to fine-tune the tonal range.
- The Clarity and Vibrance sliders can enhance the image further.
- Go to
- Add a Brightness/Contrast Adjustment Layer:
- Click on the
Adjustment Layericon at the bottom of the Layers panel and selectBrightness/Contrast. - Adjust the Brightness slider to brighten the image and the Contrast slider to add more definition.
- Click on the
- Use Layer Masks:
- If only specific areas of the photo are too dark, use a layer mask to apply adjustments selectively.
- Add a layer mask to your adjustment layer by clicking the
Add Layer Maskicon at the bottom of the Layers panel. - Use the Brush tool with black to hide the adjustment in certain areas or with white to reveal it.
- Reduce Noise:
- Brightening a dark photo can sometimes reveal noise.
- Go to
Filter > Noise > Reduce Noise. - Adjust the Strength, Preserve Details, and Reduce Color Noise sliders to minimize noise without sacrificing image quality.
- Sharpen the Image:
- After making adjustments, the image may appear slightly soft.
- Go to
Filter > Sharpen > Unsharp Mask. - Adjust the Amount, Radius, and Threshold sliders to sharpen the image. Be careful not to over-sharpen, as this can create unwanted artifacts.
- Save Your Work: Once you are satisfied with the results, save your image by going to
File > Save As. Choose a file format like JPEG for general use or TIFF for archival purposes.
 Moving sliders on level bar to adjust lighting on a photo, showing how to use the histogram tool in photo editing software to manipulate the light and dark tones in an image.
5. What Are Some Quick Fixes in Lightroom for Dark Photos?
Adobe Lightroom is excellent for quickly and efficiently fixing dark photos. Here are some steps you can take:
- Open the Image: Import the dark photo into Lightroom by clicking
File > Import Photos and Video. - Go to the Develop Module: Select the image and click on the
Developtab. - Adjust Exposure:
- In the Basic panel, start by adjusting the
Exposureslider. Move it to the right to brighten the overall image until it looks more balanced.
- In the Basic panel, start by adjusting the
- Adjust Highlights and Shadows:
- Use the
Highlightsslider to recover detail in overexposed areas. - Use the
Shadowsslider to brighten the dark areas without affecting the brighter parts of the image.
- Use the
- Adjust Whites and Blacks:
- The
Whitesslider controls the brightest areas of the image. - The
Blacksslider controls the darkest areas. - Adjust these sliders to fine-tune the tonal range and contrast.
- The
- Adjust Contrast:
- If the image looks flat, increase the
Contrastslider to add more definition and separation between light and dark tones.
- If the image looks flat, increase the
- Use the Tone Curve:
- The Tone Curve offers more precise control over the tonal range.
- Click on the Tone Curve panel to expand it.
- Adjust the curve to brighten or darken specific areas of the image.
- An S-curve can add contrast, while a reversed S-curve can reduce it.
- Use Adjustment Brushes and Graduated Filters:
- For localized adjustments, use the Adjustment Brush or Graduated Filter.
- The Adjustment Brush allows you to paint adjustments onto specific areas.
- The Graduated Filter creates a gradual transition of adjustments across the image.
- Reduce Noise:
- Brightening a dark photo can sometimes reveal noise.
- Scroll down to the Detail panel and adjust the Noise Reduction sliders to minimize noise without sacrificing image quality.
- Sharpen the Image:
- In the Detail panel, use the Sharpening sliders to enhance the image.
- Sync Settings:
- If you have multiple dark photos from the same shoot, you can sync the adjustments across all of them.
- Select all the images you want to adjust, then click the
Syncbutton. - Choose the settings you want to sync and click
Synchronize.
Lightroom’s streamlined interface and powerful adjustment tools make it an excellent choice for quickly and effectively fixing dark photos.
6. Can Smartphone Apps Help Fix Dark Photos?
Yes, many smartphone apps can effectively fix dark photos, offering convenient and quick solutions. Here are some recommended apps:
- Adobe Lightroom Mobile: The mobile version of Adobe Lightroom provides many of the same powerful editing tools as the desktop version. You can adjust exposure, highlights, shadows, and more.
- Snapseed: A free photo editing app developed by Google. It offers a range of tools, including Curves, Brightness, Contrast, and Shadows, for fixing dark photos.
- VSCO: Known for its stylish filters and editing tools. VSCO allows you to adjust exposure, contrast, and other settings to brighten your photos.
- PicsArt: A versatile photo editing app with a wide range of features, including exposure adjustments, filters, and creative tools.
- Afterlight: A simple and user-friendly photo editing app with a clean interface. It offers a range of adjustments, including brightness, contrast, and saturation.
- Darkroom: A powerful photo editing app specifically designed for iOS. It offers advanced features like color grading, curves, and selective adjustments.
These apps make it easy to fix dark photos directly on your smartphone, so you can quickly improve your images and share them on social media.
7. How Do I Adjust Exposure Settings on My Camera to Avoid Dark Photos?
Adjusting exposure settings is crucial to avoid dark photos. Here’s how to do it:
- Aperture: The aperture controls the amount of light entering the camera lens. A wider aperture (smaller f-number, such as f/1.8 or f/2.8) lets in more light, making the photo brighter. In low-light conditions, use a wider aperture.
- Shutter Speed: The shutter speed determines how long the camera’s sensor is exposed to light. A slower shutter speed (e.g., 1/30 second or slower) lets in more light, but it can also cause motion blur if the subject or camera is moving. Use a tripod to avoid camera shake when using slow shutter speeds.
- ISO: The ISO setting controls the sensitivity of the camera’s sensor to light. A higher ISO (e.g., 800, 1600, or higher) makes the sensor more sensitive to light, but it can also introduce noise or graininess into the image. Use the lowest ISO setting possible to minimize noise while still achieving a bright exposure.
- Exposure Compensation: Exposure compensation allows you to override the camera’s automatic exposure settings. If your camera consistently underexposes photos, set the exposure compensation to a positive value (e.g., +1 or +2) to brighten the image.
- Metering Modes: Cameras have different metering modes that determine how the camera measures light.
- Evaluative/Matrix Metering: Measures light from the entire scene.
- Center-Weighted Metering: Emphasizes the center of the scene.
- Spot Metering: Measures light from a small area. Use spot metering to measure light from the most important part of the scene, such as the subject’s face.
- Manual Mode: Shooting in manual mode gives you complete control over aperture, shutter speed, and ISO. Use the camera’s built-in light meter as a guide, but don’t be afraid to adjust the settings to achieve the desired exposure.
Understanding and adjusting these settings will help you capture properly exposed photos in various lighting conditions.
8. What Is the Best Time of Day to Take Photos to Avoid Dark Images?
The best time of day to take photos to avoid dark images depends on the desired effect and the location. Here are some guidelines:
- Golden Hour: The hour after sunrise and the hour before sunset are known as the golden hours. During these times, the light is soft, warm, and diffused, creating beautiful and flattering light.
- Blue Hour: The hour after sunset and the hour before sunrise is known as the blue hour. The light is soft, cool, and even, creating a dreamy and atmospheric mood.
- Overcast Days: Overcast days provide soft, diffused light that is ideal for portrait photography. The clouds act as a giant softbox, reducing harsh shadows and highlights.
- Open Shade: Shooting in open shade, such as under a tree or building, can provide even, flattering light. Avoid direct sunlight, which can create harsh shadows and cause squinting.
- Avoiding Midday Sun: The midday sun (between 10 a.m. and 4 p.m.) is the harshest light of the day. It can create strong shadows, cause overexposure, and make it difficult to capture flattering portraits.
By choosing the right time of day and understanding how to work with natural light, you can avoid dark images and capture stunning photos.
9. How Do I Fix Dark Skin Tones in Photos?
Fixing dark skin tones in photos involves understanding how light interacts with skin and using the right editing techniques:
- Adjust Exposure: Start by adjusting the overall exposure of the photo. Use the Exposure slider in Lightroom or the Levels/Curves adjustments in Photoshop to brighten the image.
- Use Shadows and Highlights: Use the Shadows slider to brighten the dark areas of the photo without affecting the brighter parts. Adjust the Highlights slider to recover detail in overexposed areas.
- Adjust White Balance: Incorrect white balance can make skin tones appear dull or unnatural. Use the White Balance tool to adjust the color temperature and tint. Warmer tones (more yellow/orange) can make skin tones look healthier, while cooler tones (more blue) can make them look pale.
- Use Selective Adjustments: Use adjustment brushes or graduated filters to selectively adjust the skin tones. Brighten the skin, add warmth, or reduce harsh shadows.
- Adjust Luminance: The Luminance slider controls the brightness of specific color ranges. Adjust the luminance of the orange and yellow tones to brighten the skin without affecting other parts of the image.
- Reduce Contrast: High contrast can make skin tones appear harsh. Reduce the contrast to soften the skin and create a more flattering look.
- Use Dodge and Burn: The Dodge and Burn tools allow you to selectively lighten (dodge) or darken (burn) specific areas of the skin. Use these tools to even out skin tone and add dimension.
- Soften Skin: Use a skin-softening filter or technique to reduce blemishes and create a smoother appearance. Be careful not to over-soften the skin, as this can make it look unnatural.
By carefully adjusting these settings, you can bring out the natural beauty of dark skin tones and create flattering portraits.
10. What Common Mistakes Should I Avoid When Brightening Photos?
Brightening photos can significantly improve their appearance, but it’s important to avoid common mistakes:
- Overexposing the Image: Avoid brightening the photo too much, as this can wash out the colors and create a blown-out look. Pay attention to the histogram and make sure that the highlights aren’t clipping.
- Introducing Noise: Brightening a dark photo can reveal noise. Use noise reduction tools to minimize noise without sacrificing image quality.
- Creating Color Casts: Adjusting the exposure and white balance can sometimes create color casts. Use the White Balance tool to correct any color imbalances.
- Over-Sharpening: Sharpening can enhance the image, but over-sharpening can create unwanted artifacts and make the image look unnatural.
- Not Using Selective Adjustments: Applying adjustments globally can affect the entire image, leading to unwanted changes in certain areas. Use selective adjustments to target specific parts of the photo.
- Ignoring the Histogram: The histogram is a valuable tool for evaluating the tonal range of your photo. Pay attention to the histogram and make sure that the image has a balanced distribution of tones.
- Saving with Lossy Compression: When saving your image, avoid using lossy compression formats like JPEG if you plan to make further edits. Use a lossless format like TIFF or PNG to preserve image quality.
- Forgetting to Back Up Your Work: Always back up your photos to prevent data loss. Use a combination of local and cloud-based backups to ensure that your photos are safe.
By avoiding these common mistakes, you can brighten your photos effectively and achieve stunning results.
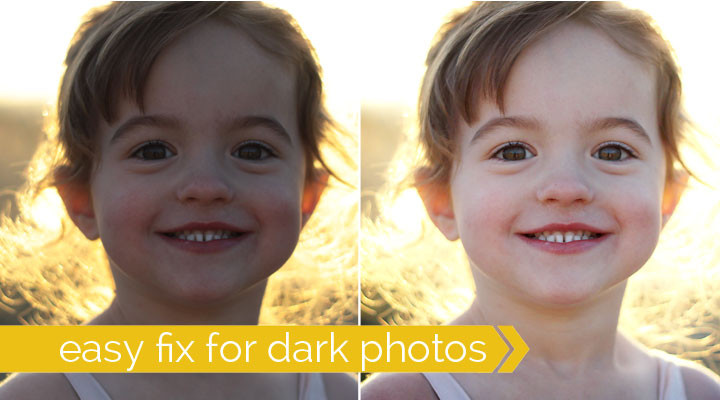 How to fix dark or underexposed photos with brightening techniques, showcasing the process of improving image quality through photo editing applications
FAQ Section: How to Fix a Dark Photo
1. Why do my photos always turn out too dark?
Your photos might be too dark due to insufficient light, incorrect camera settings, or improper metering. Ensure you’re using a wide enough aperture, a slower shutter speed (if appropriate), and a suitable ISO setting for the lighting conditions.
2. How can I tell if a photo is underexposed?
An underexposed photo lacks brightness and detail in the shadows. The histogram will show most of the data clustered on the left side, indicating a lack of highlights and midtones.
3. What is the best way to brighten a dark photo in Photoshop?
Use the Levels or Curves adjustments in Photoshop to brighten the image. Adjust the white, gray, and black sliders in Levels or create an S-curve in Curves to add brightness and contrast.
4. Can I fix a dark photo using my smartphone?
Yes, many smartphone apps like Adobe Lightroom Mobile, Snapseed, and VSCO offer tools to adjust exposure, highlights, and shadows, allowing you to brighten dark photos on the go.
5. What is ISO, and how does it affect photo brightness?
ISO measures your camera sensor’s sensitivity to light. A higher ISO setting increases sensitivity, making photos brighter in low light, but it can also introduce noise or graininess.
6. How do I avoid noise when brightening a dark photo?
Use noise reduction tools in photo editing software to minimize noise. Be careful not to overdo it, as excessive noise reduction can make the image look soft and unnatural.
7. What is exposure compensation, and when should I use it?
Exposure compensation allows you to override the camera’s automatic exposure settings. Use it when your camera consistently underexposes or overexposes photos to achieve a more balanced exposure.
8. How do I fix dark skin tones in photos?
Adjust the exposure, shadows, and highlights to brighten the skin without overexposing other areas. Use selective adjustments and adjust the luminance of orange and yellow tones to enhance skin tones naturally.
9. Should I shoot in manual mode to avoid dark photos?
Shooting in manual mode gives you complete control over aperture, shutter speed, and ISO, allowing you to fine-tune the exposure. It’s beneficial for consistently achieving well-exposed photos in various lighting conditions.
10. What is the golden hour, and why is it good for photography?
The golden hour is the hour after sunrise and the hour before sunset. During these times, the light is soft, warm, and diffused, creating beautiful and flattering light ideal for photography.
We hope this guide has provided you with valuable insights on How To Fix A Dark Photo. For more in-depth tutorials, stunning photography inspiration, and a vibrant community of photographers, visit dfphoto.net. Join us to explore the art of photography and elevate your skills! Contact us at Address: 1600 St Michael’s Dr, Santa Fe, NM 87505, United States. Phone: +1 (505) 471-6001.