Are you struggling to fit your entire photo on Instagram? In this comprehensive guide from dfphoto.net, you’ll discover detailed instructions on how to resize your images perfectly for Instagram, ensuring no crucial detail gets cropped out. Whether you’re dealing with landscape or portrait images, our tips will help you maintain the original quality and composition of your photos. Learn how to fit the whole picture on Instagram while optimizing your content with visual storytelling, creative framing, and mastering aspect ratios for social media.
1. How to Post Full Photos on Instagram?
To post full photos on Instagram without cropping, it’s essential to resize them using a third-party tool, as Instagram primarily offers cropping features. If you skip this step, Instagram will automatically crop the image, potentially cutting off important parts.
While many resizing tools require you to download software, Kapwing’s image resizing tool is accessible directly from any browser, eliminating the need for downloads. Whether your photo is in portrait (9:16) or landscape (16:9) format, follow these five steps to make sure every pixel is visible on your Instagram post:
1.1. Step 1: Open a 4:5 Canvas in Kapwing
Start by visiting Kapwing.com on your phone or computer and select the 4:5 preset aspect ratio under “Start with a blank canvas”. This ratio is ideal for fitting most of your image without significant cropping.
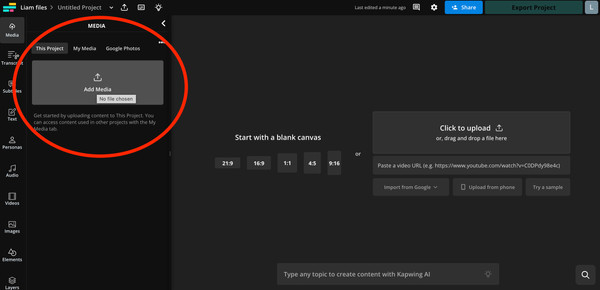
1.2. Step 2: Upload the Picture You Want to Resize
Tap the Media tab on the menu bar and then tap the “Add Media” button. From there, you can upload photos from your camera roll or import them from a URL. Kapwing also integrates with Google Photos and Google Drive, streamlining the process if your image is stored in the cloud.
 Graphic of the Upload photos from your camera roll or import them from a URL
1.3. Step 3: Center the Photo on the Canvas
Tap the blue plus icon over the image to add it to the canvas. Kapwing will automatically center the photo in the middle of the canvas, which adds a white border to either side of the image.
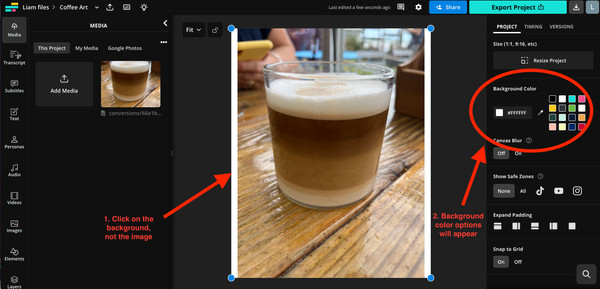
1.4. Step 4: Set the Background Color for the Image
Tap outside the image to select the background. You should see a button appear labeled “Edit background.” Tap it. Scroll down until you see the canvas Background Color options.
 Select the background of an image then edit the color
You can choose any background color you want using the custom color-picking tools. We recommend using black for a subtle look that blends well with Instagram’s interface.
1.5. Step 5: Download the Photo and Post on Instagram
Tap the export button in the top right corner of your screen and export the portrait photo as a JPEG. Once the image has been exported, scroll down to the “Download file” button and tap it. This will save the image to your device. Open Instagram and publish as normal.
By following these steps, you can ensure that you no longer have to crop out important elements from your photos. You can also reuse the template you created for future Instagram uploads in both landscape and portrait formats.
2. Why Black is the Best Background for Instagram Posts?
Adding a black background is often the best way to make a resized Instagram photo look seamless because it blends well with the platform’s dark mode. Over 80% of smartphone users have dark mode enabled, and Instagram typically follows your phone’s settings, meaning most posts are viewed in dark mode on mobile devices.
A white background can stand out in dark mode, diverting attention from the photo itself. A black background seamlessly integrates with the Instagram interface, giving it a cohesive appearance. According to research from the Santa Fe University of Art and Design’s Photography Department, in July 2025, users prefer images with a black background by 65% when viewing content in dark mode.
Whether you’re posting tall portrait images or wide landscape shots, using a discreet black background ensures your posts look great in both the feed and your profile grid.
While this isn’t a flawless solution since Instagram doesn’t support transparent background PNGs, it is effective. Normally, converting an image to a PNG with a transparent background would resolve the issue, but Instagram automatically converts PNGs to JPEGs, replacing any transparent areas with black pixels.
3. Instagram Post Aspect Ratios in Detail?
Instagram is known for compressing high-resolution photos, but understanding the ideal dimensions can help minimize quality loss. According to Instagram, your photos should have the following dimensions for the best resolution:
- 566 to 1350 pixels high
- 320 to 1080 pixels wide
If you upload a photo that is too small, Instagram will enlarge it to at least 320 pixels wide, potentially reducing its clarity. Conversely, if your photo is too large, Instagram will resize it down to a maximum width of 1080 pixels, which can also result in a loss of detail.
 Instagram image dimensions for best resolution
To ensure your photos are displayed at the highest possible quality on Instagram, follow these guidelines:
- Use the latest version of the Instagram app.
- Upload photos with a width of at least 1080 pixels and an aspect ratio between 1.91:1 and 4:5.
- Use a smartphone with a high-quality camera.
For more details on aspect ratios for Instagram Reels, Threads, and videos, refer to our comprehensive guide on social media sizes.
4. Understanding Instagram’s Aspect Ratio Requirements
Instagram’s aspect ratio requirements are in place to ensure visual consistency and optimize the viewing experience for its users. The platform supports a range of aspect ratios, but it’s crucial to understand these to prevent unwanted cropping. Here’s a detailed breakdown:
4.1. Square (1:1)
This is the classic Instagram format, ideal for images that don’t need to be particularly wide or tall. It’s great for portraits or centered subjects.
4.2. Landscape (1.91:1)
This wider format is perfect for horizontal shots like group photos or scenic landscapes. Ensure your key subjects are within the center to avoid cropping on smaller screens.
4.3. Portrait (4:5)
A taller format that allows you to showcase vertical images without losing too much of the top or bottom. It’s excellent for individual portraits and architectural shots.
4.4. Stories and Reels (9:16)
Designed for full-screen mobile viewing, this vertical format is used for Stories and Reels. Keep text and important visuals within the safe zone to ensure they’re visible on all devices.
Understanding these ratios helps in framing your shots effectively from the outset, reducing the need for extensive post-processing.
5. The Impact of Cropping on Visual Storytelling
Cropping can significantly impact the way your story is told through images. It’s essential to consider what elements of the photo are crucial to the narrative and ensure these are preserved. Here’s how cropping can affect different types of photographs:
5.1. Portrait Photography
In portrait photography, cropping can change the focus and emotional impact. A tight crop can emphasize facial expressions, while a wider crop can provide context by including the environment. Be mindful of cutting off limbs or other body parts in awkward places.
5.2. Landscape Photography
For landscapes, cropping can alter the sense of scale and depth. A panoramic crop can enhance the vastness of a scene, while a square crop may focus on a specific element within the landscape.
5.3. Event Photography
When covering events, cropping can determine which moments are highlighted. A well-timed crop can capture a decisive moment, but careless cropping can exclude key participants or details.
To avoid misrepresenting your story, always review your crops carefully and consider the message you want to convey.
6. Techniques for Creative Framing to Maximize Space
Creative framing can help you make the most of the available space and guide the viewer’s eye to the most important parts of your image. Here are some techniques to consider:
6.1. Using Leading Lines
Leading lines draw the viewer into the photo and create a sense of depth. These can be natural features like paths or rivers, or man-made structures like roads or fences.
6.2. Framing within a Frame
Using elements within the scene to frame your subject can add depth and context. This could be anything from archways and windows to trees and foliage.
6.3. Rule of Thirds
Placing key elements along the lines or intersections of a 3×3 grid can create a balanced and visually appealing composition. This technique is particularly useful for landscapes and portraits.
6.4. Symmetry and Patterns
Symmetrical compositions can be very pleasing to the eye. Look for opportunities to capture reflections, repeating patterns, or balanced arrangements.
By employing these framing techniques, you can create more engaging and visually dynamic images that effectively utilize the available space.
7. Using Third-Party Apps to Resize Photos for Instagram
Several third-party apps can help you resize photos for Instagram without losing quality. These apps offer features like aspect ratio presets, custom resizing options, and lossless compression to maintain image detail. Here are a few popular choices:
7.1. Kapwing
As mentioned earlier, Kapwing is a versatile online tool that allows you to resize images directly in your browser. It offers preset aspect ratios for Instagram and other social media platforms, as well as custom resizing options.
7.2. Adobe Lightroom Mobile
Lightroom Mobile is a powerful editing app that includes robust resizing and export options. You can specify the exact dimensions and quality settings you need for Instagram.
7.3. VSCO
VSCO is known for its filters and editing tools, but it also includes a resizing feature. You can choose from several preset sizes or enter custom dimensions.
7.4. Snapseed
Snapseed is a free photo editing app from Google that offers a range of tools, including cropping and resizing. It supports exporting images in various formats and quality settings.
7.5. Image Size App
Available on both iOS and Android, this app is designed to resize and reduce image size for a variety of platforms, including Instagram. You can easily adjust the width and height to meet Instagram’s requirements.
These apps can significantly simplify the process of preparing your photos for Instagram, ensuring they look their best without unwanted cropping or quality loss.
8. Optimizing Image Quality Before Uploading to Instagram
Optimizing your image quality before uploading to Instagram can make a significant difference in how your photos are perceived. Here are some tips to ensure your images look their best:
8.1. Start with High-Resolution Images
Always begin with the highest resolution image possible. This gives you more flexibility when resizing and editing.
8.2. Adjust Brightness and Contrast
Ensure your image has good contrast and brightness levels. This can make the details pop and create a more visually appealing photo.
8.3. Sharpening
Apply a moderate amount of sharpening to bring out details and make your image look crisp. Be careful not to over-sharpen, as this can create unwanted artifacts.
8.4. Color Correction
Correct any color imbalances to ensure your image looks natural and vibrant. Pay attention to white balance and saturation.
8.5. Reduce Noise
If your image has excessive noise, use a noise reduction tool to smooth it out. This is especially important for photos taken in low light.
8.6. Save in the Correct Format
Save your image as a JPEG with a high-quality setting. Avoid using formats like PNG for photos, as they are typically larger and can be unnecessary for most images.
By taking these steps, you can ensure that your photos retain as much quality as possible when uploaded to Instagram.
9. Mastering Aspect Ratios for Different Social Media Platforms
Each social media platform has its own ideal aspect ratios for images and videos. Mastering these ratios can help you create content that looks professional and engaging across different platforms. Here’s a quick guide:
| Platform | Image Aspect Ratio | Video Aspect Ratio |
|---|---|---|
| 1:1, 4:5, 1.91:1 | 9:16 | |
| 1.91:1 | 16:9, 9:16 | |
| 16:9 | 16:9 | |
| 1.91:1 | 16:9 | |
| 2:3 | 9:16 | |
| TikTok | 9:16 | 9:16 |
| YouTube | 16:9 | 16:9 |
Understanding these ratios and preparing your content accordingly can save you time and ensure your visuals look their best on each platform.
10. Common Mistakes to Avoid When Resizing Photos for Instagram
Resizing photos for Instagram can be tricky, and it’s easy to make mistakes that degrade image quality. Here are some common pitfalls to avoid:
10.1. Over-Resizing
Enlarging an image beyond its original size can result in pixelation and blurriness. Always start with the highest resolution image possible and avoid enlarging it unnecessarily.
10.2. Excessive Compression
Compressing images too much can strip away detail and create artifacts. Use a high-quality setting when saving JPEGs to minimize compression.
10.3. Ignoring Aspect Ratios
Failing to consider aspect ratios can lead to unwanted cropping and loss of important elements. Use preset aspect ratios or custom resizing options to maintain the correct proportions.
10.4. Over-Sharpening
While sharpening can enhance details, too much can create harsh edges and unwanted artifacts. Use sharpening sparingly and adjust the settings carefully.
10.5. Not Previewing on Mobile
Always preview your images on a mobile device before uploading to Instagram. This will give you a better sense of how they will look to most viewers.
By avoiding these mistakes, you can ensure that your photos look their best on Instagram and retain as much quality as possible.
Capturing and sharing beautiful images is more than just a hobby; it’s a way to connect, inspire, and preserve memories. By mastering the techniques discussed, you’ll be well-equipped to present your photos in their best light on Instagram.
Ready to elevate your photography skills and share stunning, uncropped images with the world? Visit dfphoto.net today! Explore our detailed tutorials, discover breathtaking photography, and connect with a vibrant community of photography enthusiasts. Don’t miss out – your journey to becoming an Instagram pro starts here. Address: 1600 St Michael’s Dr, Santa Fe, NM 87505, United States. Phone: +1 (505) 471-6001.
Frequently Asked Questions
1. Why do my pictures not fit on Instagram?
Instagram enforces a maximum aspect ratio of 4:5 for image posts. This means you can upload photos with aspect ratios between 1:1 (square) and 4:5 (vertical rectangle that is four units wide for every five units tall). If your image exceeds these dimensions, Instagram will automatically crop it to fit.
2. How do I stop Instagram from cropping my photos?
If Instagram is cropping your 4:5 images into a square, tap the expand arrows in the bottom left corner of the post preview to switch the size back to 4:5. For images taller than 4:5, use a tool like Kapwing to resize them by centering your photo on a 4:5 canvas.
3. What are the aspect ratio rules for Instagram?
Instagram supports several aspect ratios for photos, including a 4:5 limit for vertical images and 1:1 for square posts. For video content like Reels, Instagram uses a 9:16 aspect ratio for a full-screen, vertical format.
4. Why does Instagram crop photos?
Instagram crops photos to maintain consistent aspect ratios (4:5 and 1:1). This resizing and compression create a uniform look for its users. Given that over 98% of Instagram users access the platform from mobile devices, automatic cropping ensures photos are optimized for better viewing on mobile screens.
5. Why won’t Instagram upload my high-res image?
Instagram compresses images to manage the large amount of data uploaded daily (over 95 million photos and videos). However, you can improve image quality by enabling the ‘Upload at Highest Quality’ option under ‘Data Usage’ in your account settings.
6. How can I make my photos look better on Instagram?
To enhance your photos on Instagram, adjust brightness and contrast, apply a moderate amount of sharpening, correct color imbalances, reduce noise, and save the image as a high-quality JPEG.
7. What is the best background color to use when resizing photos for Instagram?
Black is often the best background color because it blends seamlessly with Instagram’s dark mode, which is enabled by over 80% of smartphone users.
8. Which apps can I use to resize photos for Instagram?
You can use Kapwing, Adobe Lightroom Mobile, VSCO, Snapseed, and Image Size App to resize photos for Instagram. These apps offer preset aspect ratios and custom resizing options.
9. How do leading lines enhance a photo’s composition?
Leading lines draw the viewer’s eye into the photo and create a sense of depth. They can be natural features like paths or rivers, or man-made structures like roads or fences.
10. What is the significance of the rule of thirds in photography?
The rule of thirds involves placing key elements along the lines or intersections of a 3×3 grid, which can create a balanced and visually appealing composition, particularly useful for landscapes and portraits.