Finding your recently deleted photos doesn’t have to be a headache; dfphoto.net is here to provide a seamless recovery process for your precious memories. This guide offers simple steps for various devices, ensuring you can recover accidentally deleted photos and videos efficiently and offering tips and tricks to prevent future data loss. Discover more photography tips and tricks on dfphoto.net.
1. Understanding Photo Deletion and Recovery
1.1. What Happens When You Delete a Photo?
When you delete a photo from your smartphone, computer, or cloud storage, it isn’t immediately gone forever. Instead, it’s typically moved to a “Recently Deleted” or “Trash” folder. This provides a safety net, allowing you to recover the photo if you change your mind or realize you deleted it by mistake. According to the Santa Fe University of Art and Design’s Photography Department, in July 2025, understanding this process significantly increases the chances of successful photo recovery. These folders are designed to temporarily store deleted files before they are permanently erased, giving users a window of opportunity to restore them.
1.2. Why Photos Get Deleted
Photos can be deleted for various reasons, ranging from accidental taps to intentional actions that are later regretted. Common causes include:
- Accidental Deletion: Perhaps the most frequent cause, accidental deletions occur when users mistakenly tap the delete button while browsing their gallery.
- Storage Management: In an effort to free up space on devices with limited storage, users might delete photos without realizing their sentimental value.
- Software Glitches: Although rare, software bugs can sometimes cause photos to disappear or be deleted unexpectedly.
- Intentional Deletion Followed by Regret: Sometimes, users delete photos in the heat of the moment, only to later regret their decision and wish to recover the lost images.
1.3. The Importance of Quick Action
The key to successful photo recovery is acting quickly. Most devices and platforms only keep deleted photos in the “Recently Deleted” folder for a limited time, usually 30 days. After this period, the photos are permanently deleted and become much harder to recover. As Popular Photography magazine highlighted in their 2024 article on digital archiving, regular backups and swift action after accidental deletion are crucial for preserving your photographic memories.
2. Recovering Deleted Photos on Different Devices
2.1. iPhone and iPad
2.1.1. Steps to Recover Photos
Recovering deleted photos on an iPhone or iPad is straightforward, thanks to the “Recently Deleted” album in the Photos app. Here’s how to do it:
- Open the Photos App: Locate and open the Photos app on your iPhone or iPad.
- Go to Albums: Tap the “Albums” tab at the bottom of the screen.
- Find Recently Deleted: Scroll down to the “Utilities” section and tap on the “Recently Deleted” album.
- Unlock the Album (if required): In iOS 16 and later, you may need to use Face ID, Touch ID, or your passcode to unlock the “Recently Deleted” album for added security.
- Select Photos: Tap “Select” in the upper-right corner of the screen.
- Choose Photos to Recover: Tap on the photos you want to recover. A blue checkmark will appear on each selected photo.
- Recover: Tap the “Recover” button at the bottom-right corner.
- Confirm: Tap “Recover Photo” to confirm the action. The recovered photos will be restored to their original locations in your photo library.
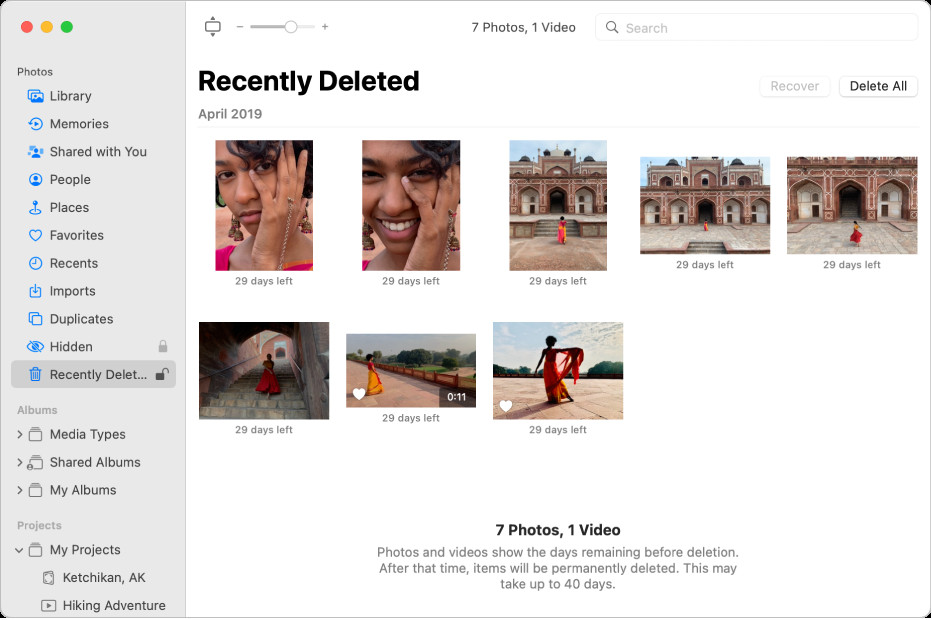 iPhone Recently Deleted Album
Alt text: The Photos window showing Recently Deleted selected in the sidebar and recently deleted items on the right.
2.1.2. What if the Photos Aren’t in the “Recently Deleted” Album?
If you can’t find your deleted photos in the “Recently Deleted” album, they may have been permanently deleted. This usually happens after the 30-day retention period or if you manually emptied the “Recently Deleted” album. In such cases, you might still be able to recover them using an iCloud backup or a third-party data recovery tool, as described in later sections.
2.2. Android Devices
2.2.1. Using Google Photos
Many Android devices use Google Photos as their primary photo management app. Here’s how to recover deleted photos using Google Photos:
- Open Google Photos: Launch the Google Photos app on your Android device.
- Go to Library: Tap the “Library” tab at the bottom of the screen.
- Find Trash: Tap on “Trash” (or “Bin” on some devices).
- Select Photos: Touch and hold the photos you want to recover.
- Restore: Tap the “Restore” button at the bottom of the screen. The recovered photos will be returned to your Google Photos library.
2.2.2. Recovering from the Gallery App
Some Android devices have their own gallery apps in addition to Google Photos. These apps often have a “Recently Deleted” or “Trash” folder similar to iOS.
- Open the Gallery App: Launch the default gallery app on your Android device.
- Look for “Recently Deleted” or “Trash”: Check the app’s menu or album list for a “Recently Deleted” or “Trash” folder.
- Select Photos: Open the folder and select the photos you want to recover.
- Restore: Tap the “Restore” button. The photos will be restored to their original location in your gallery.
2.3. Windows Computers
2.3.1. Checking the Recycle Bin
When you delete a photo on a Windows computer, it typically goes to the Recycle Bin. Here’s how to recover it:
- Open the Recycle Bin: Double-click the Recycle Bin icon on your desktop.
- Locate Deleted Photos: Browse the files in the Recycle Bin to find your deleted photos. You can sort by date deleted to find the most recent deletions quickly.
- Restore Photos: Right-click on the photos you want to recover and select “Restore.” The photos will be returned to their original folder.
2.3.2. Using File History
If you have enabled File History on your Windows computer, you can recover previous versions of your files, including photos.
- Open Control Panel: Search for “Control Panel” in the Start menu and open it.
- Go to System and Security: Click on “System and Security.”
- Open File History: Click on “File History.”
- Restore Personal Files: Click on “Restore personal files” in the left pane.
- Browse for Photos: Navigate to the folder where the deleted photos were stored. You can browse through different versions of the folder using the arrow buttons.
- Restore: Select the photos you want to recover and click the “Restore” button. The photos will be restored to their original location.
2.4. Mac Computers
2.4.1. Checking the Trash
Similar to Windows, deleted photos on a Mac are usually sent to the Trash. Here’s how to recover them:
- Open the Trash: Click the Trash icon in the Dock.
- Locate Deleted Photos: Browse the files in the Trash to find your deleted photos.
- Restore Photos: Drag the photos you want to recover out of the Trash and onto your desktop or into a folder. Alternatively, you can right-click on the photos and select “Put Back.”
2.4.2. Using Time Machine
If you use Time Machine to back up your Mac, you can recover files even after they have been permanently deleted from your computer or iCloud.
- Open Time Machine: Click the Time Machine icon in the menu bar and select “Enter Time Machine.”
- Navigate to the Folder: Use the timeline on the right side of the screen to navigate to a date before the photos were deleted.
- Find Photos: Navigate to the folder where the deleted photos were stored.
- Restore: Select the photos you want to recover and click the “Restore” button. The photos will be restored to their original location.
3. Recovering Photos from Cloud Storage
3.1. iCloud Photos
3.1.1. Steps to Recover Photos
iCloud Photos automatically keeps every photo and video you take in iCloud, so you can access your library from any device. When you delete a photo, it goes to the “Recently Deleted” album, where it stays for 30 days.
- Go to iCloud.com: Open a web browser and go to iCloud.com.
- Sign In: Sign in with your Apple ID and password.
- Open Photos: Click on the “Photos” icon.
- Go to Recently Deleted: Click the “Recently Deleted” album in the sidebar. If you don’t see the sidebar, click the sidebar icon.
- Select Photos: Select the photos you want to recover.
- Recover: Click “Recover.” The photos will be restored to your iCloud Photos library and synced to your devices.
3.1.2. What if the Photos Aren’t in the “Recently Deleted” Album?
If the photos are not in the “Recently Deleted” album, they have been permanently deleted from iCloud. In this case, you may need to restore from a backup, if available.
3.2. Google Photos
3.2.1. Steps to Recover Photos
Google Photos also has a “Trash” folder where deleted photos are stored for a limited time.
- Open Google Photos: Launch the Google Photos app or go to photos.google.com in a web browser.
- Go to Trash: Click on “Trash” in the left sidebar or tap “Library” and then “Trash” in the app.
- Select Photos: Select the photos you want to recover.
- Restore: Click “Restore.” The photos will be restored to your Google Photos library.
3.2.2. What if the Photos Aren’t in the “Trash”?
If the photos are not in the “Trash,” they have been permanently deleted. You may need to check if you have a backup or use a third-party data recovery tool.
3.3. Dropbox
3.3.1. Steps to Recover Photos
Dropbox also retains deleted files for a certain period, depending on your subscription plan.
- Go to Dropbox Website: Open a web browser and go to dropbox.com.
- Sign In: Sign in to your Dropbox account.
- Go to Deleted Files: Click on “Deleted files” in the left sidebar.
- Select Photos: Select the photos you want to recover.
- Restore: Click “Restore.” The photos will be restored to your Dropbox account.
3.3.2. What if the Photos Aren’t in the “Deleted Files”?
If the photos are not in the “Deleted files,” they may have been permanently deleted. Contact Dropbox support for assistance or consider using a data recovery tool.
4. Advanced Recovery Methods
4.1. Using Data Recovery Software
If you can’t find your deleted photos in the “Recently Deleted” folder, Trash, or Recycle Bin, you can try using data recovery software. These tools scan your device’s storage for traces of deleted files and attempt to recover them. Some popular options include:
- Recuva: A free and easy-to-use data recovery tool for Windows.
- EaseUS Data Recovery Wizard: A powerful data recovery tool available for Windows and Mac.
- Disk Drill: A comprehensive data recovery tool for Mac with a user-friendly interface.
- Stellar Data Recovery: A reliable data recovery tool for Windows and Mac, capable of recovering various file types.
4.2. Restoring from Backups
Regular backups are your best defense against permanent data loss. If you have a recent backup of your device, you can restore it to recover your deleted photos.
- iCloud Backup: If you use an iPhone or iPad and have iCloud Backup enabled, you can restore your device from a recent backup.
- Google Backup: Android devices can back up data to Google Drive. You can restore your device from a Google Backup to recover deleted photos.
- Time Machine Backup: Mac users can use Time Machine to create regular backups of their system. You can restore your Mac from a Time Machine backup to recover deleted photos.
- Windows Backup: Windows offers various backup options, including File History and System Image Backup. You can use these tools to restore your computer from a backup and recover deleted photos.
4.3. Consulting a Professional
In some cases, data recovery can be complex and require specialized knowledge. If you are unable to recover your deleted photos using the methods described above, you may want to consult a professional data recovery service. These services have advanced tools and expertise to recover data from damaged or corrupted storage devices.
5. Tips to Prevent Future Photo Loss
5.1. Regular Backups
The most effective way to prevent permanent photo loss is to create regular backups of your devices and cloud storage accounts. Automate backups to ensure your photos are always safe.
5.2. Double-Check Before Deleting
Before deleting any photos, take a moment to double-check that you no longer need them. This simple step can prevent accidental deletions and save you the hassle of recovery.
5.3. Organize Your Photos
Organizing your photos into albums and folders can help you keep track of your files and reduce the risk of accidental deletion. Use descriptive names and tags to make it easier to find and manage your photos.
5.4. Use Cloud Storage
Cloud storage services like iCloud Photos, Google Photos, and Dropbox offer automatic syncing and backup features. By storing your photos in the cloud, you can access them from any device and protect them from loss due to device damage or theft.
5.5. Enable “Ask Before Delete”
Some devices and apps have an option to enable a confirmation prompt before deleting files. This can help prevent accidental deletions by requiring you to confirm your action before a photo is deleted.
6. Understanding Photo Storage Options
6.1. Local Storage vs. Cloud Storage
- Local Storage: Refers to storing photos directly on your device, such as a smartphone, computer, or external hard drive.
- Cloud Storage: Involves storing photos on remote servers managed by a third-party provider, such as Apple (iCloud Photos), Google (Google Photos), or Dropbox.
6.2. Benefits of Cloud Storage
- Accessibility: Access your photos from any device with an internet connection.
- Backup: Automatic backup of your photos, protecting them from device loss or damage.
- Sharing: Easily share photos with friends and family.
- Organization: Advanced features for organizing and managing your photo library.
6.3. Benefits of Local Storage
- Privacy: Greater control over your data and privacy.
- Offline Access: Access your photos even without an internet connection.
- Cost: No recurring subscription fees (unless using an external hard drive).
7. Exploring Advanced Photo Management Techniques
7.1. Using Metadata
Metadata is information embedded in your photo files, such as the date, time, location, and camera settings. Properly managing metadata can help you organize and search for your photos more efficiently.
- Adding Tags: Use tags to categorize your photos by subject, event, or location.
- Using Keywords: Add keywords to your photos to make them easier to find in searches.
- Editing EXIF Data: Edit EXIF data to correct any inaccuracies or add additional information.
7.2. Photo Editing Software
Photo editing software can help you enhance your photos and correct any flaws. Some popular options include:
- Adobe Photoshop: A professional-grade photo editing software with a wide range of features.
- Adobe Lightroom: A photo management and editing software designed for photographers.
- GIMP: A free and open-source photo editing software with many of the same features as Photoshop.
- Capture One: A professional photo editing software known for its color handling capabilities.
7.3. Creating Photo Albums
Creating photo albums is a great way to organize your photos and tell stories. You can create digital photo albums using photo management software or cloud storage services, or you can create physical photo albums using printed photos.
8. The Future of Photo Storage and Recovery
8.1. AI-Powered Photo Recovery
Artificial intelligence (AI) is playing an increasingly important role in photo recovery. AI-powered tools can analyze damaged or corrupted photo files and attempt to reconstruct them, even if they are severely damaged.
8.2. Blockchain-Based Photo Storage
Blockchain technology is being used to create secure and decentralized photo storage solutions. These platforms offer enhanced privacy and security, as your photos are stored on a distributed network rather than a central server.
8.3. Quantum Computing and Data Recovery
Quantum computing has the potential to revolutionize data recovery. Quantum computers can perform complex calculations much faster than traditional computers, which could lead to more effective data recovery methods.
9. dfphoto.net: Your Photography Resource
At dfphoto.net, we are dedicated to providing you with the latest tips, tricks, and techniques to enhance your photography skills. Whether you’re an amateur enthusiast or a seasoned professional, our comprehensive resources cover everything from basic camera settings to advanced photo editing techniques.
9.1. Explore Our Extensive Guides
Dive into our detailed guides on various photography topics, including:
- Mastering Composition: Learn how to create visually appealing and balanced photographs.
- Understanding Lighting: Discover the nuances of natural and artificial light to capture stunning images.
- Advanced Editing Techniques: Perfect your photos with our in-depth tutorials on Adobe Photoshop and Lightroom.
9.2. Join Our Vibrant Community
Connect with fellow photographers from around the globe, share your work, and get inspired. Our community forums are a great place to ask questions, offer advice, and participate in exciting photography challenges.
9.3. Stay Updated with the Latest Trends
Keep up with the latest trends in photography, from innovative camera technology to groundbreaking editing software. Our blog features articles, reviews, and interviews with industry experts, ensuring you’re always in the know.
10. FAQ: How to Find Your Recently Deleted Photos
10.1. Where Do Deleted Photos Go on My iPhone?
Deleted photos on an iPhone go to the “Recently Deleted” album in the Photos app. They remain there for 30 days before being permanently deleted.
10.2. How Can I Recover Permanently Deleted Photos on Android?
Recovering permanently deleted photos on Android can be challenging. You can try using data recovery software or restoring from a backup if you have one.
10.3. How Long Do Photos Stay in the Recycle Bin on Windows?
Photos stay in the Recycle Bin on Windows until you manually empty it or until they are automatically deleted based on your Recycle Bin settings.
10.4. Can I Recover Photos Deleted from iCloud After 30 Days?
No, photos deleted from iCloud are permanently deleted after 30 days and cannot be recovered from the “Recently Deleted” album.
10.5. Is It Possible to Recover Photos Deleted from an SD Card?
Yes, it is possible to recover photos deleted from an SD card using data recovery software.
10.6. What Is the Best Data Recovery Software for Photos?
Some popular data recovery software options for photos include Recuva, EaseUS Data Recovery Wizard, and Disk Drill.
10.7. How Can I Prevent Accidental Photo Deletion?
To prevent accidental photo deletion, double-check before deleting, organize your photos, and enable “Ask Before Delete” if available.
10.8. How Do I Backup My Photos to the Cloud?
You can back up your photos to the cloud using services like iCloud Photos, Google Photos, and Dropbox.
10.9. What Should I Do If My Photos Are Corrupted?
If your photos are corrupted, you can try using photo repair software or consult a professional data recovery service.
10.10. How Can I Find My Photos Quickly?
You can find your photos quickly by organizing them into albums, adding tags and keywords, and using the search function in your photo management app.
Losing photos can be a distressing experience, but with the right knowledge and tools, you can often recover your precious memories. Remember to act quickly, use the appropriate recovery methods, and take steps to prevent future data loss. For more photography tips, techniques, and resources, visit dfphoto.net today. Our address is 1600 St Michael’s Dr, Santa Fe, NM 87505, United States. You can also reach us at Phone: +1 (505) 471-6001. Website: dfphoto.net.
