Finding lost photos can be frustrating, but don’t worry! This guide from dfphoto.net provides a comprehensive approach to locating your missing images, whether you’re a professional photographer or just enjoy capturing memories. We’ll explore various recovery methods, delve into cloud storage solutions, and offer preventative measures to ensure your precious photos are always safe. Let’s explore photo recovery strategies, cloud storage management, and camera roll organization together.
1. Understanding Where Your Photos Could Be
The first step in recovering lost photos is understanding where they might have gone. Let’s explore common scenarios where photos disappear:
- Accidental Deletion: Photos can be unintentionally deleted from your device or cloud storage.
- Hidden Albums: Some devices and apps allow you to hide photos, making them appear lost.
- Cloud Storage Issues: Problems with iCloud, Google Photos, or other cloud services can cause photos to be unavailable.
- Device Malfunctions: Hardware or software issues on your phone, camera, or computer can lead to photo loss.
- Forgotten Backups: Photos might be stored in old backups that you’ve forgotten about.
- Incorrect Account Login: Being logged into the wrong account on a device or cloud service can make photos seem missing.
2. Check the Recently Deleted or Recycle Bin Album
One of the first places to check when looking for lost photos is the Recently Deleted or Recycle Bin album on your device or in your cloud storage service.
2.1 What is the Recently Deleted Album?
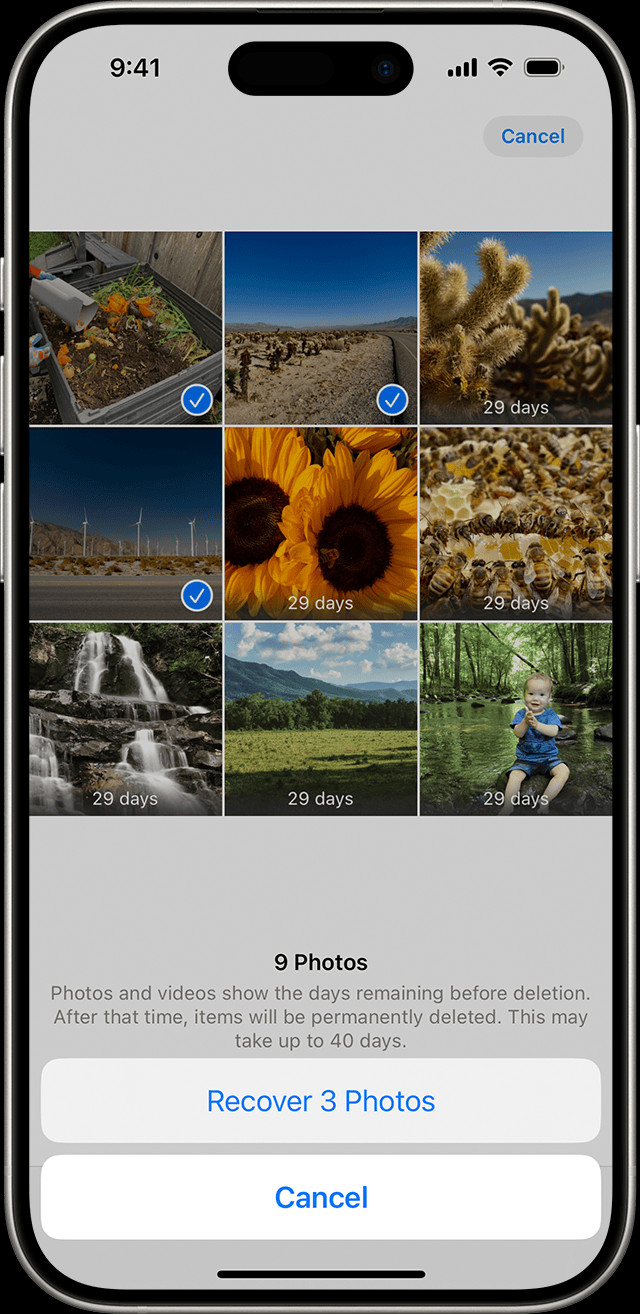
The Recently Deleted album is a temporary storage location for photos and videos that have been deleted from your device. Items in this album are typically kept for 30 days before being permanently deleted. This provides a window of opportunity to recover accidentally deleted photos.
2.2 How to Access the Recently Deleted Album on Different Devices
Here’s how to access the Recently Deleted album on various devices and platforms:
2.2.1 On Your iPhone or iPad
- Open the Photos app.
- Scroll down to the Utilities section and tap Recently Deleted.
- You may need to use Face ID or Touch ID to unlock the album.
- Browse the photos and videos in the album.
- To recover a photo, tap it, then tap Recover. To recover multiple photos, tap Select, choose the photos, tap the More button (…), and then tap Recover.
 The Recently Deleted album in Photos on iPhone
2.2.2 On Your Mac
- Open Photos.
- In the sidebar, find the Utilities section and select Recently Deleted.
- Use Touch ID or your login password to unlock the album.
- Select the photo or video you want to recover.
- Click Recover.
2.2.3 On iCloud.com
- Go to iCloud.com and sign in with your Apple Account.
- Click Photos.
- In the sidebar, select Recently Deleted. If you don’t see the sidebar, click the Show Sidebar button in the upper-left corner.
- Select a photo, then click Recover.
2.2.4 On Your Apple Vision Pro
- Open Photos, then tap Collections in the sidebar.
- Scroll down and tap Recently Deleted in the Utilities section.
- Tap View Album, then use Optic ID or your passcode to unlock your Recently Deleted album.
- Tap and hold a photo or video, then tap Recover. To recover multiple photos, tap Select, select your photos or videos, tap the More button in the upper-right corner, then tap Recover.
- Tap Recover to confirm.
2.3 What Happens After 30 Days?
Photos and videos in the Recently Deleted album are permanently deleted after 30 days. Once this happens, they cannot be recovered from the album, making it essential to check this location promptly when you realize photos are missing.
3. How to Unhide Photos on Your Device
Photos can sometimes appear to be missing because they have been hidden. Most devices and photo management apps have a feature that allows you to hide photos from the main view, moving them to a separate hidden album.
3.1 What is the Hidden Album?
The Hidden album is a special folder on your device where you can store photos and videos that you don’t want to be immediately visible. This feature is useful for keeping personal or sensitive photos out of sight without deleting them.
3.2 How to Unhide Photos on Different Devices
Here’s how to unhide photos on various devices:
3.2.1 On Your iPhone or iPad
- Open the Photos app.
- Scroll down to the Utilities section and tap Hidden.
- You may need to use Face ID or Touch ID to unlock the album.
- Select the photo or video that you want to unhide.
- Tap the More button (…), then tap Unhide.
3.2.2 On Your Mac
- Open Photos.
- In the menu bar, click View, then select Show Hidden Photo Album.
- In the sidebar, select Hidden, then click View Album.
- In macOS Ventura or later, use Touch ID or your login password to unlock the album.
- Select the photo or video that you want to unhide.
- Control-click the photo, then choose Unhide Photo. You can also choose Image > Unhide Photo from the menu bar, or press Command-L.
3.2.3 On iCloud.com
- Go to iCloud.com and sign in with your Apple Account.
- Click Photos.
- Select Hidden in the sidebar, then click Show Hidden Photos. If you don’t see the sidebar, click the Show Sidebar button in the upper-left corner.
- Select a photo, click the More button (…), then click Unhide.
3.2.4 On Your Vision Pro
- Open Photos, then tap Collections in the sidebar.
- Scroll down and tap Hidden in the Utilities section.
- Tap View Album, then use Optic ID or enter your passcode to unlock your Hidden album.
- Tap and hold a thumbnail, then tap Unhide. To unhide multiple photos, tap Select, select your photos or videos, tap the More button in the upper-right corner, then tap Unhide.
3.3 Why Photos Might Be Hidden
Photos might be hidden for several reasons:
- Privacy: To keep sensitive photos out of sight.
- Organization: To declutter the main photo library.
- Accidental Hiding: Photos may have been hidden accidentally.
4. Ensuring iCloud Photos is Enabled
iCloud Photos is a service that automatically syncs your photos and videos across all your Apple devices. Ensuring that iCloud Photos is turned on is crucial for keeping your photos safe and accessible.
4.1 How iCloud Photos Works
When iCloud Photos is enabled, all the photos and videos you take on your iPhone, iPad, or Mac are automatically uploaded to iCloud. This means that if you lose or damage one device, your photos are still safe in the cloud and can be accessed from any other device where you’re signed in with the same Apple ID.
4.2 How to Enable iCloud Photos on Different Devices
Here’s how to enable iCloud Photos on your devices:
4.2.1 On Your iPhone or iPad
- Go to Settings > [Your Name], then tap iCloud.
- Tap Photos.
- Turn on Sync this [Device].
4.2.2 On Your Mac
- Open Photos, then choose Photos > Settings (or Preferences) from the menu bar.
- Click the iCloud tab.
- Select iCloud Photos.
4.2.3 On Your Vision Pro
- Go to Settings > [Your Name], then tap iCloud.
- Tap Photos.
- Turn on Sync this Apple Vision Pro.
4.3 What to Do After Enabling iCloud Photos
After enabling iCloud Photos, it might take some time for your photos and videos to upload to iCloud, especially if you have a large library. Make sure your device is connected to Wi-Fi and plugged into a power source to speed up the process. Once the upload is complete, you can access your photos from any device logged in with your Apple ID.
5. Checking Your iCloud Shared Photo Library
The iCloud Shared Photo Library, introduced with iOS 16.1 and iPadOS 16.1, allows you to share photos and videos with up to five other people. If you’re using this feature, some photos might only appear in certain library views.
5.1 How the iCloud Shared Photo Library Works
The iCloud Shared Photo Library allows you and your chosen participants to contribute, edit, and share photos and videos in a collaborative space. This library is separate from your personal library, and you can switch between the two views as needed.
5.2 Switching Between Personal and Shared Libraries
Here’s how to switch between your Personal Library and Shared Library on your iPhone or iPad:
- Open the Photos app.
- Tap the profile button in the upper-right corner.
- Choose Both Libraries, Personal Library, or Shared Library in the Library View Options section.
In Both Libraries or Shared Library view, photos in the Shared Library are marked with the Shared Library icon, while photos in the Personal Library are marked with the Personal Library icon.
5.3 Why Photos Might Be in the Shared Library
Photos might be in the Shared Library if you or another participant intentionally moved them there. This could be for collaborative projects, shared events, or simply to share memories with family and friends.
6. Verifying You Are Signed In With the Correct Apple ID
To ensure your photos and videos stay up to date on all your devices, it’s crucial to sign in to iCloud with the same Apple ID on every device. Using different Apple IDs on different devices can lead to confusion and the appearance of missing photos.
6.1 How to Check Your Apple ID
Here’s how to check which Apple ID you’re using on your devices:
6.1.1 On Your iPhone, iPad, or Vision Pro
- Go to Settings.
- Tap [Your Name] at the top of the screen.
- You’ll see your name and email address. Your email address is your Apple ID.
6.1.2 On Your Mac
- Click the Apple menu in the upper-left corner of the screen.
- Select System Preferences or System Settings.
- Click Apple ID.
- You’ll see your name and email address. Your email address is your Apple ID.
6.2 What to Do If You’re Using Different Apple IDs
If you find that you’re using different Apple IDs on your devices, sign out of the incorrect Apple ID and sign in with the correct one. This will ensure that all your devices are syncing with the same iCloud account and that your photos and videos are accessible across all devices.
7. Third-Party Photo Recovery Software
When the above methods fail, third-party photo recovery software can be a lifesaver. These tools are designed to scan your device’s storage for deleted files and attempt to recover them.
7.1 Popular Photo Recovery Software Options
Several reputable photo recovery software options are available:
- EaseUS Data Recovery Wizard: Known for its user-friendly interface and high success rate.
- Recuva: A free option that’s effective for recovering deleted files.
- Stellar Photo Recovery: Offers advanced scanning capabilities and supports various file formats.
- Disk Drill: A comprehensive data recovery tool that can recover photos from various storage devices.
7.2 How to Use Photo Recovery Software
The general steps for using photo recovery software are:
- Download and install the software on your computer.
- Connect the device or storage medium containing the lost photos to your computer.
- Launch the software and select the device or storage medium to scan.
- Start the scan and wait for the software to find deleted files.
- Preview the recoverable photos and select the ones you want to recover.
- Choose a location to save the recovered photos.
- Recover the photos.
7.3 Precautions When Using Recovery Software
- Act quickly: The sooner you use recovery software after deleting photos, the higher the chance of successful recovery.
- Avoid writing new data: Do not save new files to the device or storage medium containing the lost photos, as this can overwrite the deleted files and make them unrecoverable.
- Use a reliable tool: Choose reputable software to avoid malware or further data loss.
8. Checking Cloud Services Like Google Photos and Dropbox
If you use cloud services like Google Photos or Dropbox to back up your photos, make sure to check these platforms for your missing images.
8.1 How to Check Google Photos
- Go to Google Photos and sign in with your Google Account.
- Browse your photos and albums.
- Check the Trash or Bin for deleted photos.
- If you find your photos in the Trash, select them and click Restore.
8.2 How to Check Dropbox
- Go to Dropbox and sign in with your account.
- Browse your files and folders.
- Check the Deleted files section for deleted photos.
- If you find your photos in the Deleted files, select them and click Restore.
8.3 Benefits of Using Cloud Services for Photo Backup
- Automatic Backup: Photos are automatically backed up to the cloud, ensuring they’re safe even if your device is lost or damaged.
- Accessibility: You can access your photos from any device with an internet connection.
- Storage Space: Cloud services offer ample storage space, allowing you to store large photo libraries.
9. Checking Your Computer’s Hard Drive
If you transferred photos to your computer and they seem to be missing, there are several places you can check on your hard drive.
9.1 How to Search for Photos on Your Computer
- Use the search function: On Windows, use the search bar in File Explorer. On macOS, use Spotlight Search.
- Search by file name: If you remember the file names of the missing photos, enter them into the search bar.
- Search by file type: Use file extensions like
.jpg,.png,.tiff, or.rawto search for photos of specific formats. - Check common photo storage locations: Look in folders like Pictures, Downloads, and Desktop.
9.2 How to Use the Recycle Bin (Windows) or Trash (macOS)
- Open the Recycle Bin (Windows) or Trash (macOS).
- Browse the files for your missing photos.
- Select the photos you want to recover.
- Click Restore (Windows) or Put Back (macOS) to move the photos back to their original locations.
9.3 Tips for Organizing Photos on Your Computer
- Create a clear folder structure: Organize your photos into folders by date, event, or project.
- Use descriptive file names: Name your photos in a way that makes it easy to identify them.
- Regularly back up your photos: Use an external hard drive or cloud service to back up your photo library.
10. Checking SD Cards and External Storage
Photos can often be lost when they are stored on SD cards or external storage devices. These devices are prone to corruption, accidental deletion, and physical damage.
10.1 How to Check SD Cards
- Connect the SD card to your computer using a card reader.
- Open File Explorer (Windows) or Finder (macOS).
- Browse the SD card for your missing photos.
- Check for hidden files: In File Explorer, click View and select Hidden items. In Finder, press Command + Shift + . to show hidden files.
10.2 How to Check External Hard Drives and USB Drives
- Connect the external hard drive or USB drive to your computer.
- Open File Explorer (Windows) or Finder (macOS).
- Browse the drive for your missing photos.
- Use the search function to search for specific files or file types.
10.3 Troubleshooting SD Card Issues
- Try a different card reader: The card reader may be faulty.
- Clean the SD card contacts: Use a soft, dry cloth to clean the gold contacts on the SD card.
- Run a disk check: Use the disk check utility on your computer to scan for and repair errors on the SD card.
- Use data recovery software: If the SD card is corrupted, use data recovery software to attempt to recover your photos.
11. Contacting Professional Data Recovery Services
When all other methods fail, contacting professional data recovery services is a viable option. These services specialize in recovering data from damaged or corrupted storage devices.
11.1 Benefits of Using Professional Data Recovery Services
- Expertise: Professional data recovery services have the expertise and tools to recover data from a wide range of storage devices and data loss scenarios.
- Advanced Equipment: They use advanced equipment and techniques to recover data from physically damaged devices.
- Higher Success Rate: Professional services often have a higher success rate than DIY methods.
11.2 How to Choose a Data Recovery Service
- Check reviews and testimonials: Look for a service with positive reviews and a good reputation.
- Ask about their success rate: Find out what their success rate is for recovering data from devices similar to yours.
- Inquire about their data recovery process: Understand the steps they take to recover data and how they ensure the confidentiality of your data.
- Get a quote: Get a quote for the data recovery service and understand the payment terms.
11.3 What to Expect From a Data Recovery Service
- Initial Consultation: Discuss your data loss situation with the service provider.
- Device Evaluation: They will evaluate the damaged device to determine the extent of the damage and the feasibility of data recovery.
- Data Recovery Process: They will use specialized tools and techniques to recover your data.
- Data Verification: They will verify the recovered data to ensure its integrity.
- Data Delivery: They will deliver the recovered data to you on a new storage device.
12. Preventing Future Photo Loss
Preventing photo loss is always better than trying to recover lost photos. Here are some tips to help you protect your precious memories:
12.1 Regularly Back Up Your Photos
- Use multiple backup methods: Combine local backups (external hard drives) with cloud backups (iCloud, Google Photos, Dropbox) for redundancy.
- Automate your backups: Set up automatic backups to ensure your photos are regularly backed up without you having to manually initiate the process.
12.2 Organize Your Photos Effectively
- Create a clear folder structure: Organize your photos into folders by date, event, or project.
- Use descriptive file names: Name your photos in a way that makes it easy to identify them.
- Tag your photos: Use tags or keywords to make it easier to search for specific photos.
12.3 Use Cloud Storage Services
- Enable automatic uploads: Configure your cloud storage service to automatically upload photos from your devices.
- Check your storage limits: Make sure you have enough storage space to accommodate your growing photo library.
- Regularly review your cloud storage: Periodically review your cloud storage to ensure your photos are properly backed up and organized.
12.4 Handle Storage Devices Carefully
- Protect SD cards and external hard drives: Store them in a safe place to prevent physical damage.
- Eject storage devices properly: Always eject storage devices properly to prevent data corruption.
- Avoid exposing storage devices to extreme temperatures: Extreme temperatures can damage storage devices and lead to data loss.
12.5 Be Careful When Deleting Photos
- Double-check before deleting: Always double-check that you’re deleting the correct photos before pressing the delete button.
- Use the Recently Deleted album: Take advantage of the Recently Deleted album to recover accidentally deleted photos.
- Consider hiding photos instead of deleting them: If you’re not sure whether you want to delete a photo, consider hiding it instead.
13. Understanding Photo File Formats
Understanding photo file formats can help you better manage and recover your photos. Different file formats have different characteristics, such as image quality, file size, and compatibility.
13.1 Common Photo File Formats
- JPEG (.jpg): A widely used format that offers good image quality and small file sizes. It’s suitable for most everyday photos.
- PNG (.png): A lossless format that preserves image quality and supports transparency. It’s ideal for graphics, logos, and images with text.
- TIFF (.tiff): A high-quality lossless format that’s often used for professional photography and archival purposes.
- RAW (.raw): An uncompressed format that contains all the data captured by the camera sensor. It offers the most flexibility for editing and post-processing.
13.2 How File Formats Affect Recovery
- Lossy vs. Lossless: Lossy formats like JPEG compress images by discarding some data, which can make recovery more challenging. Lossless formats like PNG and TIFF preserve all image data, making recovery easier.
- File Size: Larger file sizes (e.g., RAW) may require more advanced recovery tools and techniques.
- Fragmentation: Over time, files can become fragmented on storage devices, which can complicate the recovery process.
13.3 Converting File Formats
- Use photo editing software: Programs like Adobe Photoshop, Lightroom, and GIMP can convert photos between different file formats.
- Use online converters: Several online tools can convert photos between different file formats quickly and easily.
- Consider the implications of conversion: Converting from a lossless format to a lossy format can result in a loss of image quality.
14. Utilizing Camera Roll Organization
Effective camera roll organization can prevent photos from getting lost in the first place. By organizing your photos, you can easily find and manage them.
14.1 Strategies for Organizing Your Camera Roll
- Create albums: Group your photos into albums by date, event, or project.
- Use folders: On devices that support folders, create a clear folder structure to organize your albums.
- Delete unwanted photos regularly: Delete blurry, duplicate, or otherwise unwanted photos to declutter your camera roll.
- Use tags or keywords: Tag your photos with relevant keywords to make them easier to search for.
- Utilize smart albums: Smart albums automatically organize photos based on certain criteria, such as date, location, or people.
14.2 How to Use Camera Roll Features on Different Devices
- iPhone and iPad: Use the Photos app to create albums, hide photos, and use smart albums.
- Android: Use the Google Photos app to create albums, archive photos, and use smart albums.
- Digital Cameras: Organize photos into folders on the SD card or internal storage.
14.3 Benefits of an Organized Camera Roll
- Easy to find photos: Quickly locate specific photos when you need them.
- Efficient photo management: Easily manage, edit, and share your photos.
- Reduced risk of photo loss: Prevent photos from getting lost or forgotten.
15. Exploring Photo Metadata and EXIF Data
Photo metadata, also known as EXIF (Exchangeable Image File Format) data, contains information about your photos, such as date, time, camera settings, and location. This information can be invaluable when trying to find lost photos.
15.1 What is Photo Metadata?
Photo metadata is embedded within the photo file and provides details about the image. This data can include:
- Date and time: When the photo was taken.
- Camera settings: Aperture, shutter speed, ISO, and focal length.
- Location: GPS coordinates of where the photo was taken.
- Camera model: The make and model of the camera used to take the photo.
- Copyright information: Information about the copyright holder of the photo.
15.2 How to Access Photo Metadata
- On Windows: Right-click the photo, select Properties, and click the Details tab.
- On macOS: Open the photo in Preview, click Tools, and select Show Inspector.
- Using photo editing software: Programs like Adobe Photoshop and Lightroom allow you to view and edit photo metadata.
- Using online EXIF viewers: Several online tools can display the metadata of a photo.
15.3 How Metadata Aids in Recovery
- Sorting and filtering: Use metadata to sort and filter photos by date, time, or location.
- Identifying missing photos: Use metadata to identify gaps in your photo library, which can help you pinpoint when photos went missing.
- Verifying recovered photos: Use metadata to verify that recovered photos are genuine and contain the correct information.
16. The Impact of Storage Device Health
The health of your storage devices (e.g., hard drives, SD cards) significantly impacts the risk of photo loss. Maintaining the health of your storage devices can prevent data loss.
16.1 Common Storage Device Issues
- Physical damage: Damage from drops, impacts, or exposure to extreme temperatures.
- Logical errors: Corruption of the file system or data structures.
- Wear and tear: Gradual degradation of the storage medium over time.
- Bad sectors: Areas on the storage device that are no longer reliable for storing data.
- Electrical issues: Power surges or other electrical problems that can damage the storage device.
16.2 How to Check Storage Device Health
- Use built-in utilities: Windows and macOS have built-in utilities for checking the health of storage devices.
- Use third-party tools: Several third-party tools can provide more detailed information about the health of your storage devices.
- Monitor SMART data: SMART (Self-Monitoring, Analysis, and Reporting Technology) data provides information about the health and performance of hard drives and SSDs.
16.3 Best Practices for Storage Device Maintenance
- Handle storage devices carefully: Avoid dropping or exposing them to extreme temperatures.
- Eject storage devices properly: Always eject storage devices properly to prevent data corruption.
- Regularly defragment hard drives: Defragmenting hard drives can improve performance and reduce the risk of data loss.
- Run disk checks regularly: Use the disk check utility to scan for and repair errors on your storage devices.
- Replace aging storage devices: Replace storage devices that are nearing the end of their lifespan to prevent data loss.
17. Staying Updated on Data Recovery Techniques
Data recovery techniques are constantly evolving. Staying updated on the latest techniques can improve your chances of recovering lost photos.
17.1 Following Industry Blogs and Forums
- Data recovery blogs: Follow blogs that cover data recovery techniques and industry news.
- Photography forums: Participate in photography forums to learn from other photographers and data recovery experts.
- Technology news sites: Stay updated on the latest technology news to learn about new data recovery tools and techniques.
17.2 Participating in Workshops and Seminars
- Data recovery workshops: Attend workshops to learn hands-on data recovery techniques.
- Photography seminars: Attend photography seminars to learn about photo management and data protection.
- Online courses: Take online courses to learn about data recovery and photo management.
17.3 Using dfphoto.net as a Resource
- Regularly check dfphoto.net: Stay informed about the latest data recovery techniques and photo management tips by regularly visiting dfphoto.net.
- Engage with the community: Share your experiences and learn from other photographers on dfphoto.net.
- Utilize available resources: Take advantage of the guides, tutorials, and other resources available on dfphoto.net.
18. Understanding Common Causes of Photo Corruption
Understanding the common causes of photo corruption can help you take steps to prevent it.
18.1 Software and Hardware Issues
- Software bugs: Bugs in photo editing software or operating systems can cause photo corruption.
- Hardware failures: Failures of storage devices, cameras, or computers can lead to photo corruption.
- Driver issues: Incompatible or outdated drivers can cause photo corruption.
18.2 Viruses and Malware
- Viruses: Viruses can infect photo files and corrupt them.
- Malware: Malware can damage storage devices and lead to photo corruption.
18.3 Improper Handling of Storage Devices
- Abruptly removing storage devices: Removing storage devices without properly ejecting them can cause data corruption.
- Using unreliable storage devices: Using low-quality or unreliable storage devices can increase the risk of photo corruption.
- Exposing storage devices to extreme conditions: Exposing storage devices to extreme temperatures, humidity, or magnetic fields can cause data corruption.
18.4 File System Errors
- File system corruption: Corruption of the file system can make photos inaccessible or cause them to be corrupted.
- Incomplete file transfers: Interruptions during file transfers can result in incomplete or corrupted photo files.
18.5 Power Outages
- Power surges: Power surges can damage storage devices and cause photo corruption.
- Unexpected shutdowns: Unexpected shutdowns can interrupt file transfers and cause photo corruption.
19. Optimizing Your Workflow for Photo Safety
Optimizing your workflow can minimize the risk of photo loss and corruption.
19.1 Creating a Secure Photo Workflow
- Use reliable equipment: Use high-quality cameras, storage devices, and computers.
- Regularly update software: Keep your software and drivers up to date to prevent bugs and compatibility issues.
- Use a secure network: Protect your network with a strong password and firewall.
- Use a reliable power supply: Use a surge protector to protect your equipment from power surges.
- Handle storage devices carefully: Avoid dropping or exposing them to extreme conditions.
19.2 Implementing a Photo Management System
- Create a clear folder structure: Organize your photos into folders by date, event, or project.
- Use descriptive file names: Name your photos in a way that makes it easy to identify them.
- Tag your photos: Use tags or keywords to make it easier to search for specific photos.
- Regularly back up your photos: Use multiple backup methods and automate your backups.
- Use a photo management software: Use software like Adobe Lightroom or Capture One to manage and organize your photos.
19.3 Regularly Reviewing and Updating Your Workflow
- Stay informed about best practices: Stay updated on the latest photo management and data protection techniques.
- Evaluate your workflow: Regularly evaluate your workflow to identify potential weaknesses.
- Update your workflow: Update your workflow as needed to improve photo safety.
20. Staying Informed About Scams and Fraudulent Recovery Services
Being vigilant about scams and fraudulent recovery services is essential to avoid further data loss and financial harm.
20.1 Identifying Scam Data Recovery Services
- Unrealistic promises: Be wary of services that promise a 100% recovery rate.
- High-pressure sales tactics: Be cautious of services that pressure you into making a decision quickly.
- Lack of transparency: Be wary of services that are not transparent about their data recovery process or pricing.
- Poor reviews: Check online reviews and testimonials to see what other customers have to say about the service.
- Unprofessional communication: Be cautious of services that use unprofessional language or communication.
20.2 Protecting Your Data and Finances
- Research the service: Before hiring a data recovery service, research their reputation and track record.
- Read the fine print: Carefully read the terms and conditions of the service agreement before signing it.
- Get a written quote: Get a written quote for the data recovery service and understand the payment terms.
- Protect your personal information: Do not provide sensitive personal or financial information to the service unless you are confident in their legitimacy.
- Monitor your accounts: Monitor your bank accounts and credit cards for unauthorized transactions.
20.3 Reporting Scams and Fraud
- Report the scam to the authorities: Report the scam to the Federal Trade Commission (FTC) or your local law enforcement agency.
- Report the scam to the Better Business Bureau (BBB): Report the scam to the BBB to help protect other consumers.
- Warn others: Share your experience with others to warn them about the scam.
By following these steps, you can significantly increase your chances of finding your lost photos and preventing future data loss. At dfphoto.net, we are dedicated to providing you with the resources and knowledge you need to protect your precious memories. Remember to regularly back up your photos, organize them effectively, and stay informed about the latest data recovery techniques.
FAQ: How to Find Lost Photos
Here are some frequently asked questions about finding lost photos:
1. Where do deleted photos go?
Deleted photos typically go to the Recently Deleted album on your device or the Trash/Bin in cloud storage services.
2. How long do photos stay in the Recently Deleted album?
Photos usually stay in the Recently Deleted album for 30 days before being permanently deleted.
3. Can I recover permanently deleted photos?
Recovering permanently deleted photos is difficult but sometimes possible with data recovery software or professional services.
4. How do I unhide photos on my iPhone?
Open the Photos app, go to the Hidden album, and tap Unhide on the photos you want to recover.
5. How do I enable iCloud Photos?
Go to Settings > [Your Name] > iCloud > Photos and turn on Sync this [Device].
6. What is the iCloud Shared Photo Library?
It’s a feature that allows you to share photos and videos with up to five other people, with a separate library view.
7. How do I check my Apple ID?
Go to Settings > [Your Name] on your iPhone, iPad, or Vision Pro, or System Preferences > Apple ID on your Mac.
8. What should I do if I’m using different Apple IDs on my devices?
Sign out of the incorrect Apple ID and sign in with the correct one to ensure all your devices sync with the same iCloud account.
9. What is photo metadata (EXIF data)?
Photo metadata is embedded information within a photo file, including date, time