iCloud Photos offers a seamless way to keep all your cherished photos and videos synchronized across your Apple devices. But what if you want to access your iCloud photo library on your Windows PC? This guide provides a detailed walkthrough on how to effortlessly find, view, and manage your iCloud Photos directly from your computer. Whether you’re looking to download them for offline access or upload new memories from your PC to iCloud, we’ve got you covered.
Setting Up iCloud Photos on Your Windows PC
Before you can find your iCloud Photos on your PC, you need to ensure that iCloud for Windows is properly set up and iCloud Photos is enabled. Here’s how to get started:
-
Install or Open iCloud for Windows: If you haven’t already, download and install iCloud for Windows from the official Apple website. If you have it installed, open the application on your PC. Ensure you are logged in with the same Apple ID you use for iCloud on your iPhone, iPad, or Mac.
-
Access iCloud Photos Settings: Once you’re in iCloud for Windows, locate “iCloud Photos.” It should be listed with other iCloud features. Click the arrow next to “iCloud Photos” to access its settings.
-
Enable iCloud Photos: In the settings panel, you’ll see an option to “iCloud Photos.” Toggle the switch to turn it on.
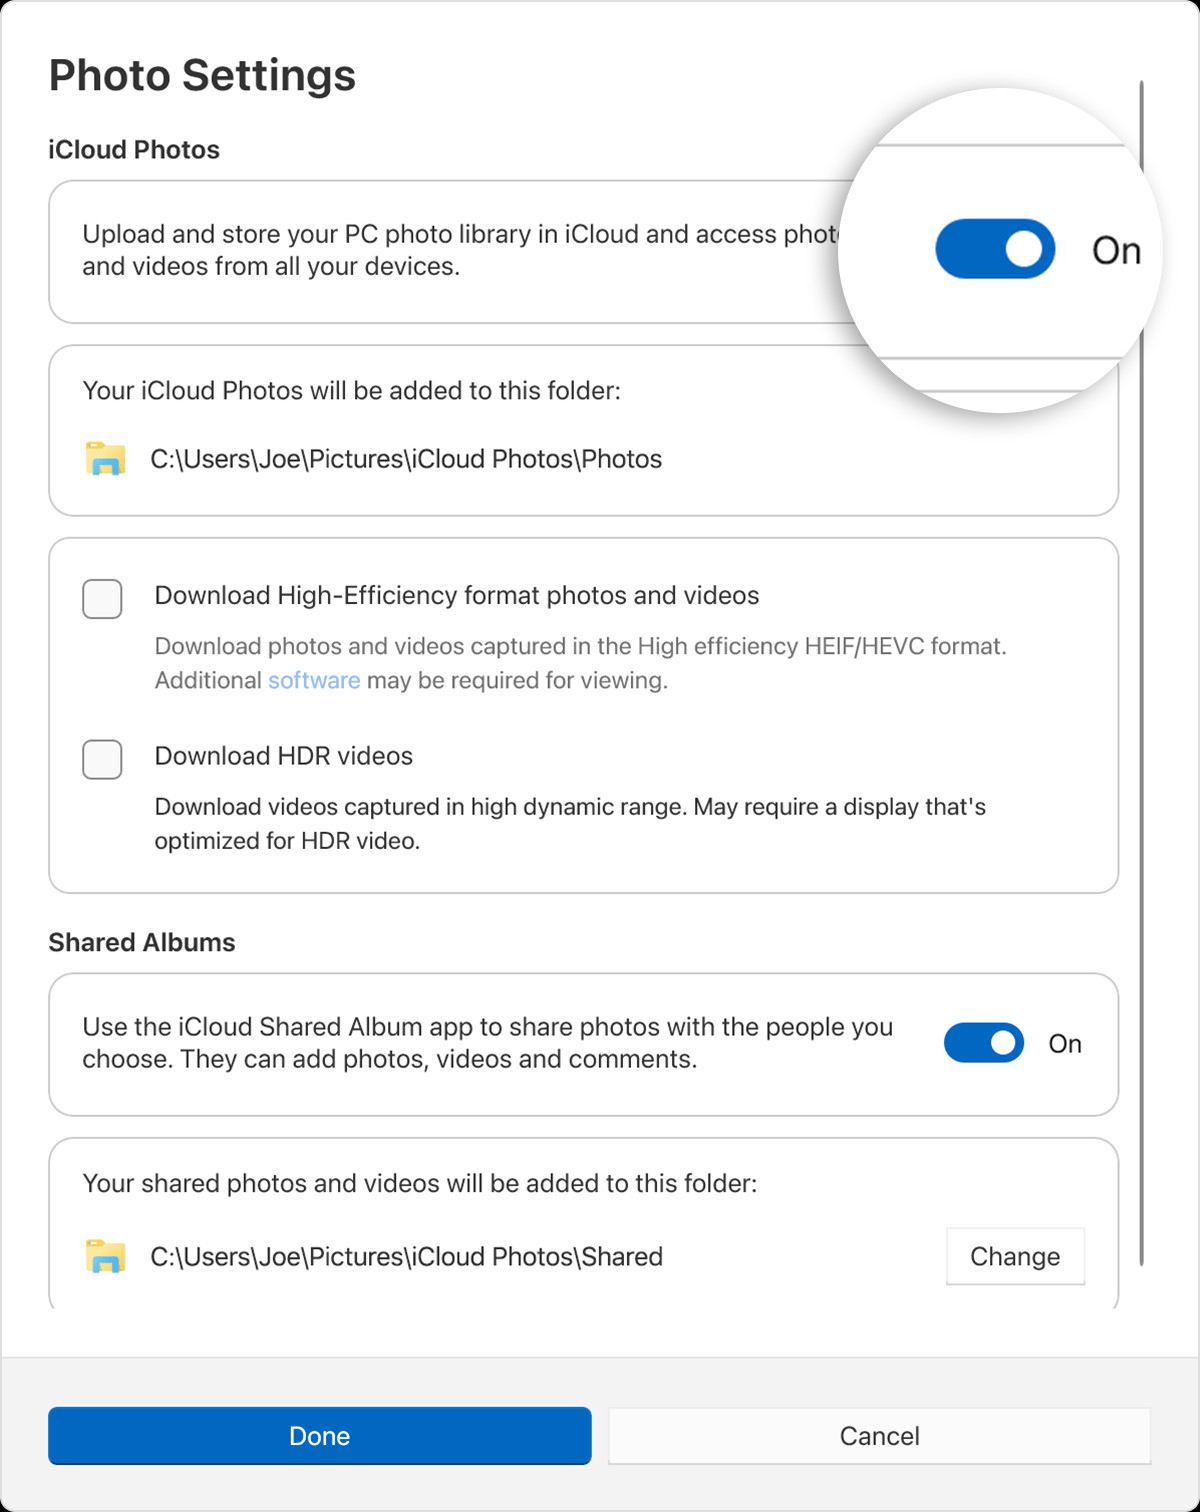 Enable iCloud Photos in iCloud for Windows settings on PC
 -
Advanced Download Options (Optional): For users of iCloud for Windows version 14.2 or later, clicking “Advanced” provides choices for photo and video download formats. You can select “Download High-Efficiency format photos and videos” to save space or “Download HDR videos” if you prefer to keep HDR versions. Choose the option that best suits your needs.
-
Enable Shared Albums (Optional): If you use Shared Albums in iCloud and wish to access them on your PC, ensure “Shared Albums” is also turned on. This will allow you to view and interact with albums shared with you or that you’ve shared with others.
-
Finalize Setup: After configuring your desired settings, click “Done” to save your changes. Note that you can change the location for Shared Albums, but it must be on your C: drive; external drives are not supported.
Locating Your iCloud Photos Folder on PC
Once iCloud Photos is enabled, your photos and videos will start syncing to your PC. Here’s how to find the dedicated iCloud Photos folder:
Your iCloud Photos are stored in a specific location on your computer’s hard drive. You can find them in the following directory:
C:Users[your user name]PicturesiCloud PhotosPhotos
Replace [your user name] with your actual Windows user account name.
Accessing iCloud Photos in Windows 11
For Windows 11 users, the easiest way to view your iCloud Photos is through the Microsoft Photos app:
- Open Microsoft Photos: Launch the Photos application from your Start Menu.
- Navigate to iCloud Photos: In the left-hand pane of the Photos app, you should see “iCloud Photos” listed as a source. Click on it to view your synced iCloud photo library.
Accessing iCloud Photos in Windows 10 and Later
If you are using Windows 10 or a later version, you can access iCloud Photos directly through File Explorer:
- Open File Explorer: Open File Explorer from your taskbar or Start Menu.
- Find iCloud Photos in Navigation Pane: Look for “iCloud Photos” in the Navigation pane on the left side of the File Explorer window. Click on “iCloud Photos” to access your synced photos and videos.
Downloading iCloud Photos to Your PC
By default, iCloud for Windows may only download thumbnails of your photos to save space. When you want to view a photo in full resolution, it will be downloaded on demand. However, if you wish to ensure certain photos or videos are always available offline on your PC, you can manually download them:
- Open File Explorer and Navigate to iCloud Photos: Follow the steps above to open File Explorer and access the iCloud Photos folder.
- Select Photos or Videos: Browse through your iCloud Photos and select the specific images or videos you want to download and keep permanently on your PC.
- Choose “Always keep on this device”: Right-click on your selection. From the context menu, choose the option “Always keep on this device.” This will download the full-resolution files to your PC and ensure they remain downloaded even when offline.
Any edits or changes made to your photos or videos on other devices or on iCloud.com will automatically sync and update on your PC, ensuring your library is consistent across all platforms.
Uploading Photos and Videos to iCloud from Your PC
You can also easily add photos and videos from your Windows PC to your iCloud Photos library. Here’s how:
- Open File Explorer and iCloud Photos Folder: Open File Explorer and navigate to the “iCloud Photos” folder in the Navigation pane.
- Open Source Folder: Open another File Explorer window and locate the folder on your PC that contains the photos and videos you wish to upload to iCloud Photos.
- Select and Drag Files: Select the photos and videos you want to upload. Drag these selected files from the source folder into the “iCloud Photos” folder in the other File Explorer window.
Once uploaded, these photos and videos will be available in the Photos app on iCloud.com and on all your Apple devices connected to the same iCloud account.
Remember that deleting a photo from the iCloud Photos folder on your PC, either through File Explorer or Microsoft Photos, will also delete it from iCloud Photos and all your synced devices. This action is permanent, so exercise caution when deleting files.
By following these steps, you can effectively find, access, and manage your iCloud Photos on your Windows PC, ensuring your precious memories are always within reach, regardless of the device you are using.